AGENTIC SOLUTIONS
Building an Agentic Workflow: Orchestrating a Multi-Step Software Engineering Interview

Riza Farheen
Developer Advocate
Last updated: April 21, 2025
April 21, 2025
8 min read


Join thousands of developers building the future with Orkes.
As language models evolve, so does the way we build intelligent systems. One emerging pattern is the agentic workflow—a coordinated sequence of tasks in which an AI agent interacts with external tools and APIs, makes decisions, and executes complex flows autonomously.
But intelligence alone isn’t enough. Large language models excel at reasoning and response generation, yet they fall short when it comes to real-world execution. Managing state, coordinating asynchronous tasks, handling tool invocation, and ensuring reliability across multiple steps remain key challenges. That’s where orchestration comes in.
By combining LLMs with a robust workflow engine, we can design resilient, multi-step systems that bridge reasoning with action. In this guide, we’ll walk through an agentic workflow that automates a full software engineering technical interview—from candidate intake to interview questions, evaluation, and report delivery.
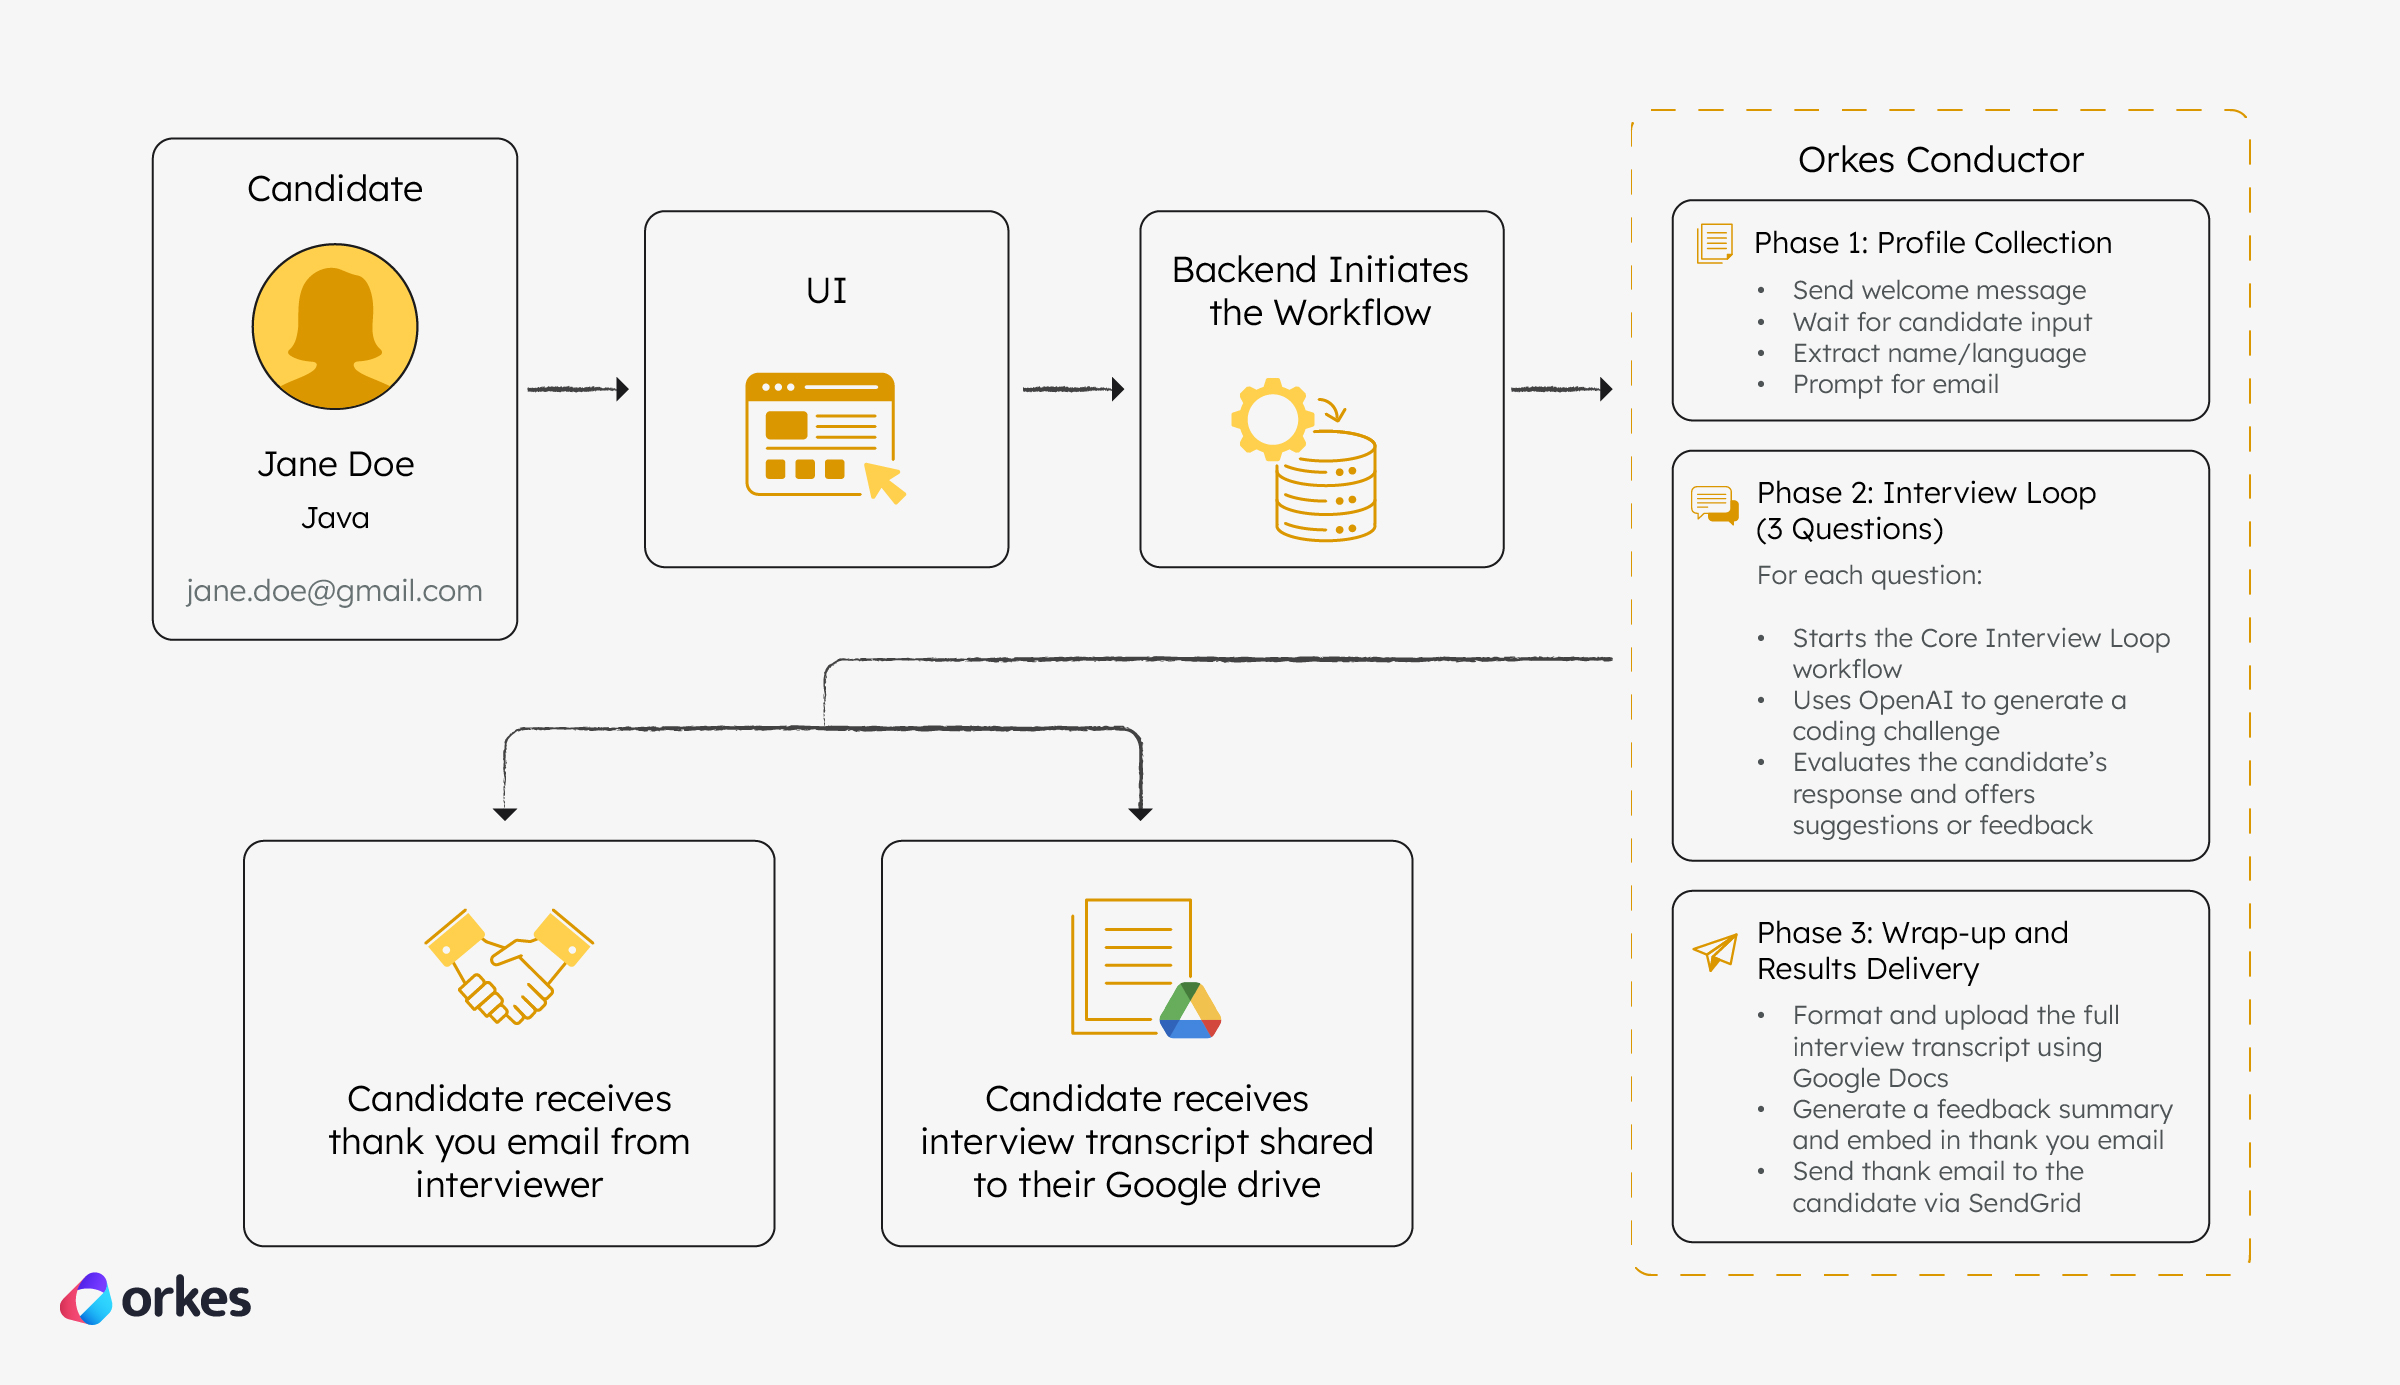
Let’s build an application that mimics a human-led coding interview, where:
This multi-step process involves reasoning (via OpenAI), external tools (Google Docs and SendGrid), and orchestration (Orkes Conductor).
To build it, we’ll use the following components:
Now, let’s walk through how these tools come together to form the agentic interview application.
You can follow this tutorial using the free Developer Edition. Create an account to get started.
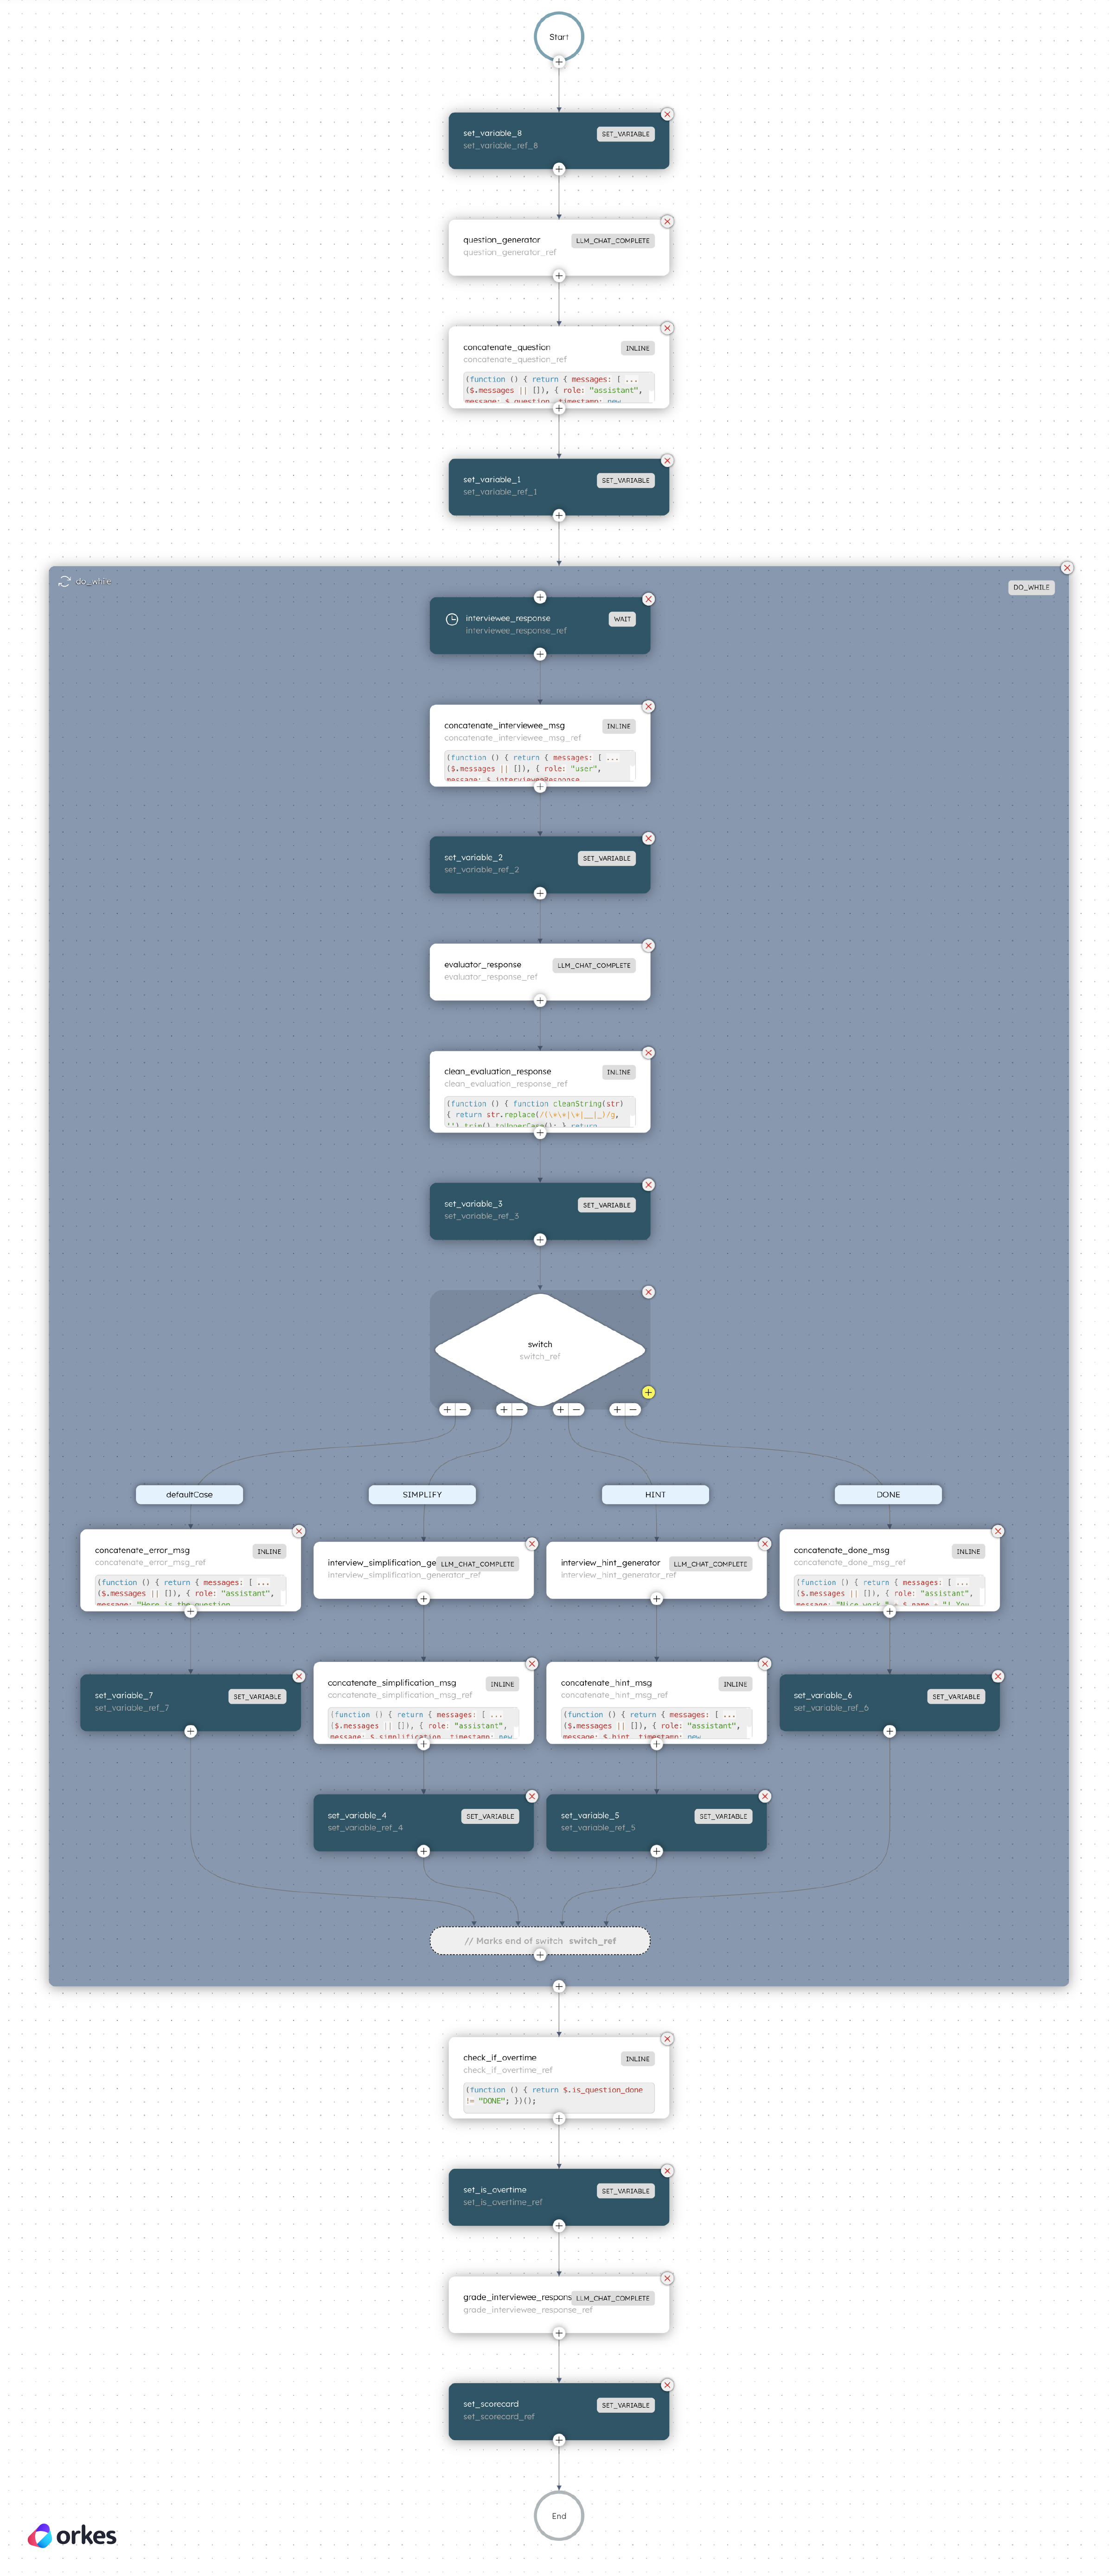
We’ll build an interview app powered by the following Conductor workflow:

After gathering the candidate details, the interview will begin. Conductor’s Start Workflow task then starts the Core Interview Loop workflow and generates a coding question using OpenAI. It then enters a loop to collect and evaluate the candidate’s responses (with support for hints or simplifications), finally scoring the answer and storing a structured evaluation as a scorecard.
Now, here’s how you can create an agentic interview application on your own.
The source code for this example project is available in this GitHub repository. Clone it to your local machine:
git clone https://github.com/conductor-oss/awesome-conductor-apps/
Open the project and navigate to the interview app folder:
cd python/interview_agentic_app
This application interacts with multiple tools and APIs. You’ll need to configure a few credentials before running it locally.
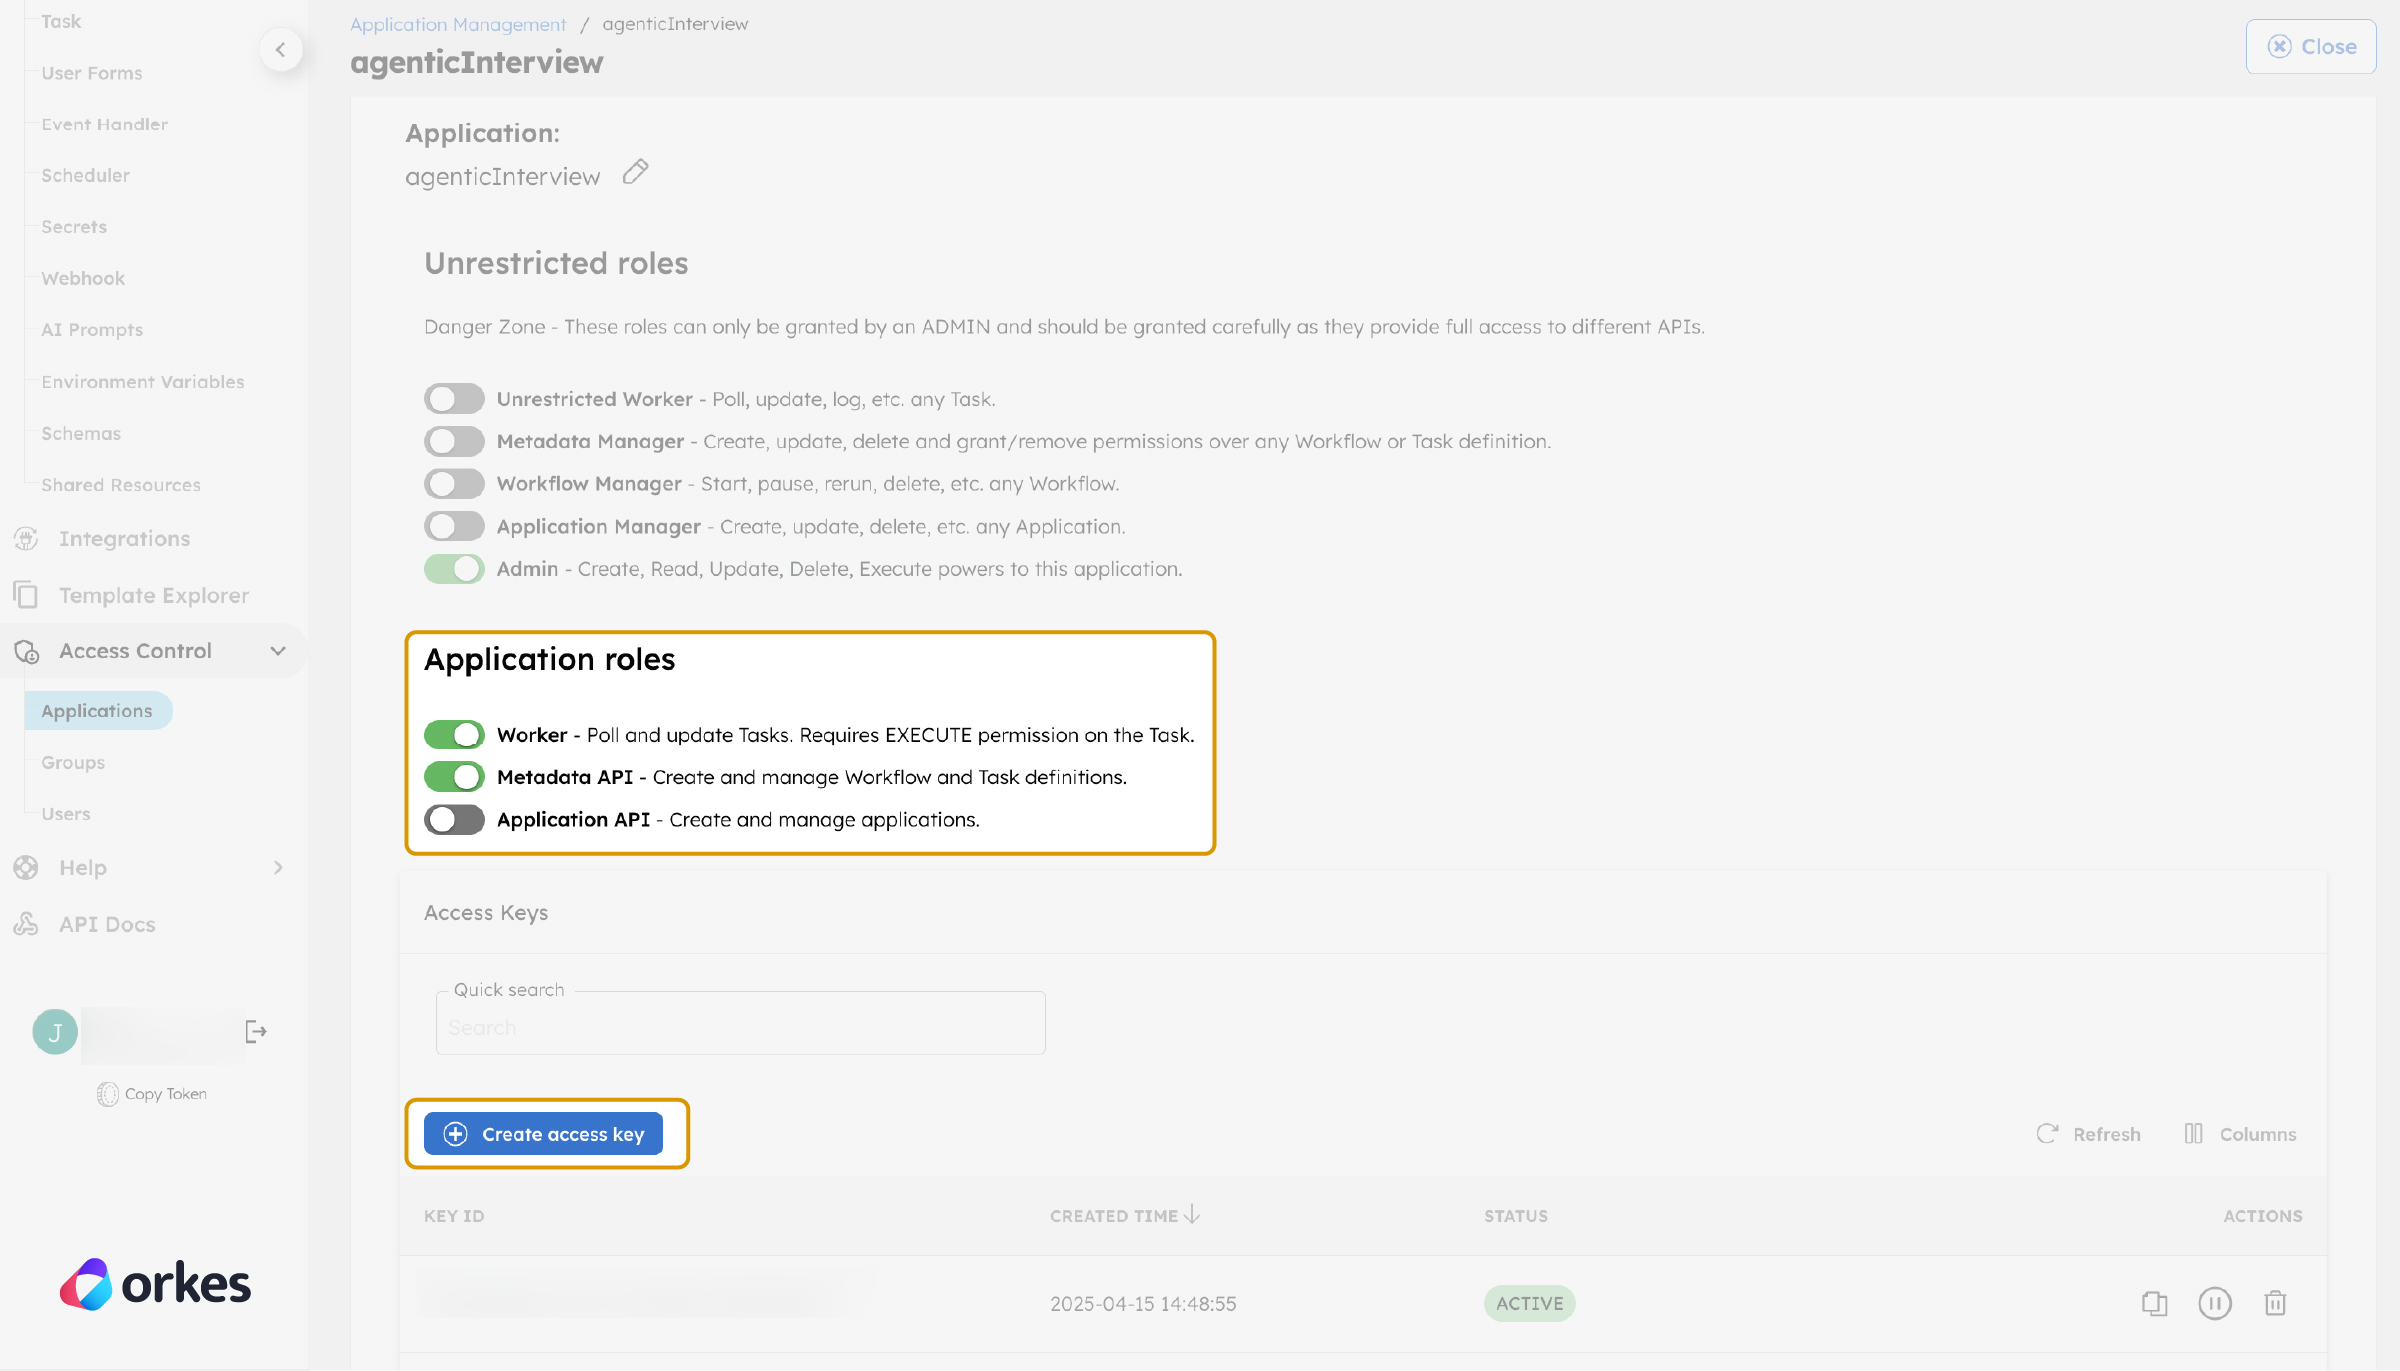
Get the access key and secret from Developer Edition by creating a new application from Access Control > Applications. Set the Application role to Worker and Metadata API.
Generate the access key and secret.
Open your project in the IDE of your choice and set the following environment variables:
export CONDUCTOR_SERVER_URL=https://developer.orkescloud.com/api
export CONDUCTOR_AUTH_KEY=<YOUR_CONDUCTOR_AUTH_KEY>
export CONDUCTOR_AUTH_SECRET=<YOUR_CONDUCTOR_AUTH_SECRET>
Generate your API key from the OpenAI platform, then set the environment variable:
export OPENAI_API_KEY=<YOUR_OPENAI_KEY>
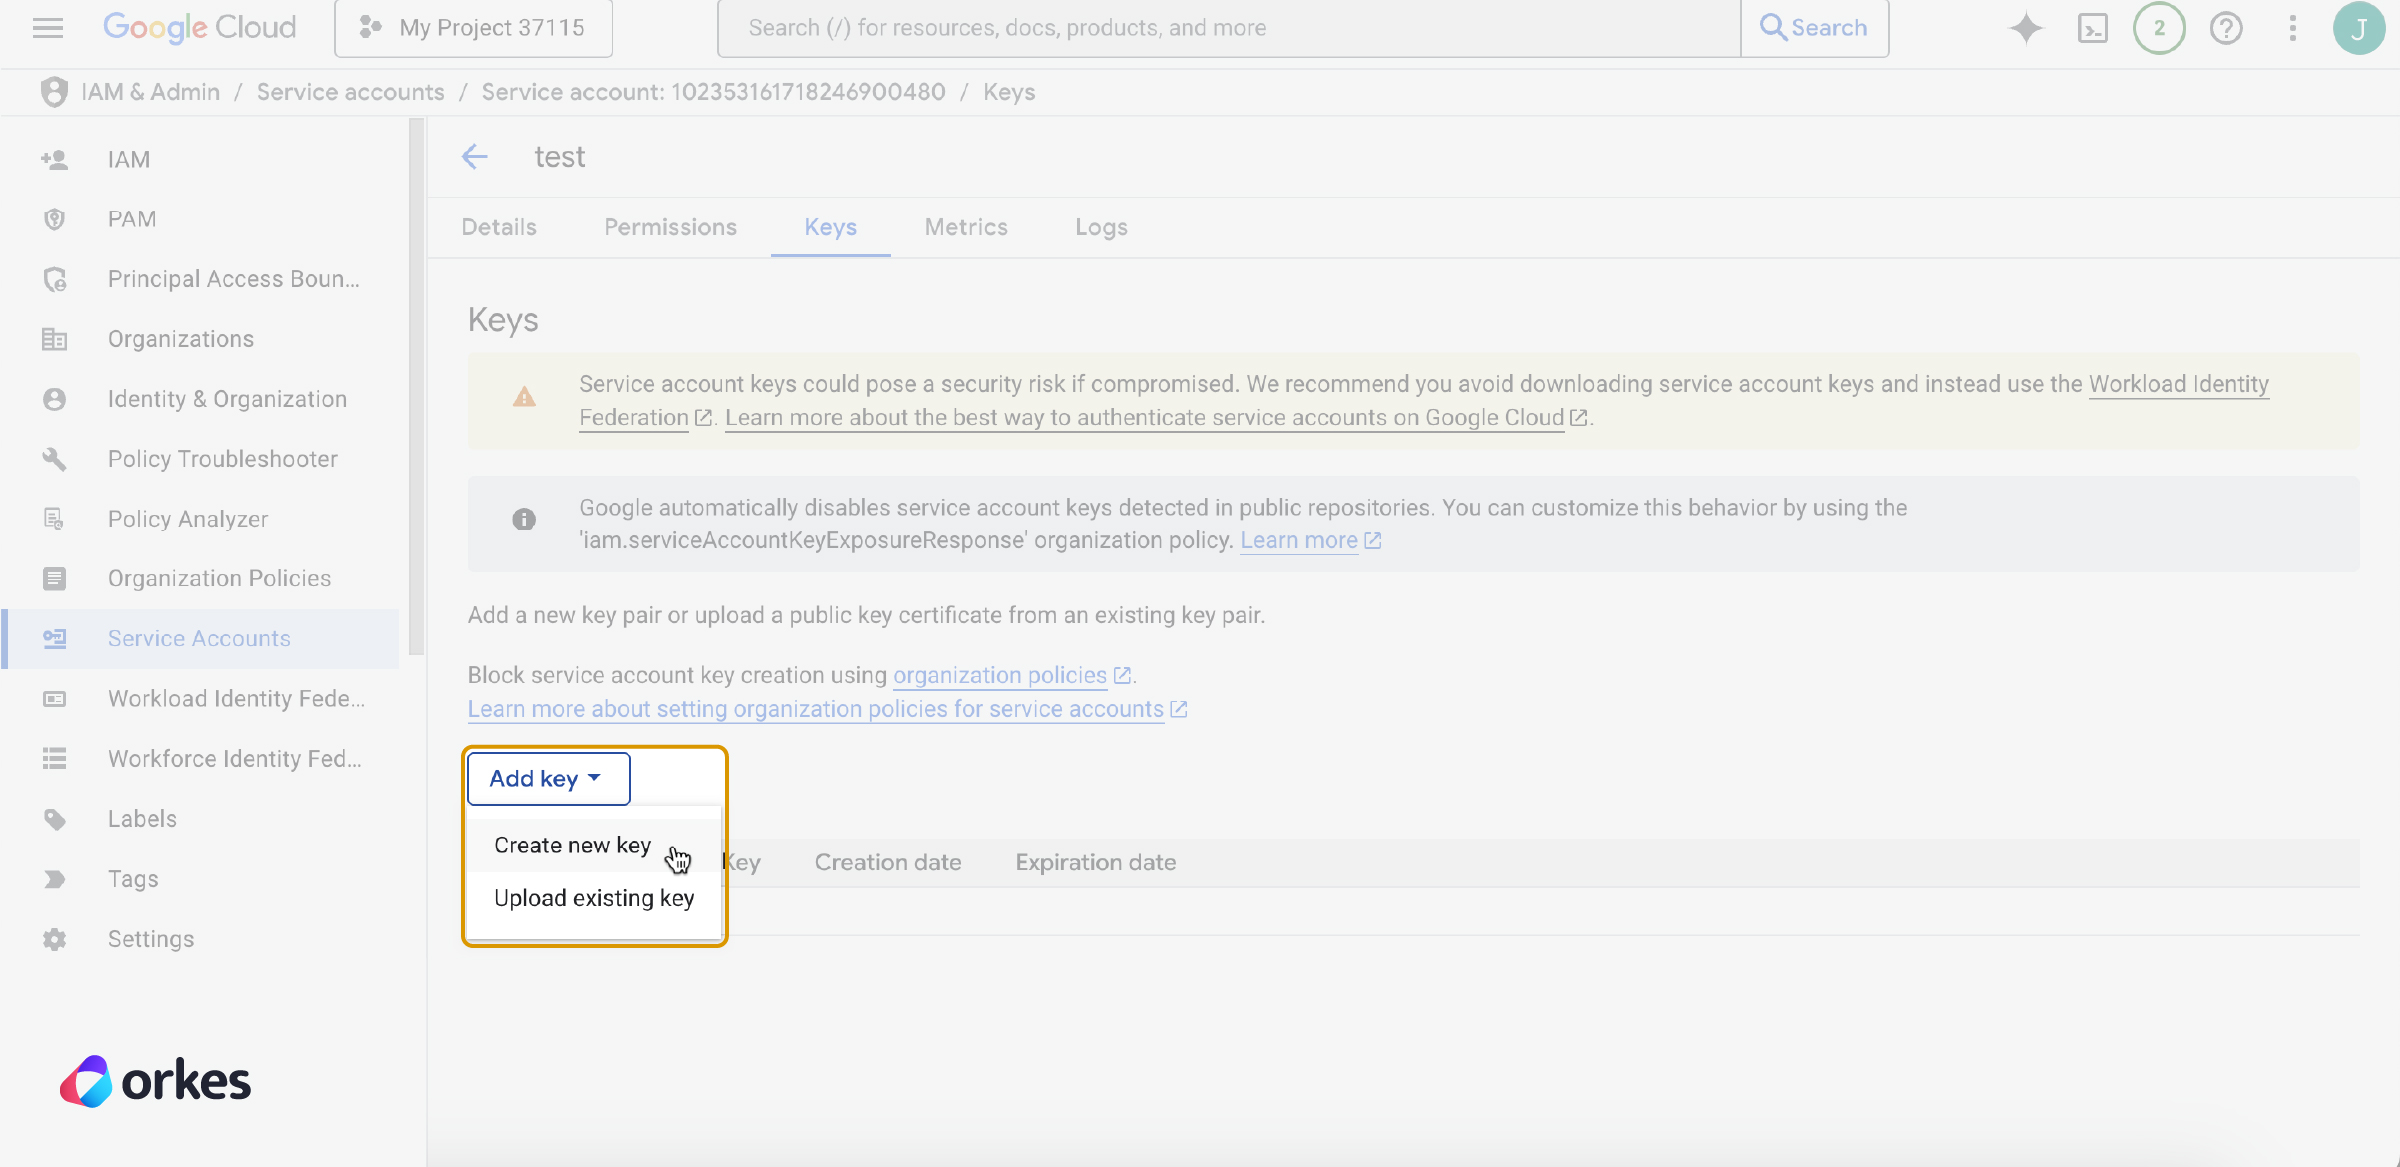
Google authentication credentials are required to access Google APIs. Ensure Google Docs API is enabled on your GCP project.
Create a service account in your Google Cloud console and download the JSON key file. It will be named something like project-name.json.
Next, we need to stringify the contents of the JSON file using the following command:
python3 -c 'import json; print(json.dumps(json.load(open("<PATH-TO-JSON-FILE>/project-name.json"))))'
Copy the output (the stringified JSON), then set the environment variables:
export GOOGLE_SERVICE_ACCOUNT_JSON='<PASTE_THE_STRING_HERE>'
export ENV=prod
SendGrid automatically sends the final interview summary and feedback to the candidate via email.
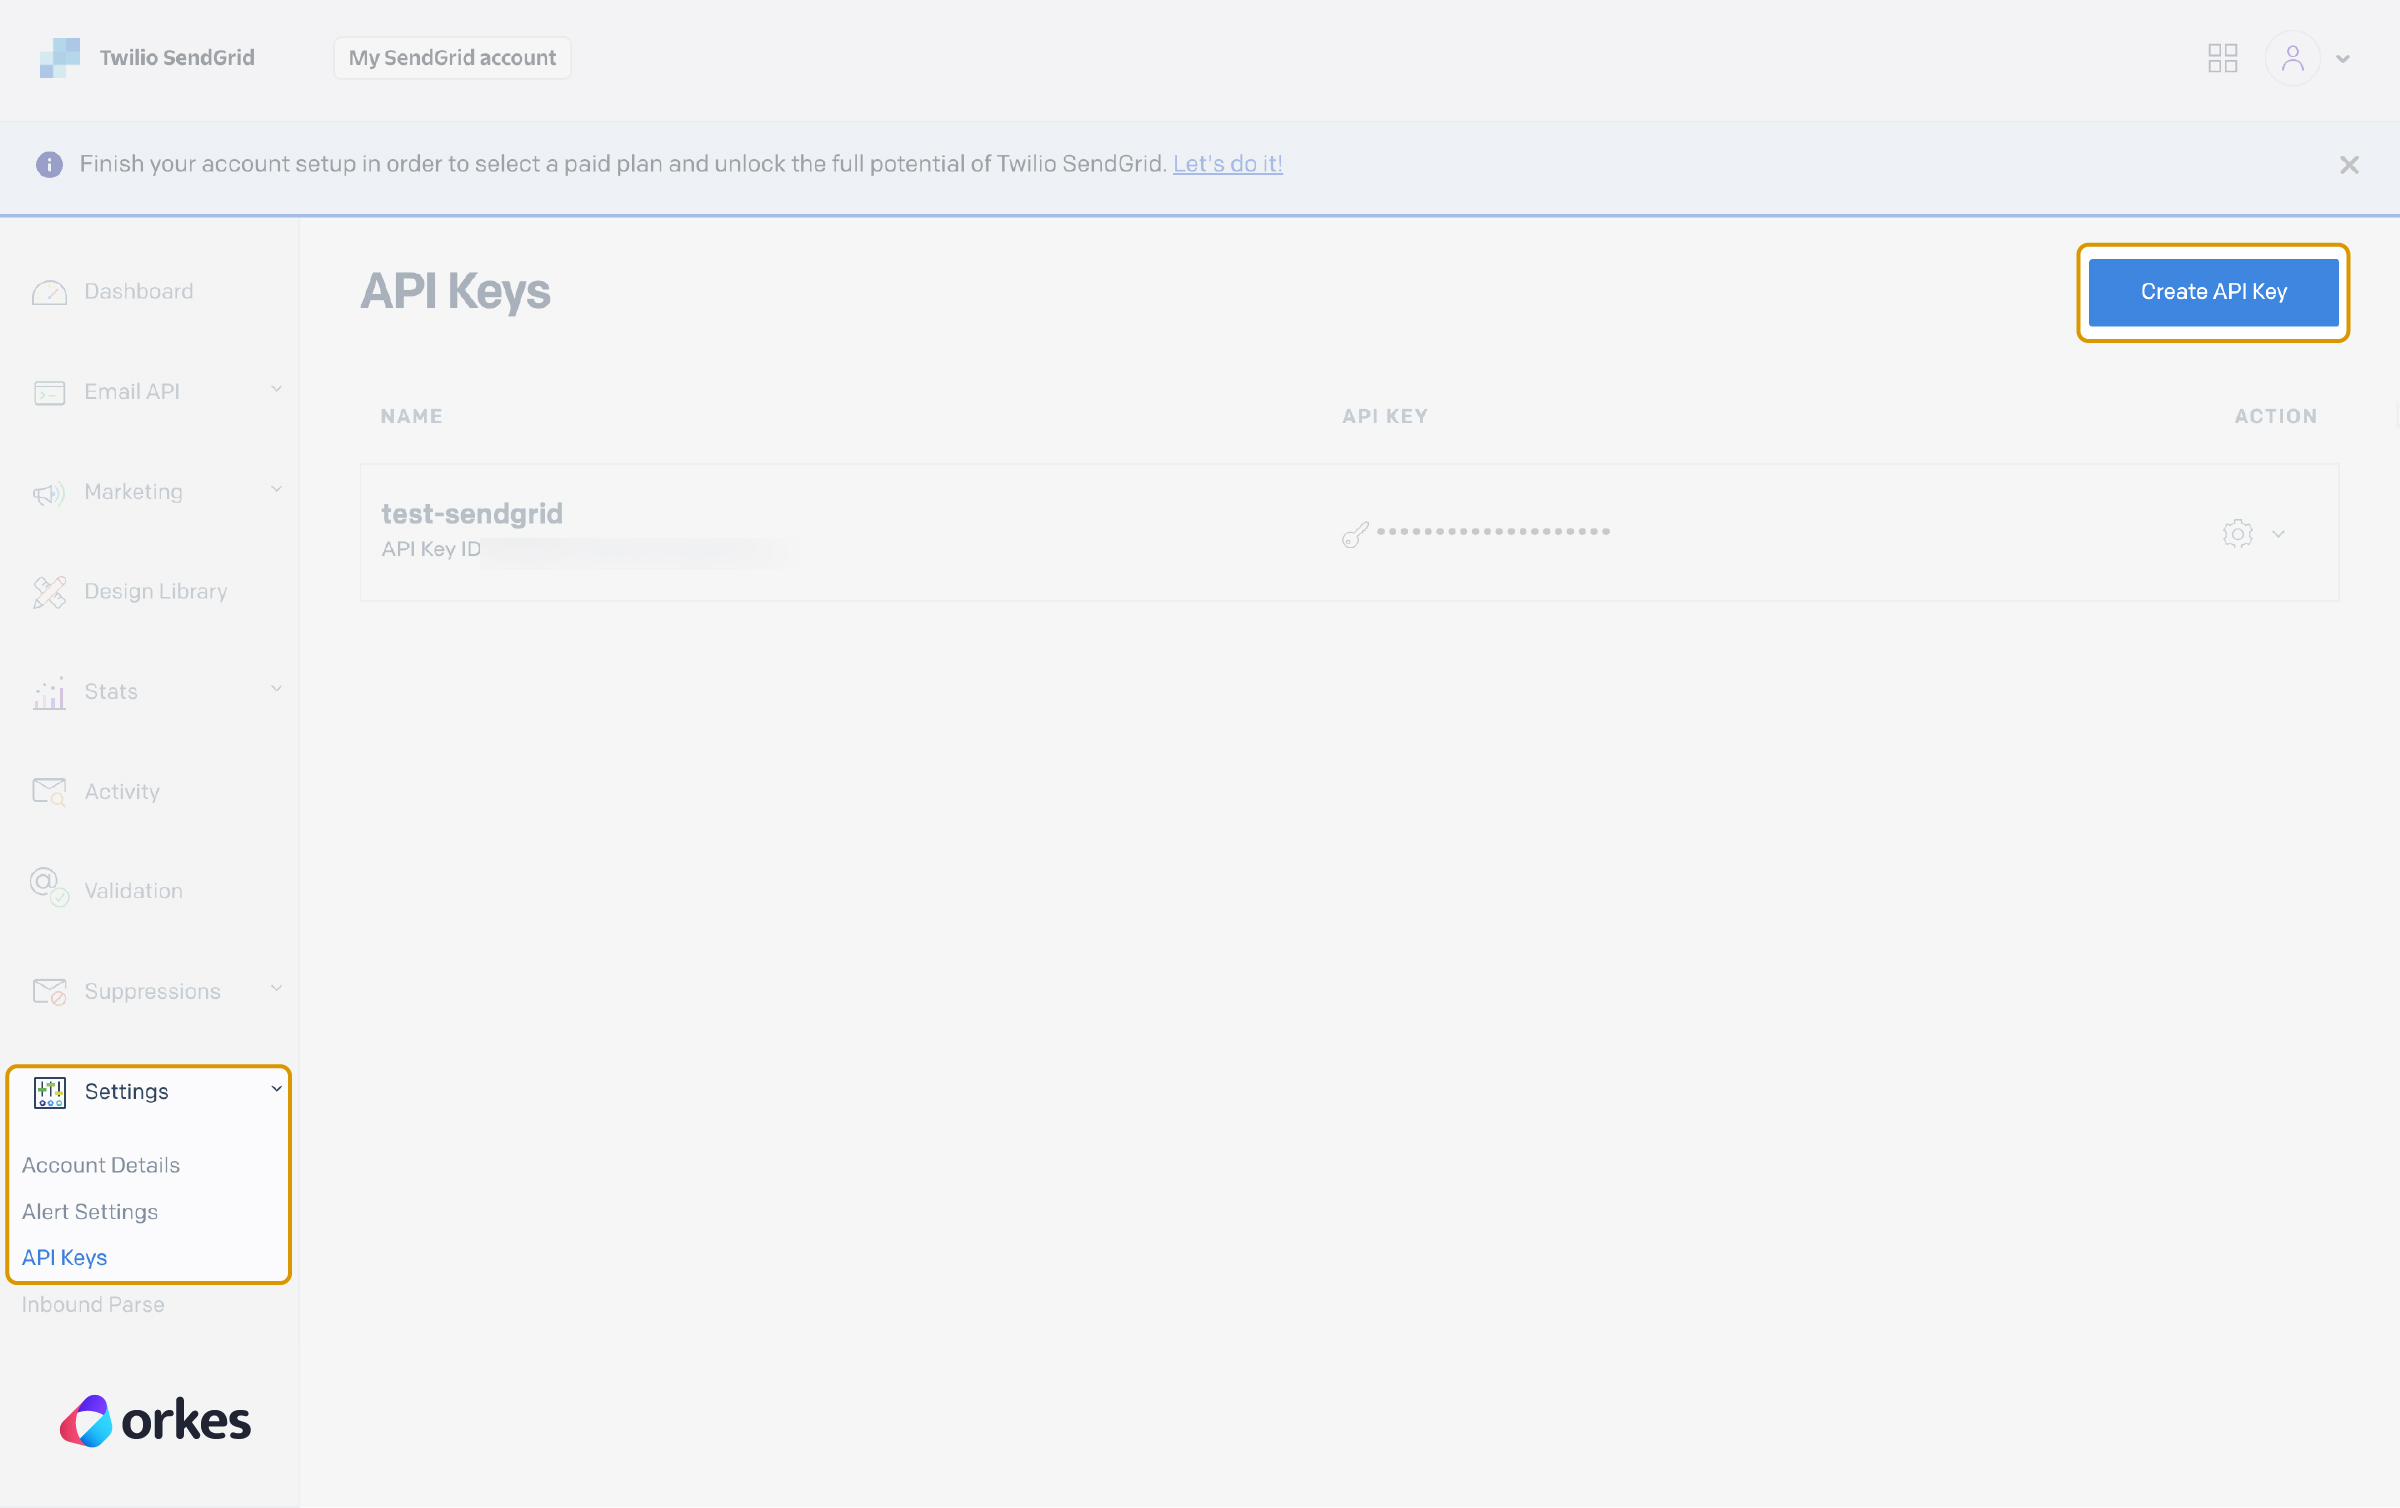
Start by creating an account on SendGrid, then create and verify the sender email address. Next, generate an API key from SendGrid.
Now, set the environment variable for your API Key:
export SEND_GRID_API_KEY=<YOUR_SEND_GRID_API_KEY>
Then, set the environment variable for your verified sender email:
export SEND_GRID_EMAIL_ADDRESS=<YOUR_SEND_GRID_VERIFIED_EMAIL_ADDRESS>
Finally, update your workflow JSON to use this sender email. Navigate to python/interview_agentic_app/resources/interviewAgenticWorkflow.json file.
//workflow JSON

 "from": {
                  "email": "<SENDGRID_VERIFIED_SENDER_EMAIL>" //Line 878
                },
                "subject": "Thank you ${workflow.variables.name} for interviewing with Orkes",
//workflow JSON
                "from": {
                  "email": "<SENDGRID_VERIFIED_SENDER_EMAIL>" //Line 996
                },
                "subject": "Thank you ${workflow.variables.name} for interviewing with Orkes",
This step launches the Python-based backend that listens for incoming requests and triggers the Conductor workflow.
Set the Python path:
export PYTHONPATH=/[PATH_TO_REPO]/awesome-conductor-apps/python/interview_agentic_app
Create and activate a virtual environment:
python3 -m venv venv
source venv/bin/activate
Install required dependencies:
pip3 install -r requirements.txt
Start the backend server:
cd workflow
python app.py
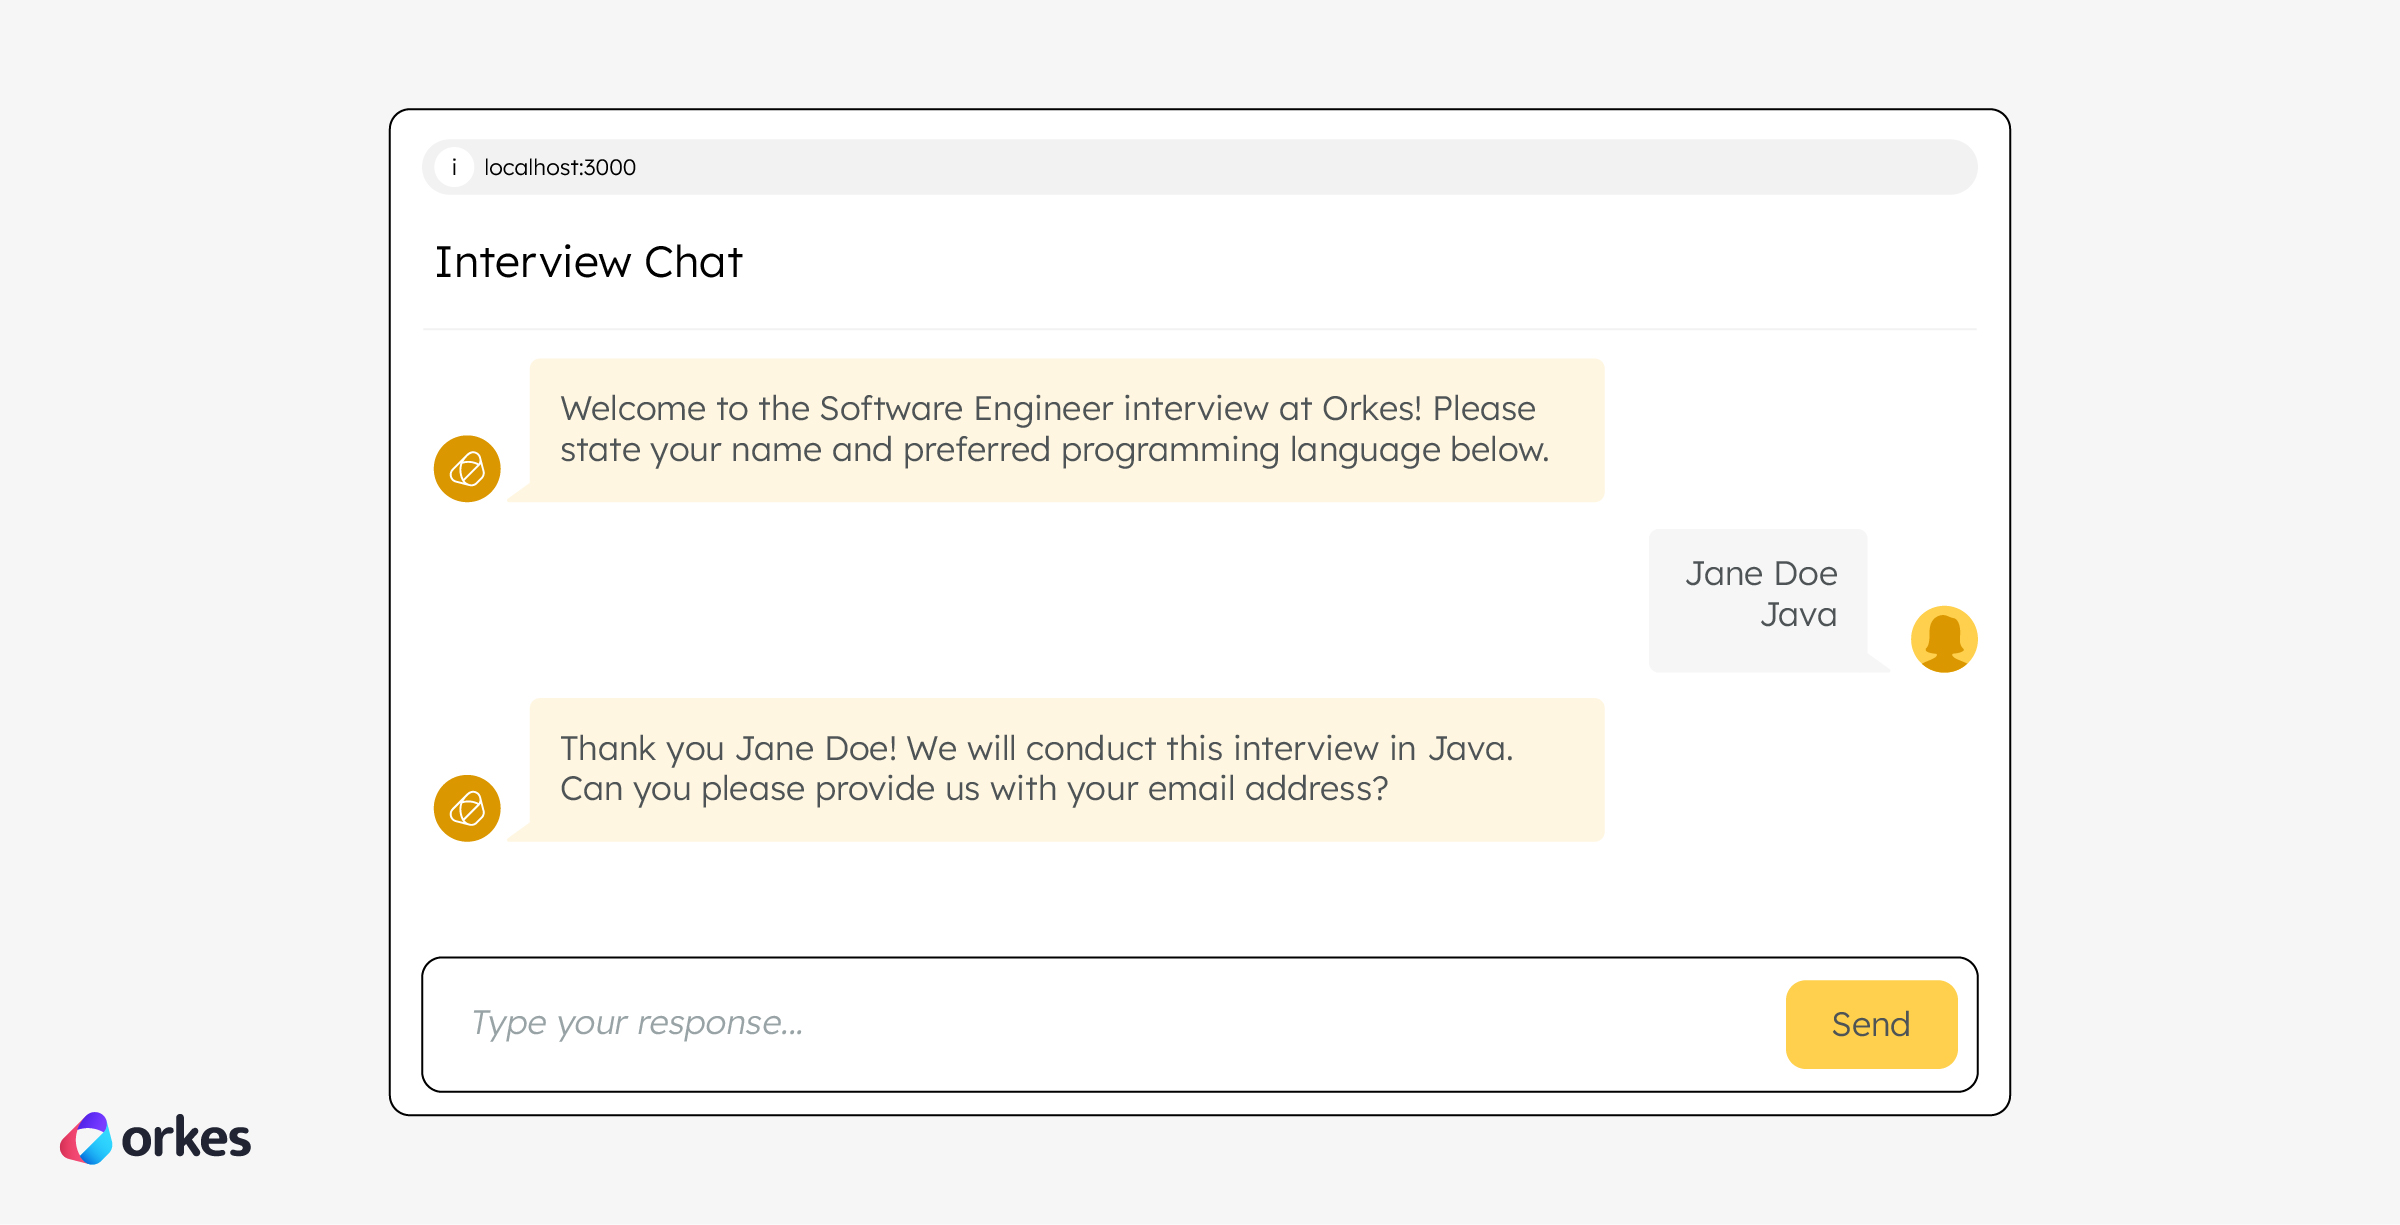
This starts the Next.js frontend, where candidates can enter their details and take the interview in an interactive chat UI.
Open a new terminal and navigate to your project:
cd python/interview_agentic_app
Next, navigate to the frontend directory:
cd interview-chat
Install dependencies:
npm install --legacy-peer-deps
Start the frontend server:
npm run dev
The app should now be running locally.
To start the interview, open it in your browser at http://localhost:3000, this launches the interview experience locally.
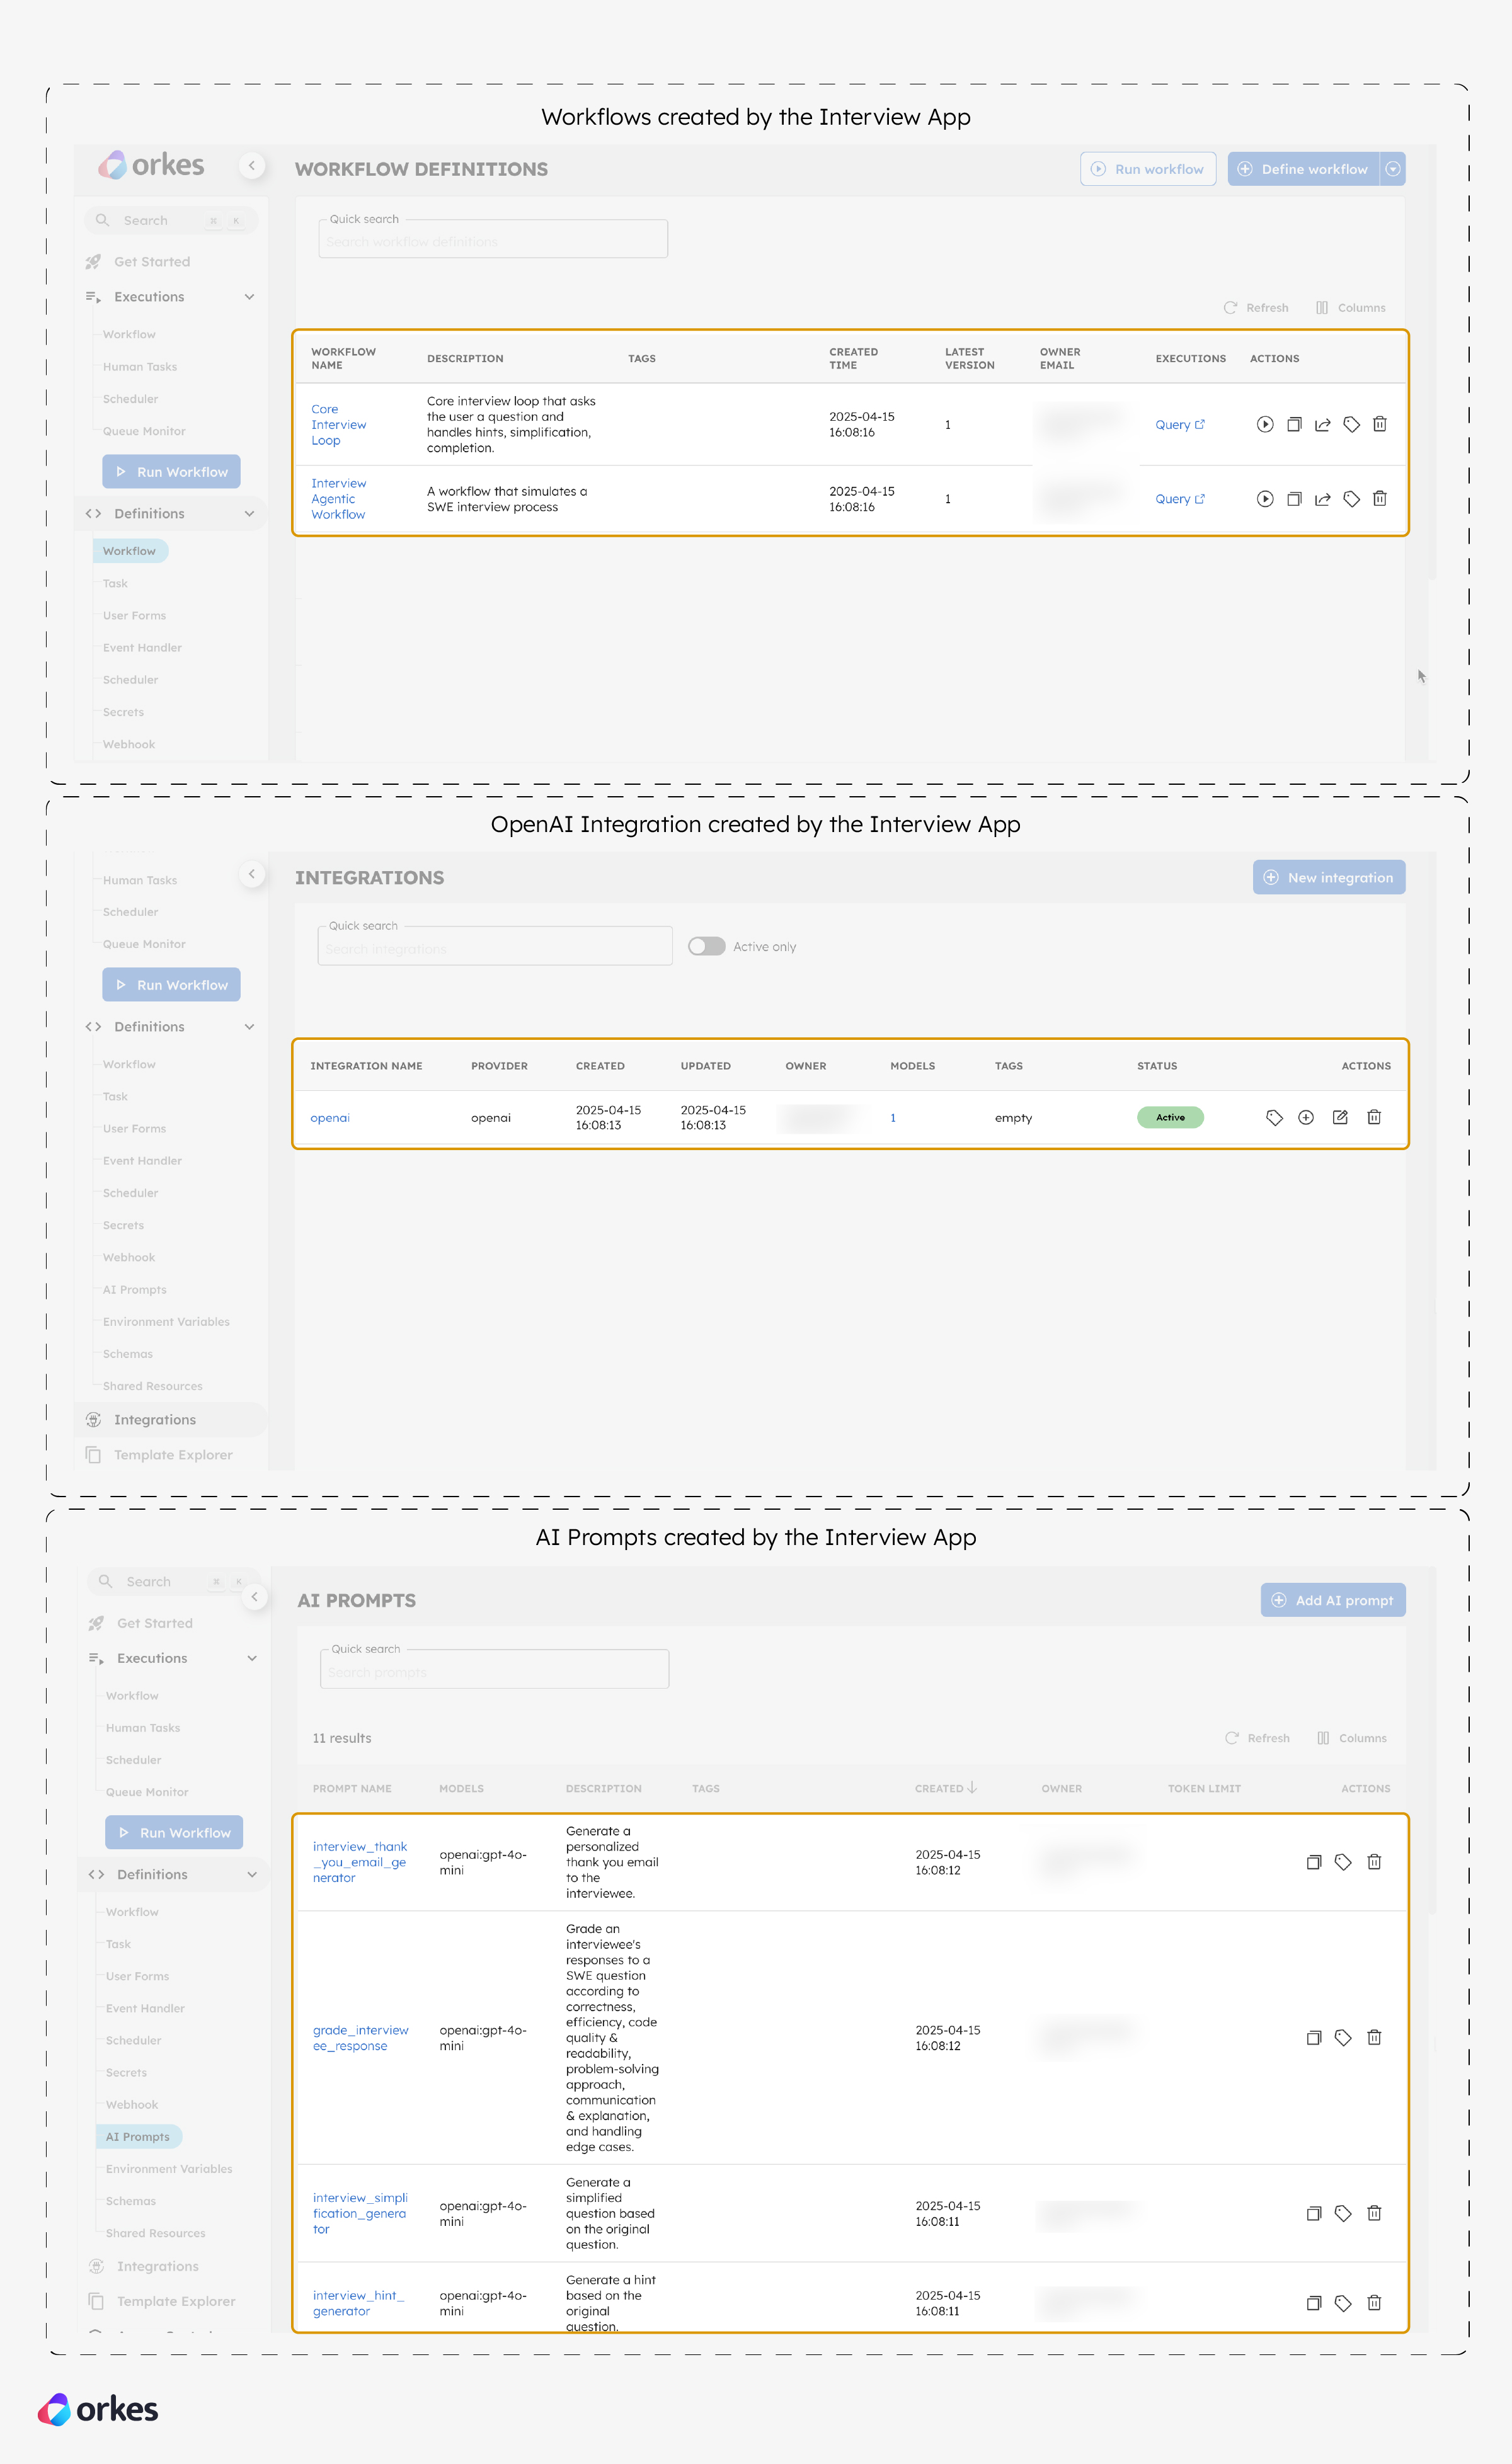
In your Developer Edition, you’ll notice that the required OpenAI integration, AI prompts, and workflow definitions are automatically created.
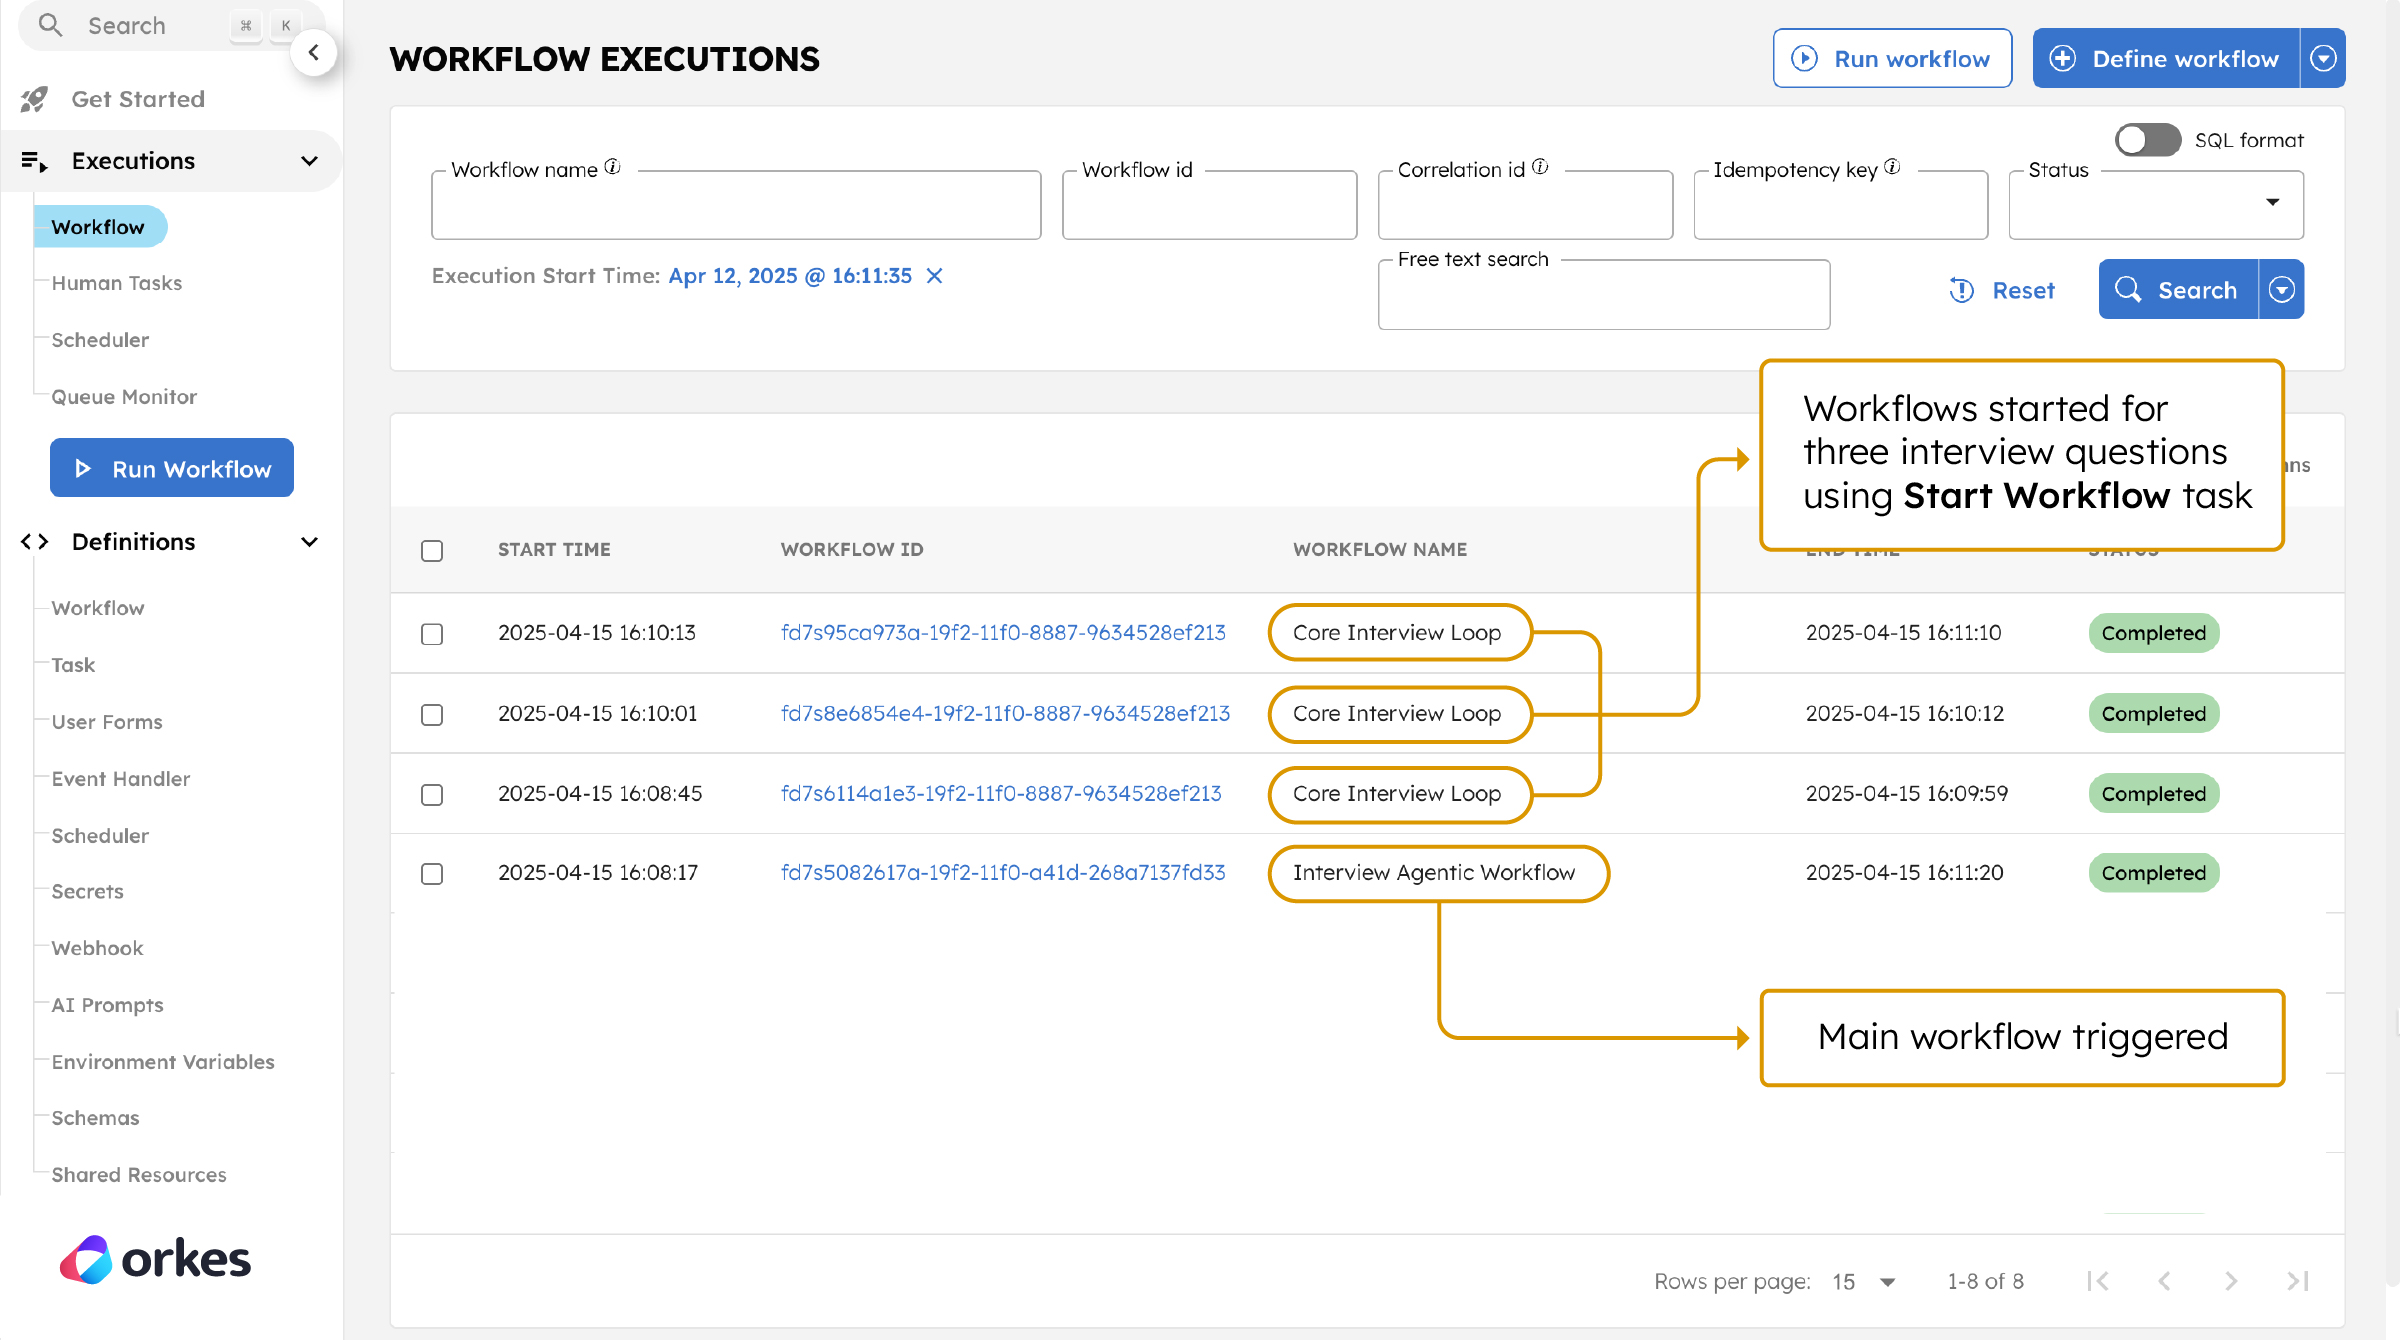
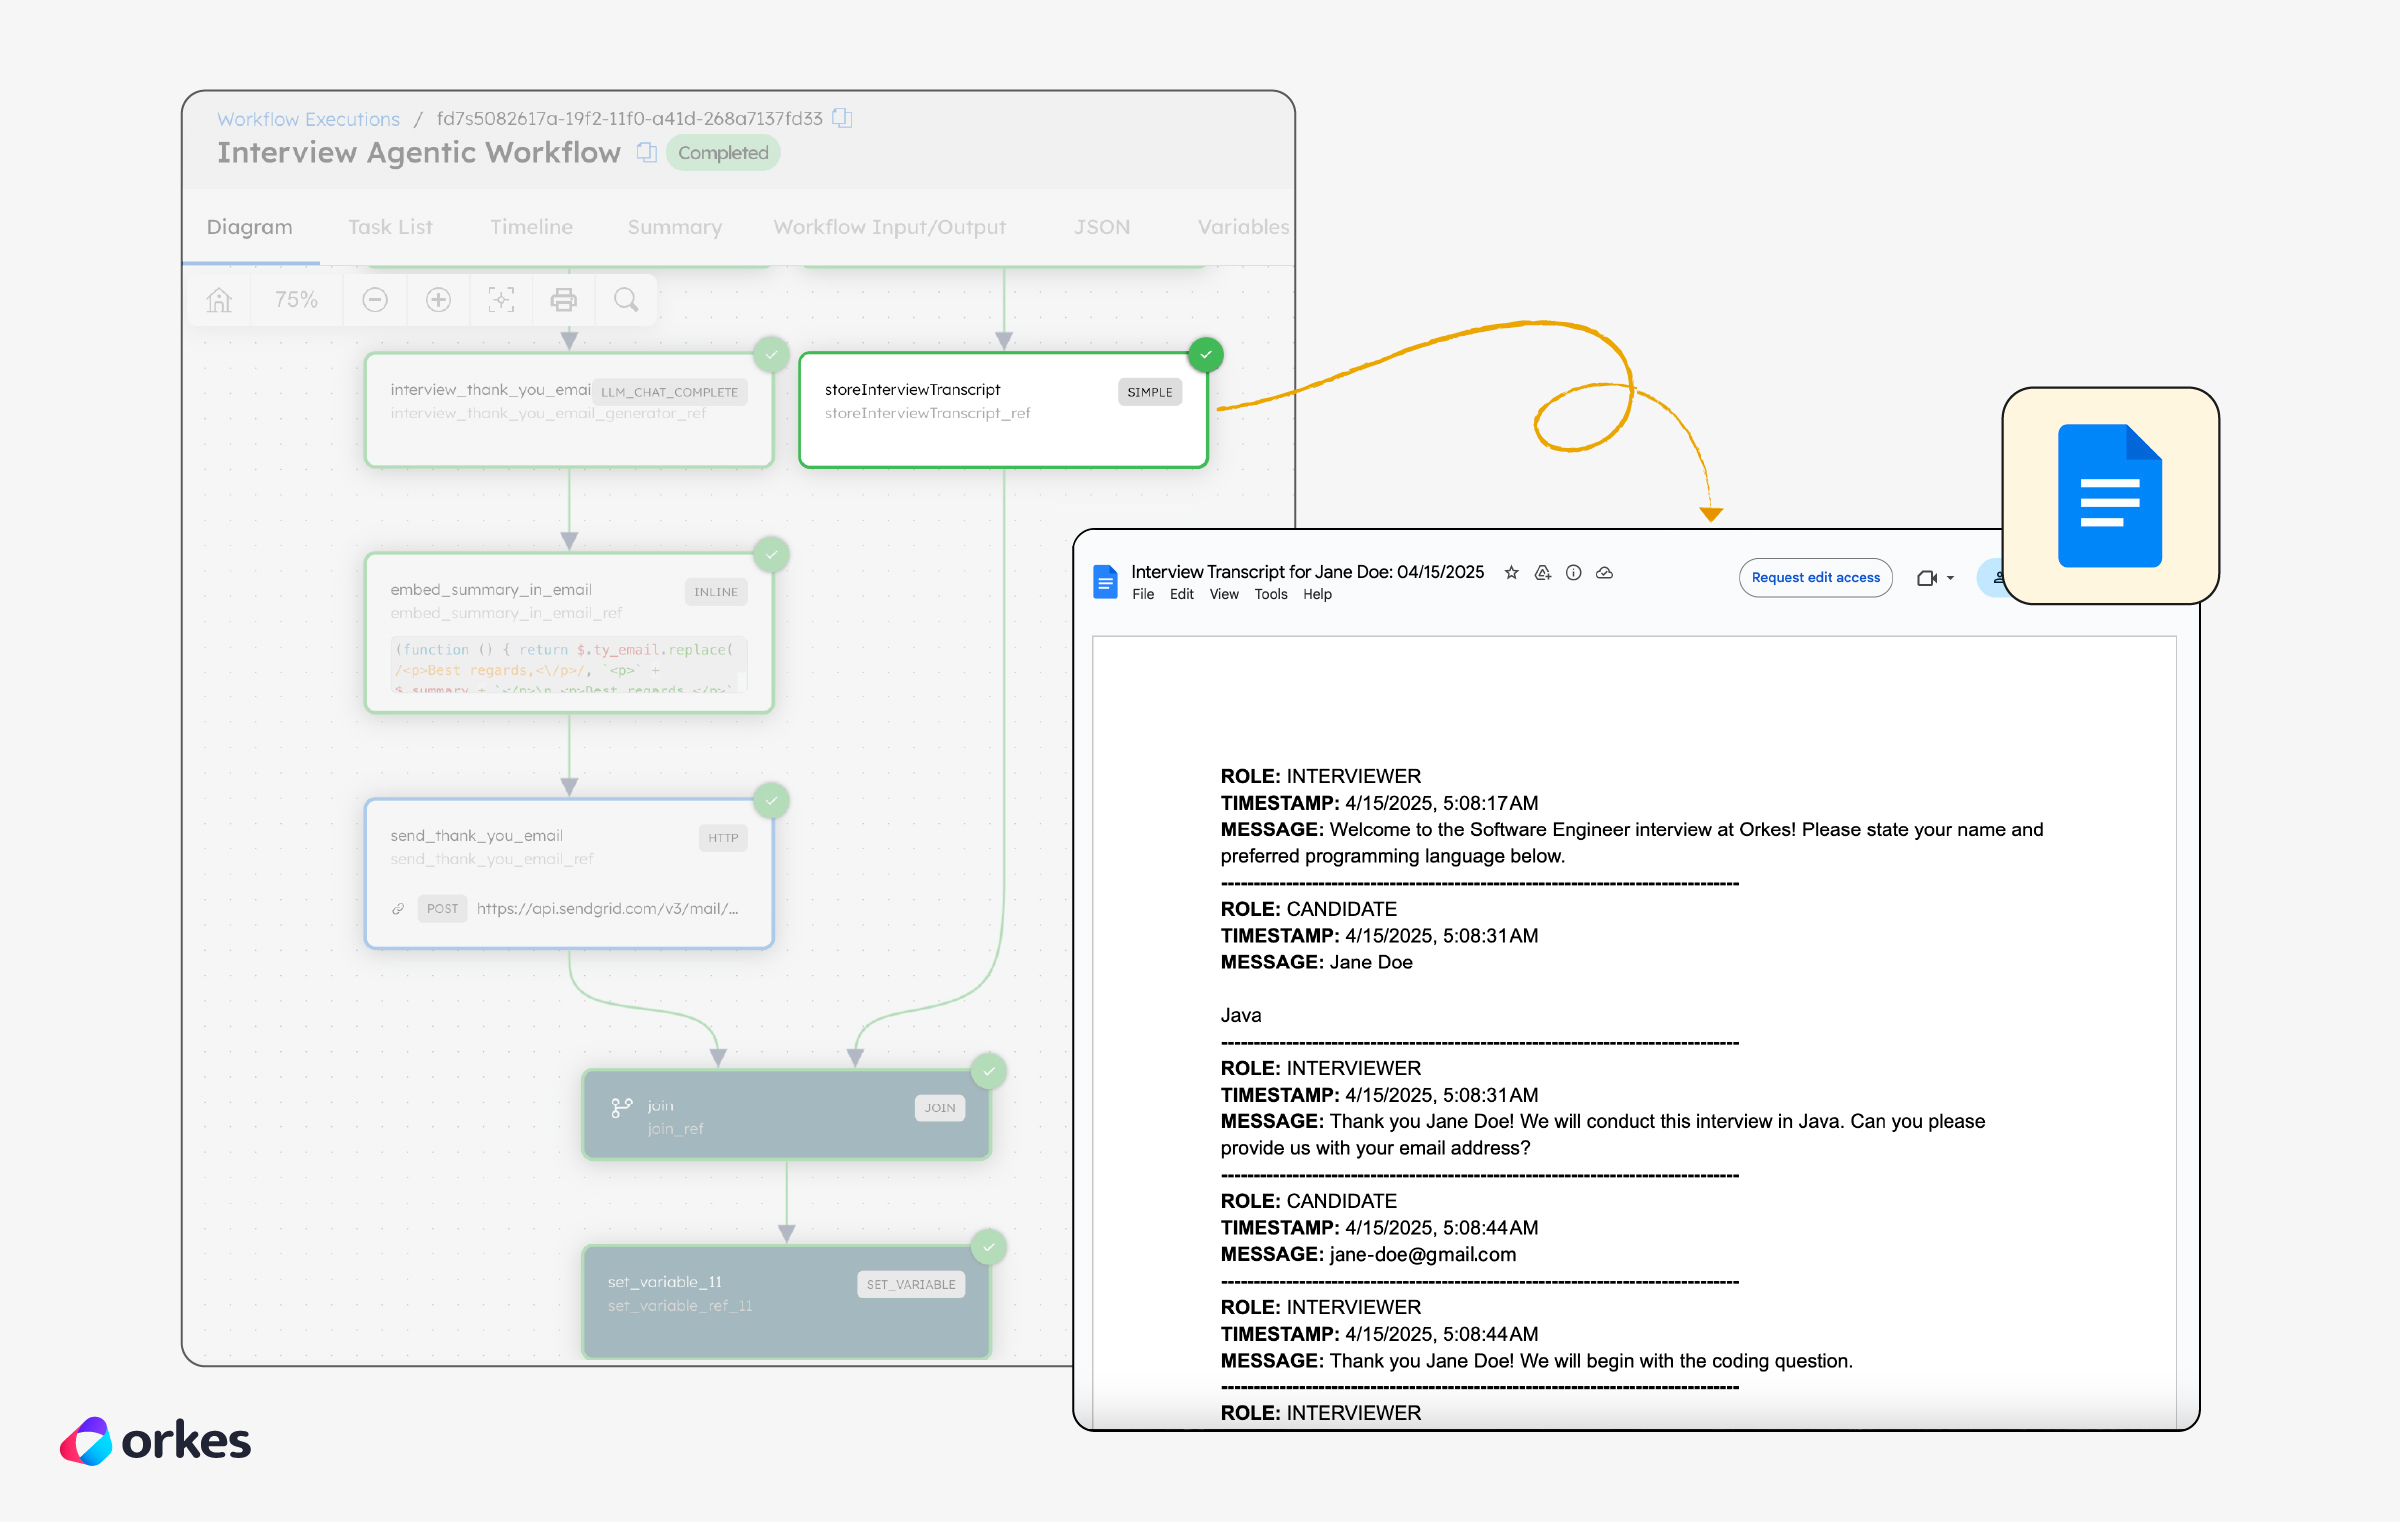
As the candidate proceeds, the Interview Agentic Workflow is triggered. Each interview question is handled by a separate workflow, Core Interview Loop. So, for a three-question interview, three workflows run in sequence using Conductor’s Start Workflow task.
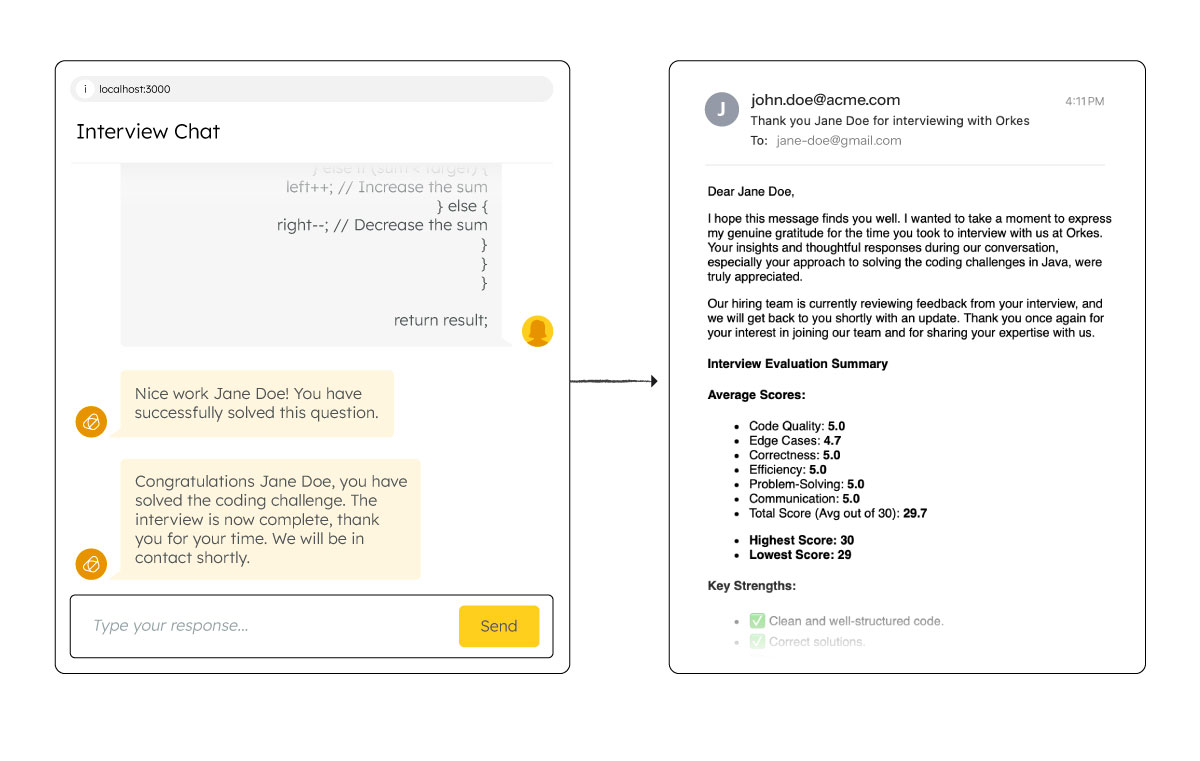
Once the interview is complete, a thank you email with personalized feedback and scores is instantly sent to the candidate via SendGrid API.
In parallel, a fully formatted Google Docs transcript is generated and stored in Google Drive. The interviewer and candidate are granted access, and a link is shared in another email.
That’s it—you’ve now built a fully automated coding interview for a Software Engineer, from candidate intake to evaluation and reporting.
With the core workflow in place, you can easily tailor it to your own needs: customize the prompts, add more questions, or plug it into tools of your choice.
This agentic interview app isn’t just for demos—it’s built for production. You can deploy the backend on platforms like Render and the frontend on Vercel, with your Conductor workflows running in the Orkes Cloud.
Now that you’ve built and tested your agentic interview workflow, here are a few ways you can take it further:
This tutorial walked you through building a complete agentic workflow—one that goes beyond single-shot prompts to orchestrate a real-world, multi-step interview process. Using OpenAI for reasoning, Google Docs for formatting, SendGrid for communication, a modern frontend and backend stack, and Orkes Conductor at the core, you now have a robust foundation for deploying agentic workflows in production.
Whether you’re building technical assessments, onboarding flows, or multi-agent decision systems, Conductor gives you the structure to scale—with full control over inputs, logic, and integrations.
Explore more AI-powered workflows built with Conductor
Try building and running your first agentic workflow using the free Developer Edition. Drop by our Slack community and show us what you’ve built.