- ENGINEERING
How to Build a UI Screenshot-to-Code AI Agent
 Maria Shimkovska Content Engineer
 I wanted to build an agent that takes a screenshot of a UI component and gives me back the code for it. And to show you how you can do it too.
I wanted to build an agent that takes a screenshot of a UI component and gives me back the code for it. And to show you how you can do it too.
I built this one with Conductor Agents. Here’s a quick look at how it works before I get into the code.
First a quick overview: the idea is you drag a screenshot of a UI component into the app (or upload manually through a button), the AI agent analyzes it, and returns the working code for the component it sees that matches the entire design. So like the layout, colors, spacing, and typography. I haven’t optimized for the functionality, just for the look of the component.
Also, do keep in mind that this is a simple agent because I wanted to show you how you can build it. If you decide to build it yourself, you can easily add more functionality or change things about the way it works.
For example, this specific agent doesn’t do great with more complex UI screenshot and that makes sense. It’s designed to be a one-shot generation. I will explain why toward the end of the article (or you can jump straight there if you want to). But it’s essentially because of loop engineering.
Why Build an AI Agent to Generate UI Code for You
Honestly, to essentially to speed things along. I see UI components I love all the time, and wanted to build an agent where I can just copy/paste a screenshot and get the code for it. Yes, I can go step by step and build out the code myself, but I wanted to see how an AI agent can speed things up so I don’t start from scratch.
And yes, I can just use paste the screenshot into Claude or ChatGPT too, but the reason I like building my own agents is because I can create an application that is specific to my use case and customize what my agent does with the response. Plus the visibility into what the agent did is really helpful.
Like I mentioned in the beginning, my biggest win here is speed. Even if it’s not pixel perfect (although that IS the goal), it gives me an amazing starting point.
Here is what an AI agent can do with a screenshot faster than me:
- Identify the layout structure (flex, grid, positioning)
- Extract colors, font size, and spacing
- Recognize common UI patterns like cards, navbars, modals, and tabs and anything else for that matter
- Generate accessibility markup with the proper aria attributes
- Produce Typescript interfaces for the component’s props
So for this post I’m showing you how to build this screenshot to code AI agent that can accept the image upload through the web UI, pass the screenshot to a visual LLM model, generate a complete React and Typescript component, and then return the code back to me.
Ok, let’s go into the code so you can see how it was built.
How I Built The AI Agent
If you want to see the full code, you can check it out on Github. I also documented everything to make things easy to understand. And if you have any questions, feel free to let me know. This is a base AI agent that I want to just have and in the next iteration of building it improve it with loop engineering.
Setting up the AI agent
Ok, so the agent definition (the basic setup for the agent) is the simplest part here. You essentially just give it a name, the model it will use, and instructions/prompt that tell it what to do (like generate the code for this screenshot in React and Typescript). The instructions are what the agent will do, and the model is figuring out how to do it.
The code below is not hard to go over. There are just a lot of lines where my instructions go. But pay attention to the name (component_forge), model (openai/gpt-5.5), and instructions (You are an expert React UI component builder…).
from conductor.ai.agents import Agent, AgentRuntime
agent = Agent(    name="component_forge",    model="openai/gpt-5.5",    instructions="""You are an expert React UI component builder. You receivescreenshots of UI designs and recreate them as clean, production-readyReact + TypeScript components.
Rules:- Match the screenshot's layout, spacing, colors, and typography  as closely as possible- Use functional components with TypeScript- Use Tailwind CSS for styling (utility classes only, no external CSS)- Include proper TypeScript prop types via an interface- Export the component as a named export- Use semantic HTML elements- Add aria attributes for accessibility where appropriate
Return ONLY the complete component code, nothing else.""",    max_turns=1,)
I made max_turns just 1, because I want the model to just give me the code for the component. I don’t need it to take extra steps for now. The model is good enough to create the code. And you are of course welcome to use a better model too.
I initially built this GPT-4o but then switched the model to GPT-5.5 and the results were significantly better.
The components it generates are closer to the original screenshot. The spacing, colors, and just the overall layout are noticeably more accurate.
If you’re building this yourself, I’d recommend going with a better model, but it’s also fun to see the difference to you can also experiment. If you want to render more complex UIs then going with a better model is worth it, but if you want just simpler ones then going with a cheaper one is better.
You can also just allow the agent to decide if it’s a complex or simple component and use a model depending on the complexity to save you money.
Passing the Screenshot
The agent needs to also see the image obviously. The Conductor Agents SDK handles this through its media parameter so I can pass it a file path and then the runtime includes it in the message it gives to the LLM model so it has the context of the image along with my instructions to generate the code for me.
with AgentRuntime() as runtime: result = runtime.run( agent, "Recreate this UI component as a React + TypeScript component " "with Tailwind CSS. Match the layout, spacing, colors, and " "typography as closely as possible.", media=["/path/to/screenshot.png"], )Good to note: the Conductor server reads the file itself, not your Python process. When the server runs in Docker, mount the folder that holds your screenshots into the container, allow-list it, and pass the path as the server sees it:
docker run -d -p 8080:8080 \ -e OPENAI_API_KEY=$OPENAI_API_KEY \ -v $PWD/uploads:/data/uploads \ -e CONDUCTOR_DOCUMENTACCESSPOLICY_ALLOWEDDIRECTORIES=/data/uploads \ conductoross/conductor:3.32.1Then media=["/data/uploads/screenshot.png"] works. A URL the server can fetch works too, with no mount needed.
The model will receive the image alongside the text prompt you gave it, so it’s like extra context it now has. It will then generate a component that matches what it sees.
The Web App for the Entire AI Agent
I like to have my agents have some sort of UI. It makes everything much easier to use. You don’t always need them of course, but for AI agents where you need a person to kick it off, it helps to have a web app of some sort.
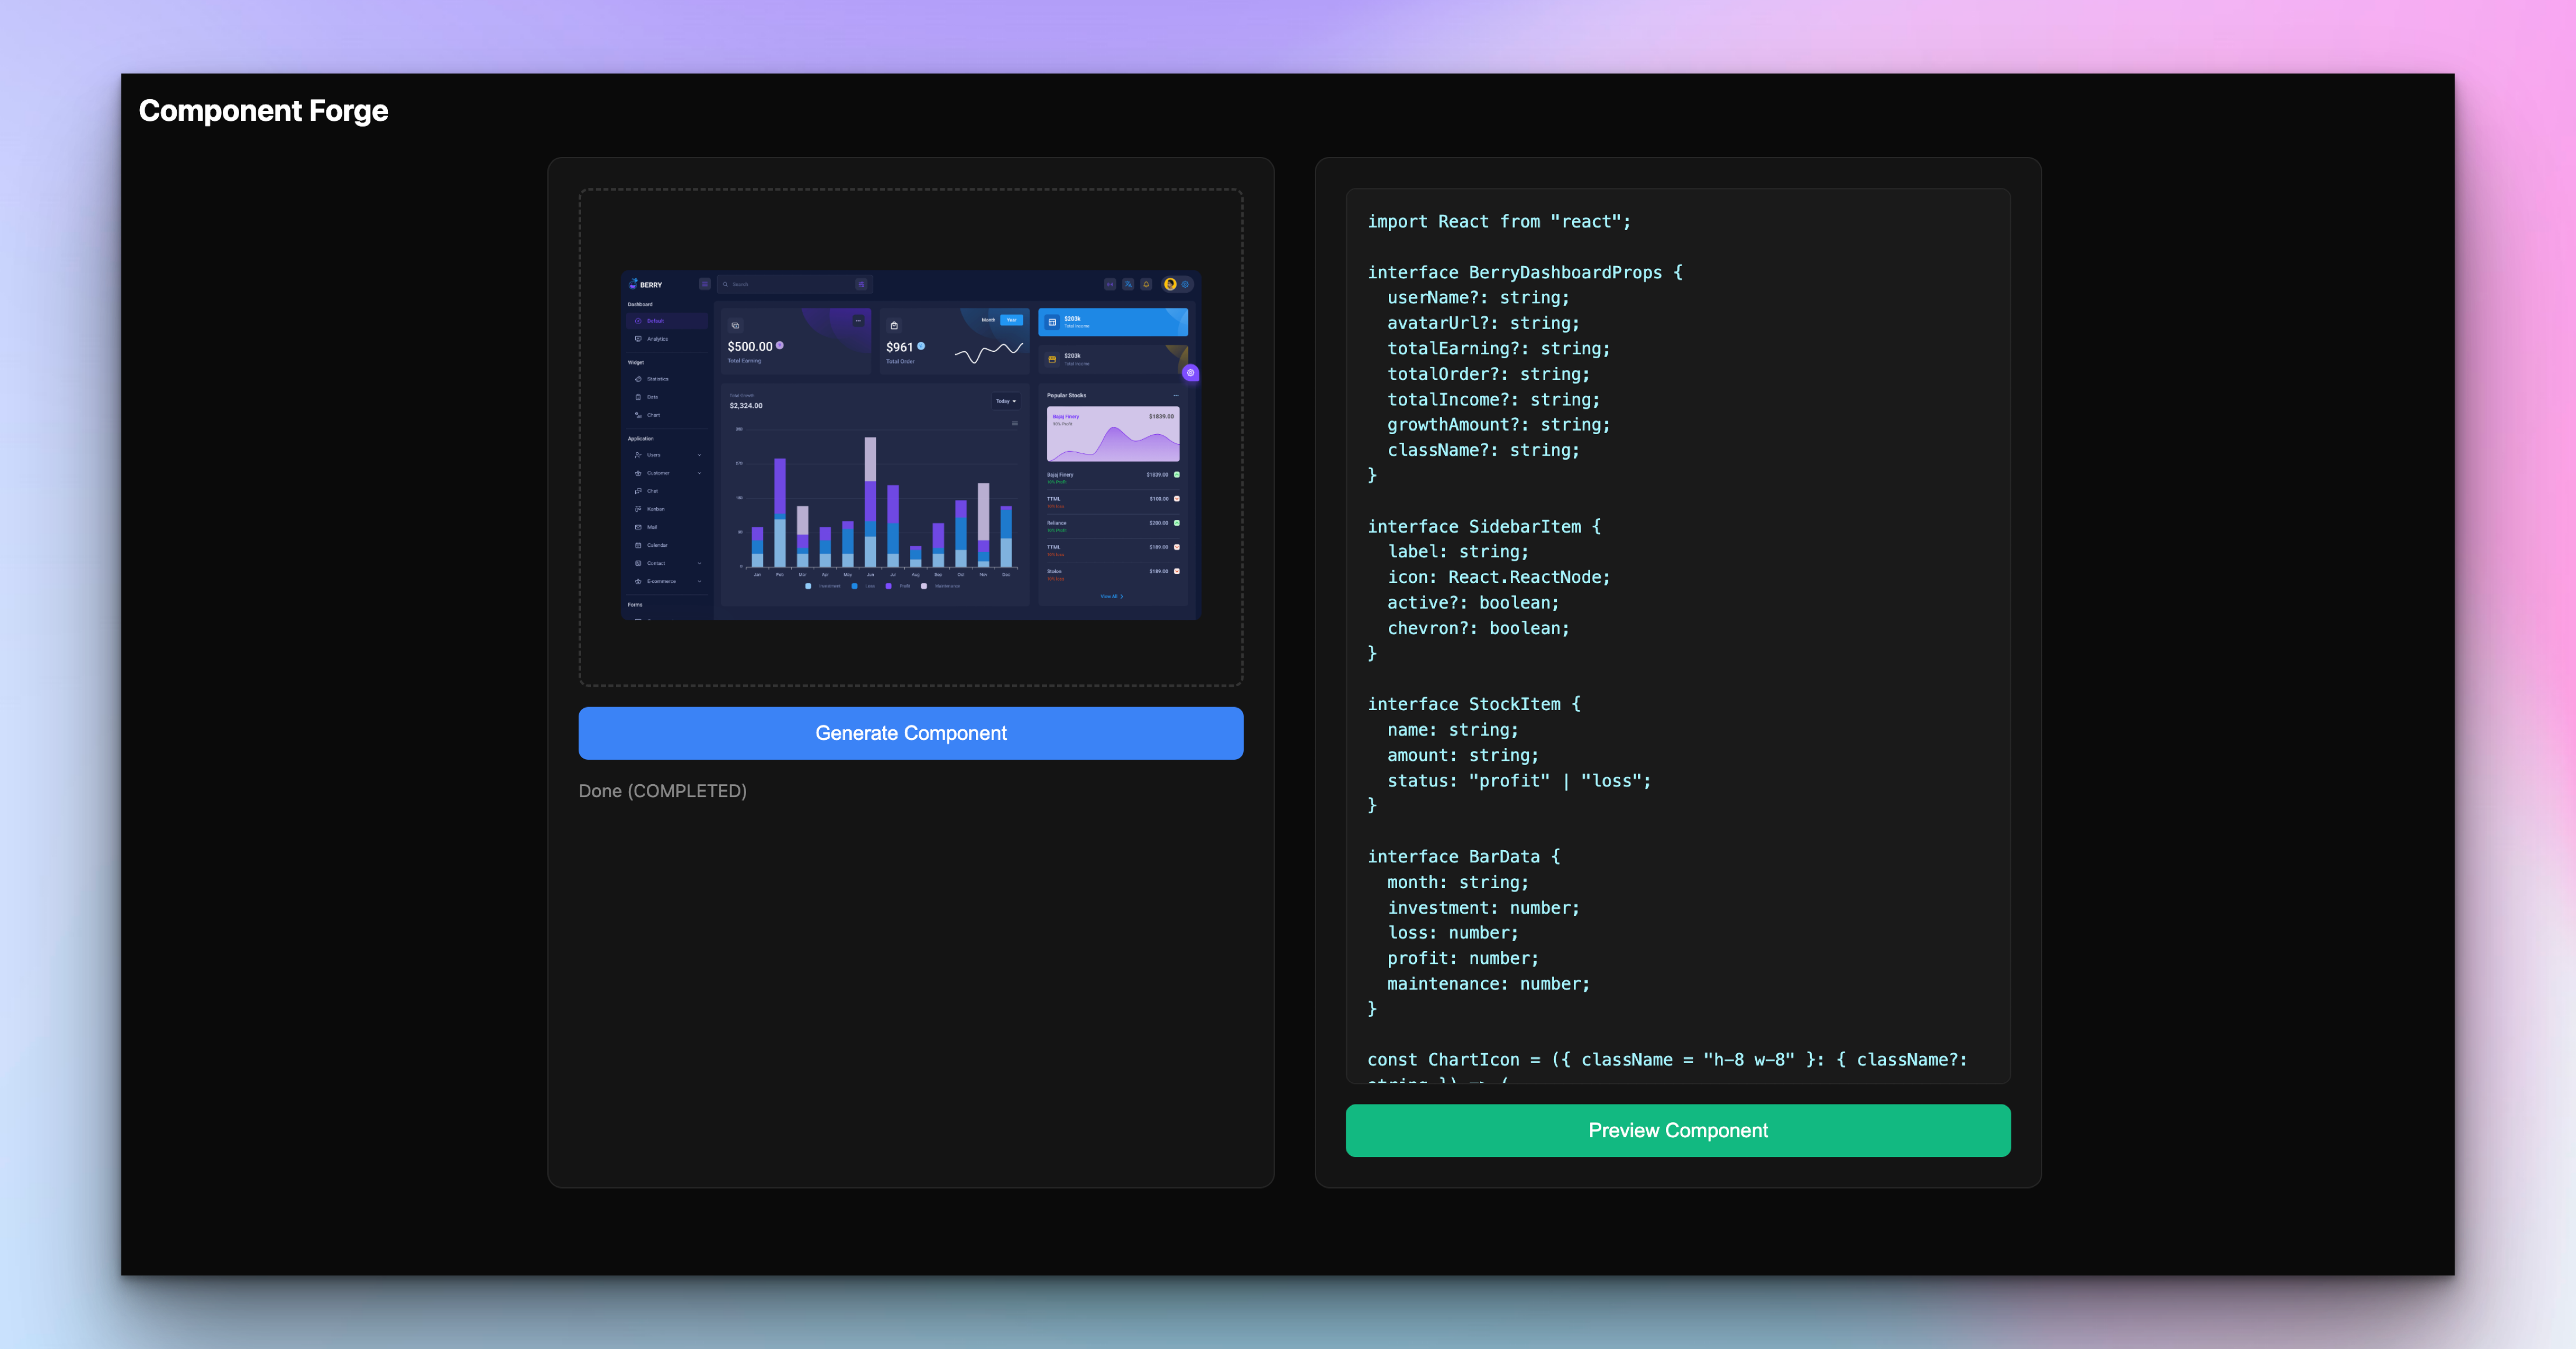
The frontend for this is a single HTML page with a drop zone. I can just drag the screenshot in, click the generate button to get the code, and then wait for the agent to do its thing and generate the code for me. On this page, the code will show up on the right side.
The backend is a FastAPI endpoint that saves the uploaded image and passes it to the agent.
@app.post("/generate")async def generate(file: UploadFile = File(...)):    dest = Path("/path/to/screenshots/screenshot.png")    dest.write_bytes(await file.read())
    with AgentRuntime() as runtime:        result = runtime.run(            agent,            "Recreate this UI component as a React + TypeScript "            "component with Tailwind CSS.",            media=[str(dest)],        )
    return {"code": result.output, "status": result.status}
That’s essentially all I did for the backend for a very simple AI agent.
Define Your Agent’s Prompt/Instructions
This is the first thing that shapes how good your output will be. How well your agent performs depends on the model’s vision capabilities and how specific your instructions are.
instructions = """You are an expert React UI component builder. You receivescreenshots of UI designs and recreate them as clean,production-ready React + TypeScript components.
Rules:- Match the screenshot's layout, spacing, colors, and typography  as closely as possible- Use functional components with TypeScript- Use Tailwind CSS for styling (utility classes only, no external CSS)- Include proper TypeScript prop types via an interface- Export the component as a named export- Use semantic HTML elements- Add aria attributes for accessibility where appropriate
Return ONLY the complete component code, nothing else.Do not wrap in markdown code blocks."""
Creating the Actual AI Agent with Conductor Agents
You don’t need a lot of code to actually create an agent. Here is what mine looks like with the Conductor Agents SDK:
agent = Agent( name="component_forge", model="openai/gpt-4o", instructions=INSTRUCTIONS, max_turns=1,)Like I mentioned, I set the max_turns to 1 here because I am not giving it any tools to use and I just want it to use the model’s capability to give me back the code. LLM models are good enough to do that. They’re pretty good with code.
Running the AI Agent
Here is the code you can use to run your agent, to give it a runtime. This also gives you things like observability so you can see what steps your agent took while running.
This is also why I like using agent building and agent runtime frameworks.
with AgentRuntime() as runtime: result = runtime.run( agent, "Recreate this UI component...", media=["/path/to/screenshot.png"], ) print(result.output)Once you run this, the model analyzes the screenshot, generates the component code, and returns it. You can check the full execution trace in the Conductor UI at localhost:8080, like what the model received, what it produced, and how long it took.
Preview the Generated Component
Once the agent generates the code, you probably want to see what it actually looks like rendered, and not just read the raw code. So I added a “Preview Component” button that lets you see the output instantly in the browser.
There’s a small React app running alongside FastAPI that handles this. When you click the button, it takes the generated code, drops it into a React component file, and Vite’s hot reload renders it immediately in a new tab.
That way you can compare the result against the original screenshot without having to copy the code somewhere else.
I find that seeing what was generated is pretty important, especially for the next step where I will build a loop around this agent so it re-prompts itself until it gets to the point where the two are identical (or just highly similar).
You Can Try a Few Different Screenshots as Input
The agent handles different component types with varying degrees of accuracy. All because of the model that it uses alone. A few you can try to see what you get back are:
- Simple components, which can give you near perfect results, like search bars, buttons, cards, badges, and alerts.
- Medium complexity components that can give you pretty good structure with minor details off, like navigation bars, pricing cards, and form groups.
- More complex components, where you might get the right structure with details a bit more off, like multi-tab editors, data tables, dashboards, and especially screenshots with animations or illustrations with svg.
For this AI agent, I designed it to create a single shot generation so that I can see what produces and play around with different models. But mostly because I wanted to build a base AI agent that I can engineer a loop around where the agent can re-prompt itself until it gets the perfect (or near perfect) result.
But for now you can see how you can have an agent like this come together. My advice is to play around with it and see what you can do.
Happy building!