ENGINEERING
How to Call Any External API From a Workflow in Orkes Conductor

Maria Shimkovska
Content Engineer
Last updated: June 17, 2026
June 17, 2026
3 min read


Join thousands of developers building the future with Orkes.
This is for you if you would prefer not to read documentation and see more examples.
I want to show you everything that's possible with the built-in tasks in Orkes Conductor.
This is part of a series covering every built-in task in Orkes Conductor. This one is for the HTTP task.
The HTTP task sends an HTTP request to any URL and makes the response available to the next task in your workflow. It supports GET, POST, PUT, PATCH, DELETE, HEAD, OPTIONS, and TRACE, along with headers, request bodies, authentication, and more.
You point it at a URI, tell it what method to use, and it handles the rest. The response like the status code, headers, and body comes back as structured output that any downstream task can reference directly.
Why does this matter? Well, because most workflows need to talk to the outside world at some point. This is probably one of my most used tasks when I build workflows.
Without a built-in HTTP task, you will need to write a custom worker every time. But this is something that works perfect as a built-in task so we built it so you don't have to manage that part yourself and can focus on the core logic of your business.
If you're building an onboarding workflow, where you onboard new users into your product or service and need to set up their account, send them a welcome email, or assign them to a team, then you would need to pull the new user's profile from your internal API so every downstream task has the data it needs.
This is exactly what the HTTP task can be used for, a single GET request that fetches the profile and makes the full response available to everything that follows:
{
  "name": "get_user_profile",
  "taskReferenceName": "get_user_profile_ref",
  "type": "HTTP",
  "inputParameters": {
    "uri": "https://api.yourapp.com/users/${workflow.input.userId}",
    "method": "GET",
    "accept": "application/json",
    "headers": {
      "Authorization": "Bearer ${workflow.input.token}"
    }
  }
}
Every task after that in the workflow can now reference ${get_user_profile_ref.output.response.body.email} or any other field from the response directly.
If you're building an order processing workflow, where you handle purchases and need to notify a fulfilment service once an order is confirmed, then you would need to send the order details to an external API via a POST request.
Like when a customer clicks "Buy Now" and your workflow needs to immediately fire off the order to your warehouse system with the item list, quantity, and shipping address before sending a confirmation email.
This is what the HTTP task can be used for. A POST with a structured body built from earlier workflow outputs:
{
  "name": "notify_fulfilment",
  "taskReferenceName": "notify_fulfilment_ref",
  "type": "HTTP",
  "inputParameters": {
    "uri": "https://fulfilment.partner.com/orders",
    "method": "POST",
    "accept": "application/json",
    "contentType": "application/json",
    "headers": {
      "x-api-key": "${workflow.input.fulfilmentApiKey}"
    },
    "body": {
      "orderId": "${workflow.input.orderId}",
      "items": "${process_order_ref.output.result.items}",
      "shippingAddress": "${workflow.input.address}"
    }
  }
}
If you're building a user onboarding workflow, where new signups need to be added to your CRM but you want to avoid creating duplicates, then you would need to check whether the user already exists before triggering the creation step.
Like when a user signs up through a new channel but might have already been added manually by your sales team. you need to know before you act.
This is exactly what the HTTP task can be used for, combined with acceptedStatusCodes so a 404 doesn't stop your workflow. Here is what that would look like in your workflow definition:
{
  "name": "check_user_exists",
  "taskReferenceName": "check_user_ref",
  "type": "HTTP",
  "inputParameters": {
    "uri": "https://crm.internal/contacts/${workflow.input.email}",
    "method": "GET",
    "accept": "application/json",
    "contentType": "application/json",
    "acceptedStatusCodes": ["2xx", "404"]
  }
}
A 200 means the user already exists and a downstream SWITCH task can route the workflow to an update path.
A 404 means they're new and you can proceed with creation.
Either way the workflow keeps running, and ${check_user_ref.output.response.statusCode} tells the next task exactly what it's working with.
When the HTTP task runs, it gives you everything from the response:
| Field | What It Contains |
|---|---|
response.body | The full response body as a JSON object |
response.statusCode | The HTTP status code (200, 404, 500, etc.) |
response.headers | The response headers |
response.reasonPhrase | The status message (OK, Not Found, etc.) |
Reference them in downstream tasks like:
${get_user_profile_ref.output.response.body.email}
${notify_fulfilment_ref.output.response.statusCode}
We built this task so you can connect your workflow to the outside world without writing a single line of custom code.
The point here is not to prevent you from writing your code, you totally still can. But this let's you focus on writing the code that matters for your business.
Any time your workflow needs to fetch data from an API, trigger an external service, send a webhook, or check the state of a remote resource this is the task for it.
If it's an HTTP call, the HTTP task handles it natively.
The fastest way to see this in action is to spin up a free Developer Edition account of Orkes Conductor.
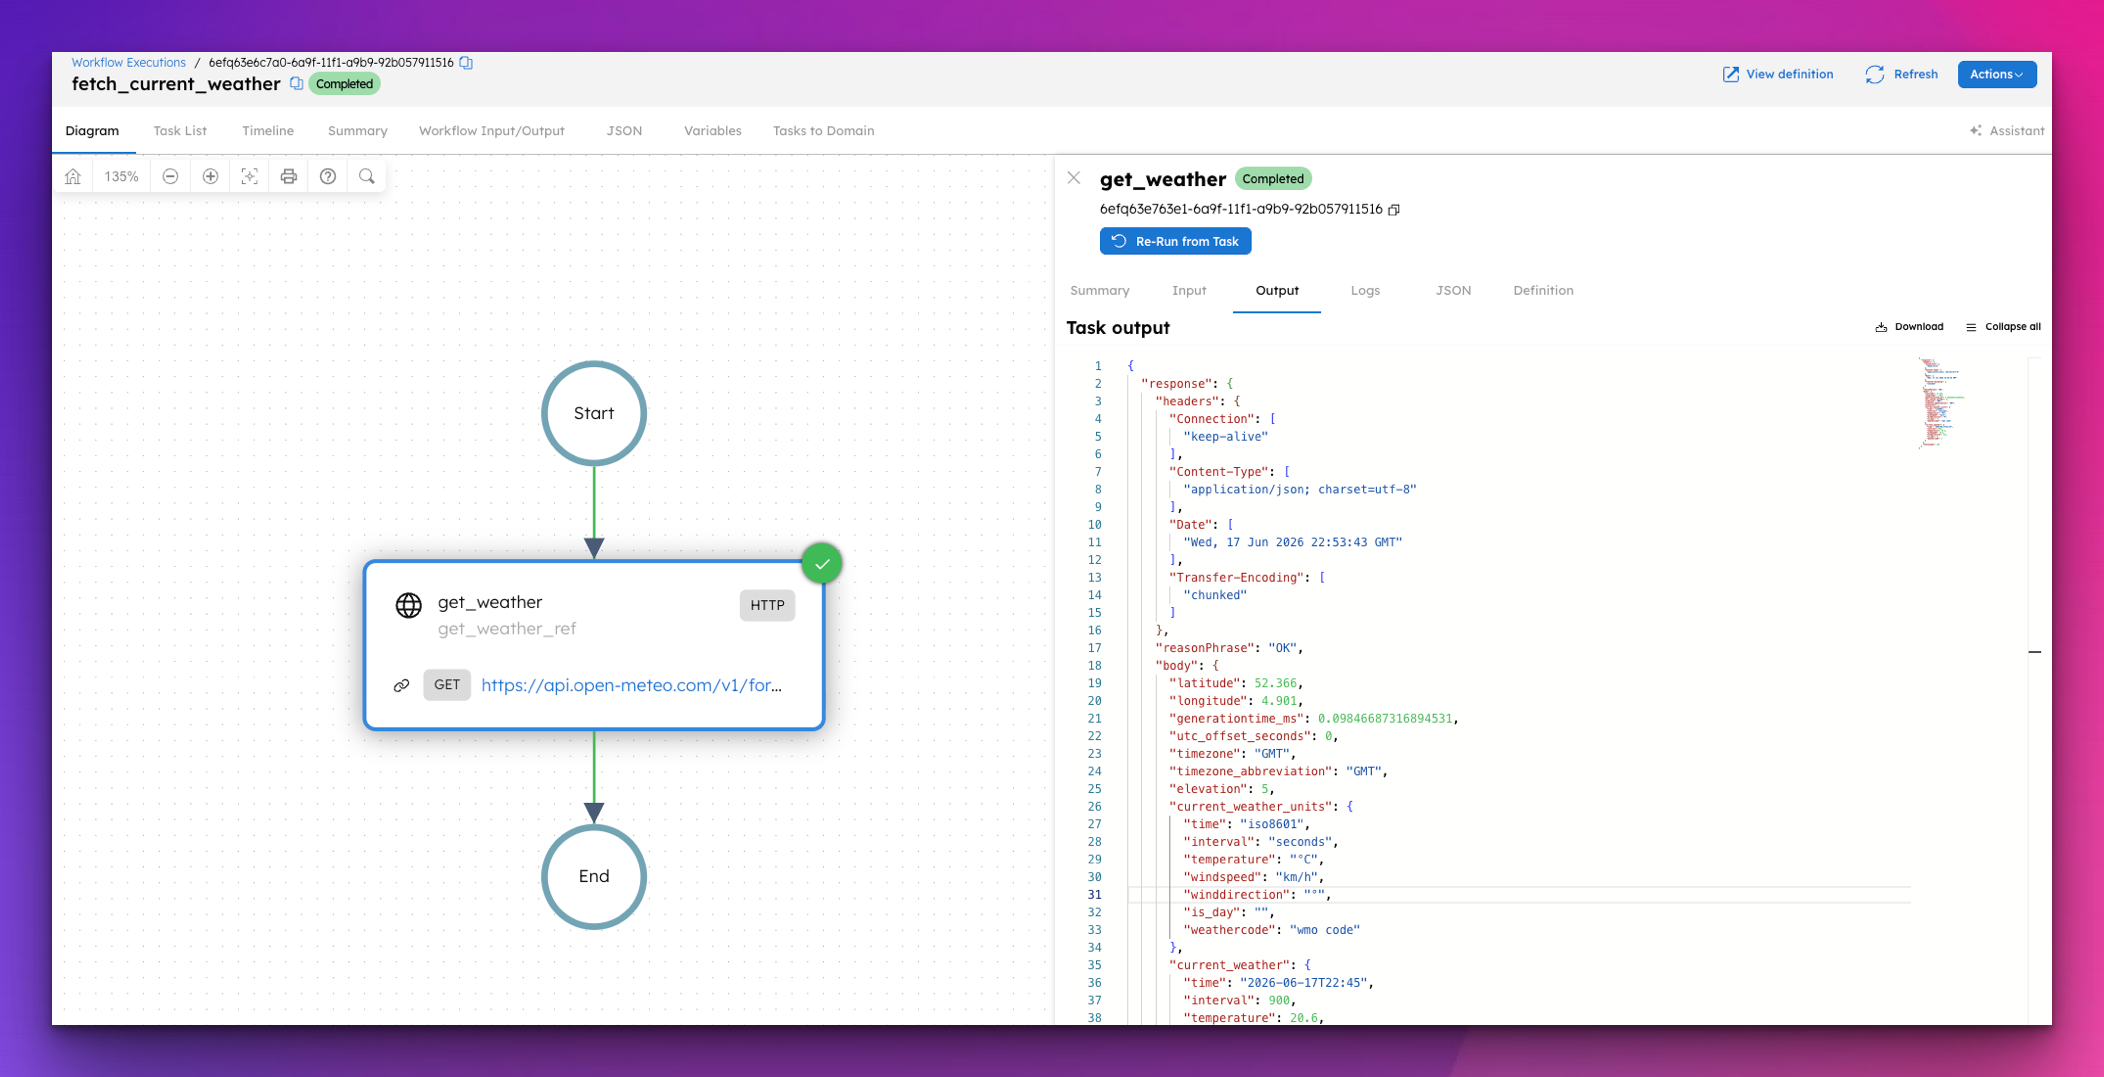
This workflow hits the Open-Meteo API (a free, no-auth weather API) and fetches the current weather for any city using its coordinates. Paste this into Conductor and hit Execute.
{
"name": "fetch_current_weather",
"description": "Fetches the current weather for a location using the free Open-Meteo API.",
"version": 1,
"tasks": [
{
"name": "get_weather",
"taskReferenceName": "get_weather_ref",
"type": "HTTP",
"inputParameters": {
"uri": "https://api.open-meteo.com/v1/forecast?latitude=${workflow.input.latitude}&longitude=${workflow.input.longitude}¤t_weather=true",
"method": "GET",
"accept": "application/json"
}
}
],
"inputParameters": [
"latitude",
"longitude"
],
"outputParameters": {
"temperature": "${get_weather_ref.output.response.body.current_weather.temperature}",
"windspeed": "${get_weather_ref.output.response.body.current_weather.windspeed}",
"weathercode": "${get_weather_ref.output.response.body.current_weather.weathercode}",
"time": "${get_weather_ref.output.response.body.current_weather.time}"
},
"schemaVersion": 2,
"restartable": true,
"workflowStatusListenerEnabled": false,
"timeoutPolicy": "ALERT_ONLY",
"timeoutSeconds": 0
}
To run it, pass coordinates as input. Here's Amsterdam:
{
  "latitude": 52.3676,
  "longitude": 4.9041
}
The Open-Meteo API returns a full forecast object with dozens of fields. The workflow surfaces just the four that matter as clean output, with no transformation code and no auth needed. The HTTP task handles the rest.
This is part of a series covering every built-in task in Orkes Conductor. Next up: the Inline task.