- ENGINEERING
- PRODUCT
Turn Any Function Into a Workflow Step: Build Your First Orkes Conductor Worker
 Maria Shimkovska Content Engineer
 Build a real worker from scratch and wire it into a complete workflow. New to workers? Part one covers what they are and how polling works.
Quick recap if you’re landing here fresh: a worker is your own code, running on your own machines, that runs as a single step inside a Conductor workflow.
Your worker polls the server for tasks, runs your function, and sends the result back.
The full mental model is in part one. This article is where we build one.
I’m using Python here, but everything works the same way in every SDK.
The Workflow: Processing an Image
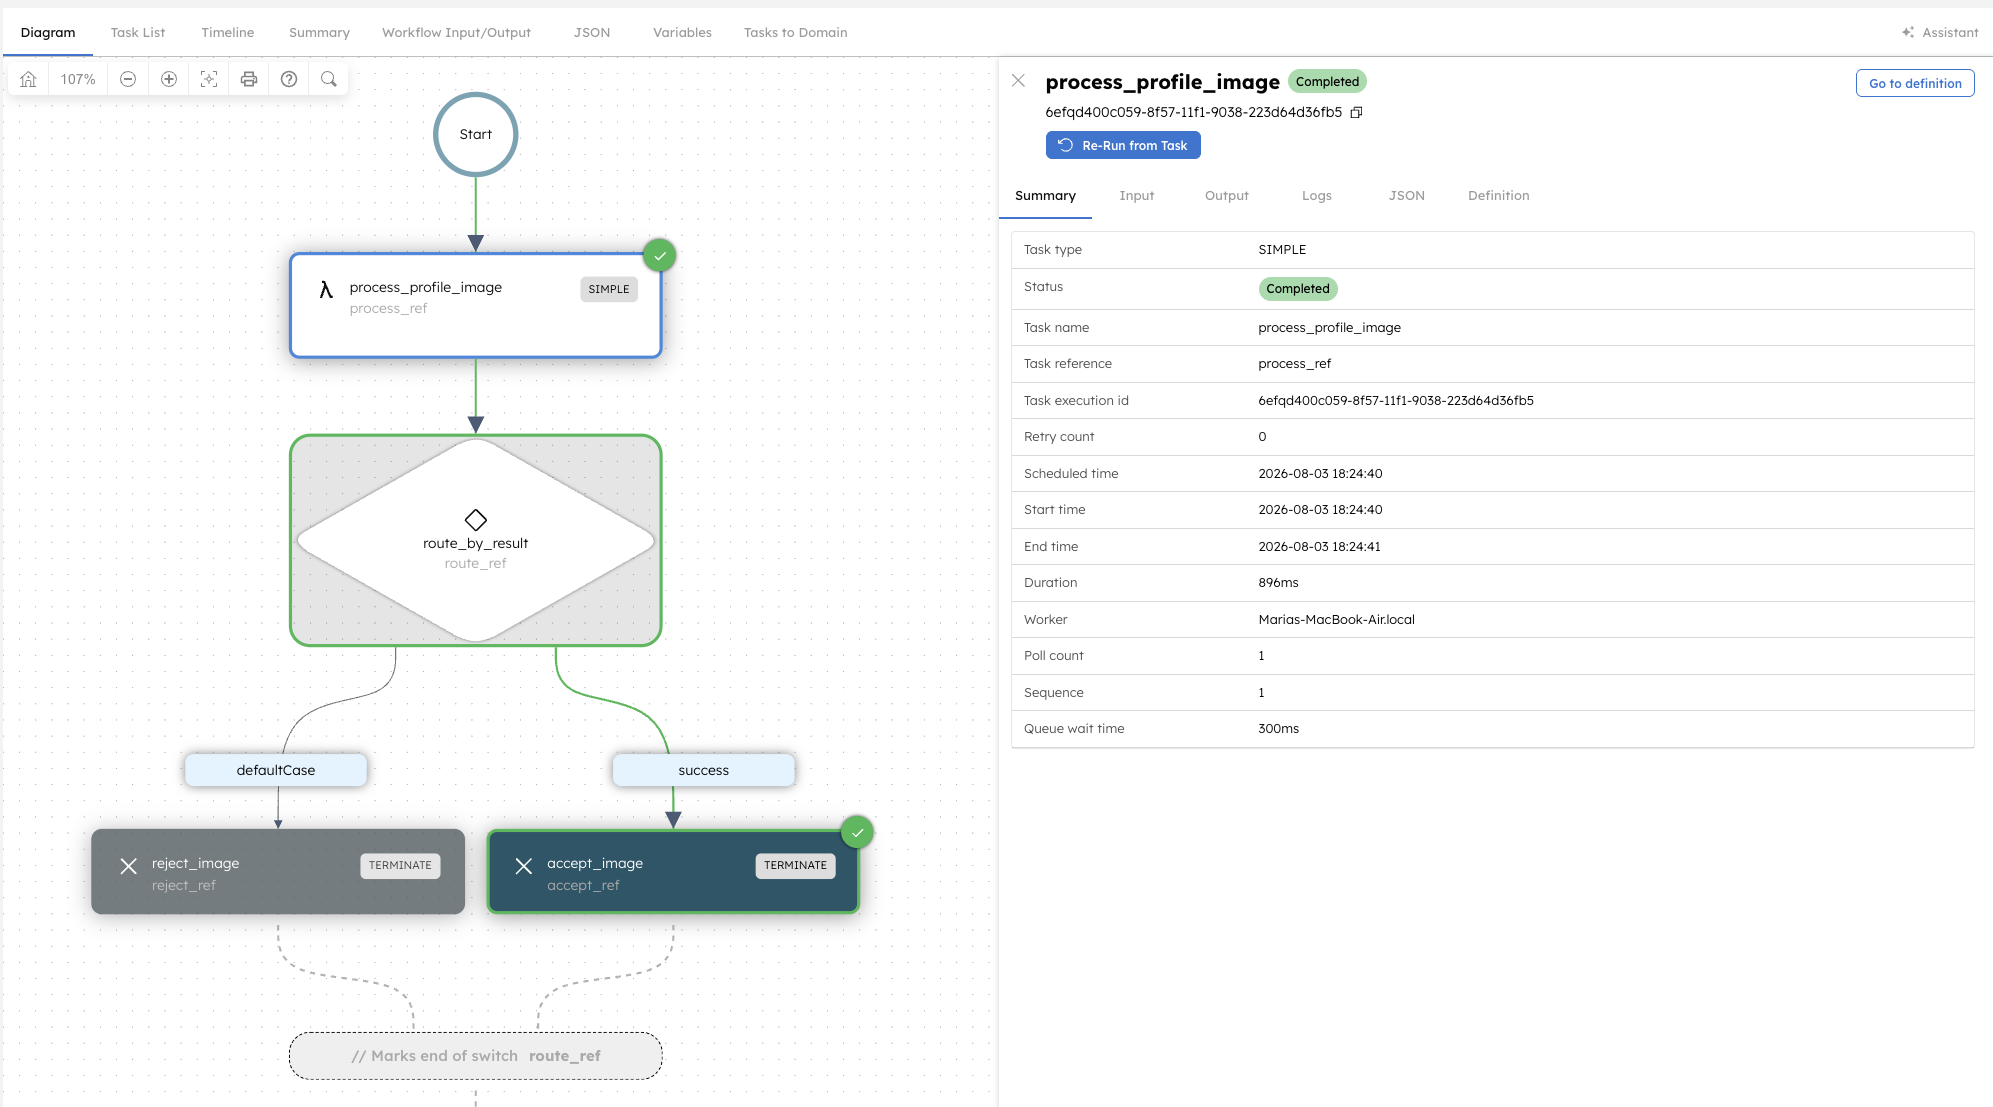
Say you’re building an app where users submit a profile photo by URL, and you want a workflow that fetches the image, resizes it, and routes on the result. The routing is built-in territory: a SWITCH task picks a path based on how things went.
The processing step is the odd one out. Fetching the image, opening it, and resizing it all need real code, and real code means a worker.
Ours takes an image URL, downloads it, checks that it really is an image, and resizes it down to fit in 400×400. Because the input is just a URL, you can run this workflow with any public image on the internet, and we will.
This whole walkthrough is meant to be built, so go for it. Everything below runs on a free Conductor server, and the only thing you need before Step 1 is a Developer Edition account. It takes about a minute, there’s no credit card, and there’s nothing to install. Feel free to sign up so you can run every command as you go. Developer Edition is my favorite way to build workflows with Conductor.
Step 1: Get a Conductor server
You don’t install Conductor. It’s a server, and the easiest way to have one is to let Orkes run it for you: sign up for the Developer Edition. It’s free, there’s no credit card, and it takes about a minute. When you’re done you have a running Conductor server with a UI, and there’s nothing on your machine to manage.
(Want to run the server on your own machine instead? You can. The Conductor CLI can start a local one with conductor server start, though that route needs Java 21 installed. For this tutorial, stick with the hosted server and skip all of that.)
Step 2: Install the SDK and Pillow
The only thing that goes on your machine is the Python SDK, plus Pillow for the image work:
pip install conductor-python PillowStep 3: Write the worker
Create a file called worker.py. This one file holds your function and the few lines that start it polling.
The decorator does two jobs here. task_definition_name names the task, and register_task_def=True tells the SDK to register that task definition with Conductor for you the first time it connects. So there’s no separate registration step: the heads-up that “a task called process_profile_image exists” happens automatically, with sensible defaults for retries and timeouts. (You can tweak those later in the Developer Edition UI under Definitions → Tasks, where you’ll find fields like retryCount and responseTimeoutSeconds.)
The function parameter, image_url, gets filled in automatically from the task’s inputParameters, so there’s no JSON to parse and no dictionary to dig through. If your function needed more inputs, you’d just add more parameters with matching names. Whatever dictionary you return becomes the task’s outputData.
# worker.py — the whole worker in one fileimport ioimport urllib.requestfrom PIL import Image, UnidentifiedImageErrorfrom conductor.client.automator.task_handler import TaskHandlerfrom conductor.client.configuration.configuration import Configurationfrom conductor.client.worker.worker_task import worker_task
@worker_task(task_definition_name='process_profile_image', register_task_def=True)def process_profile_image(image_url: str) -> dict:    try:        request = urllib.request.Request(            image_url, headers={'User-Agent': 'conductor-tutorial/1.0'}        )        with urllib.request.urlopen(request, timeout=10) as response:            raw_bytes = response.read()    except Exception as error:        return {'status': 'download_failed', 'error': str(error)}
    try:        img = Image.open(io.BytesIO(raw_bytes))    except UnidentifiedImageError:        return {'status': 'not_an_image'}
    resized = img.copy()    resized.thumbnail((400, 400))
    return {        'status': 'success',        'original_size': list(img.size),        'resized_to': list(resized.size),        'format': img.format,    }
if __name__ == '__main__':    with TaskHandler(configuration=Configuration(), scan_for_annotated_workers=True) as handler:        handler.start_processes()        handler.join_processes()
Notice the early returns. When something is wrong, the worker doesn’t throw an error or fail the task. It returns a result with a status field the workflow can branch on.
Step 4: Start the worker
Set three environment variables so the SDK knows where your server is, then run the file. The key and secret come from Access Control → Applications in the Developer Edition UI (create an application and generate an access key if you haven’t yet — the secret is shown once, so copy it right away).
export CONDUCTOR_SERVER_URL=https://developer.orkescloud.com/apiexport CONDUCTOR_AUTH_KEY=your_key_idexport CONDUCTOR_AUTH_SECRET=your_key_secretpython worker.pyThe worker registered its own task definition and is now watching the process_profile_image queue. Every time a workflow reaches a SIMPLE task with that name, it picks it up, processes the image, and reports back.
Using the Worker in a Workflow
Two names have to match exactly: the task_definition_name in the decorator, and the name in the workflow task below. Both say process_profile_image. (The task definition itself always matches, because register_task_def=True creates it from the decorator.) If the two differ, the task sits in a queue nobody is polling, and the workflow waits forever.
Adding the task
{ "name": "process_profile_image", "taskReferenceName": "process_ref", "type": "SIMPLE", "inputParameters": { "image_url": "${workflow.input.image_url}" }}The inputParameters are what gets handed to your worker function. Anything with ${workflow.input.*} comes from whatever you passed in when you started the workflow. If a task needed an earlier task’s output instead, you’d write ${taskRefName.output.*}, and you’ll see the SWITCH task below do exactly that. The keys here have to match your function’s parameter names: the workflow sends image_url because the function asks for image_url. If they drift apart, the SDK quietly passes None and your worker crashes at runtime, so when you see a NoneType error in a worker, check these names first.
The taskReferenceName is how other tasks point at this one’s output. It has to be unique within the workflow, but it doesn’t have to match the task name.
Accessing the output downstream
${process_ref.output.status}returns"success","download_failed", or"not_an_image"${process_ref.output.original_size}returns the dimensions of the downloaded image${process_ref.output.resized_to}returns the dimensions after resizing${process_ref.output.format}returns the detected image format, like"JPEG"
Branching on the result
A SWITCH task right after the processing step routes the upload down different paths:
{ "name": "route_by_result", "taskReferenceName": "route_ref", "type": "SWITCH", "evaluatorType": "value-param", "expression": "processing_status", "inputParameters": { "processing_status": "${process_ref.output.status}" }, "decisionCases": { "success": [] }, "defaultCase": []}On success, you accept the image and report the results. Everything else, like a failed download or a URL that isn’t an image, falls into the defaultCase, which is the SWITCH’s catch-all: you don’t need a named case for every status your worker might return.
The worker knows nothing about any of this. It processes an image and returns a status, and the workflow takes it from there. Keeping those two jobs apart is what makes both of them easy to change later without breaking the other.
A complete workflow example
Your worker fetches and resizes the image, a SWITCH routes on the result, and each branch ends in a TERMINATE that reports what happened.
{ "name": "process_image", "description": "Fetches an image from a URL, resizes it with a worker, and branches on the result", "version": 1, "schemaVersion": 2, "tasks": [ { "name": "process_profile_image", "taskReferenceName": "process_ref", "type": "SIMPLE", "inputParameters": { "image_url": "${workflow.input.image_url}" } }, { "name": "route_by_result", "taskReferenceName": "route_ref", "type": "SWITCH", "evaluatorType": "value-param", "expression": "processing_status", "inputParameters": { "processing_status": "${process_ref.output.status}" }, "decisionCases": { "success": [ { "name": "accept_image", "taskReferenceName": "accept_ref", "type": "TERMINATE", "inputParameters": { "terminationStatus": "COMPLETED", "workflowOutput": { "result": "accepted", "original_size": "${process_ref.output.original_size}", "resized_to": "${process_ref.output.resized_to}" } } } ] }, "defaultCase": [ { "name": "reject_image", "taskReferenceName": "reject_ref", "type": "TERMINATE", "inputParameters": { "terminationStatus": "COMPLETED", "workflowOutput": { "result": "rejected", "reason": "${process_ref.output.status}" } } } ] } ]}Register and run it, all in the browser. In the Developer Edition UI, go to Definitions → Workflows and create a new workflow. Switch the editor to its code view, paste the JSON above, and save. Then hit Run (Conductor calls this executing the workflow) and give it this input:
{ "image_url": "https://upload.wikimedia.org/wikipedia/commons/3/3f/JPEG_example_flower.jpg" }Keep the terminal with worker.py visible while it runs. You’ll see the task arrive, and in the UI you can watch the execution move through the diagram step by step, with every task’s input and output recorded. The run lands on the success branch and finishes with "result": "accepted" and the resized dimensions.
Then break it on purpose, because watching the other branch fire teaches more than the happy path.
Run it again with { "image_url": "https://example.com" } and watch the same workflow fork the other way, ending in "result": "rejected", "reason": "not_an_image".
Wrapping Up
A worker is ordinary code that Conductor calls when it needs it. You write a function, register a task definition so Conductor knows the name, start a runner so the function starts polling, and drop the task into your workflow with SIMPLE.
Look back at how little of that pipeline was your code. The routing, the retries, the branching, and the record of every run all came from Conductor. Your worker did one thing: it fetched and resized an image.
Now you have the tools and knowledge to add any code you want as part of your workflows as just another step in the process.