Build a Loan Approval Workflow with Orkes Conductor
In this tutorial, you’ll build a loan approval workflow using Orkes Conductor. This workflow combines AI-simulated credit scoring with validation checks and a manual review step for higher-value loans.
The workflow mimics real-world processes in banking and finance, where initial application screening is automated, but large loans require manual review before approval.
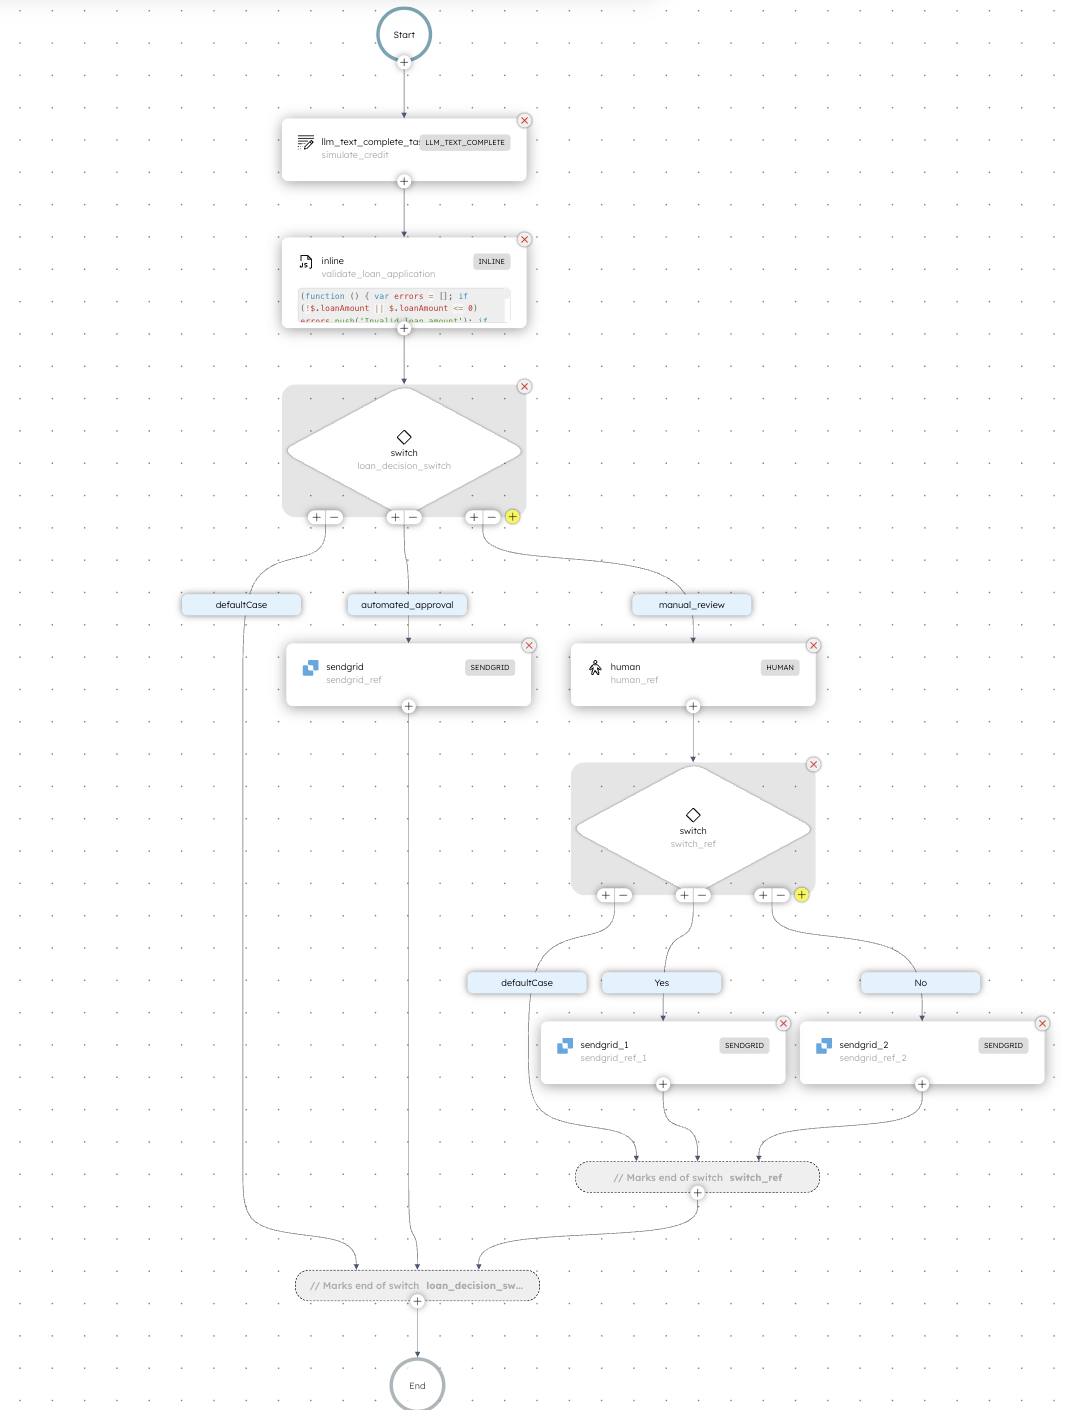
The loan approval workflow
In this tutorial, you’ll build a workflow where:
- A customer submits a loan application with details such as loan amount, income, debt, employment status, and payment history.
- An AI model simulates a credit score based on the applicant’s details.
- The system validates the application for completeness and data accuracy.
- Based on conditions:
- Approval is automated if the loan amount is $10,000 or less, and the customer receives an approval email.
- If the loan amount exceeds $10,000, the application is sent for manual review.
- If approved, the customer receives an approval email.
- If rejected, the customer receives a rejection email.
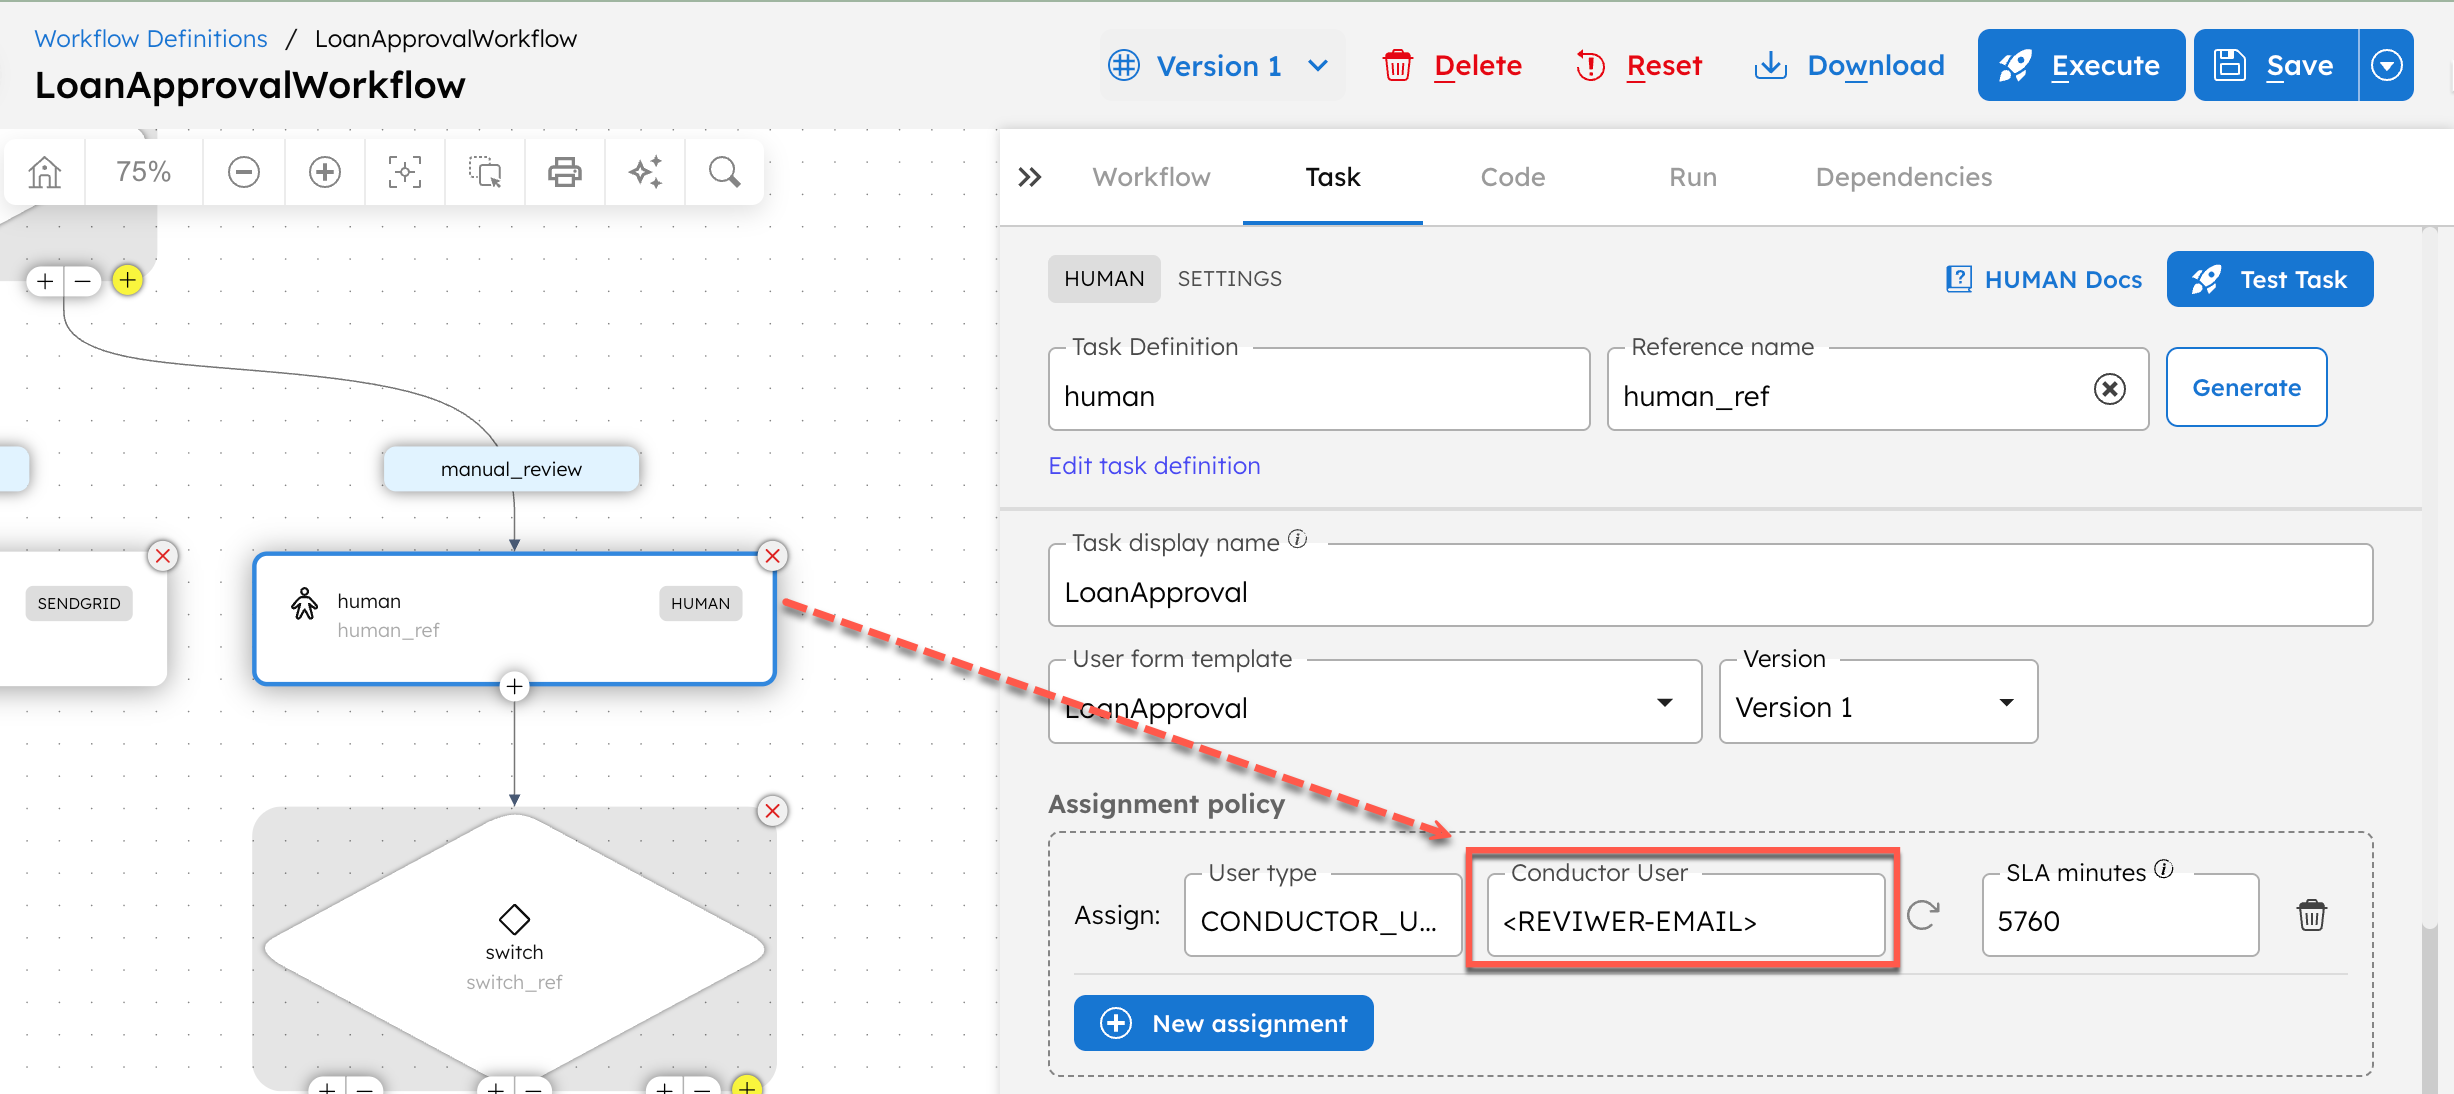
The workflow is configured so that if the assigned reviewer does not act on the task within the SLA period of 96 hours, the task automatically gets terminated. This can be configured according to the business requirements. Learn more about how assignment policies work for Human tasks.
Here’s how the workflow looks like:
Follow along using the free Orkes Developer Edition. If you don’t have an account yet, sign up to get started.
Step 1: Create an OpenAI integration in Orkes Conductor
This workflow uses OpenAI to simulate credit scores.
To create an OpenAI integration:
- Go to Integrations from the left navigation menu on your Conductor cluster.
- Select + New integration.
- In the AI/LLM section, choose OpenAI.
- Select + Add and enter a name for the integration, API key, and a description.
- Select Save.
Step 2: Create a SendGrid integration in Orkes Conductor
In this tutorial, we’ll use SendGrid to send emails. To do that, you must set up a SendGrid integration in your Orkes Conductor cluster.
To create a SendGrid integration:
- Go to Integrations from the left navigation menu on your Conductor cluster.
- Select + New integration.
- In the Integrations section, choose SendGrid Email.
- Select + Add and enter a name for the integration, API key, and a description.
- Select Save.
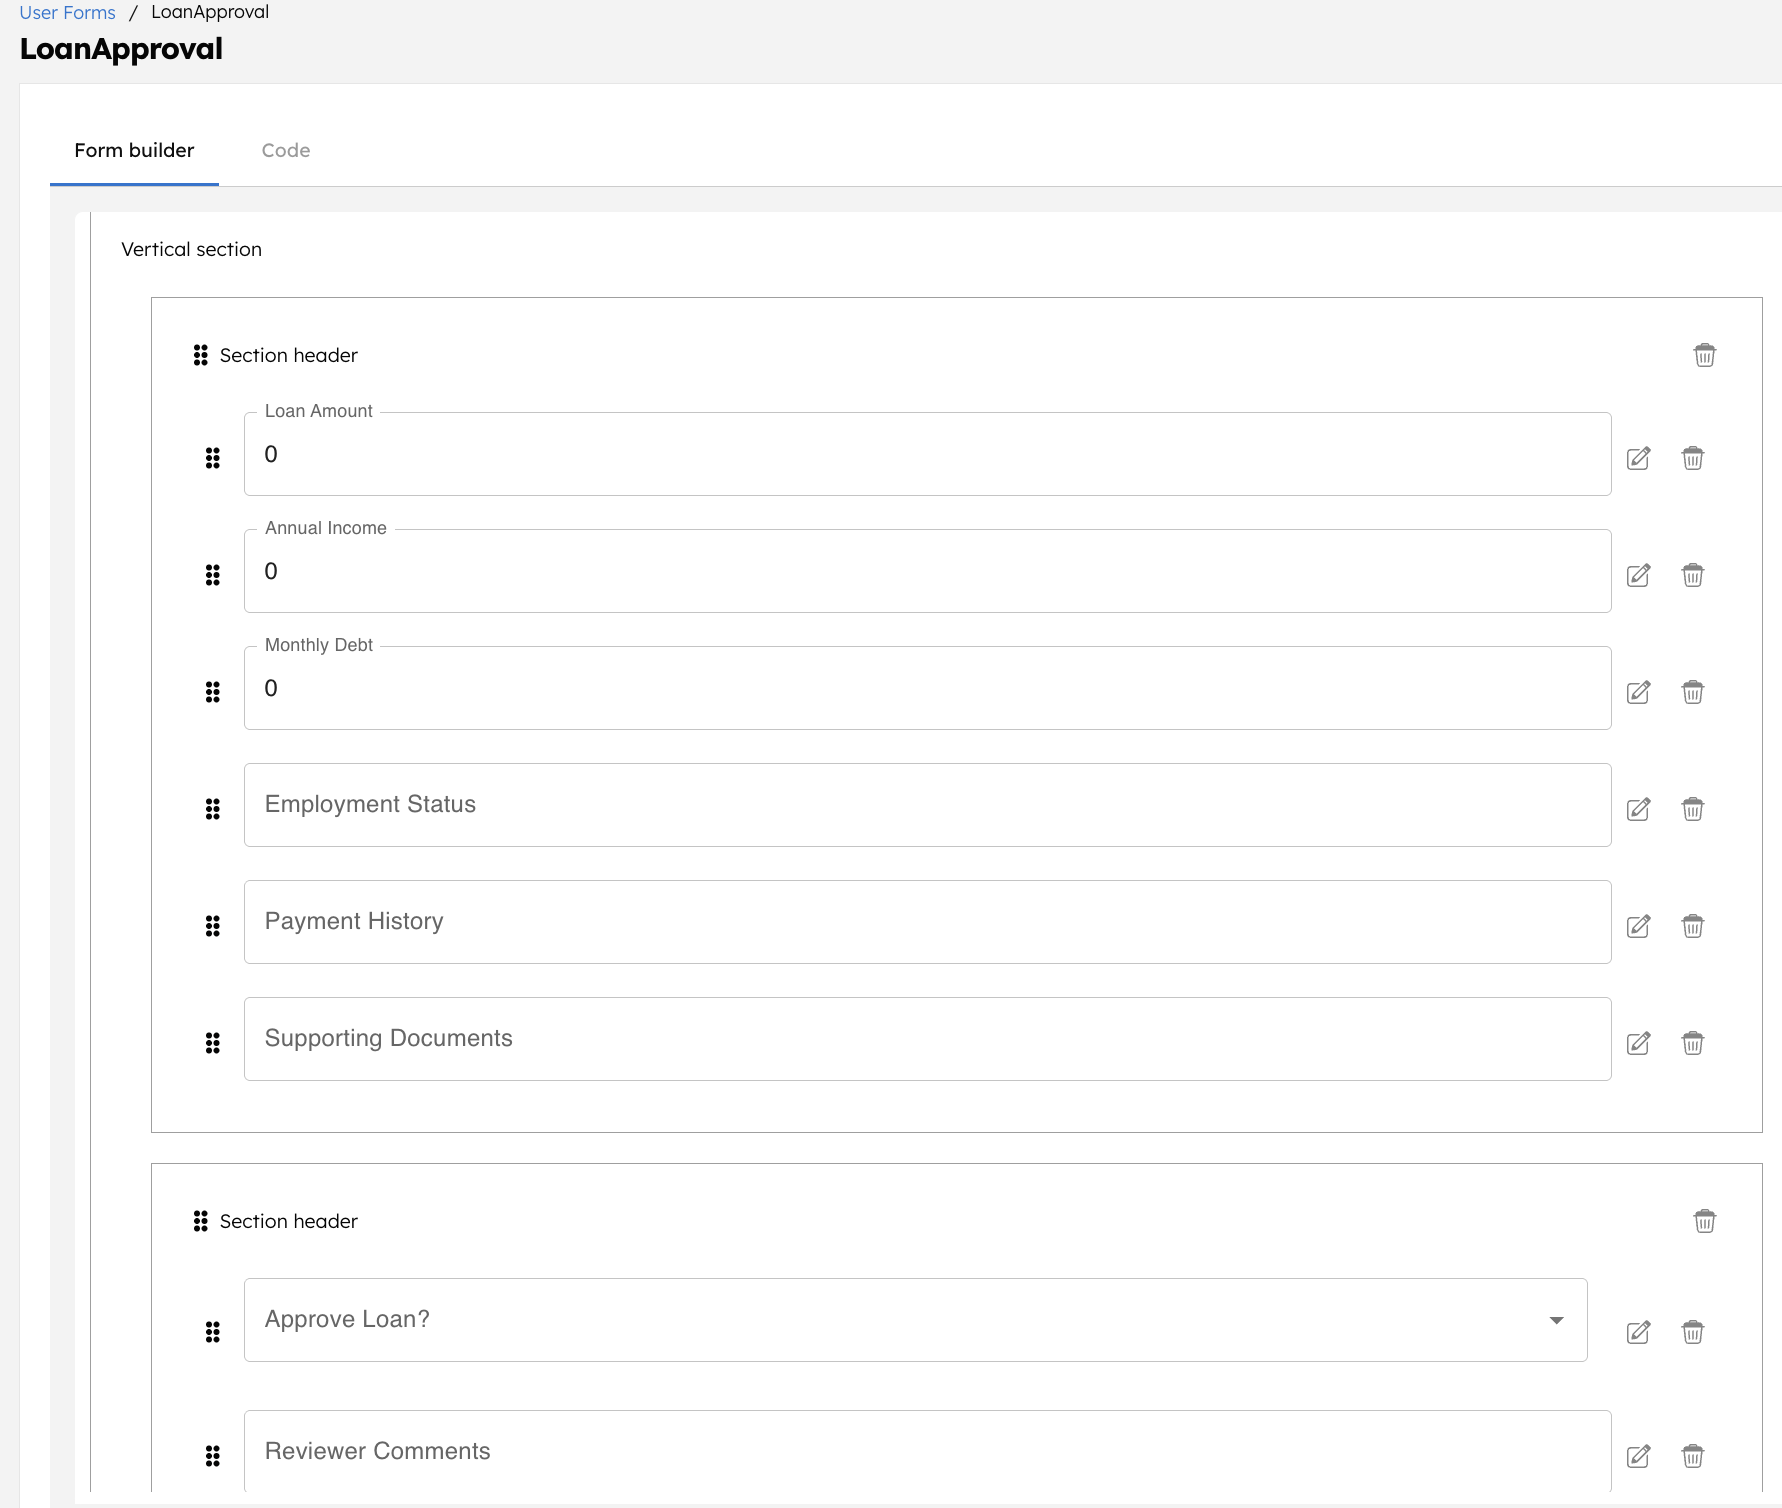
Step 3: Create a user form in Orkes Conductor
The workflow uses a Human task in Orkes Conductor to route the loan request for manual approval. Reviewers can complete approvals either through the Conductor UI or an external interface, such as an internal website or loan approval portal.
In this tutorial, you’ll use the Conductor UI to complete approvals. For this, a user form is to be created in Conductor.
To create a user form:
- Go to Definitions > User Forms from the left navigation menu on your Conductor cluster.
- Select + New form.
- In the Code tab, paste the following code:
{
 "name": "LoanApproval",
 "version": 1,
 "jsonSchema": {
   "$schema": "http://json-schema.org/draft-07/schema",
   "properties": {
     "loan_amount": {
       "type": "number"
     },
     "annual_income": {
       "type": "number"
     },
     "monthly_debt": {
       "type": "number"
     },
     "employment_status": {
       "type": "string"
     },
     "payment_history": {
       "type": "string"
     },
     "paperUrl": {
       "type": "string"
     },
     "approve": {
       "type": "string",
       "enum": [
         "Yes",
         "No"
       ]
     },
     "comments": {
       "type": "string"
     }
   },
   "required": [
     "approve",
     "comments"
   ]
 },
 "templateUI": {
   "type": "VerticalLayout",
   "elements": [
     {
       "type": "Group",
       "label": "Loan Application Details",
       "elements": [
         {
           "type": "Control",
           "scope": "#/properties/loan_amount",
           "label": "Loan Amount",
           "options": {
             "readonly": true
           }
         },
         {
           "type": "Control",
           "scope": "#/properties/annual_income",
           "label": "Annual Income",
           "options": {
             "readonly": true
           }
         },
         {
           "type": "Control",
           "scope": "#/properties/monthly_debt",
           "label": "Monthly Debt",
           "options": {
             "readonly": true
           }
         },
         {
           "type": "Control",
           "scope": "#/properties/employment_status",
           "label": "Employment Status",
           "options": {
             "readonly": true
           }
         },
         {
           "type": "Control",
           "scope": "#/properties/payment_history",
           "label": "Payment History",
           "options": {
             "readonly": true
           }
         },
         {
           "type": "Control",
           "scope": "#/properties/paperUrl",
           "label": "Supporting Documents",
           "options": {
             "readonly": true
           }
         }
       ]
     },
     {
       "type": "Group",
       "label": "Reviewer Decision",
       "elements": [
         {
           "type": "Control",
           "scope": "#/properties/approve",
           "label": "Approve Loan?"
         },
         {
           "type": "Control",
           "scope": "#/properties/comments",
           "label": "Reviewer Comments"
         }
       ]
     }
   ]
 }
}
- Select Save > Confirm.
Your user form looks like this:
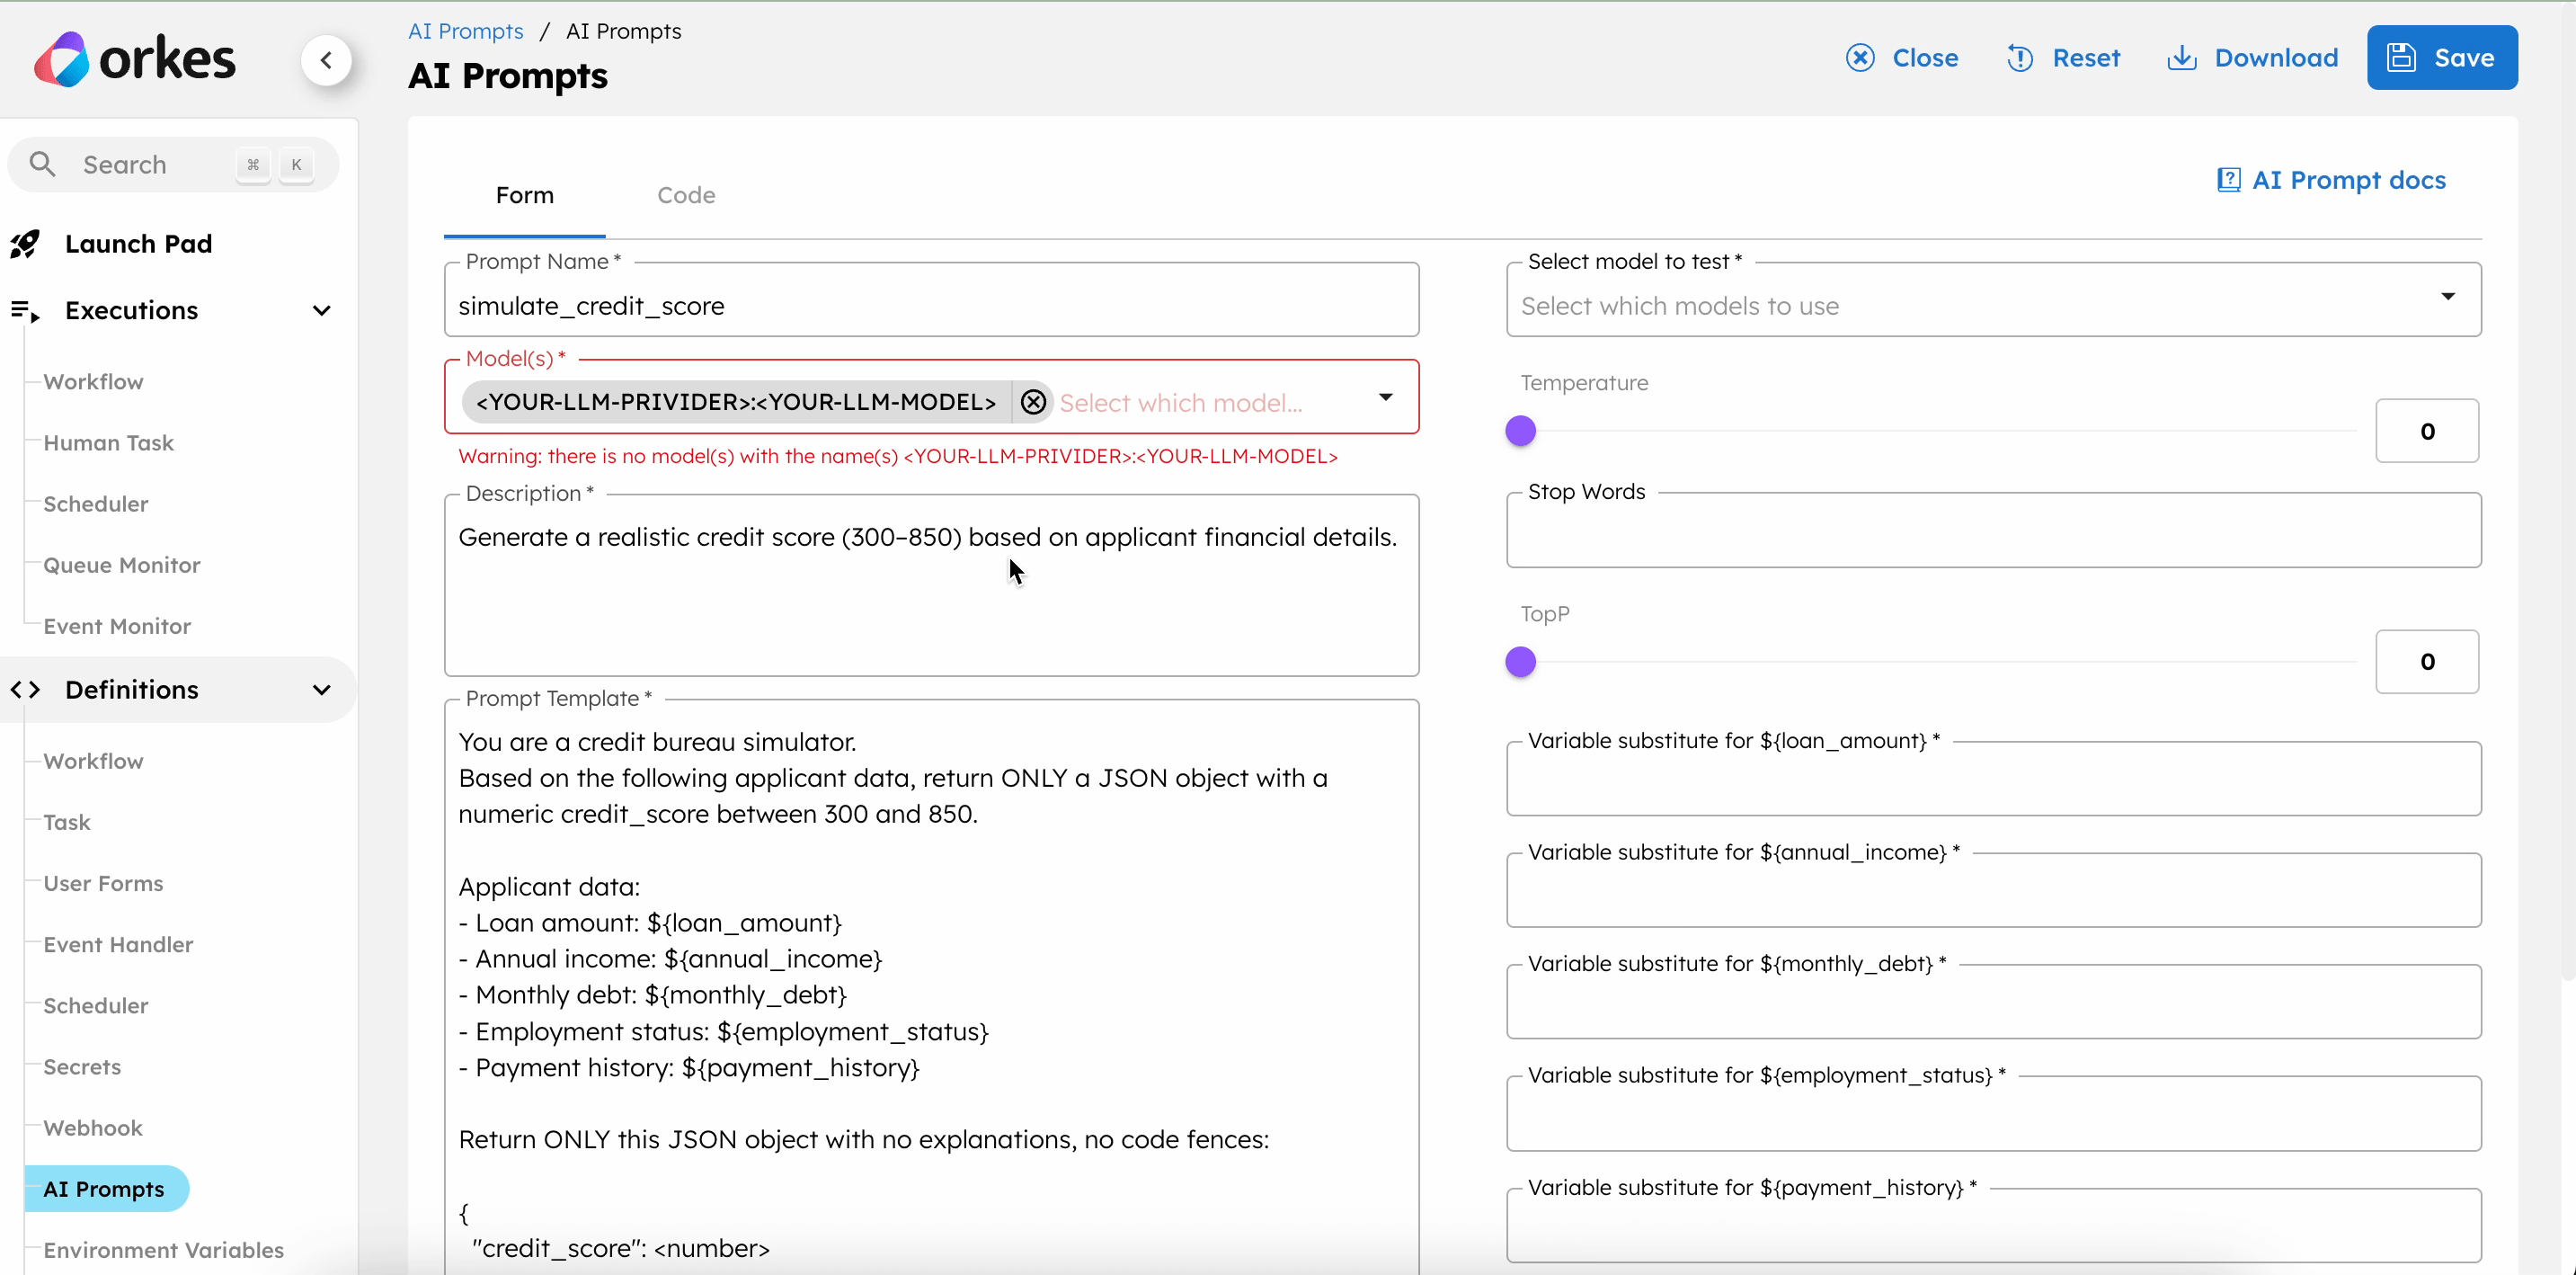
Step 4: Create an AI prompt in Orkes Conductor
The workflow uses an LLM Text Complete task in Orkes Conductor to simulate the credit score using OpenAI. The task uses an AI prompt to facilitate this.
To create an AI prompt:
- Go to Definitions > AI Prompts from the left navigation menu on your Conductor cluster.
- Select + Add AI prompt.
- In the Code tab, paste the following code:
{
 "name": "simulate_credit_score",
 "template": "You are a credit bureau simulator.  \nBased on the following applicant data, return ONLY a JSON object with a numeric credit_score between 300 and 850.\n\nApplicant data:\n- Loan amount: ${loan_amount}\n- Annual income: ${annual_income}\n- Monthly debt: ${monthly_debt}\n- Employment status: ${employment_status}\n- Payment history: ${payment_history}\n\nReturn ONLY this JSON object with no explanations, no code fences:\n\n{\n  \"credit_score\": <number>\n}",
 "description": "Generate a realistic credit score (300–850) based on the applicant's financial details.\n",
 "variables": [
   "monthly_debt",
   "loan_amount",
   "employment_status",
   "annual_income",
   "payment_history"
 ],
 "integrations": [
   "<YOUR-LLM-PROVIDER>:<YOUR-LLM-MODEL>"
 ],
 "version": 1
}
- Select Save > Confirm Save.
Update the Model(s) drop-down with the OpenAI integration created in Step 1, and save the changes.
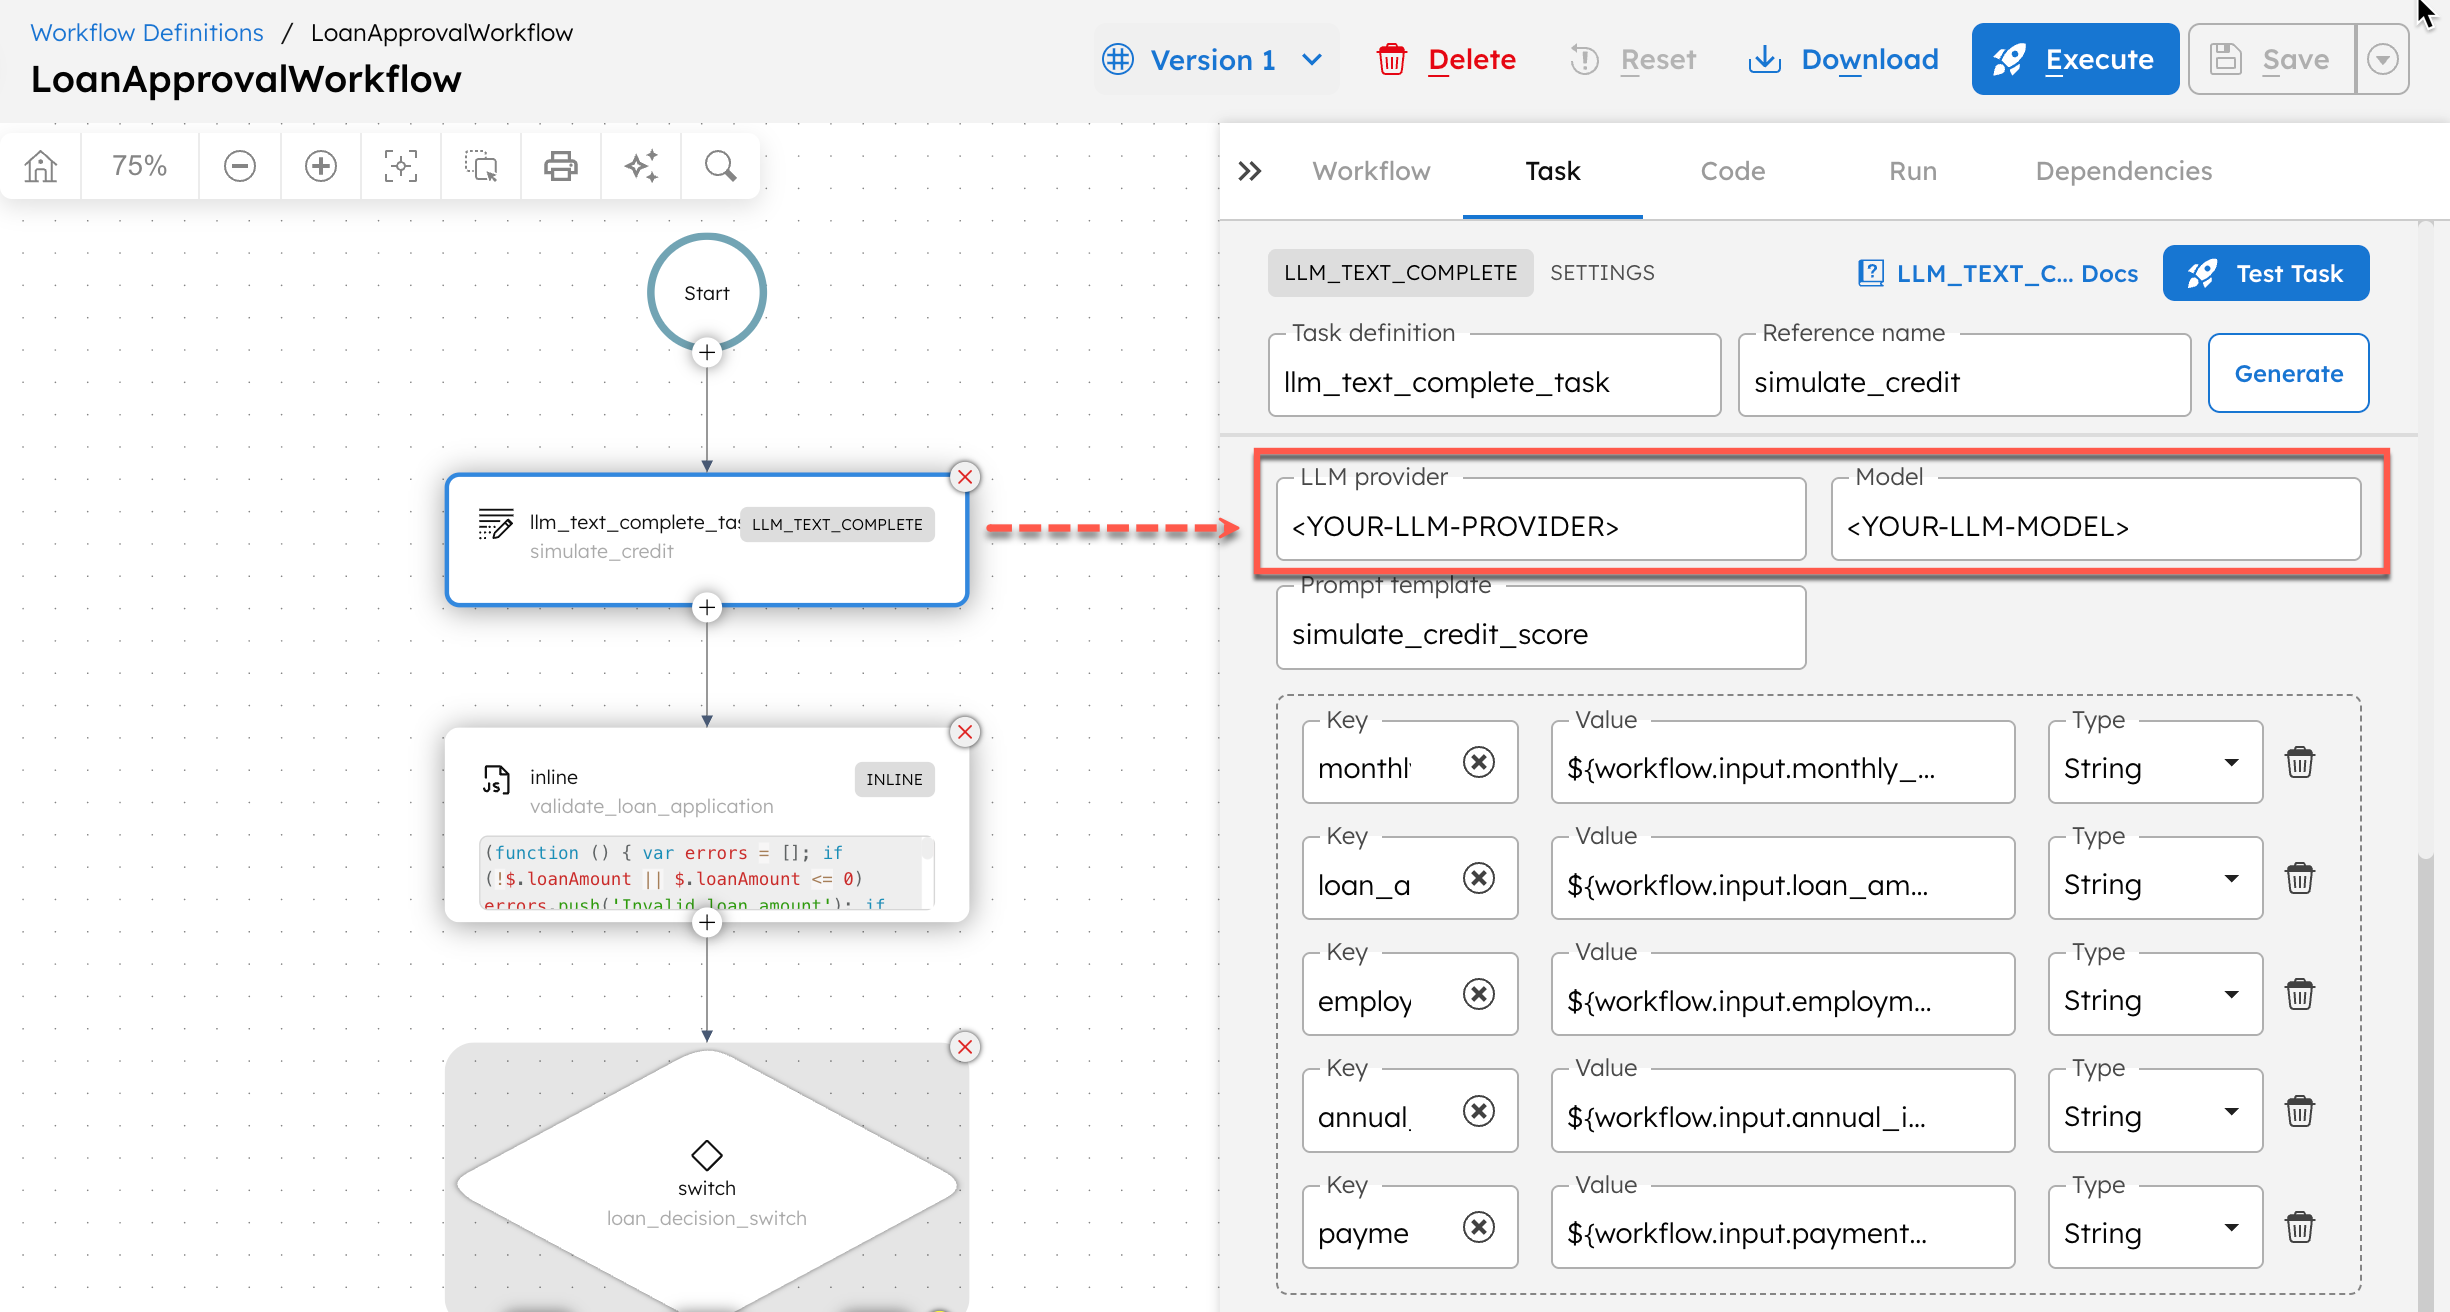
Step 5: Create a workflow in Orkes Conductor
Orkes Conductor lets you define workflows as JSON, through SDKs, APIs, or the UI.
To create a workflow using Conductor UI:
- Go to Definitions > Workflow from the left navigation menu on your Conductor cluster.
- Select + Define workflow.
- In the Code tab, paste the following code:
{
 "name": "LoanApprovalWorkflow",
 "description": "Automated loan approval workflow with AI-simulated credit score and manual review for amounts over $10,000",
 "version": 1,
 "tasks": [
   {
     "name": "llm_text_complete_task",
     "taskReferenceName": "simulate_credit",
     "inputParameters": {
       "aiPromptRef": "simulate_credit_score",
       "params": {
         "loan_amount": "${workflow.input.loan_amount}",
         "annual_income": "${workflow.input.annual_income}",
         "monthly_debt": "${workflow.input.monthly_debt}",
         "employment_status": "${workflow.input.employment_status}",
         "payment_history": "${workflow.input.payment_history}"
       },
       "llmProvider": "<YOUR-LLM-PROVIDER>",
       "model": "<YOUR-LLM-MODEL>",
       "promptName": "simulate_credit_score",
       "promptVariables": {
         "monthly_debt": "${workflow.input.monthly_debt}",
         "loan_amount": "${workflow.input.loan_amount}",
         "employment_status": "${workflow.input.employment_status}",
         "annual_income": "${workflow.input.annual_income}",
         "payment_history": "${workflow.input.payment_history}"
       }
     },
     "type": "LLM_TEXT_COMPLETE"
   },
   {
     "name": "inline",
     "taskReferenceName": "validate_loan_application",
     "inputParameters": {
       "loanAmount": "${workflow.input.loan_amount}",
       "applicantScore": "${simulate_credit.output.result.credit_score}",
       "applicantIncome": "${workflow.input.annual_income}",
       "expression": "(function () { var errors = []; if (!$.loanAmount || $.loanAmount <= 0) errors.push('Invalid loan amount'); if (!$.applicantScore || $.applicantScore < 300 || $.applicantScore > 850) errors.push('Invalid credit score'); if (!$.applicantIncome || $.applicantIncome <= 0) errors.push('Invalid annual income'); return { isValid: errors.length === 0, errors: errors, loan_amount: $.loanAmount, credit_score: $.applicantScore, annual_income: $.applicantIncome }; })();",
       "evaluatorType": "graaljs"
     },
     "type": "INLINE"
   },
   {
     "name": "switch",
     "taskReferenceName": "loan_decision_switch",
     "inputParameters": {
       "validationResult": "${validate_loan_application.output.result}"
     },
     "type": "SWITCH",
     "decisionCases": {
       "manual_review": [
         {
           "name": "human",
           "taskReferenceName": "human_ref",
           "inputParameters": {
             "__humanTaskDefinition": {
               "assignmentCompletionStrategy": "TERMINATE",
               "assignments": [
                 {
                   "assignee": {
                     "user": "<REVIWER-EMAIL>",
                     "userType": "CONDUCTOR_USER"
                   },
                   "slaMinutes": 5760
                 }
               ],
               "displayName": "LoanApproval",
               "userFormTemplate": {
                 "name": "LoanApproval",
                 "version": 1
               }
             },
             "loan_amount": "${workflow.input.loan_amount}",
             "annual_income": "${workflow.input.annual_income}",
             "monthly_debt": "${workflow.input.monthly_debt}",
             "employment_status": "${workflow.input.employment_status}",
             "payment_history": "${workflow.input.payment_history}",
             "paperUrl": "${workflow.input.documents}",
             "approve": "",
             "comments": ""
           },
           "type": "HUMAN"
         },
         {
           "name": "switch",
           "taskReferenceName": "switch_ref",
           "inputParameters": {
             "switchCaseValue": "${human_ref.output.approve}"
           },
           "type": "SWITCH",
           "decisionCases": {
             "No": [
               {
                 "name": "sendgrid_2",
                 "taskReferenceName": "sendgrid_ref_2",
                 "inputParameters": {
                   "from": "<YOUR-SENDGRID-VERIFIED-EMAIL>",
                   "to": "${workflow.input.email}",
                   "subject": "Loan Rejected",
                   "contentType": "text/html",
                   "content": "<p>Dear Customer,</p><p>We regret to inform you that your loan application for ${workflow.input.loan_amount} has been rejected. Please contact our support team for further details.</p><p>Sincerely,<br/>XYZ Bank Loan Services</p>",
                   "sendgridConfiguration": "<YOUR-SENDGRID-INTEGRATION>"
                 },
                 "type": "SENDGRID"
               }
             ],
             "Yes": [
               {
                 "name": "sendgrid_1",
                 "taskReferenceName": "sendgrid_ref_1",
                 "inputParameters": {
                   "from": "<YOUR-SENDGRID-VERIFIED-EMAIL>",
                   "to": "${workflow.input.email}",
                   "subject": "Loan Approved",
                   "contentType": "text/html",
                   "content": "<p>Dear Customer,</p><p>We are pleased to inform you that your loan application for ${workflow.input.loan_amount} has been approved. The approved amount will be disbursed shortly. You will receive further details about repayment schedules and documentation via email.</p><p>Thank you for choosing XYZ Bank.</p><p>Sincerely,<br/>XYZ Bank Loan Services</p>",
                   "sendgridConfiguration": "<YOUR-SENDGRID-INTEGRATION>"
                 },
                 "type": "SENDGRID"
               }
             ]
           },
           "evaluatorType": "value-param",
           "expression": "switchCaseValue"
         }
       ],
       "automated_approval": [
         {
           "name": "sendgrid",
           "taskReferenceName": "sendgrid_ref",
           "inputParameters": {
             "from": "<YOUR-SENDGRID-VERIFIED-EMAIL>",
             "to": "${workflow.input.email}",
             "subject": "Loan Approved",
             "contentType": "text/html",
             "content": "<p>Dear Customer,</p><p>We are pleased to inform you that your loan application for ${workflow.input.loan_amount} has been approved. The approved amount will be disbursed shortly. You will receive further details about repayment schedules and documentation via email.</p><p>Thank you for choosing XYZ Bank.</p><p>Sincerely,<br/>XYZ Bank Loan Services</p>",
             "sendgridConfiguration": "<YOUR-SENDGRID-INTEGRATION>"
           },
           "type": "SENDGRID"
         }
       ]
     },
     "defaultCase": [],
     "evaluatorType": "graaljs",
     "expression": "(function () { if (!$.validationResult.isValid) return 'invalid'; return $.validationResult.loan_amount > 10000 ? 'manual_review' : 'automated_approval'; })();"
   }
 ],
 "inputParameters": [
   "loan_amount",
   "annual_income",
   "monthly_debt",
   "employment_status",
   "payment_history",
   "email",
   "documents"
 ],
 "outputParameters": {
   "final_credit_score": "${simulate_credit.output.result.credit_score}",
   "final_decision": "${loan_decision_switch.output.result}"
 },
 "schemaVersion": 2
}
- Select Save > Confirm.
Next, replace all placeholder values with your actual reviewer information and integrations.
- Select the LLM Text Complete task, and update the LLM provider and Model with your configurations created in Step 1.
- Select the Human task and update the assignee to a valid Conductor user. In the Developer Edition, you’re the only available user, so assign the task to yourself. In other clusters, you can assign it to any user who has already been added to the Conductor cluster.
- Select the sendgrid task and update the following parameters:
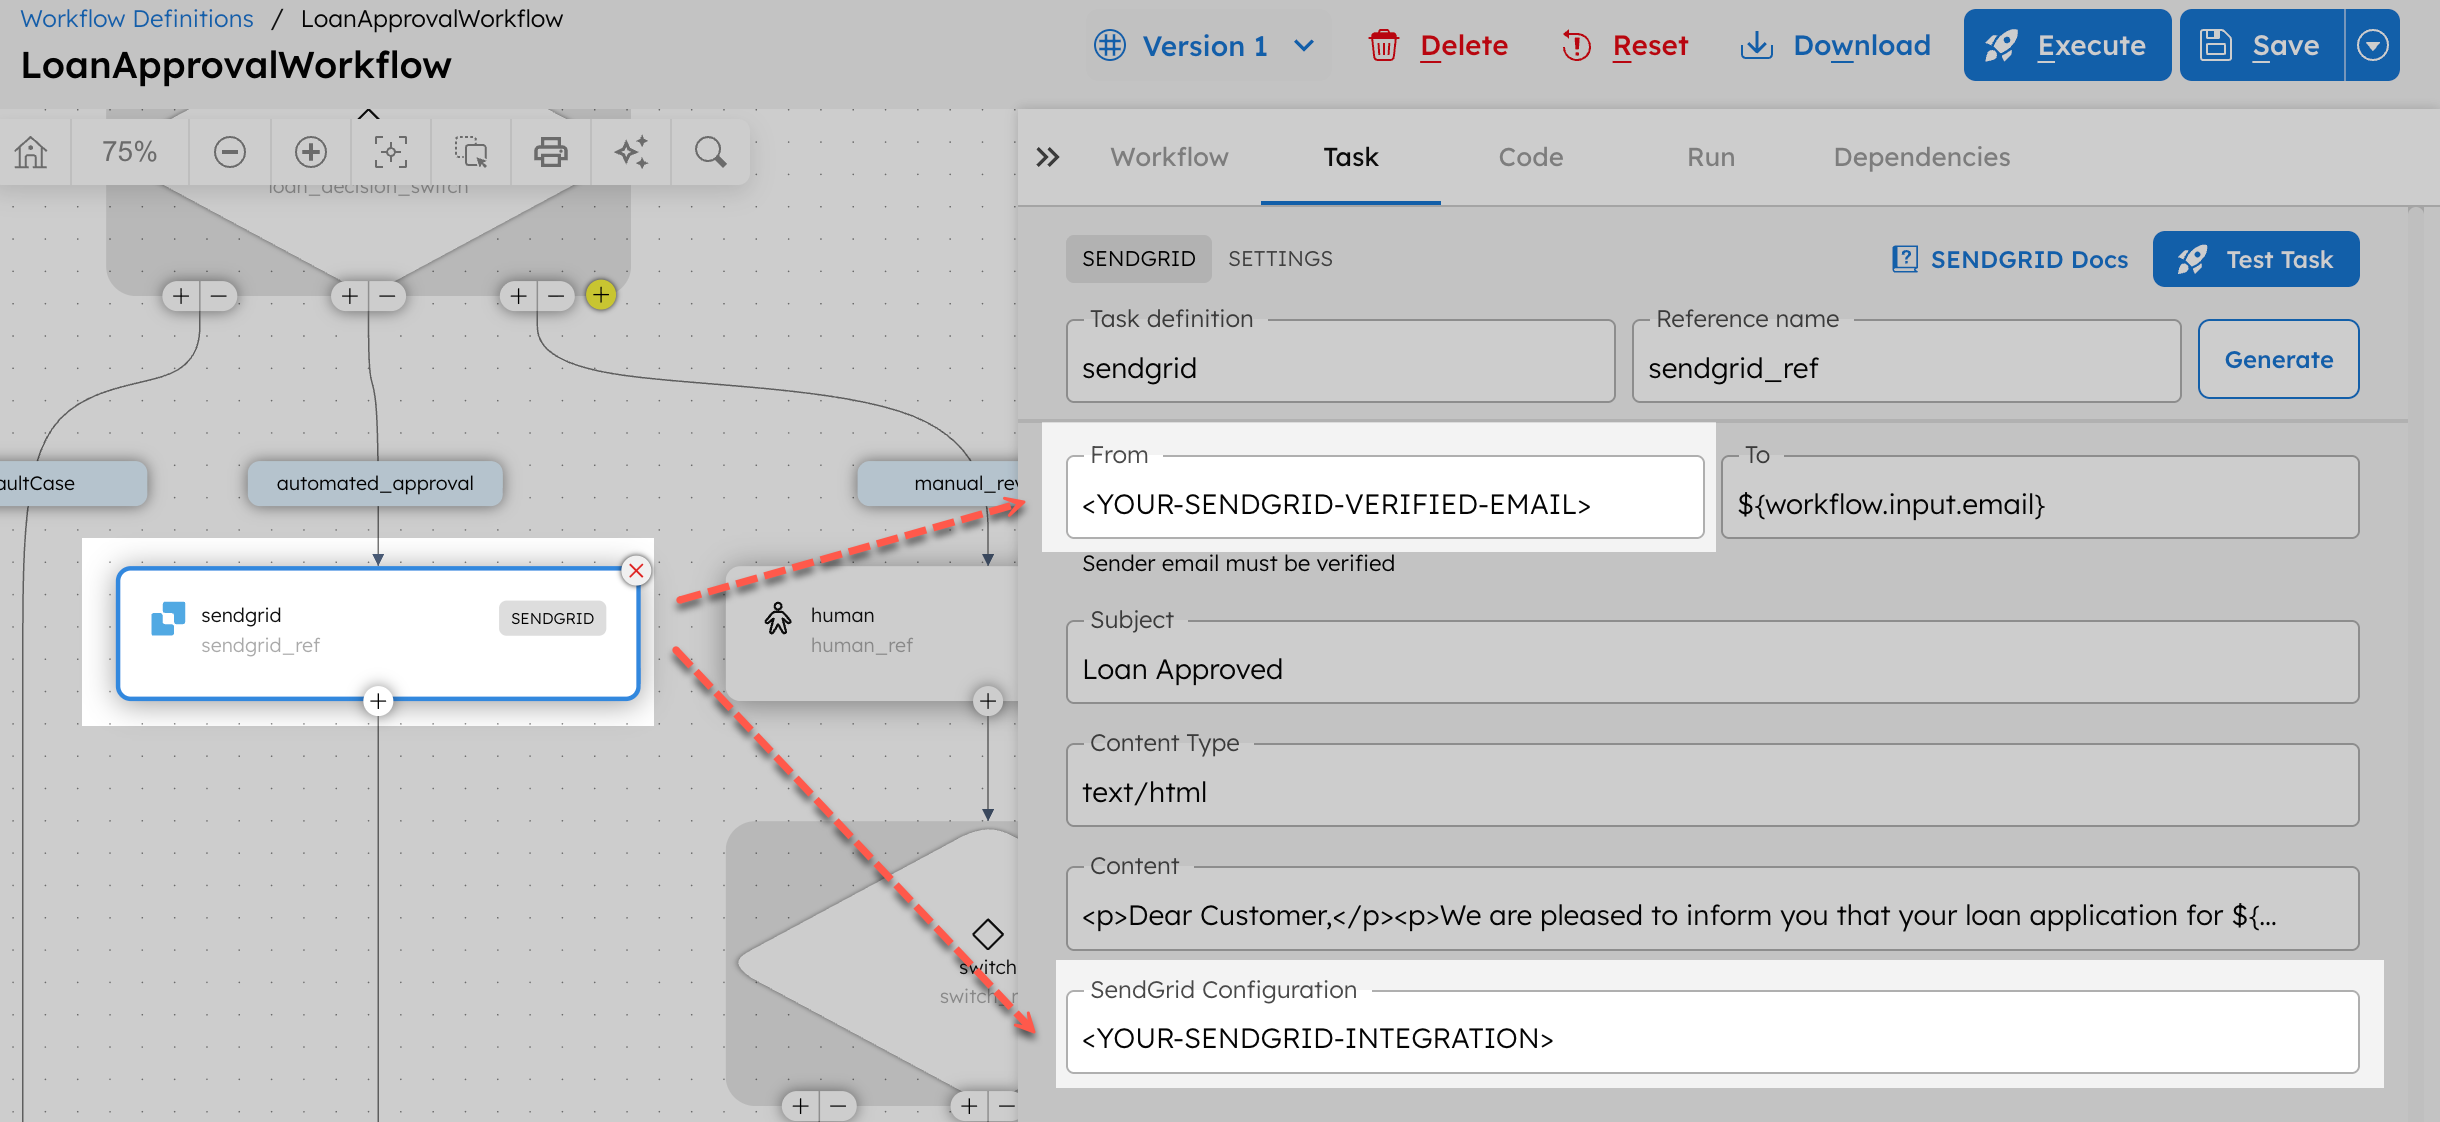
- Update the sendgrid_1 and sendgrid_2 tasks with the same email and integration values.
- Select Save > Confirm.
Step 6: Execute workflow
To test the workflow:
- From your workflow definition, go to the Run tab.
- Set the input parameter. For example:
{
  "loan_amount": 8000,
  "annual_income": 75000,
  "monthly_debt": 1100,
  "employment_status": "employment-doc.pdf",
  "payment_history": "bank-statement.pdf",
  "email": "john.doe@acme.com",
  "documents": "documents.pdf"
}

- Select Execute.
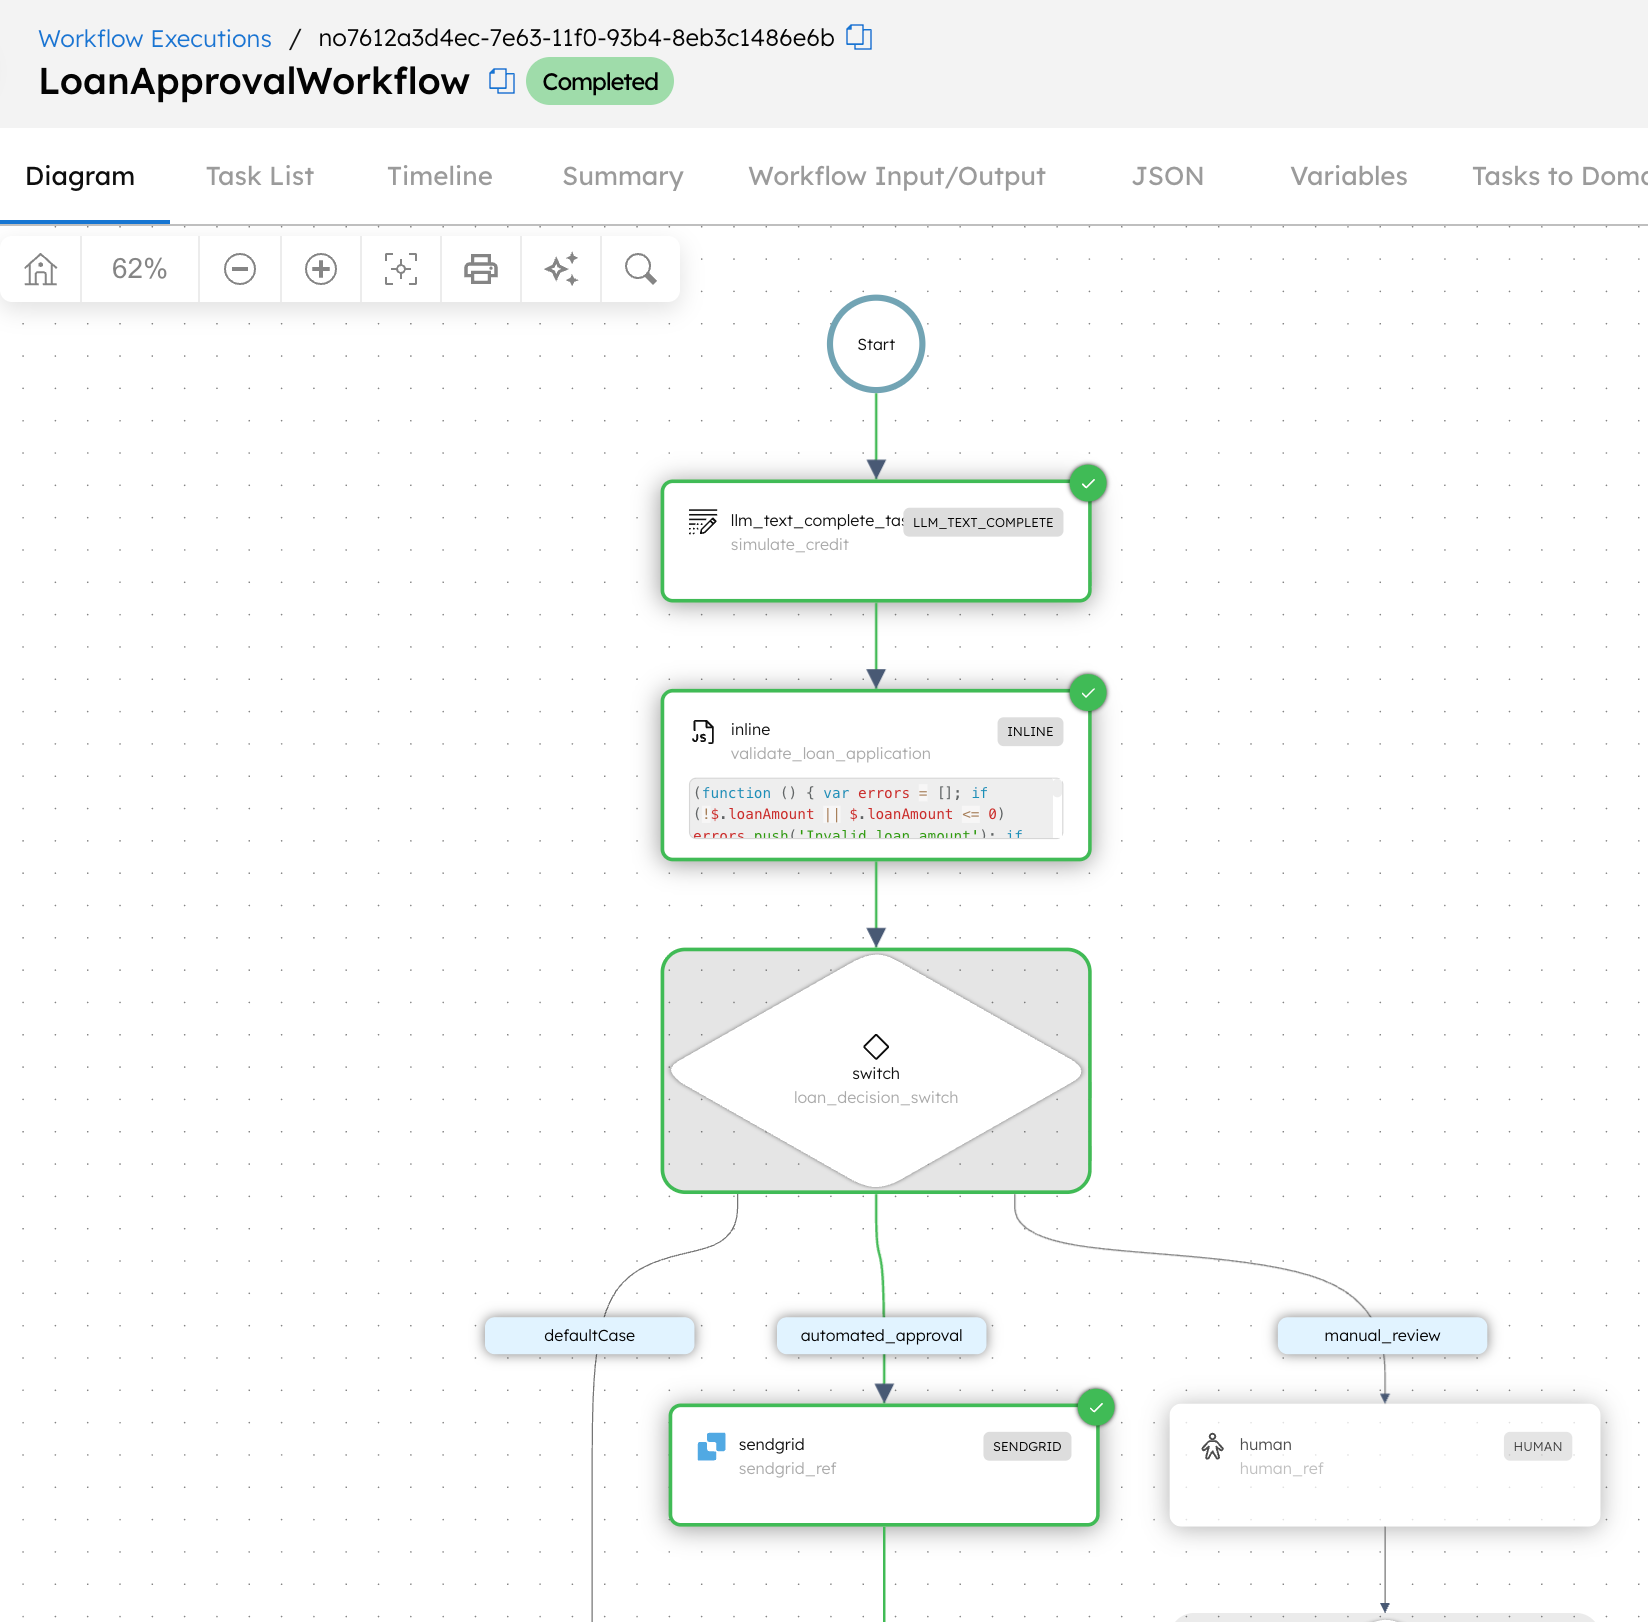
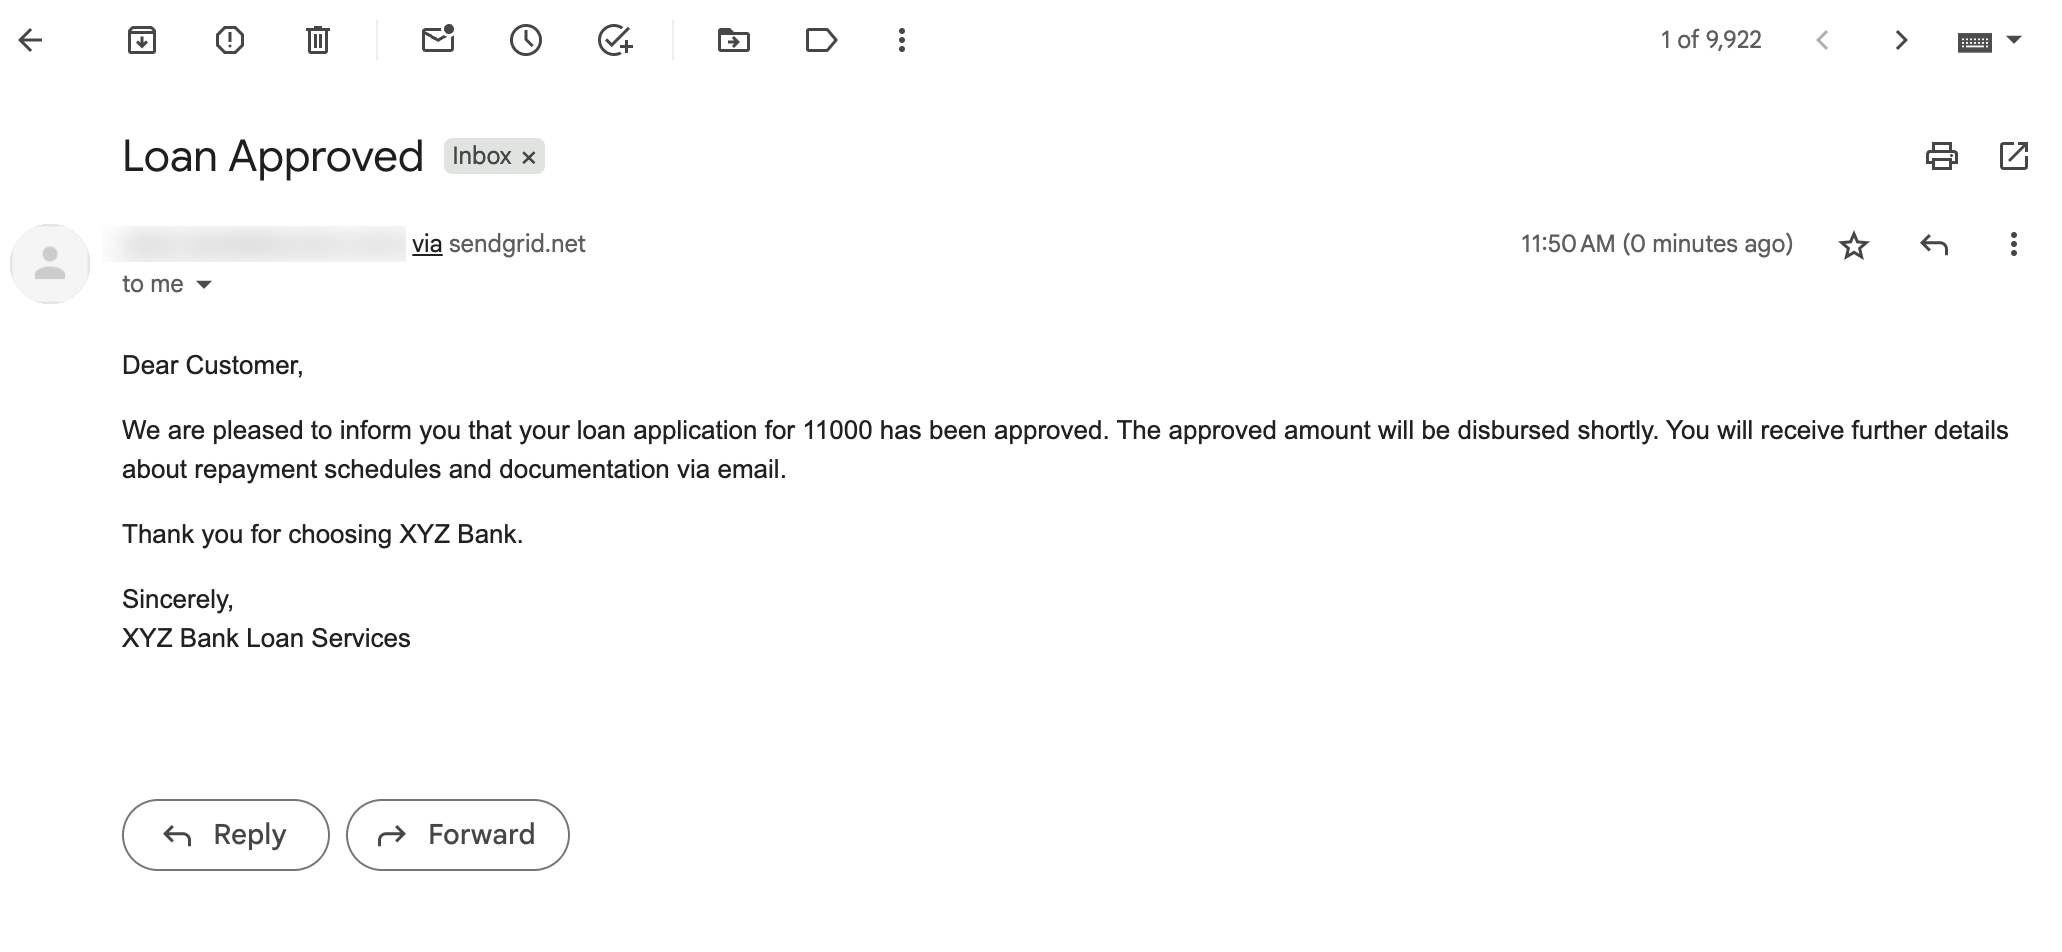
This initiates the workflow and takes you to the workflow execution page. Since the loan amount here is less than $10,000, it goes into automated approval, and the user receives an email through SendGrid.
Now, let’s rerun the workflow for a loan over $10,000. Here’s the updated workflow input:
{
  "loan_amount": 11000,
  "annual_income": 75000,
  "monthly_debt": 1100,
  "employment_status": "employment-doc.pdf",
  "payment_history": "bank-statement.pdf",
  "email": "john.doe@acme.com",
  "documents": "documents.pdf"
}
This initiates the workflow and takes you to the workflow execution page. Since the loan amount is over $ 10,000, it goes into manual approval.
Completing the Human task
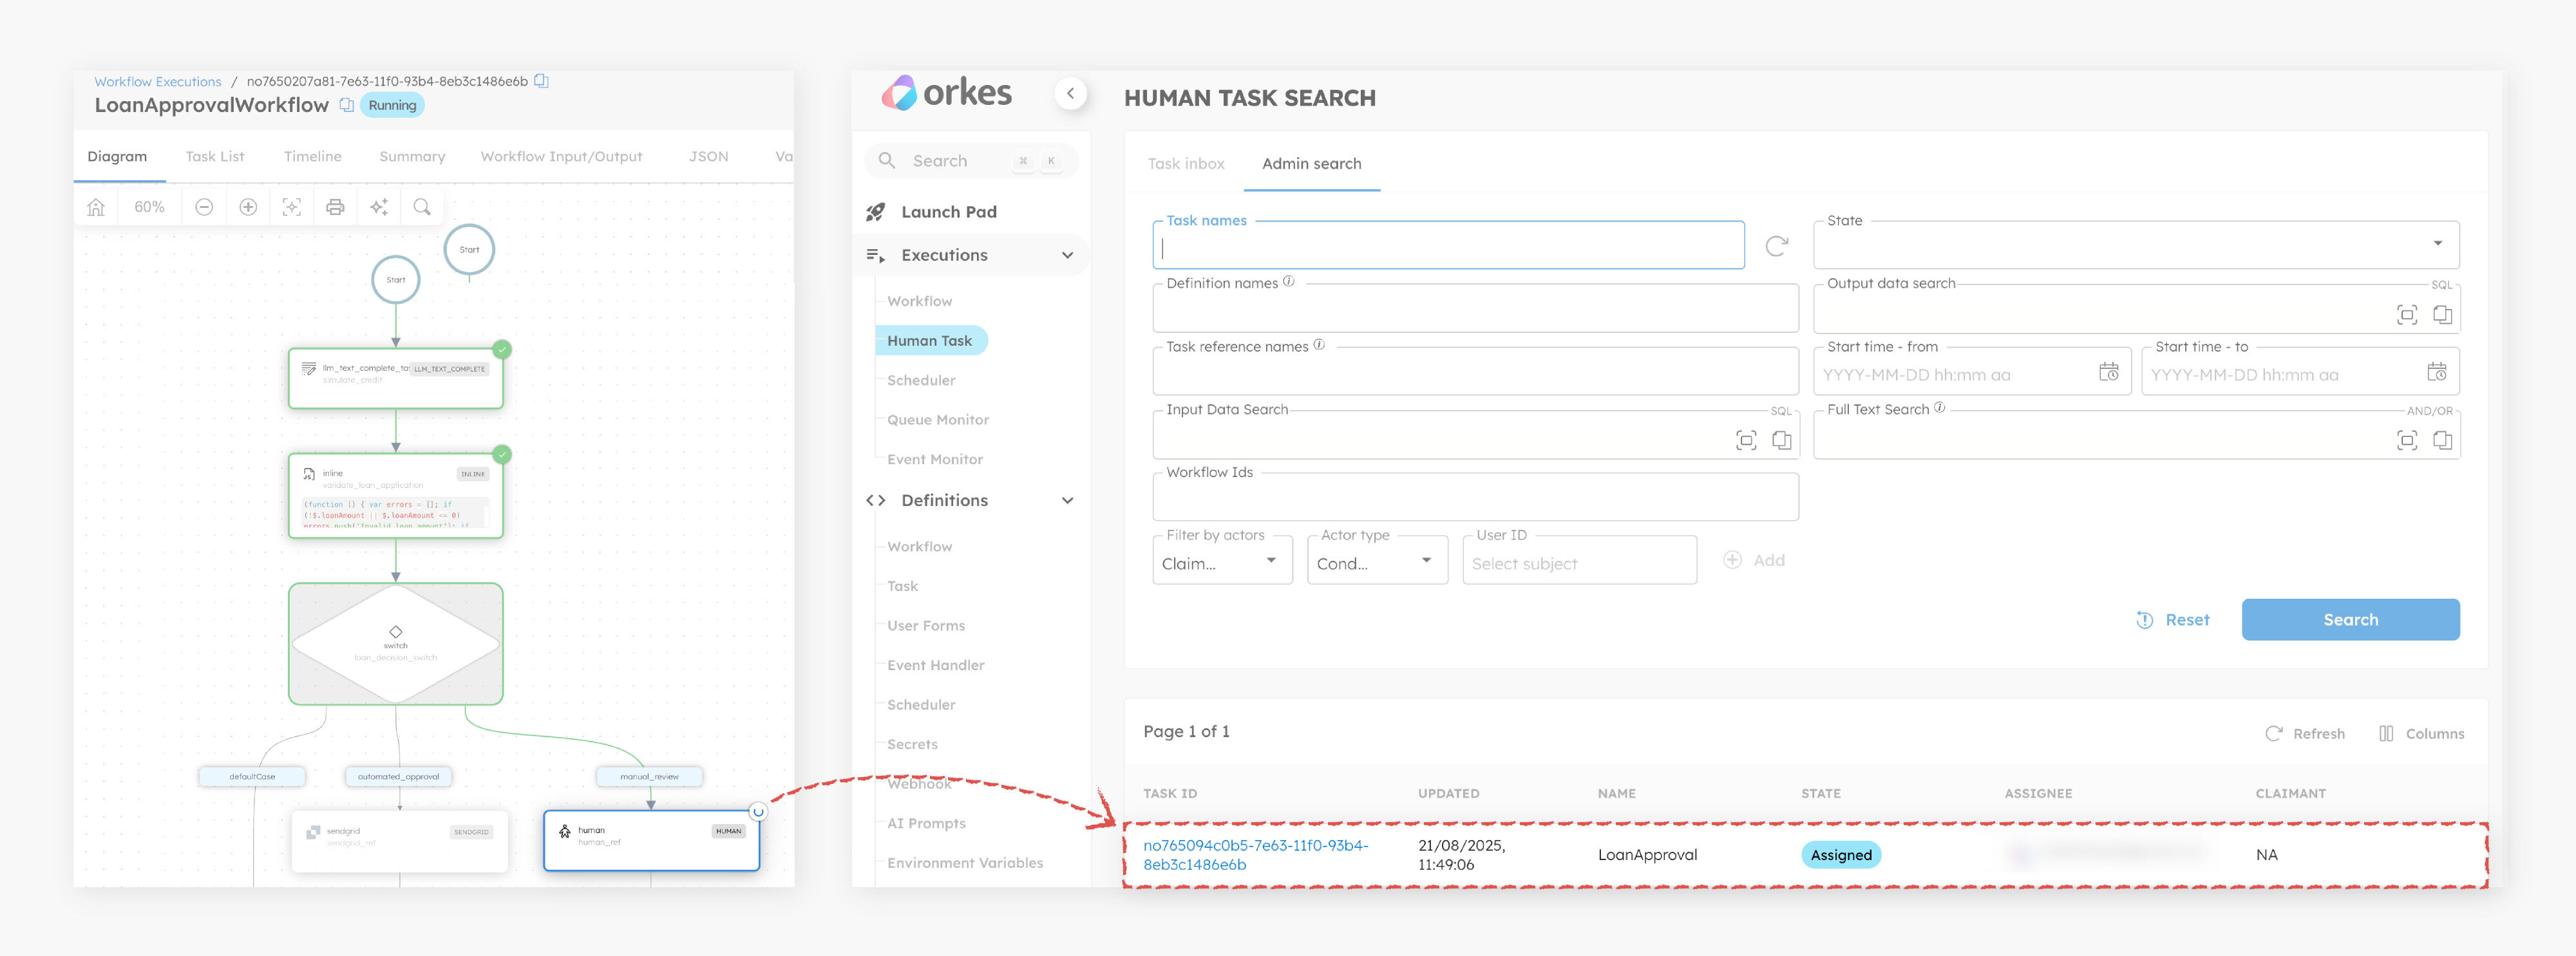
The workflow is running, and the Human task is assigned to the reviewer.
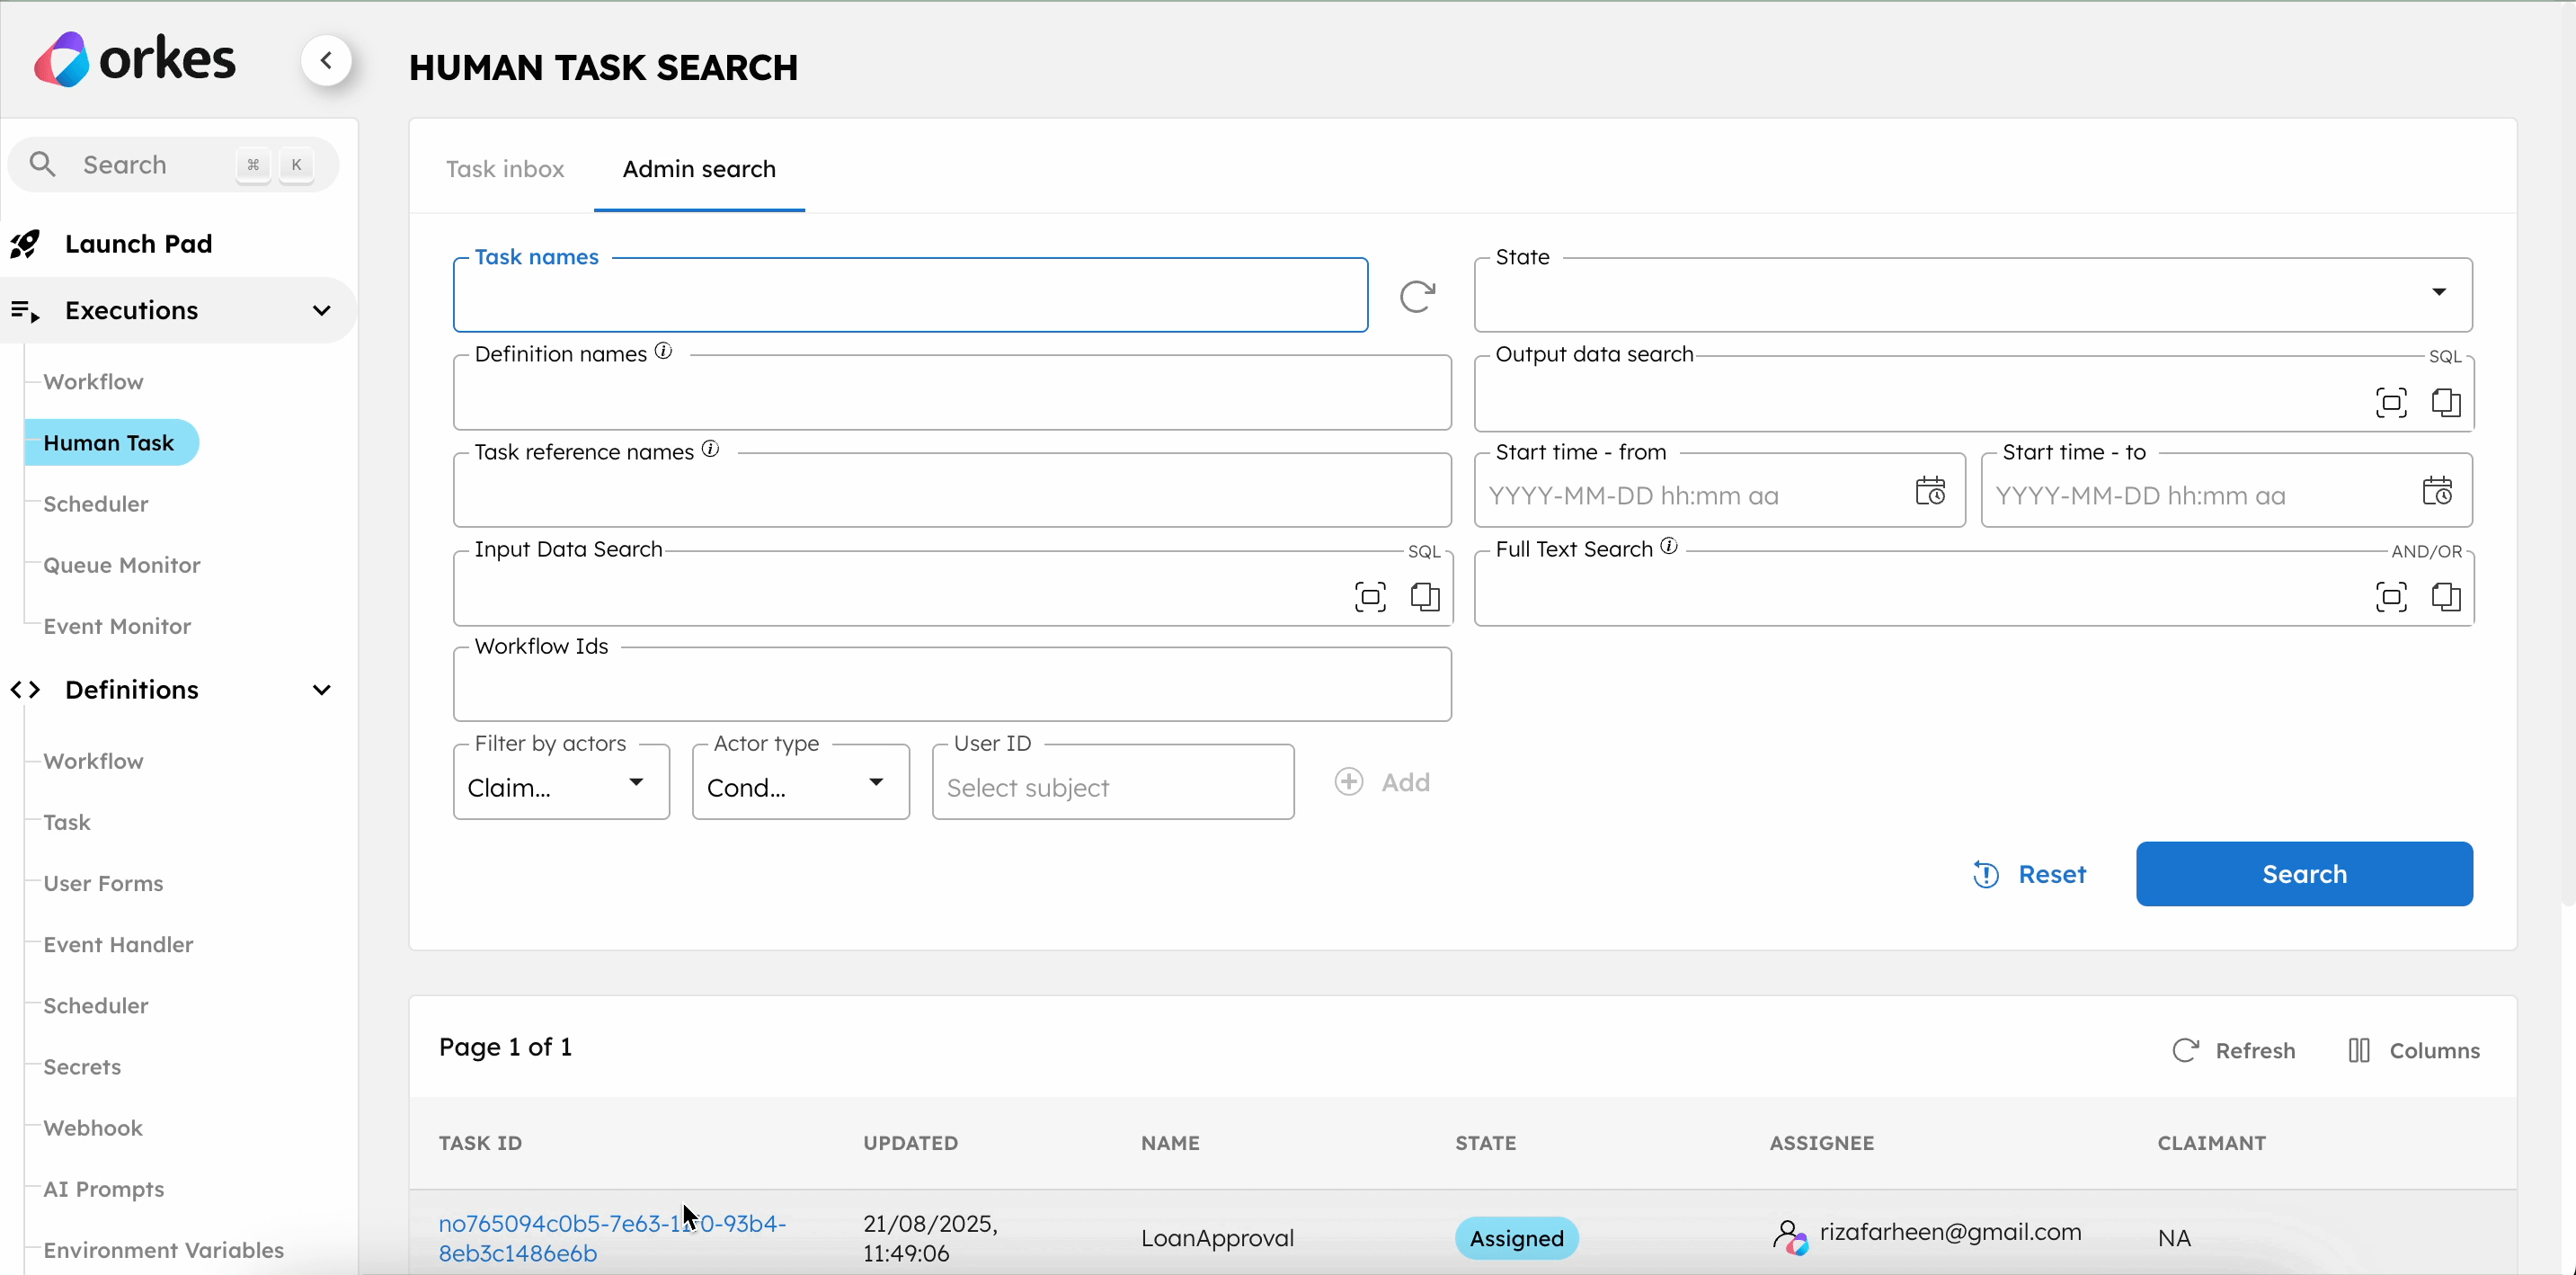
To complete the Human tasks in the UI:
- Go to Executions > Human Task.
- Select the Task ID to view the form.
- Select Claim.
- Review the loan details, select the approval status, and leave comments.
- Select Complete to submit the form.
Once the reviewer approves the loan, the workflow is completed, and the user receives an approval email via SendGrid.
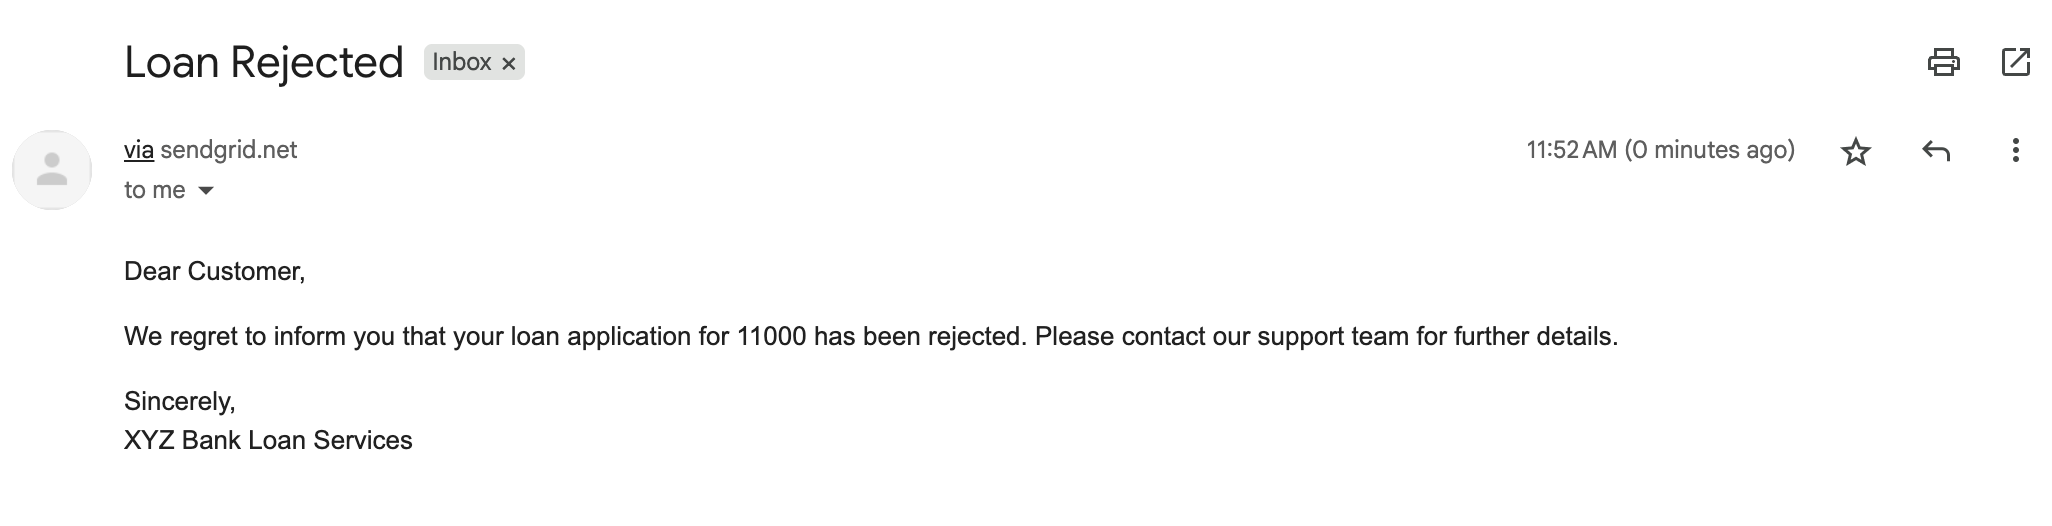
If the reviewer rejects the loan, the user is emailed about the next steps.
Workflow modifications
This loan approval workflow can be extended by:
- Adding additional validation rules or fraud detection checks. For example, include checks for monthly debt ratios or employment status to improve accuracy.
- Adjusting the loan amount threshold for manual review.
- Adjusting the review SLA (currently set to 96 hours) to meet your specific timing requirements. You can also configure fallback actions if the reviewer does not act in time, such as sending an escalation email.
- Integrating other AI or ML models for risk assessment.
- Customizing email templates for different decision outcomes.