Human Task Orchestration
Human tasks allow workflows to pause and wait for manual input from users. In Orkes Conductor, a Human task is linked to a user form that defines the data to be collected and is assigned to a user or group to complete it.
Human tasks can be configured with assignment and trigger policies to control ownership, escalation, and downstream workflow behavior.
When a workflow reaches a Human task, Conductor generates a form from the associated user form schema and assigns it based on the configured assignment policy. Once the form is submitted, the task completes and the workflow continues.
During development, you can test Human tasks directly in Orkes Conductor before integrating them with your own UI.
Orchestrating human-involved tasks
To orchestrate human-involved tasks:
- Create a user form schema for the Human task. A user form is a reusable JSON-based schema that defines the form fields and layout.
- Define the Human task.
- Configure the Human task in your workflow definition to set the assignment and trigger policy.
- Test the Human task using the Orkes Conductor UI. This allows you to validate form behavior, assignment rules, and workflow progression during development.
- Display the user form on your own UI.
Step 1: Create a user form schema
To use a Human task in a workflow, you must first create a user form. User Forms in Orkes Conductor let you define form schemas using JSON or pre-built components. These forms are versioned and can be reused across workflows.
User forms define the structure of Human task forms and can be completed in the following ways:
- Conductor UI: The form is rendered and completed directly in the Orkes Conductor UI.
- Your own UI: The same form schema is rendered in a custom UI using the Human Tasks APIs.
It is a best practice to create user forms in Conductor UI, even if the form is displayed on your own UI. With the user form schema stored on Conductor, any changes can be instantly reflected on the frontend without any additional development effort.
To create a user form on Orkes Conductor:
- Go to Definitions > User Forms from the left menu on your Conductor cluster.
- Select + New form.
- In Form details, provide a name for the form in Form name.
- To build the form, drag and drop the pre-built items for Layout and Components and configure each component.
- Preview your form at any time by selecting Preview on the top right.
- Once the form is ready, select Save > Confirm on the top right.
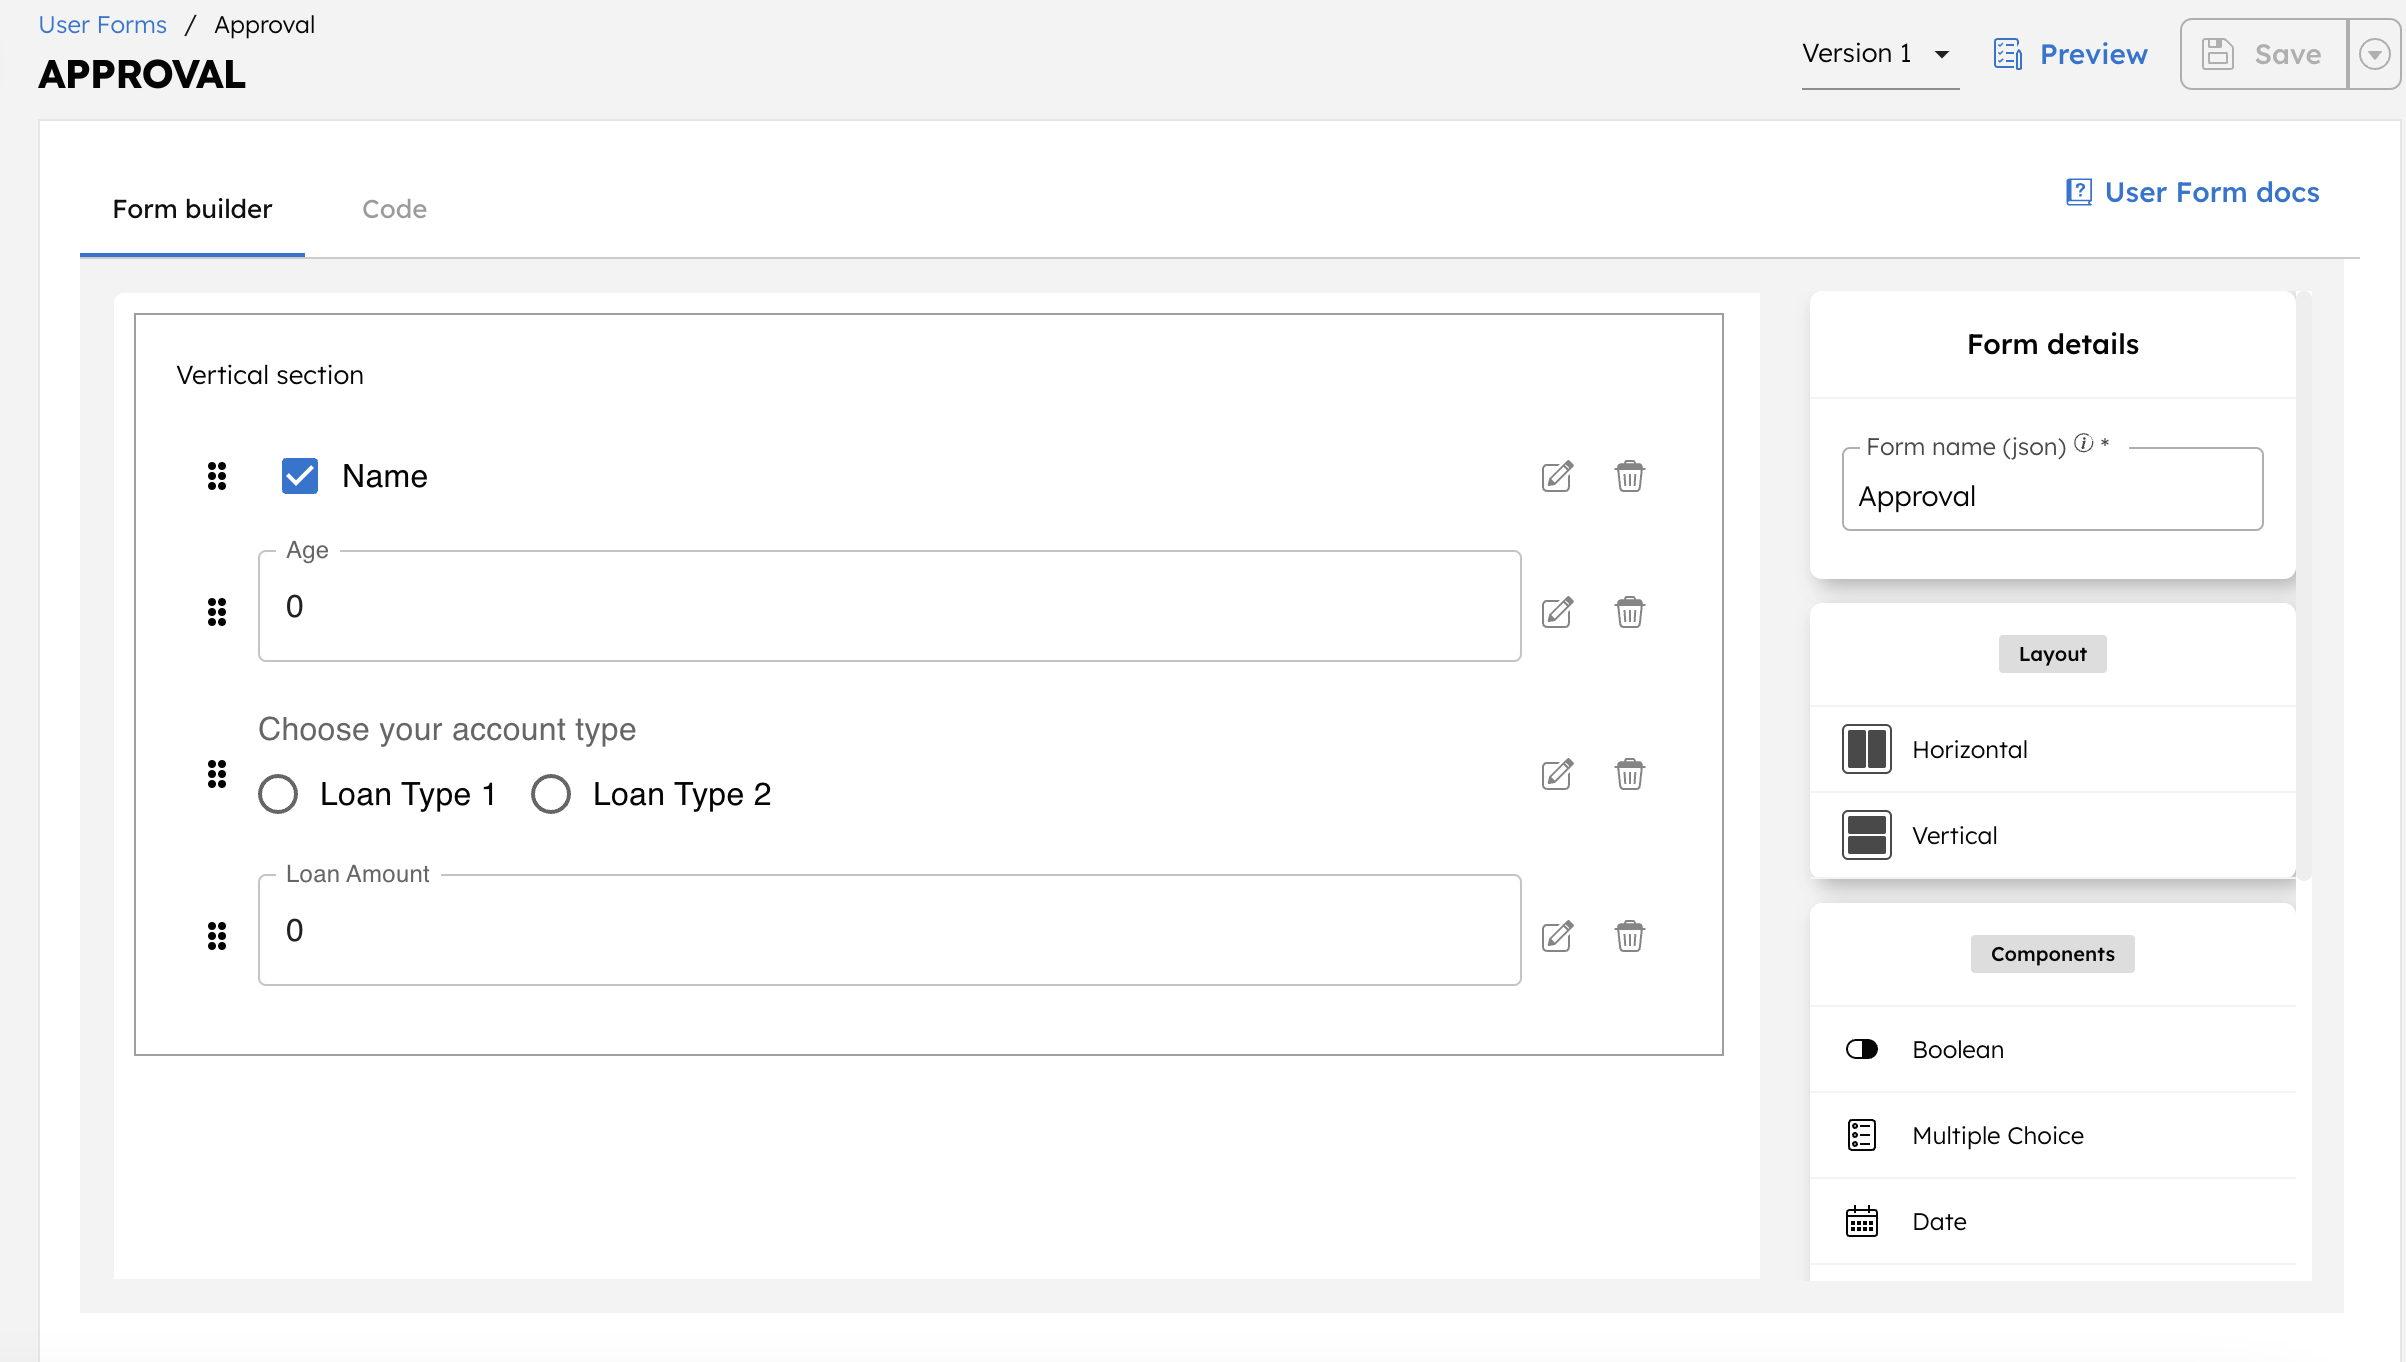
Supported form layout and components
Horizontal and vertical layouts are supported for user forms.
Following are the pre-built form components available on Orkes Conductor:
- Boolean
- Multiple Choice
- Date
- Date + Time
- Description Text
- Image
- Number Field
- Text
- Time
- Video
- Radio
You can toggle to the Code tab to create custom components for your form. However, all inputs to the form will be part of the Conductor workflow and JSON response, so the input data size should be as small as possible.
Configuring form components
To configure a component:
- Select the Edit icon beside the component.
A pop-up box appears.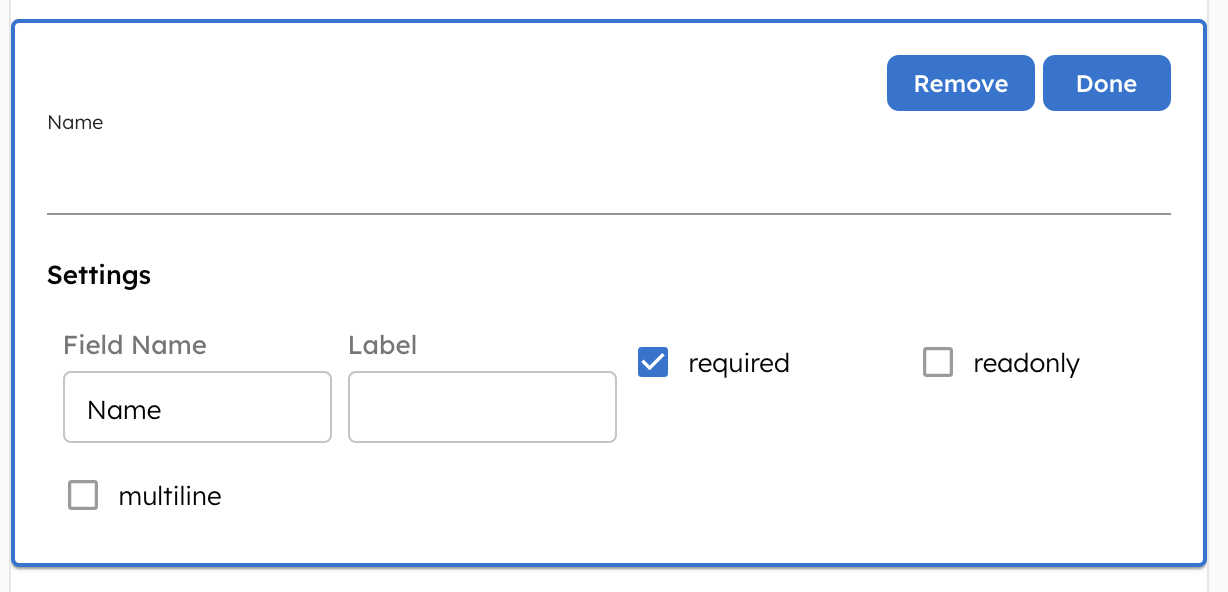
- Enter the Field Name, which serves as the input parameter name in the Human task configuration.
- Enter the Label, which is the text that end-users see when filling out the form.
- Configure the remaining settings:
| Setting | Applicable to | Description |
|---|---|---|
| Required | All components except Description Text. | Sets whether the form component is mandatory. |
| Read-only | All components except Description Text. | Sets whether the form component can accept user input. If the component is read-only, the user cannot fill out the field and the value must be supplied from elsewhere, such as from the workflow parameters. |
| Boolean default value | Boolean. | Sets whether the default value is true or false. |
| Items split by commas | Multiple Choice and Radio. | Contains the list of selection items split by a comma. |
| Alignment | Description Text. | Sets the alignment of the description text. Supported values:
|
| Allow-decimal | Number Field. | Sets whether to allow decimal values as input. |
| Multiline | Text. | Sets whether the text input box is multiline. |
| Height | Image and Video. | Sets the height of the image or video. |
| Width | Image and Video. | Sets the width of the image or video. |
| Default URL | Image and Video. | Sets the default image or video displayed on the form if it is not supplied from elsewhere. |
Step 2: Define a Human task
To use a Human task with your own UI, you must first define the Human task in Definitions > Task.
To define a Human task:
- Go to Definitions > Task from the left menu on your Conductor cluster.
- Select + Define task.
- In Name, enter a unique name for your Human task.
- In Description, enter the task description.
- Configure the task details, such as the rate limits, retry settings, timeout settings, and expected inputs and outputs.
- Select Save > Confirm Save.
Once the task is defined, you can proceed to add it to a workflow definition.
The Human task created acts as a resource identifier for access control in Orkes Conductor. When added to an application/group, Orkes Conductor uses this name to apply role-based access control (RBAC) permissions to control who can access or modify the task. For more information, see Role-based Access Control (RBAC) in Orkes Conductor.
Step 3: Configure the Human task
Add the Human task to your workflow and configure its assignment and trigger policies.
To add a Human task:
- In your workflow, select the (+) icon and add a Human task.
- In Task Definition, select the task definition created in Step 2.
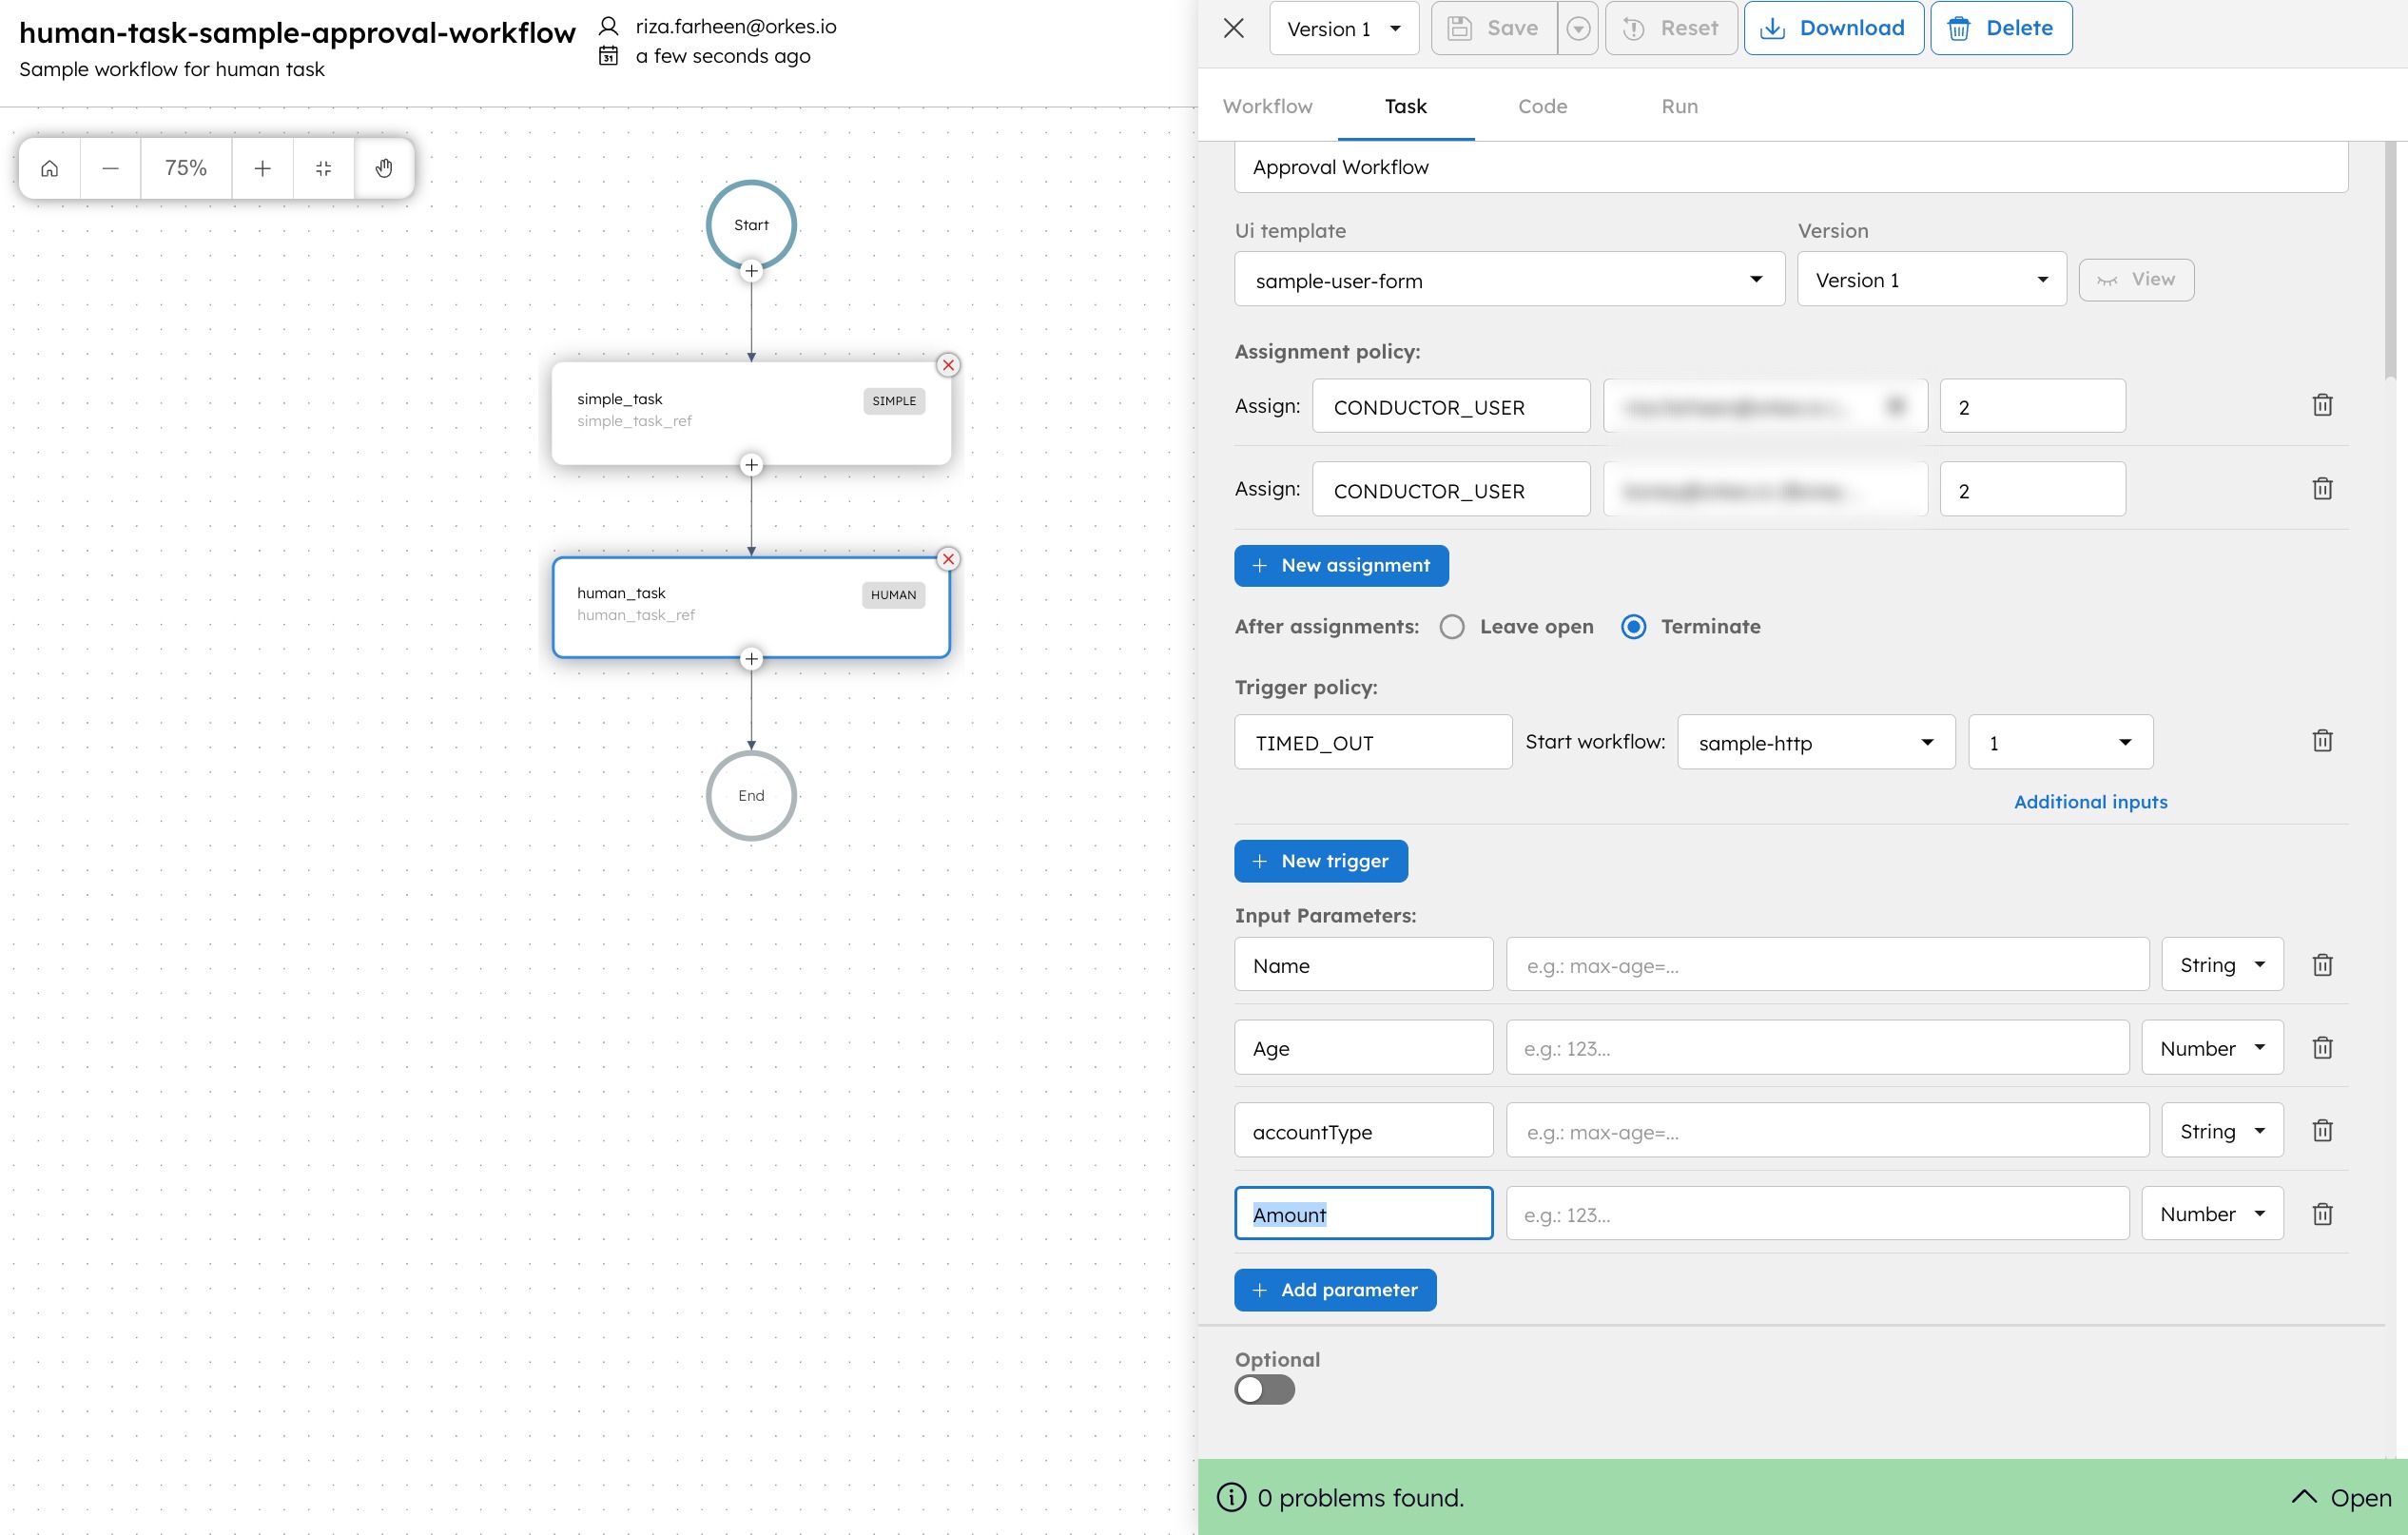
- Configure the human task with the following parameters:
| Parameter | Description | Required/Optional |
|---|---|---|
| Task display name | The display name for the human task that appears in the human task execution. Use a unique human-friendly name, such as “Loan Approval” or “Booking Form”. Note: Whenever a workflow containing a human task is executed, the execution status of the human task can be viewed under Executions > Human Tasks from the left menu on your Conductor cluster. The name specified under this field can be used to identify your human task execution from the list. | Required. |
| User form template | Select the User form template previously created in Step 1 and its Version. | Required. |
| Assignment policy | Add an assignment policy to control who can fill out the form. If not configured, the Human task will not be limited to a certain group or user; anyone can complete the form. To add an assignment policy:
Notes:
| Optional. |
| Auto claim | When enabled, the Human task is automatically claimed by the first assignee in the assignment list as soon as the task execution begins. This eliminates the need for manual claiming from the Human Task inbox. Disable this option if you want assignees to claim the task manually. | Optional. |
| After assignments | Select the action to be carried out after the assignment policy is timed out. You can select one of the following actions:
| Optional. |
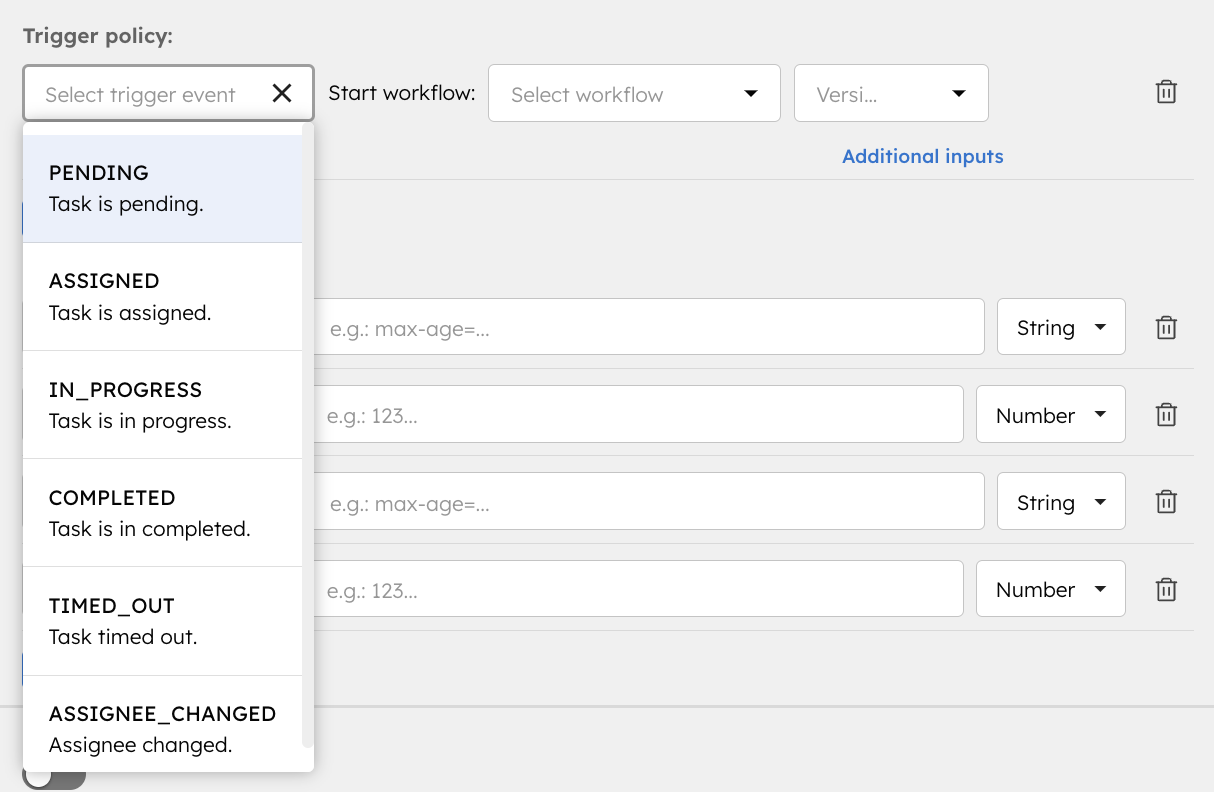
| Trigger policy | Add a trigger policy to start new workflows when the state of the Human task changes. The trigger policy works based on the human task state in the Executions > Human Tasks list. 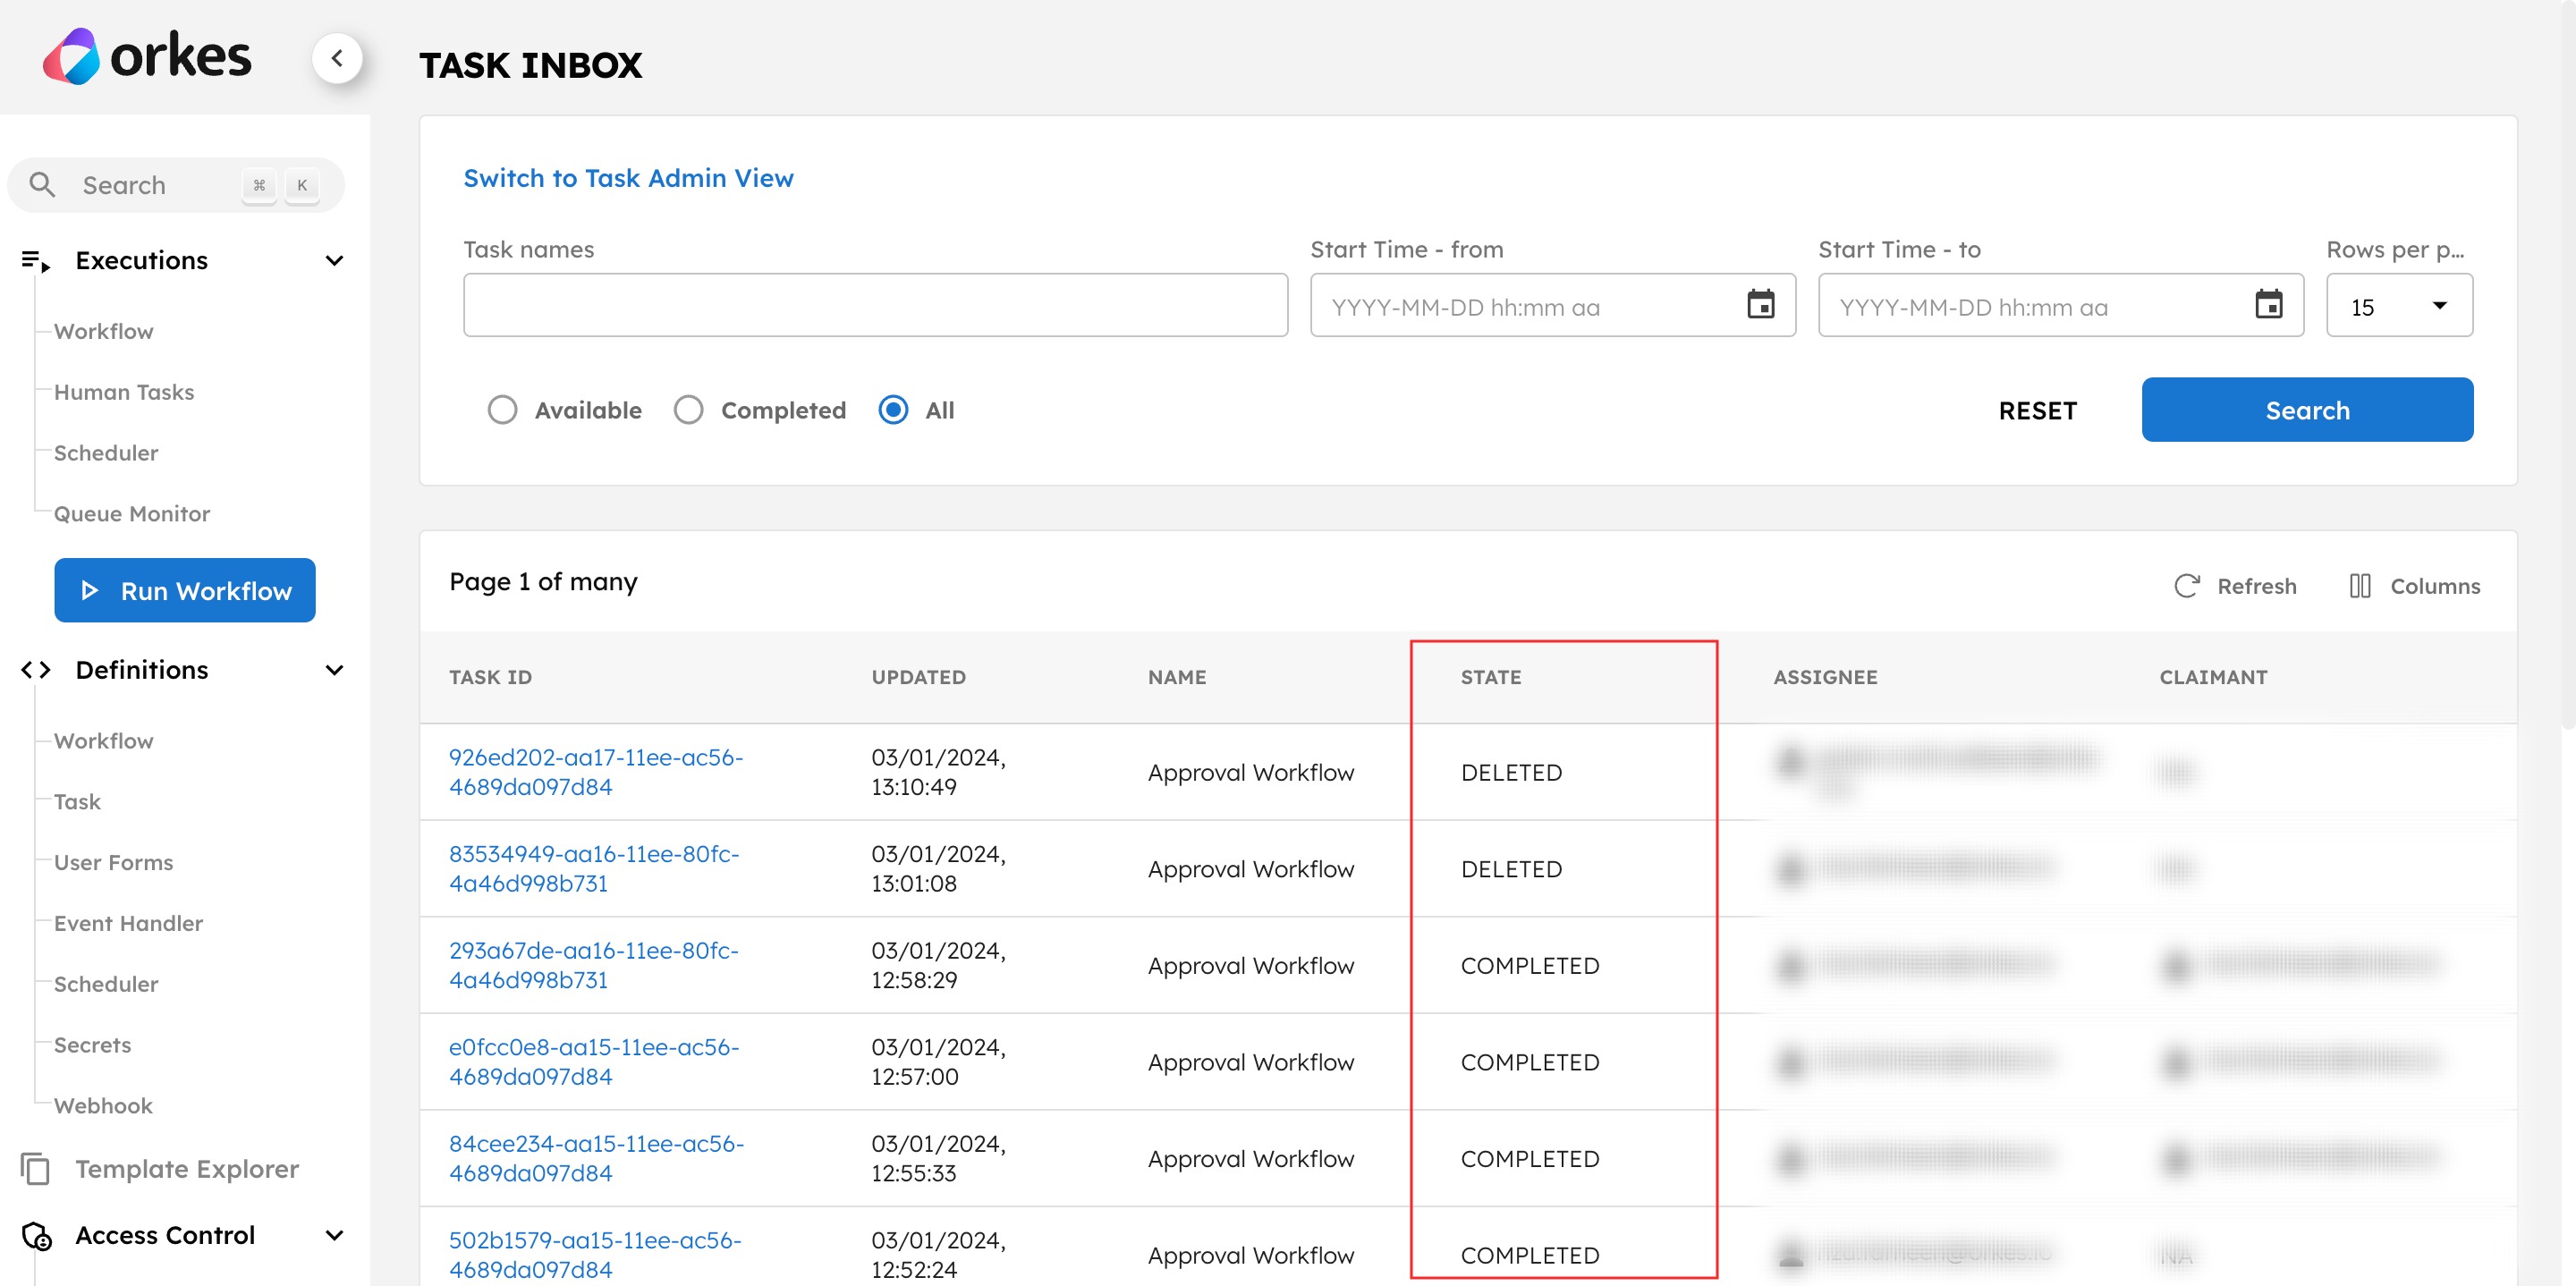 To add a trigger policy: To add a trigger policy:
| Optional. |
| Input parameters | Configure the form fields depending on the input source:
| Optional. |

Refer to the Human task reference for more information and examples on configuring the task.
- Save the workflow.
During development, you can set the assignment policy to Conductor User or Group first to test the form. Once the Human task is connected to your own UI, you can easily switch to External User or Group.
Step 4: Testing Human tasks in Orkes Conductor
When defining your workflows with Human tasks, you can test and complete the task internally on Orkes Conductor without testing it from your own UI.
To test and complete Human tasks in Orkes Conductor:
- Run the workflow.
- Complete the Human task in Orkes Conductor.
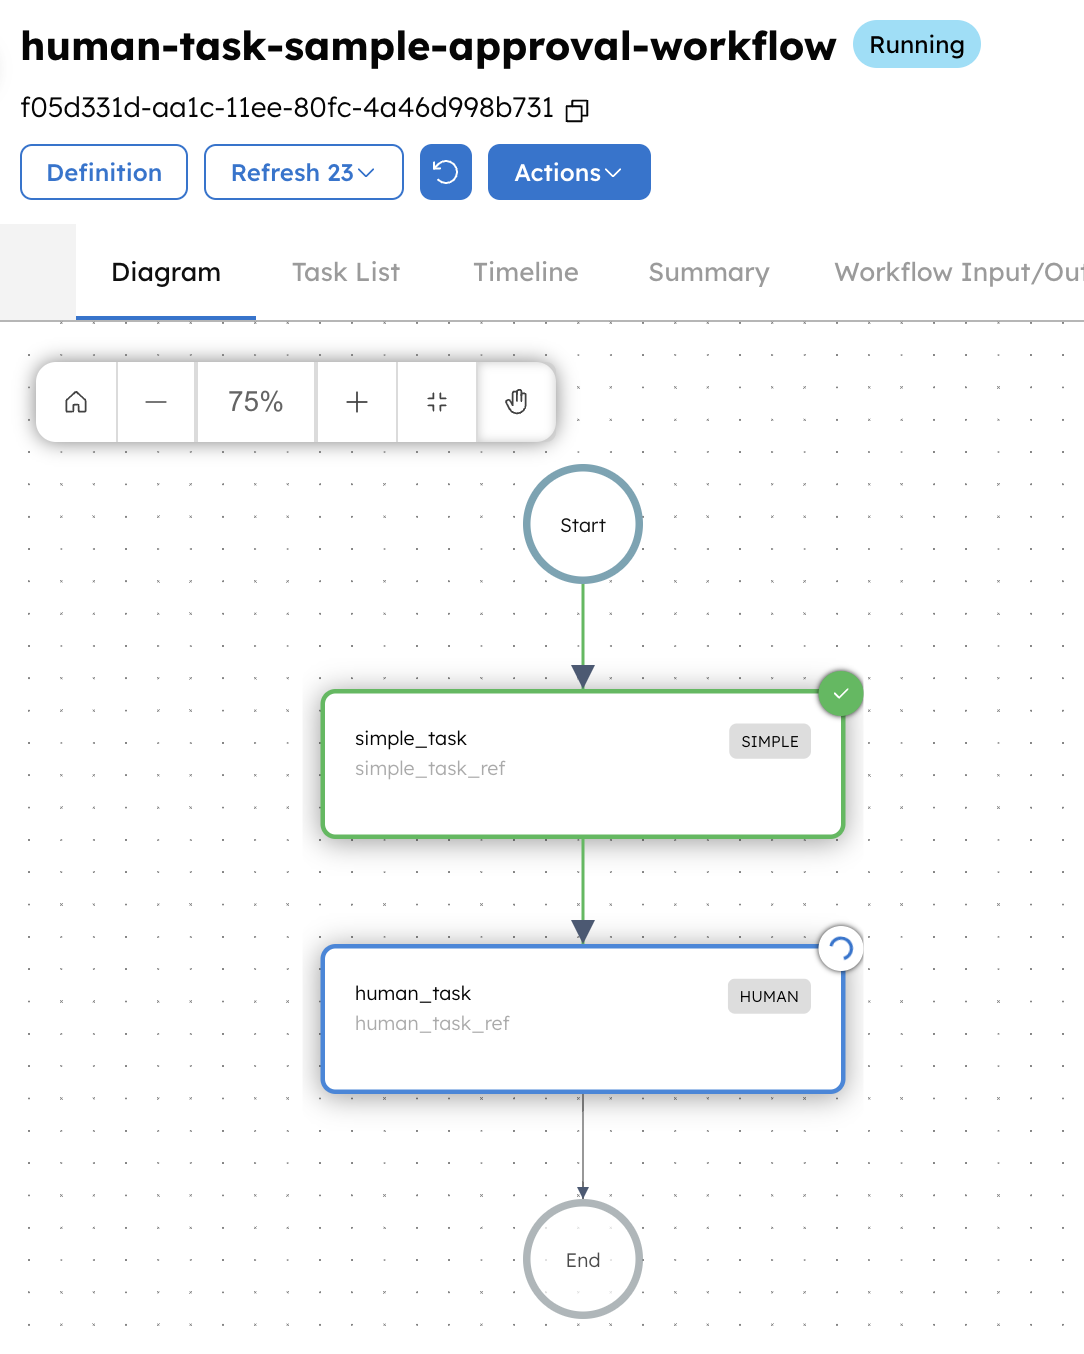
Run the workflow
Run the workflow to trigger a Human task execution. The Human task will remain in progress until the human interaction with the user form is complete.
To run the workflow on Orkes Conductor:
- From your workflow, go to the Run tab.
- Enter any input parameters as needed.
- Select Execute.
The workflow (execution) ID is generated. You can use it to view the execution progress and details.
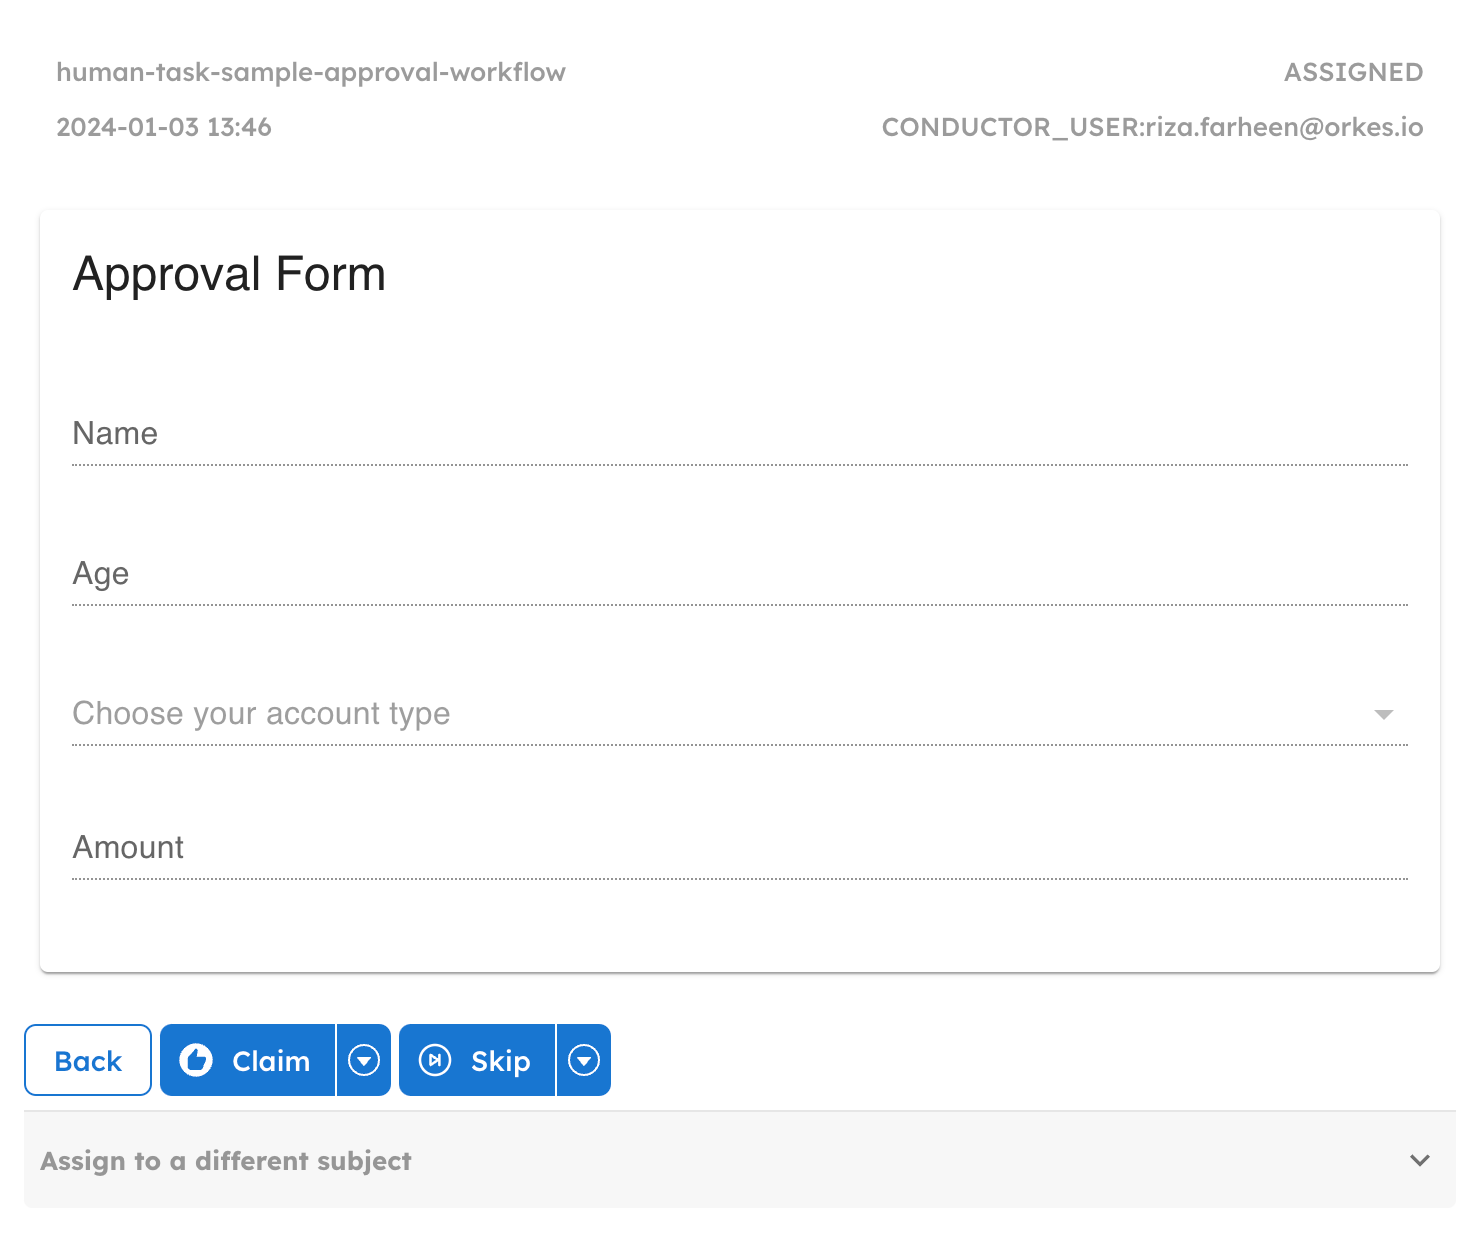
Complete the Human task
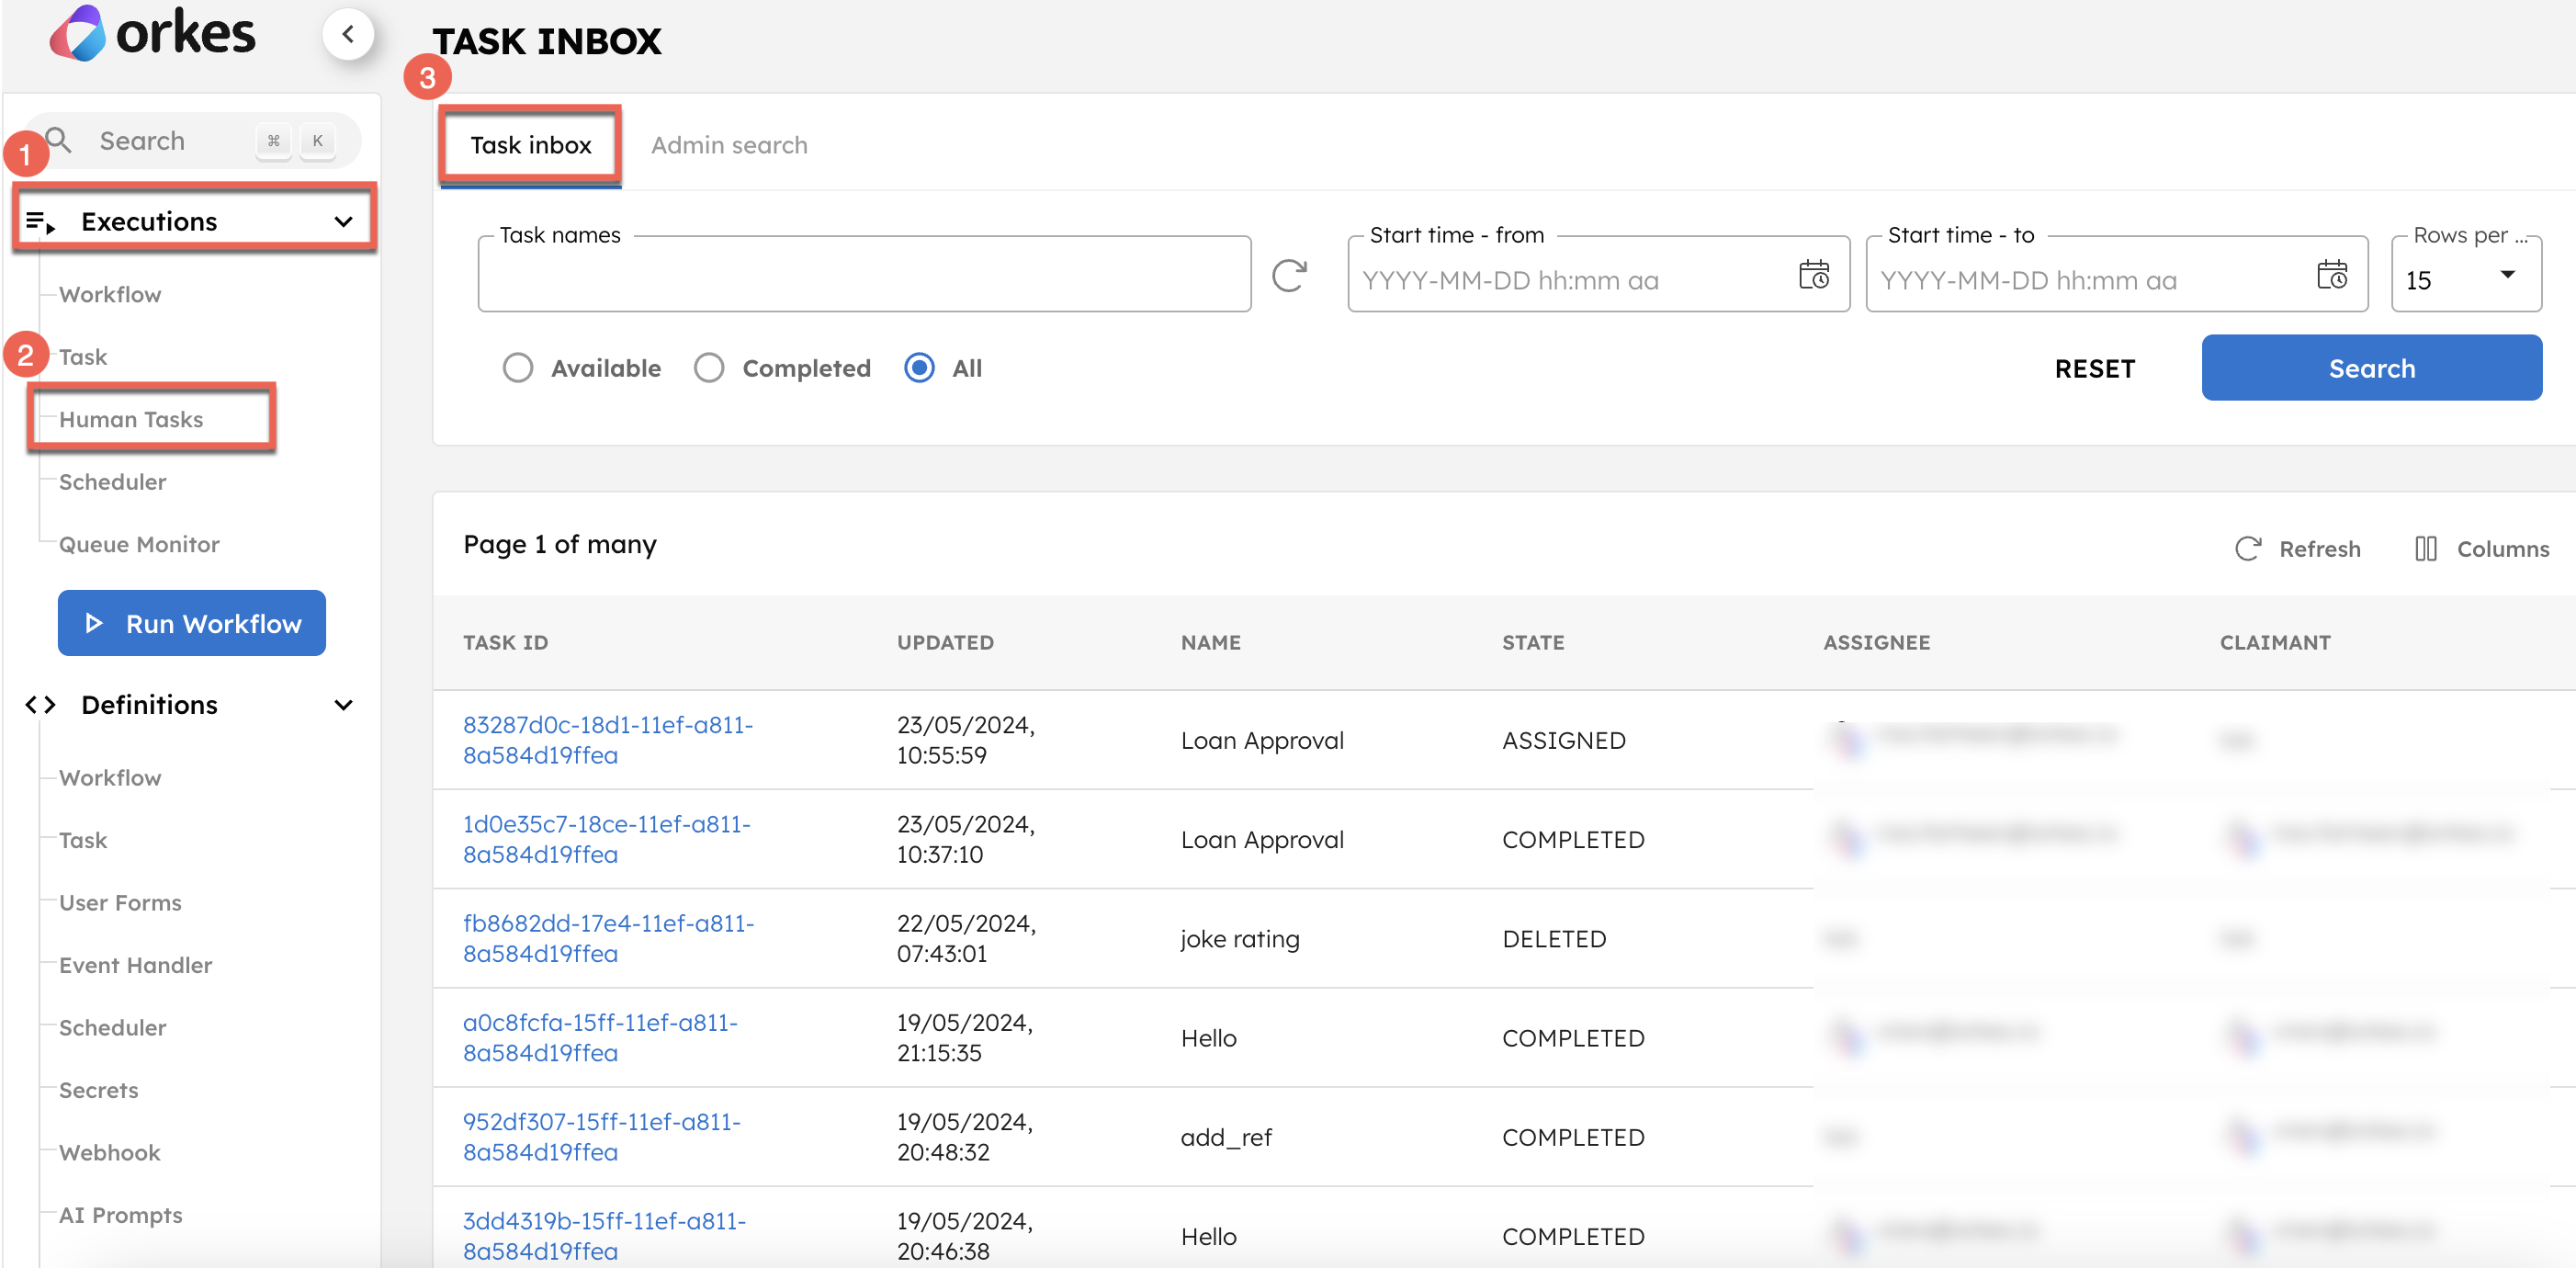
As a Conductor user, you can also access all the Human task executions on Orkes Conductor. The list of Human task executions can be found in the left navigation menu under Executions > Human Tasks, allowing you to claim and complete pending Human tasks and view past Human task executions.
Depending on your permission level, there are two tab views available on the page:
- Task inbox: As a regular non-admin user, you get the task Inbox view, which lists all the tasks assigned to you or your group or unassigned left open ones.
- Admin search: (Applicable only to cluster admins or task creators, i.e., who created the workflow containing human tasks) Contains all Human tasks in the Conductor cluster.
- To claim a task
- To skip a task
- To assign the task to a different user or group
To claim a task:
- Go to Executions > Human Tasks > Task inbox.
- In the filter box, select Available to view all tasks available to you.
- Select a task.
- Select Claim to claim a task. Alternatively, select the drop-down arrow > Override claim to claim a previously-claimed task.
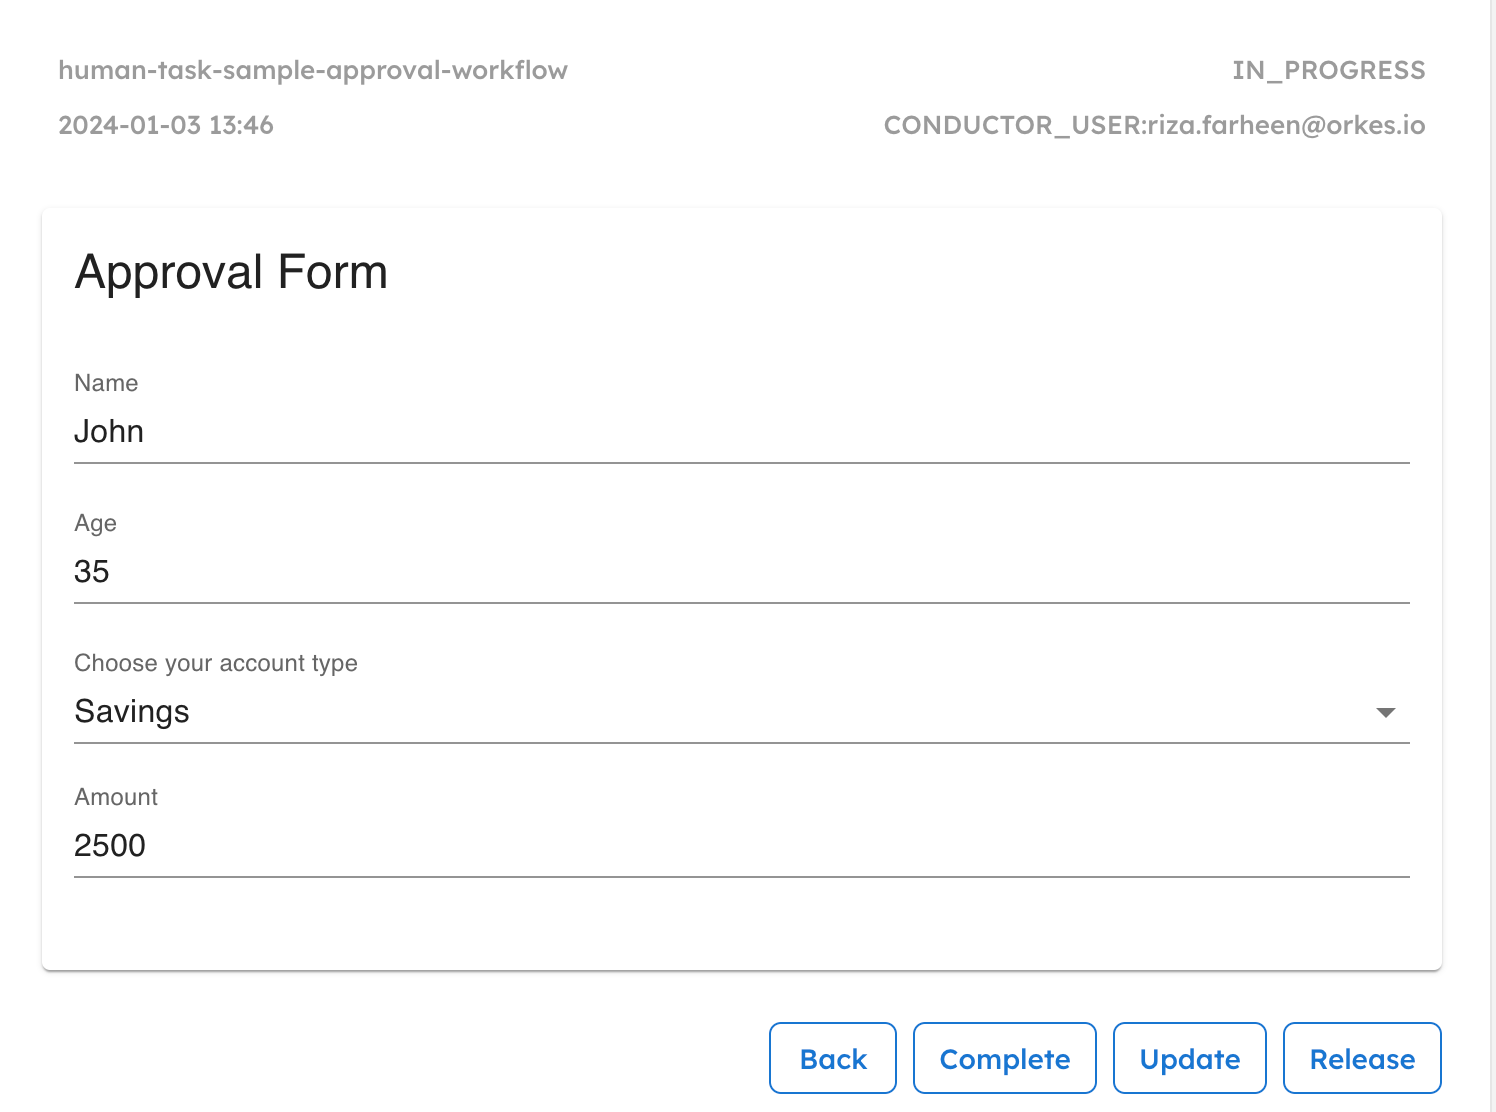
Once claimed, you can Update or Complete the task. In addition, you can Release the task to remove your claim so that someone else can claim it.
To skip a task:
In your selected Human task, select Skip to bypass it. Alternatively, select the drop-down arrow > Skip with reason to include a reason for skipping the task.
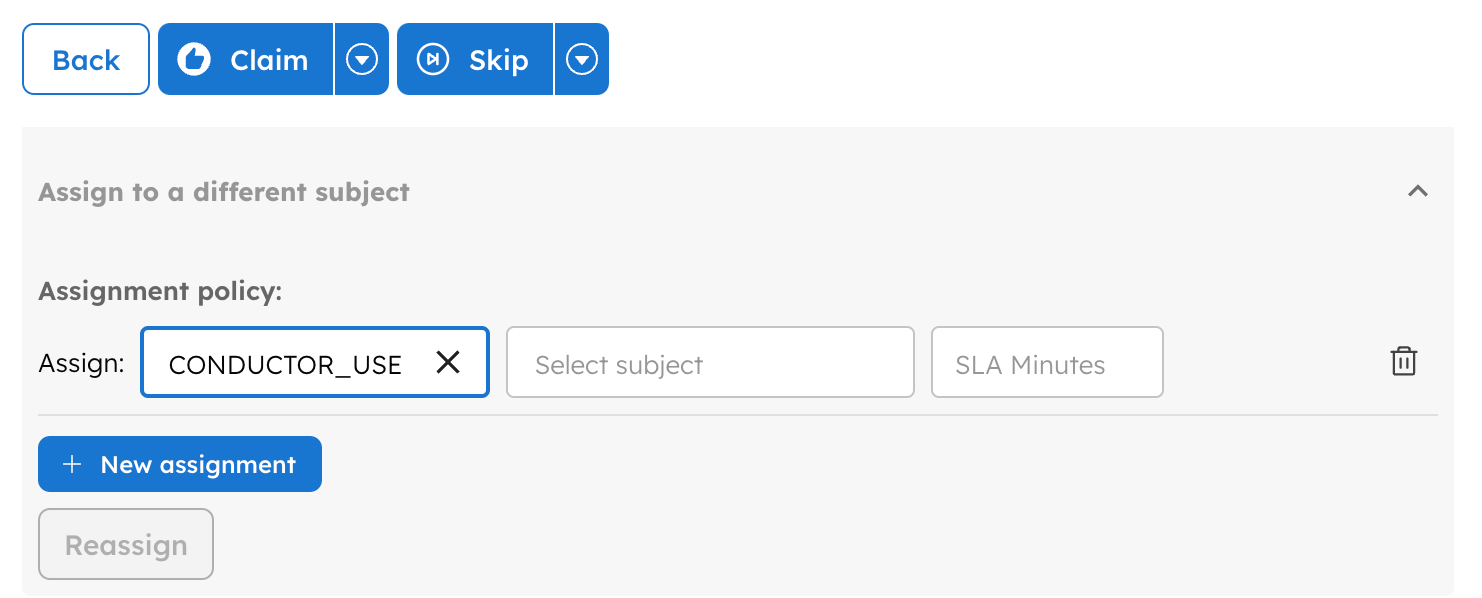
To assign the task to a different user or group:
- In your selected Human task, select Assign to a different subject > (+) New assignment.
- In Assign, select the User type for the assignee(s) and enter the corresponding user or group ID.
- External User or Group: Select this if the assignees are managed and verified in an external system, and will access your own UI to complete the task.
- Conductor User or Group: Select this if the assignees are Conductor users and will access Orkes Conductor to complete the task.
- Enter the SLA minutes to specify the assignment duration before it times out. Use 0 minutes to set a non-expiring assignment.
- If needed, add another assignment to create a multi-level assignment chain.
Search Human task executions
You can search for Human task executions in Orkes Conductor. The search page provides two views based on your permissions:
- Task inbox: Lists tasks assigned to you, your group, or unassigned tasks available to claim.
- Admin search: Available to cluster admins and human task creators. Lists all Human tasks in the cluster.
- Task inbox
- Admin search
The task inbox view is the non-admin regular user view that lists all the tasks assigned to you, your group, or left open.
Task inbox filters
| Filter | Description |
|---|---|
| Task names | Filters based on the task display name specified in the Human task definition. Multiple entries can be selected. |
| Workflow IDs | Filters based on the workflow execution IDs. |
| Start time | Filters based on the task execution time. |
| Output data search | Filters based on the output data. |
| Input data search | Filters based on the input data. |
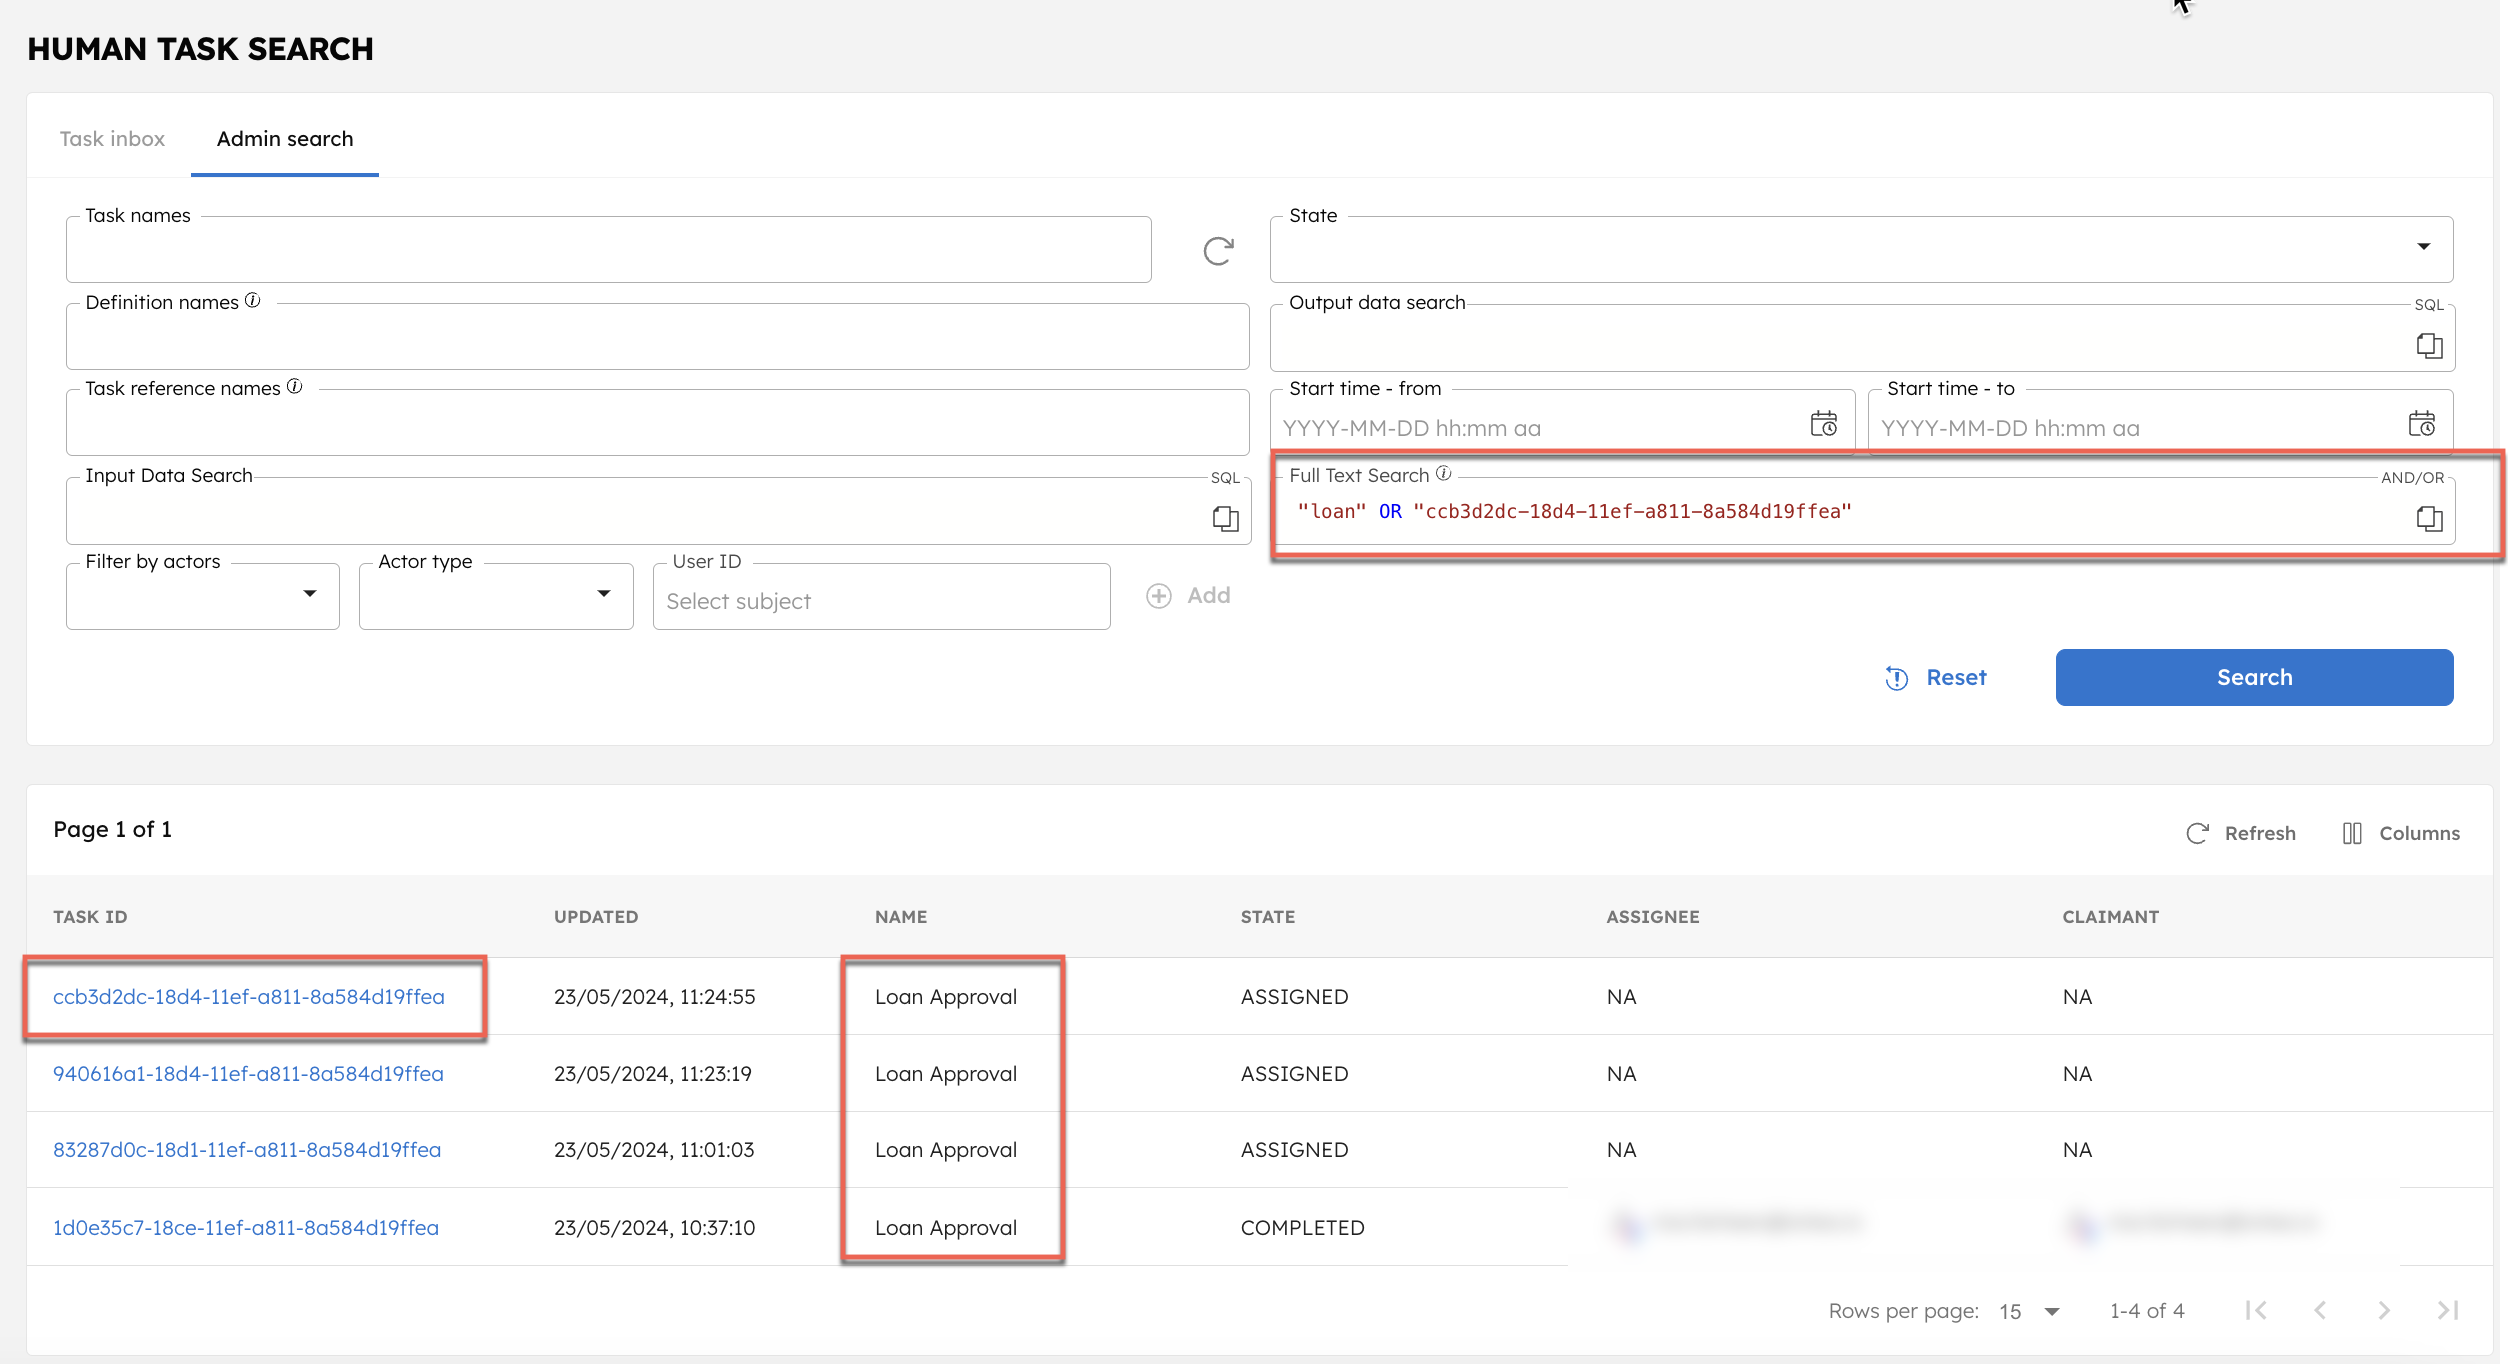
| Full-text search | Searches all data within the execution columns based on an “AND” and “OR” query.
“loan" OR "cc3d2dc-18d4-11ef-a811-8a584d19ffea". The search will return all results that contain either the text “loan” or the specific task ID “cc3d2dc-18d4-11ef-a811-8a584d19ffea”. To get results matching both criteria, use “AND” instead of “OR”. |
You can also filter the executions by Available, Completed, or All.
If you are a cluster admin or workflow creator for the Human task, you can use the Admin search tab in Executions > Human Tasks to filter and sort through all Human task executions for testing and debugging.
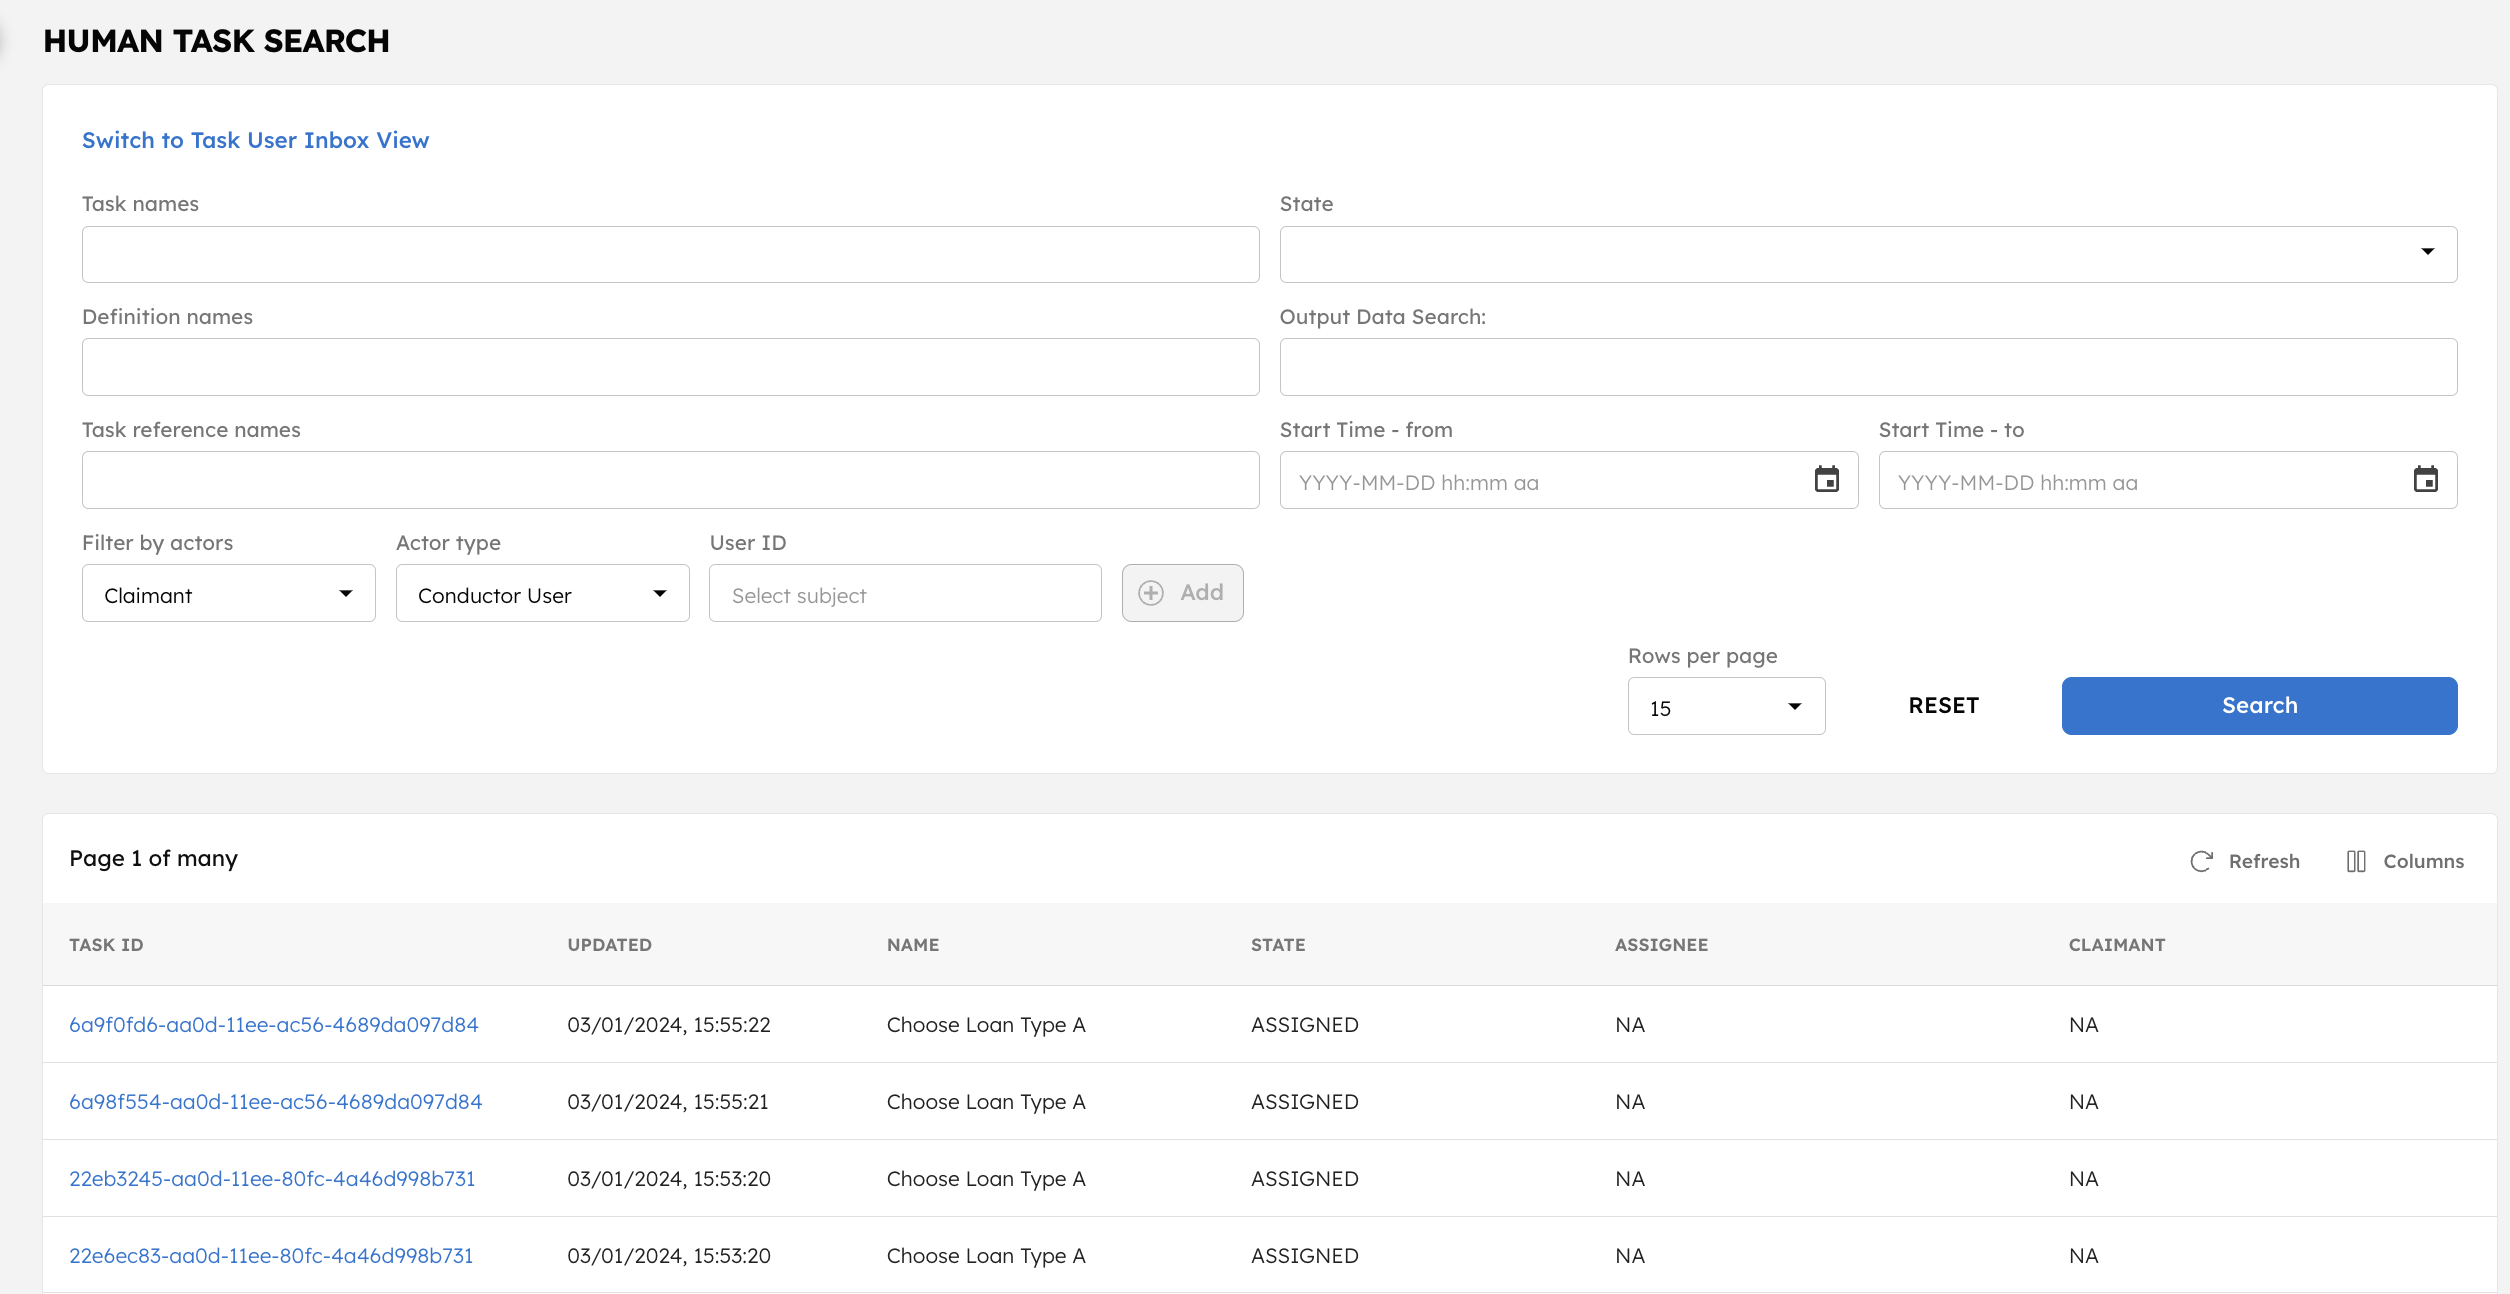
Admin search filters
| Filter | Description |
|---|---|
| Task names | Filters based on the task display name specified in the workflow definition. Multiple entries can be selected. |
| State | Filters based on the Human task status. Supported values:
|
| Definition names | Filters based on the task definition name. Multiple entries can be selected. |
| Output data search | Filters based on the output data. Supports partial search using the * wildcard. For example, entering result="success*" returns all tasks where the output key result starts with “success”. |
| Task reference name | Filters based on the task reference name. Multiple entries can be selected. |
| Start time | Filters based on the task's last updated time. |
| Input data search | Filters based on the input data. Supports partial search using the * wildcard. For example, entering name="*doe" returns all tasks where the input key name ends with “doe”. |
| Full-text search | Searches all data within the execution columns based on an “AND” and “OR” query.
“loan" OR "cc3d2dc-18d4-11ef-a811-8a584d19ffea". The search will return all results that contain either the text “loan” or the specific task ID “cc3d2dc-18d4-11ef-a811-8a584d19ffea”. To get results matching both criteria, use “AND” instead of “OR”. |
| Workflow IDs | Filters based on the workflow (execution) IDs. |
| Filter by actors | Filters based on Claimant or Assignee. |
| Actor type | Filters based on the actor type for the selected actor. Supported values:
|
| User/Group ID | Filters based on a particular user or group ID. Supports partial search using the * wildcard. For example, john* returns all users whose IDs start with “john”, and *doe* returns all users whose IDs contain “doe”. |
Step 5: Display the form on your own UI
If you are using a custom UI for a Human task, configure it to render the form.
When the Human task begins, the associated user form will be assigned to the user or group defined in the task. The user form can be displayed on your own UI so that assignees can claim and complete user forms without having to log into Orkes Conductor. These external assignees are referenced in the Human task configuration but managed and verified in an external system.
To display the form on your own UI:
- Create the UI in your preferred language.
- Add the Human task to an application account and grant permissions for execution.
- Configure the Human task for external form assignment.
- Integrate the UI with Conductor.
1. Create the UI in your preferred language.
Create your own UI to display the user form as desired. Some common display options include an action inbox containing all pending approval items or a multi-page form, each corresponding to one Human task on the Conductor end.
2. Add the Human task to an application and grant permissions for execution.
To use a Human task with your own UI, you need to add the Human task to an application and grant Execute permission to the application.
To add the Human task to an application:
- Go to Access Control > Applications from the left menu on your Conductor cluster.
- Select an application that you will be adding your worker to. Otherwise, create an application.
- In Application roles, enable the Worker role.
- Select + Create access key.
- Store the generated credentials safely.
- In Permissions, select + Add permission.
- Select the Task tab, search, and add your Human task created in Step 2.
- Enable the Execute, Read, and Update toggles.
- Select Add Permissions.
The application can now execute the Human task.
3. Configure the Human task for external form assignment.
If the assignment policy in the Human task is not yet configured, go to the Human task in your workflow definition and ensure that the User type for the assignee(s) is set as External User or Group.
4. Integrate the UI with Conductor.
Use the Human Tasks APIs to connect your external UI with the Conductor cluster. Integrate the UI using the access credentials generated for the application in the previous step.
- Display all active Human task executions.
Call
GET human/tasks/searchto list Human tasks with Assigned status and Assignee as External Group or External User. - Display the user form for each Human task execution.
First, call
GET human/templateusing the form name and version to get the user form schema. Then, inject the form inputs from theGET human/tasks/searchcall into the form schema so that the read-only fields are pre-filled. - Submit the form response.
First, call
POST human/tasks/{taskId}/externalUser/{userId}to claim the Human task. Then, callPOST human/tasks/{taskId}/updateto save or submit the form response.