Build an Agentic Interview App with Orkes Conductor
This tutorial demonstrates how to build an agentic coding interview application using Conductor’s AI Orchestration features. The app leverages LLMs for reasoning, Google Docs for transcript generation, SendGrid for email delivery, and Orkes Conductor for workflow orchestration.
In this tutorial, you will:
- Set up APIs for OpenAI, Google Docs, and SendGrid.
- Clone and configure the application code.
- Deploy a Python backend and Next.js frontend.
- Trigger and run a multi-step interview workflow.
- Generate interview transcripts and send thank-you emails.
Agentic interview application
The application consists of a frontend for candidate interaction, a backend that triggers Conductor workflows automatically, and Orkes Conductor, which orchestrates the flow.
The application flow includes:
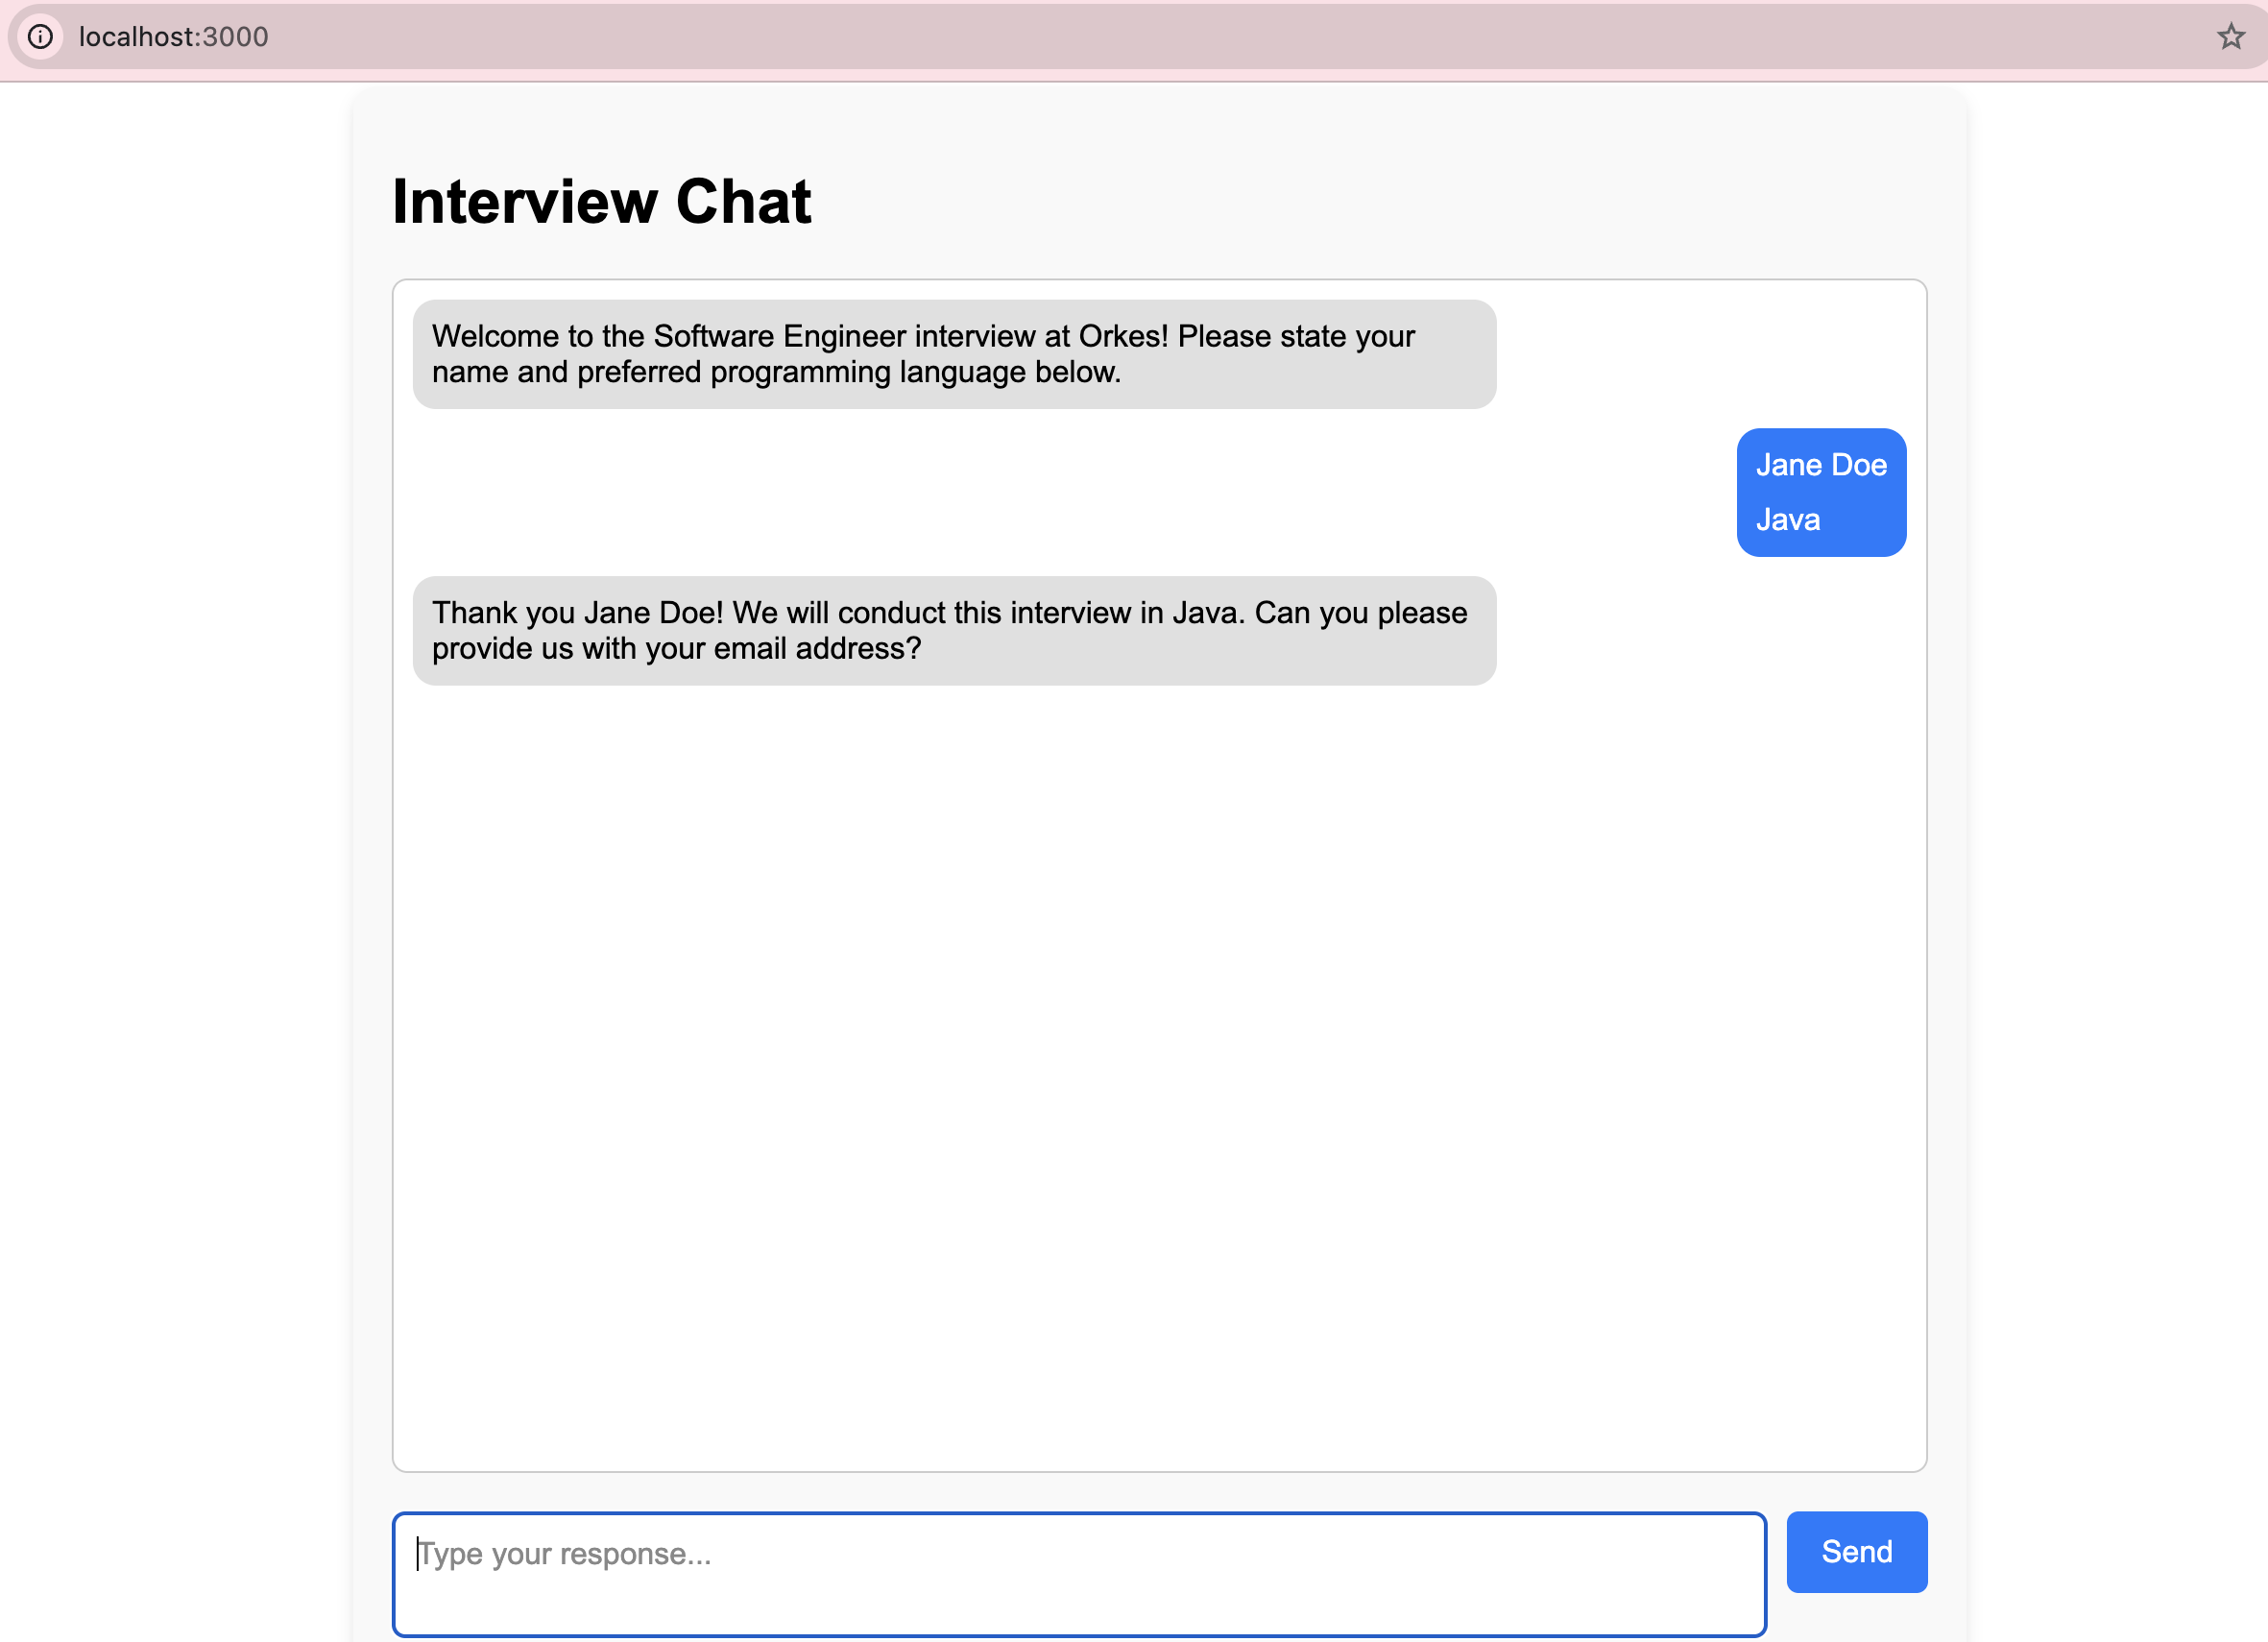
- Candidate data collection, including name, email, and preferred programming language.
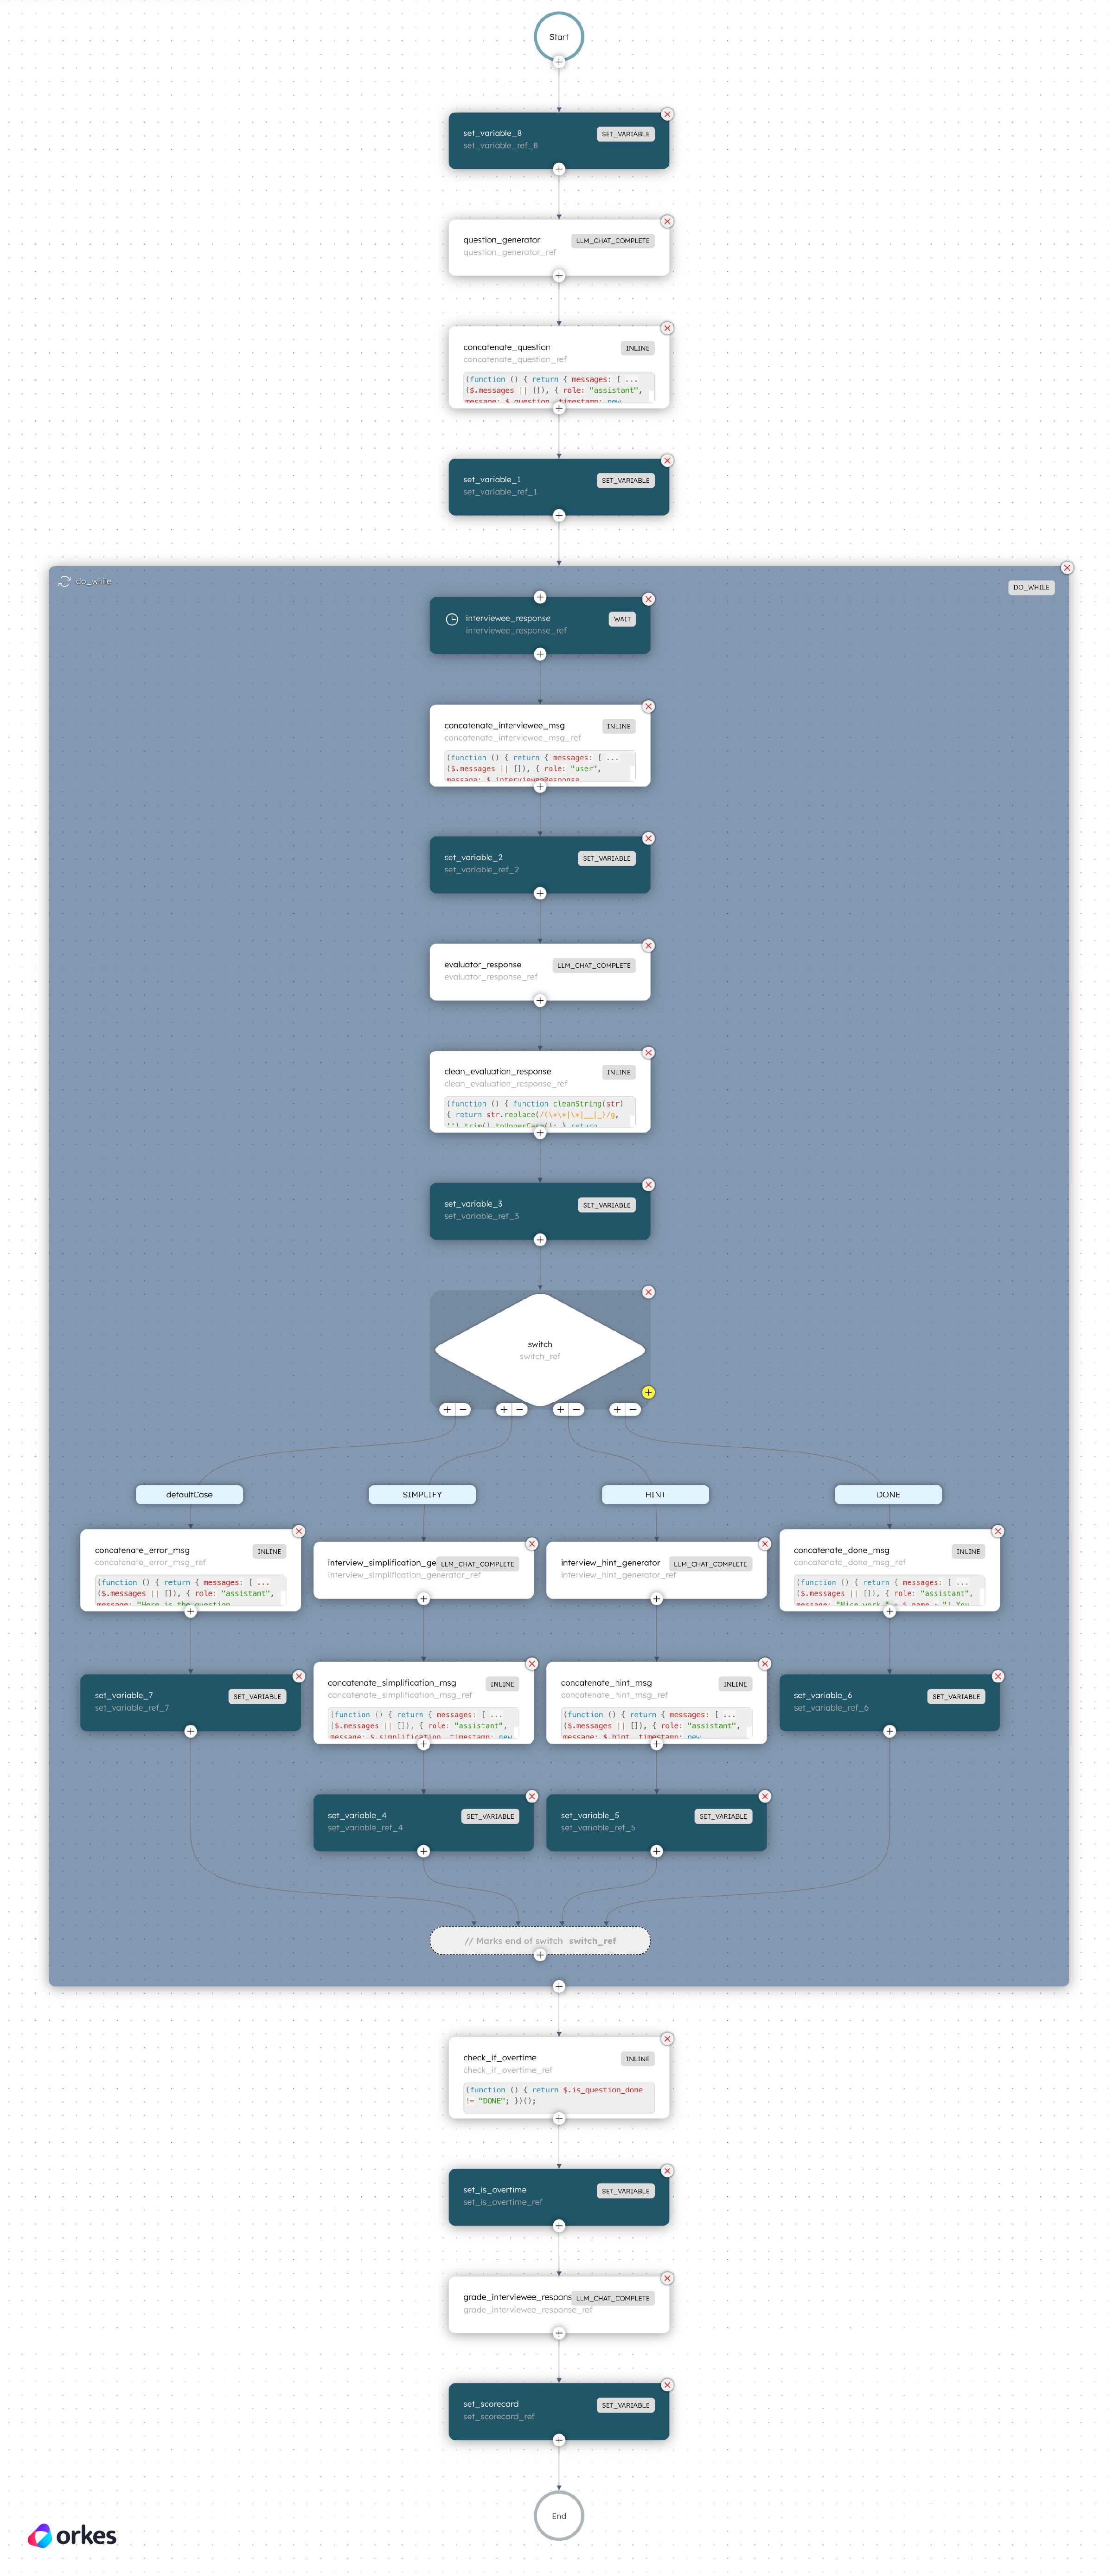
- A looped interview using LLM-generated LeetCode-style programming questions.
- Evaluation of the response, scores answers, and provides feedback.
- Generates a formatted interview transcript.
- Sends a thank-you email.
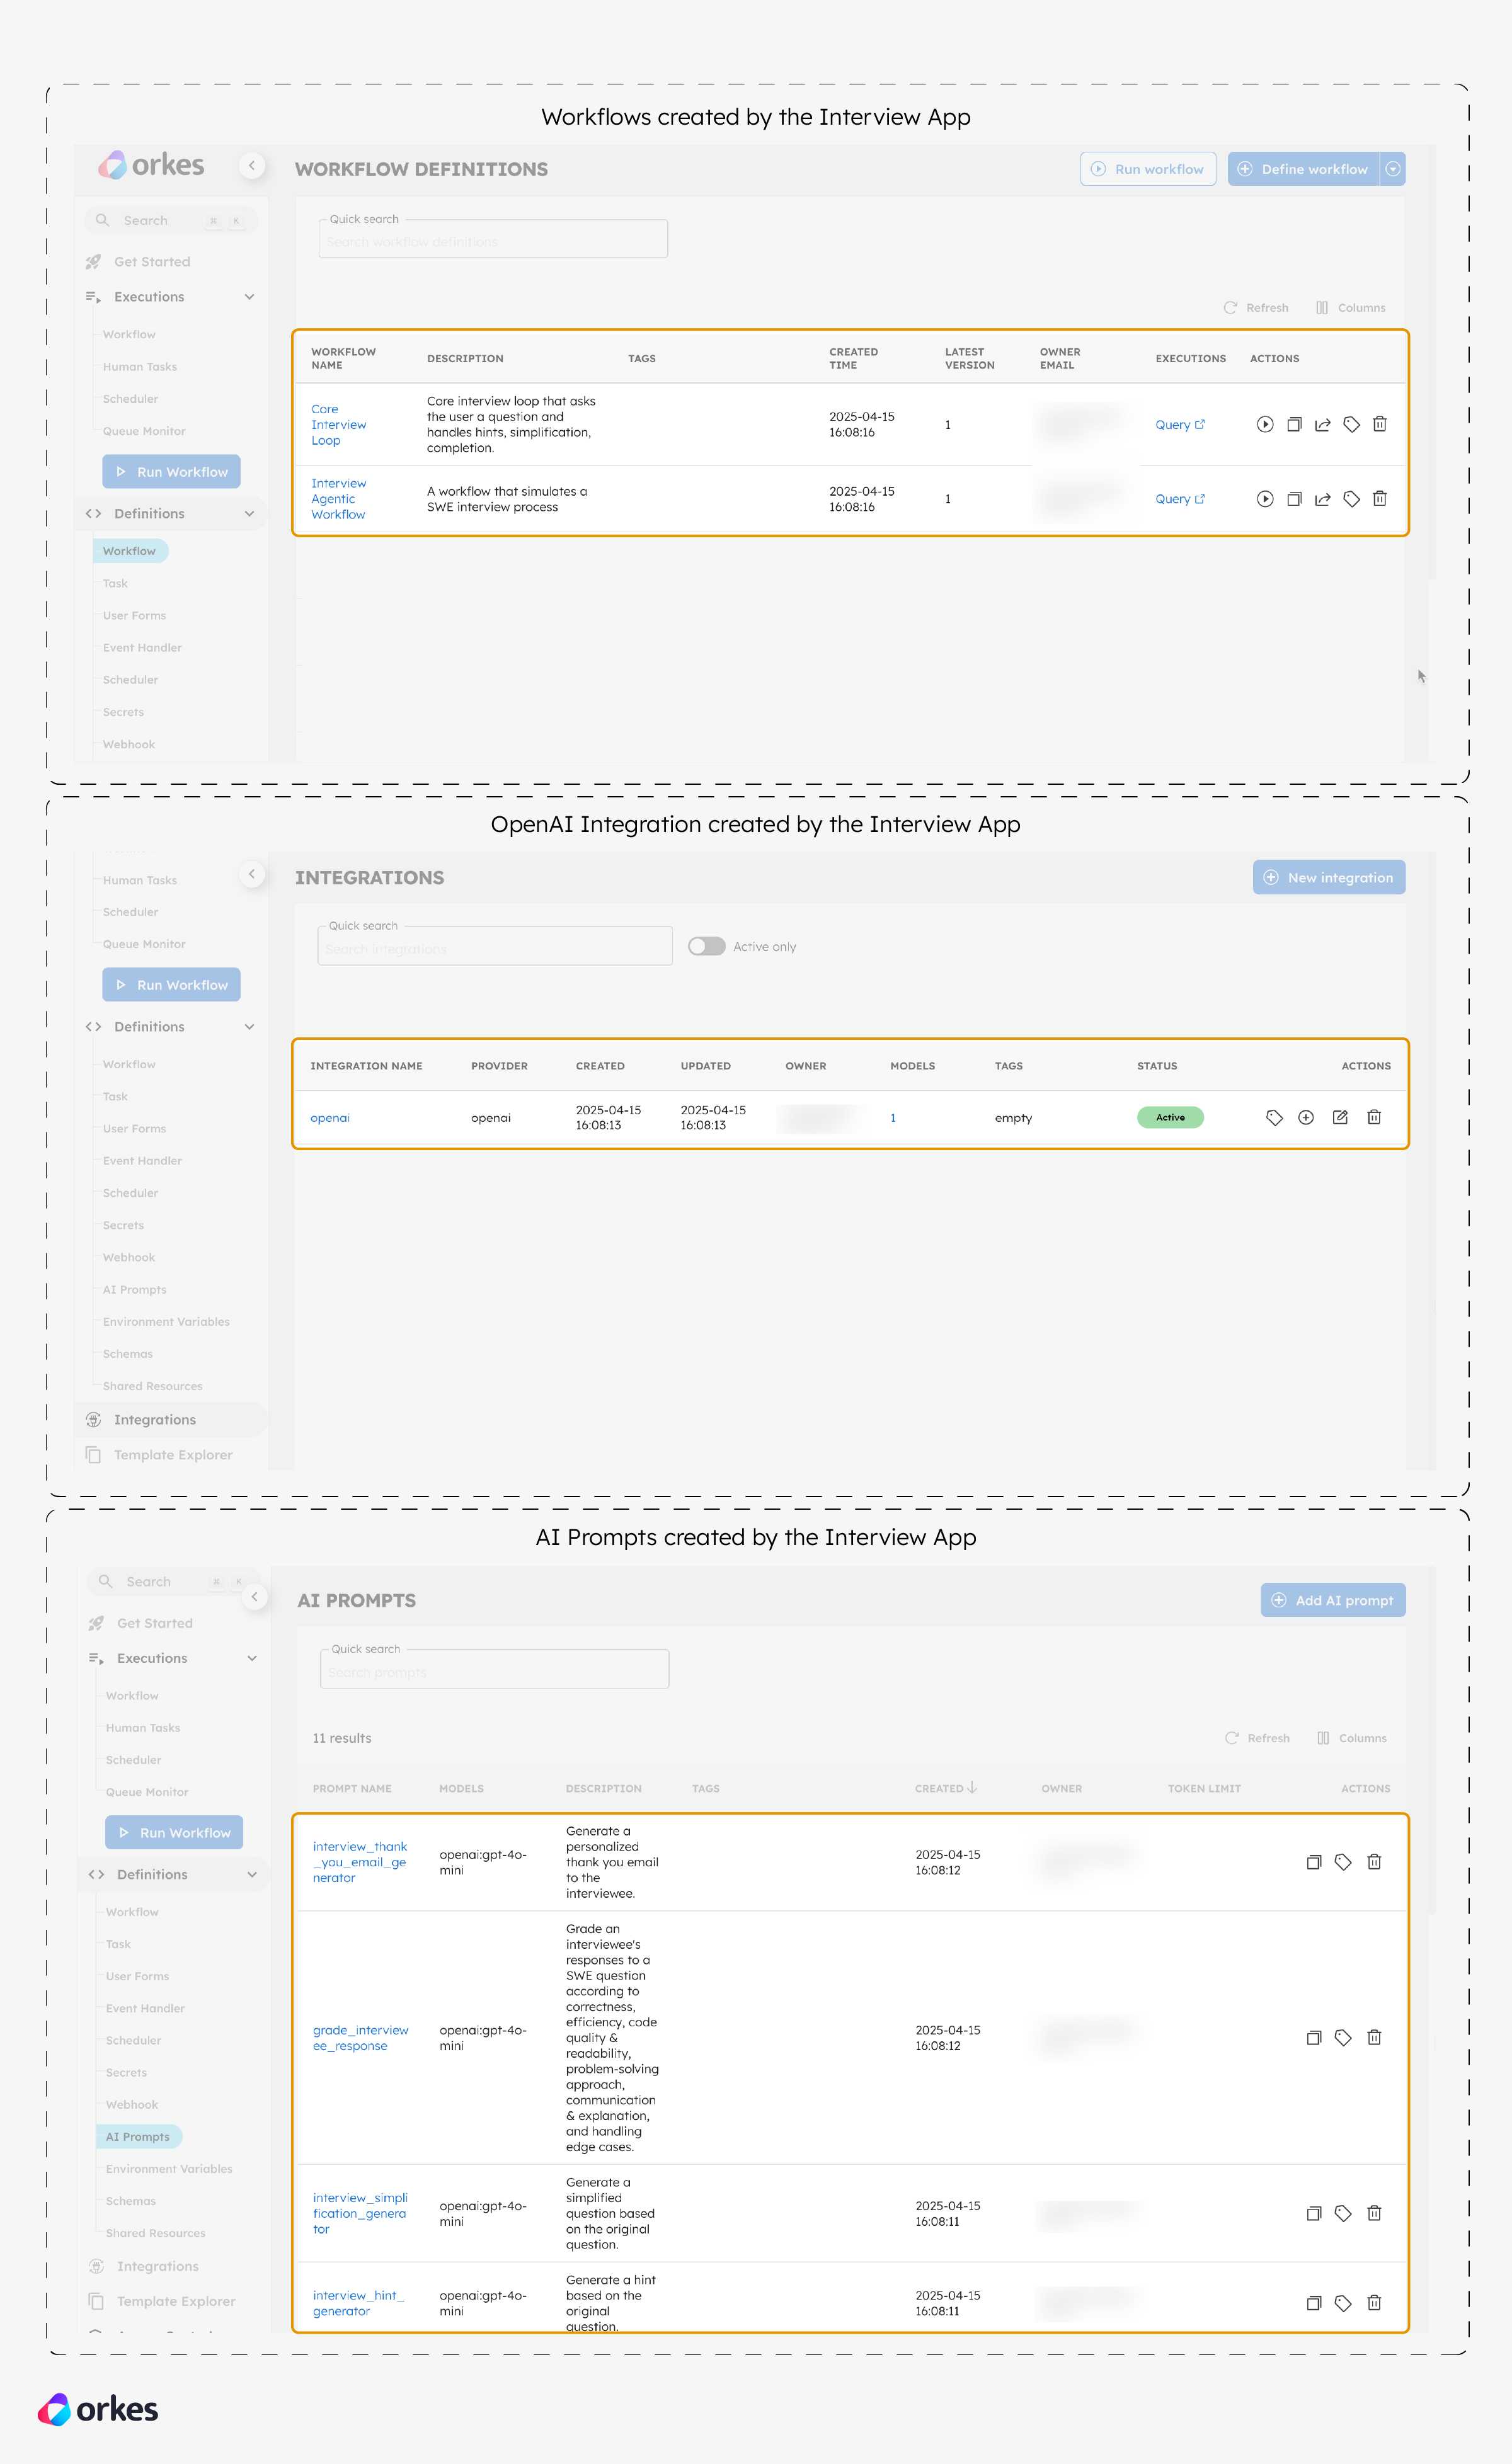
When you run the application, it automatically registers and runs the following Interview Agentic Workflow, which handles candidate intake and initiates the interview process:
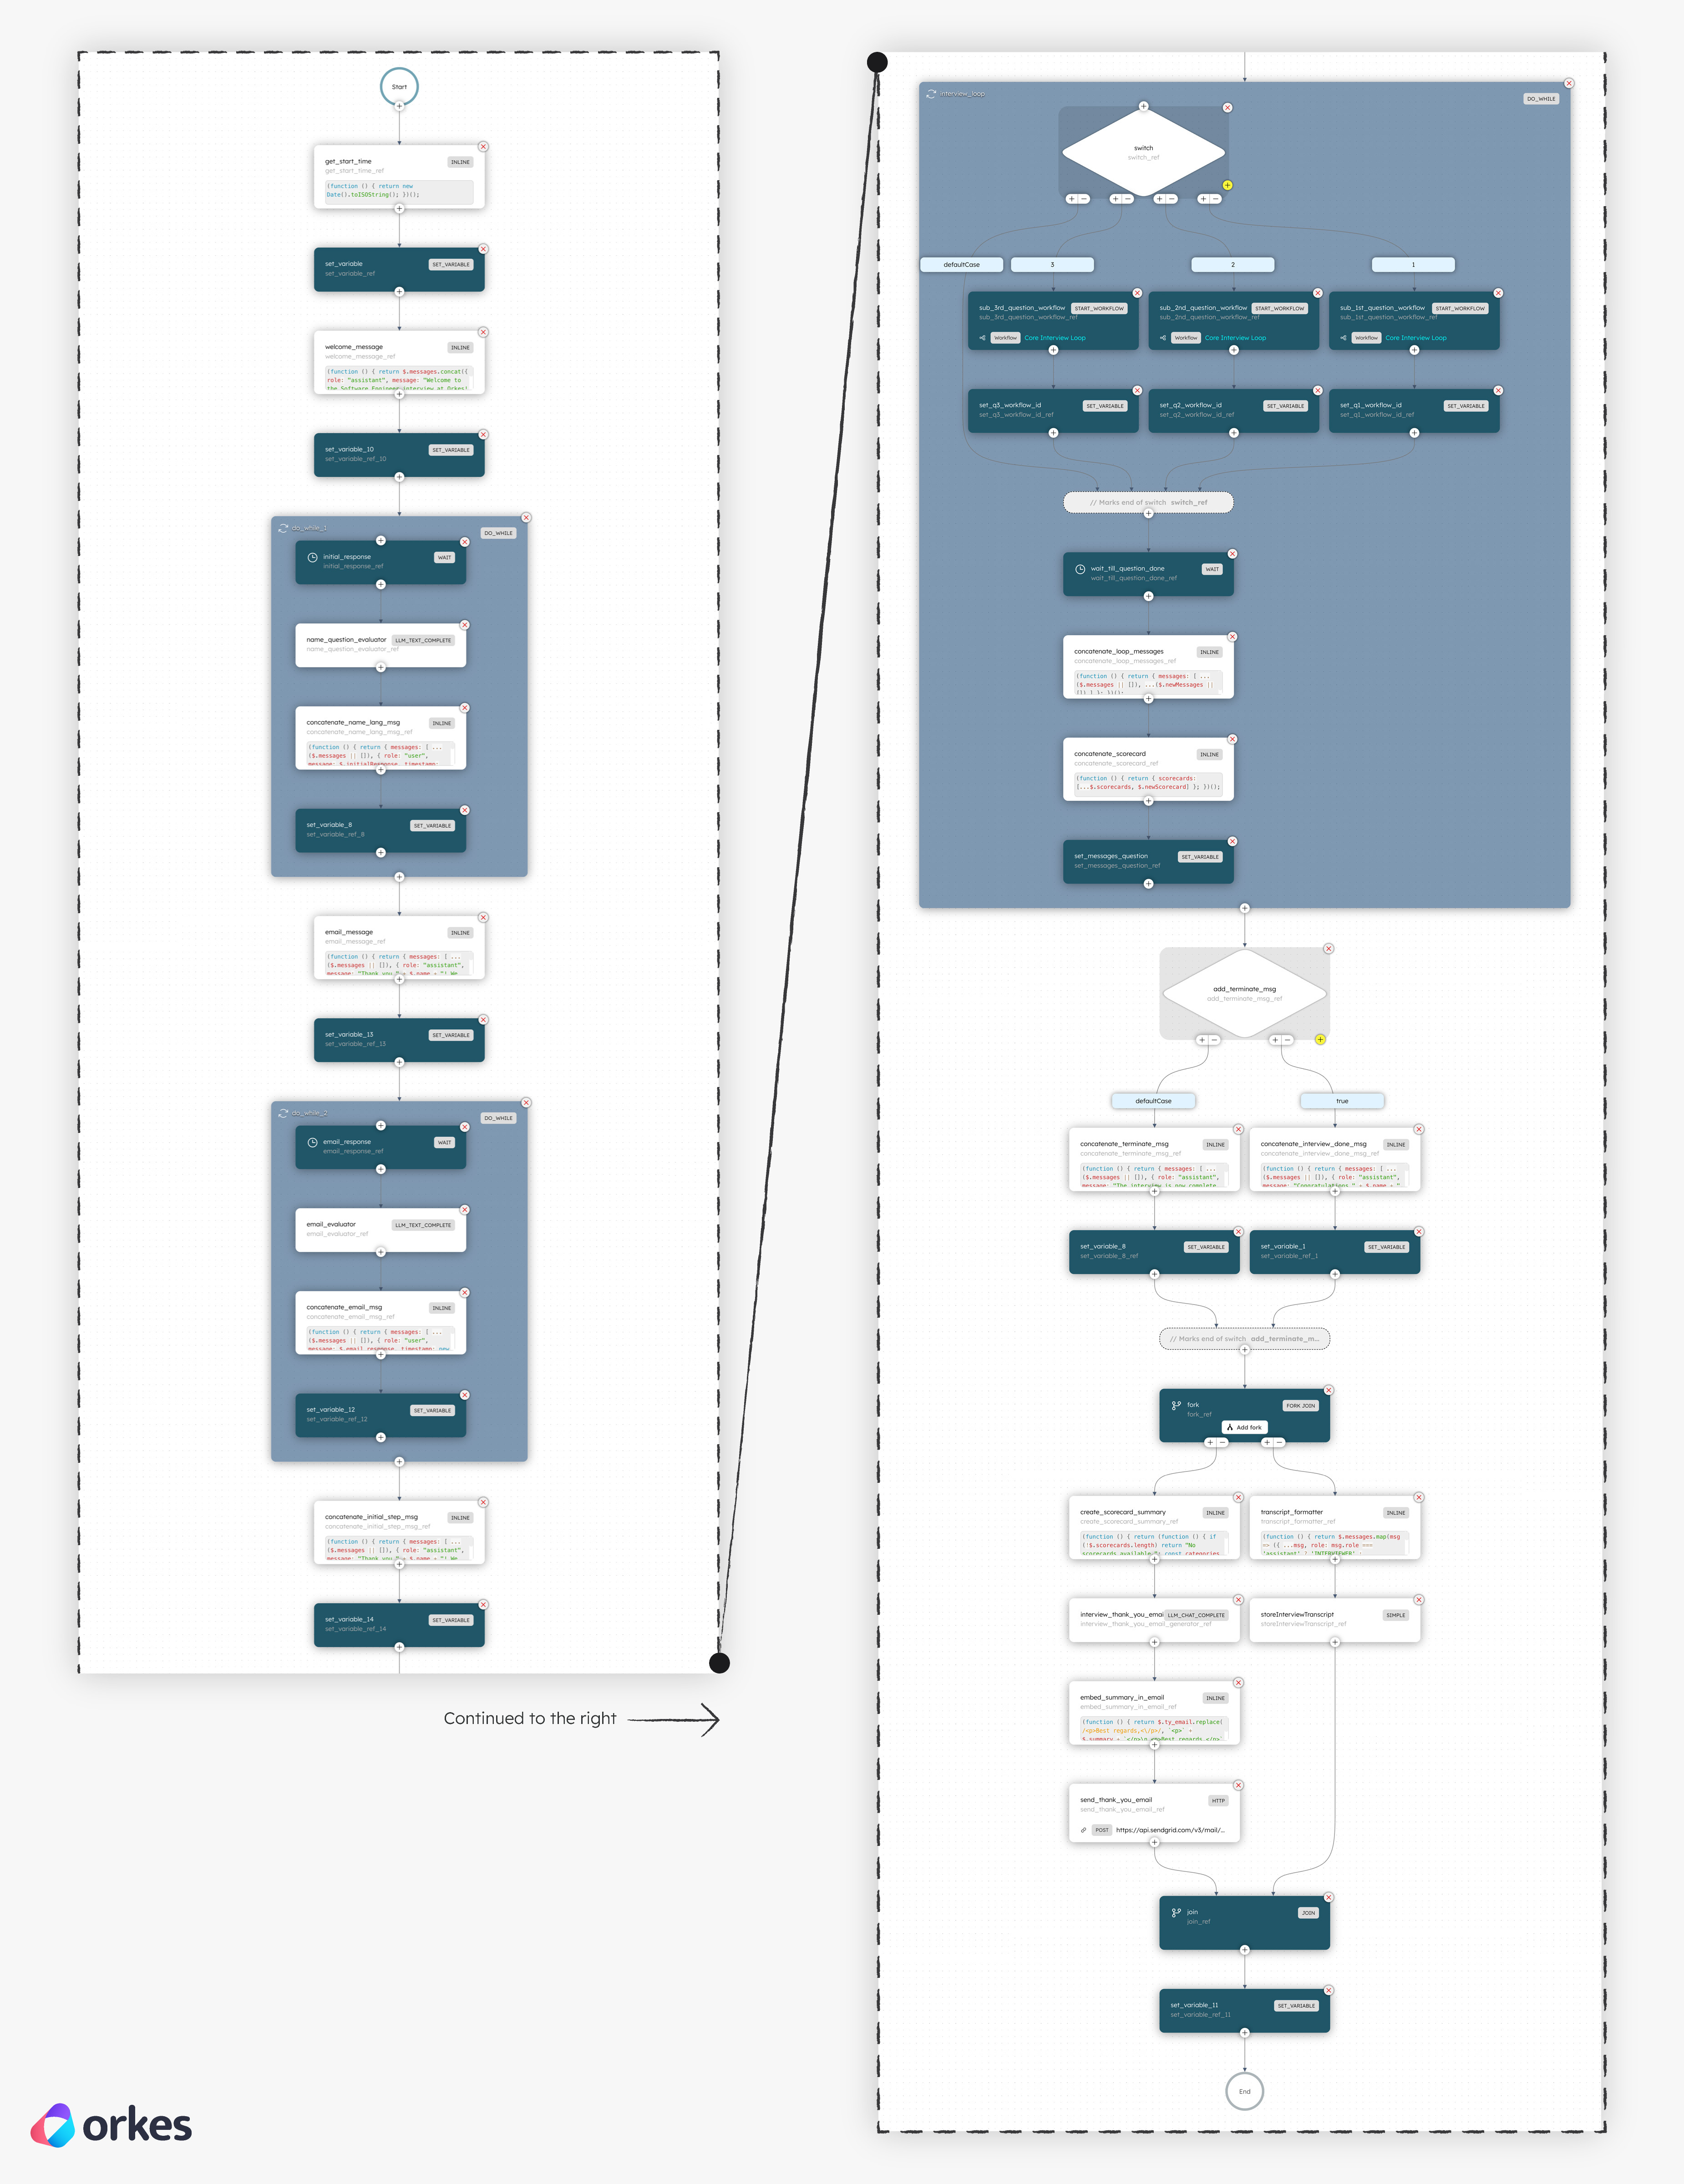
After collecting the candidate details, the app proceeds to generate questions. It uses a secondary workflow, the Core Interview Loop, to create and process a sequence of three LeetCode-style programming challenges. This is accomplished using the Start Workflow task in Conductor, which runs a new workflow instance separately.
To follow along, ensure you have access to the following:
- A free account on Orkes Developer Edition
- An OpenAI account
- A Google Cloud project
- A SendGrid account
- Python 3.9+ and Node.js 18+ installed on your machine.
Step 1: Clone the repository
Clone the awesome-conductor-apps repository where the project source code is available:
git clone https://github.com/conductor-oss/awesome-conductor-apps/
Open the project and navigate to the interview_agentic_app folder:
cd python/interview_agentic_app
Step 2: Set up environment variables
Since the application interacts with multiple tools, you must set up environment variables after retrieving the following credentials:
- Orkes Conductor
- OpenAI
- Google Cloud
- SendGrid
Ensure all environment variables are set in the same terminal session used to start the backend server.
Orkes Conductor access key and secret
To connect your Developer Edition with your interview application, create an Application in Orkes Conductor and generate the access keys.
To generate the access keys:
- Go to Access Control > Applications from the left navigation menu on your Conductor cluster.
- Select + Create application.
- Enter a Name for your application, and select Save.
- Set the Application roles to Worker and Metadata API.
- Select + Create access key.
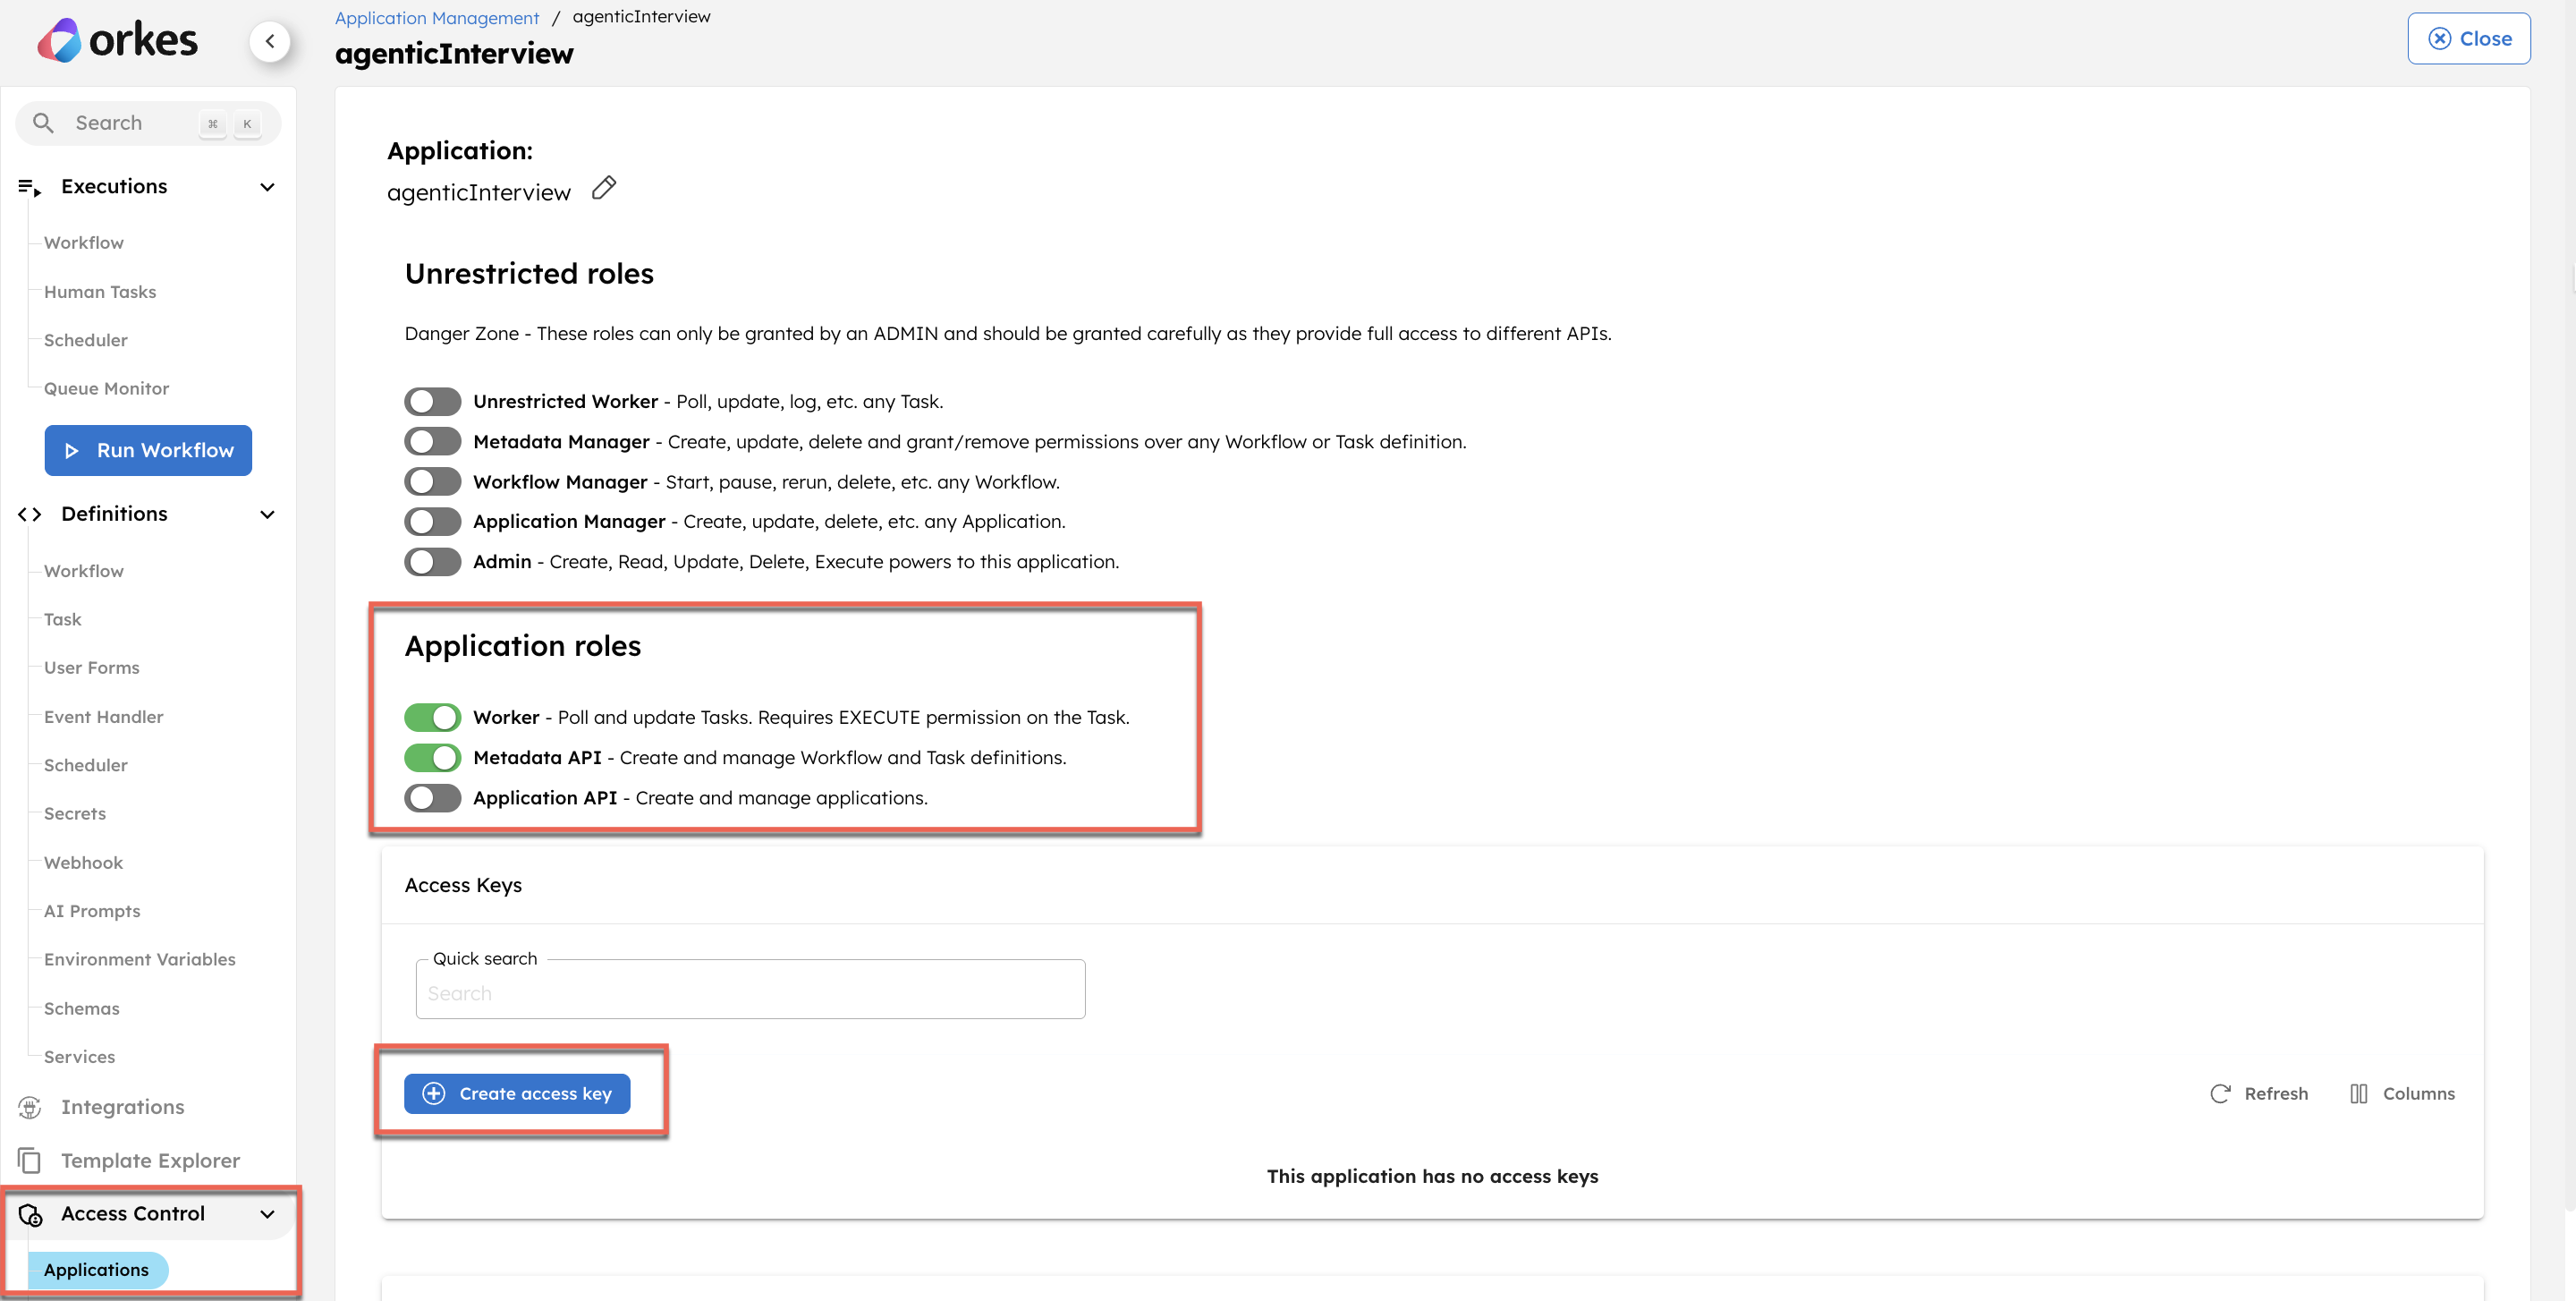
- Copy the Key ID, Key Secret, and Server URL.
Next, open the cloned project in any IDE of your choice and set the following variables:
export CONDUCTOR_SERVER_URL=<YOUR_SERVER_URL>
export CONDUCTOR_AUTH_KEY=<YOUR_CONDUCTOR_AUTH_KEY>
export CONDUCTOR_AUTH_SECRET=<YOUR_CONDUCTOR_AUTH_SECRET>
OpenAI API key
Next, generate the API key from the OpenAI platform.
To generate an API key:
- Log in to the OpenAI platform.
- Go to Dashboard from the top navigation menu and select API keys from the left menu.
- Select + Create new secret key.
- Enter a Name for the key, and then select Create secret key.
- Copy and store the generated key.
Return to your project and set the environment variable:
export OPENAI_API_KEY=<YOUR_OPENAI_KEY>
Google authentication credentials
Google authentication credentials are required to access Google APIs. The interview transcription is generated using the Google Docs API.
Generate a service account key
To generate a service account key:
- Log in to the Google Cloud console.
- Go to IAM & Admin > Service Accounts.
- Select a project. If you don't have any existing projects, consider creating a new one.
- Enter a Service account name and select Done.
- Open the created service account and go to the Keys tab.
- Select Add key > Create new key.
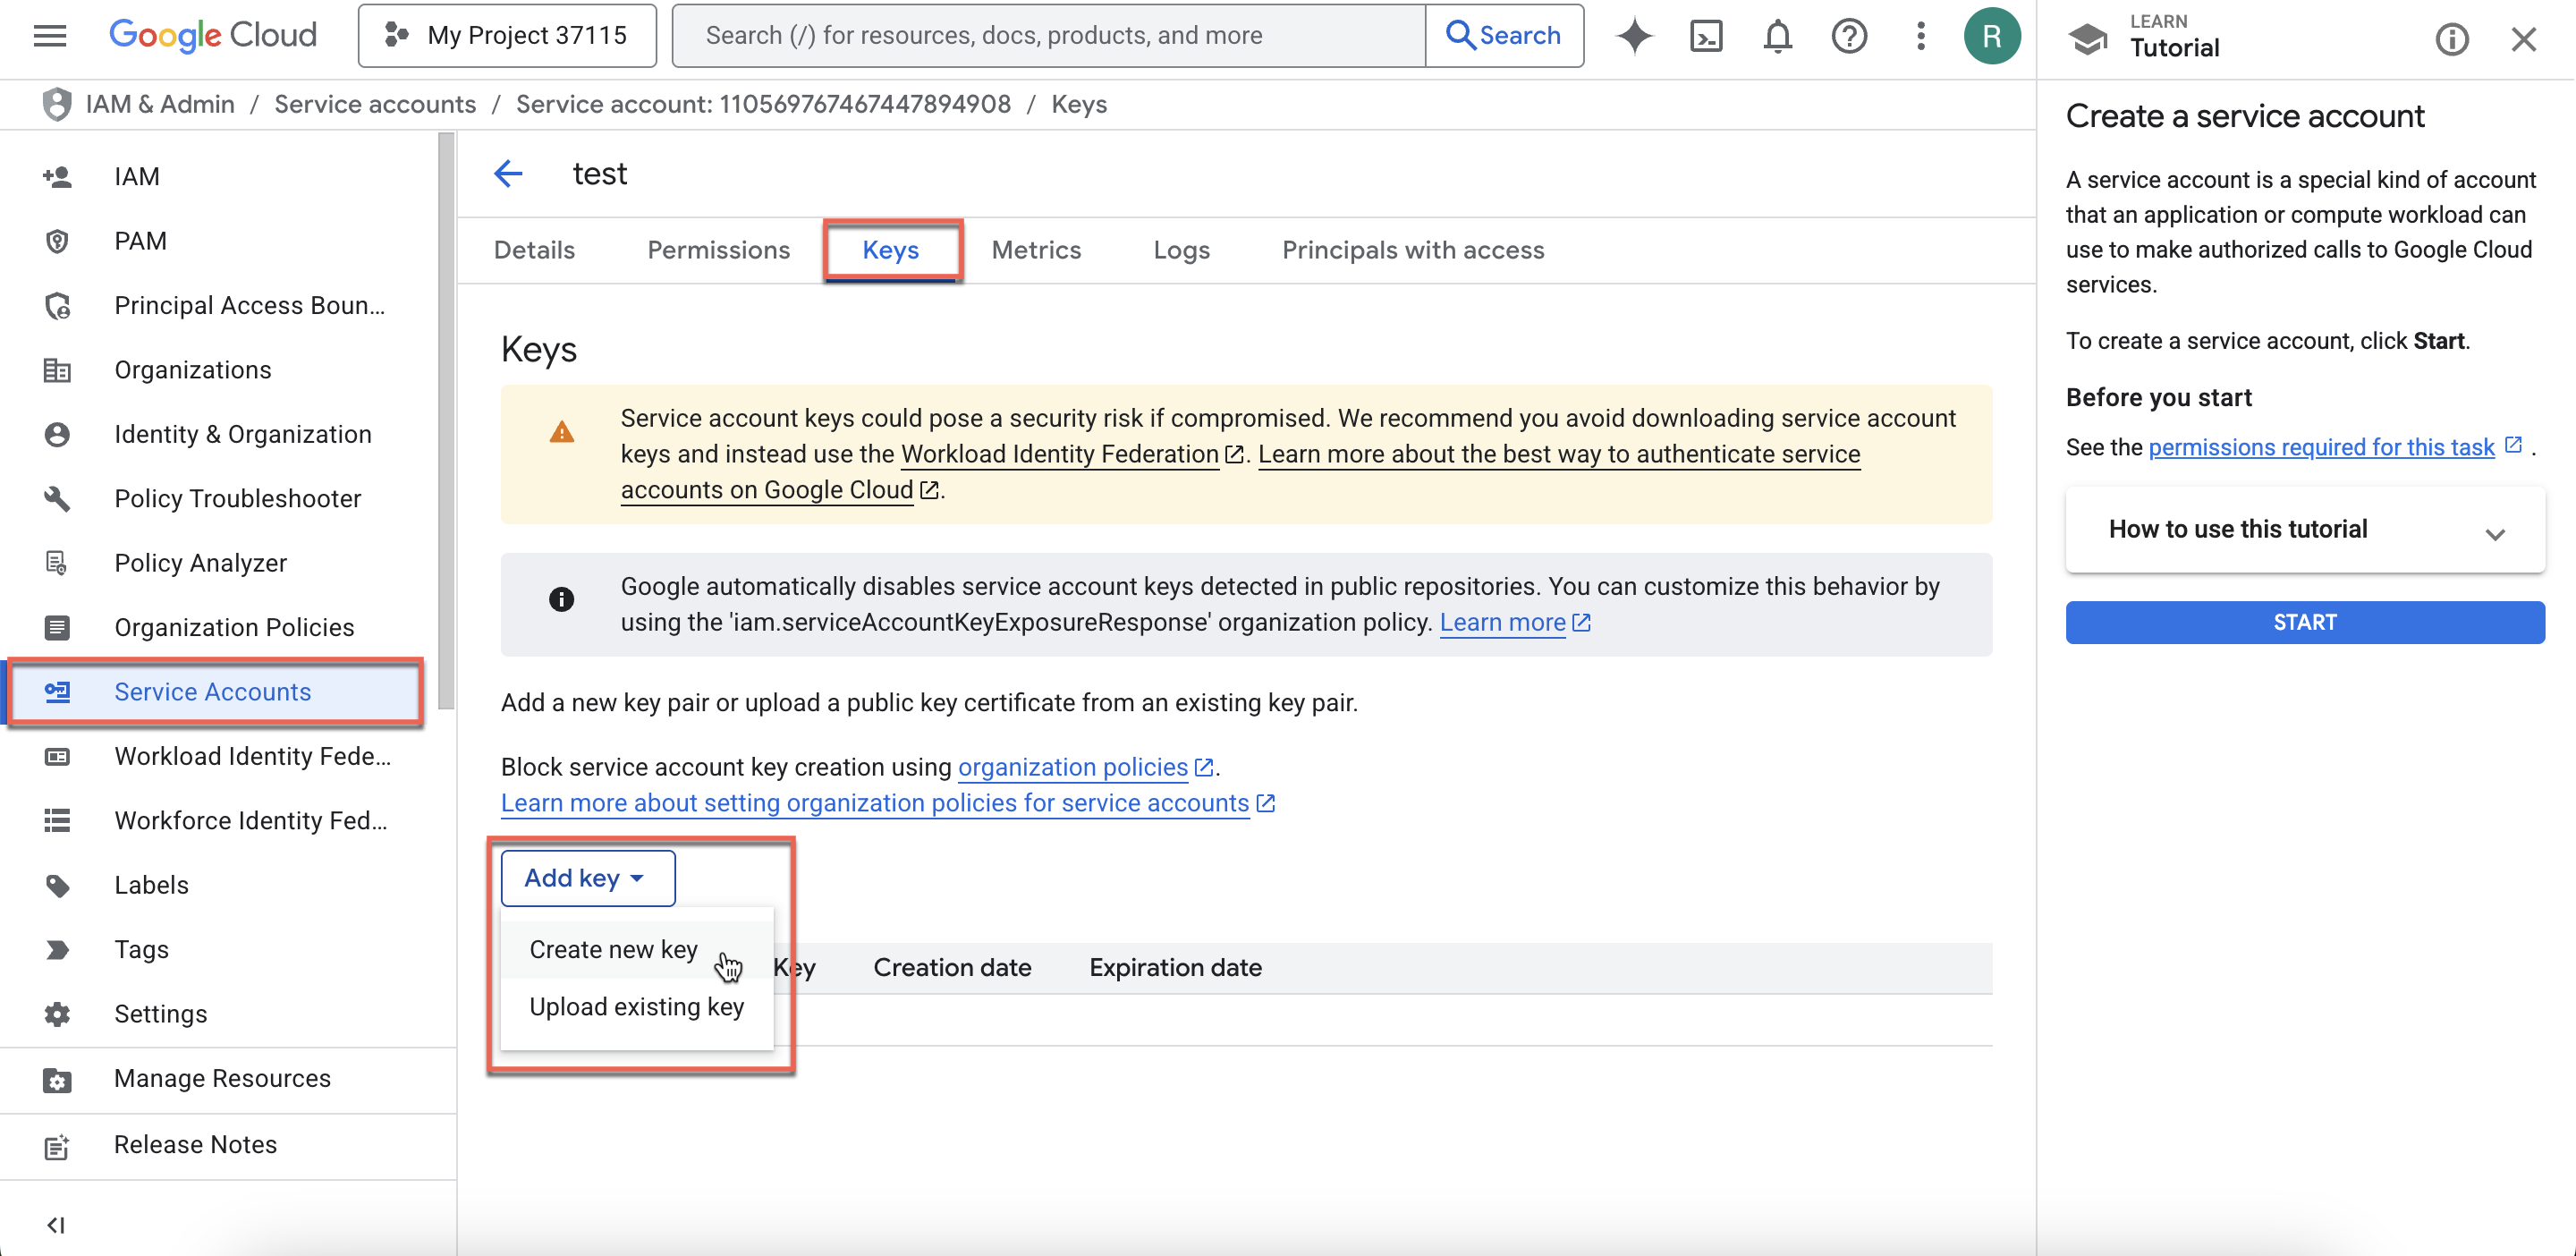
- Select the Key type as JSON and select Create.
This saves a private key to your device.
Next, we need to stringify the contents of the JSON file using the following command:
python3 -c 'import json; print(json.dumps(json.load(open("<PATH-TO-JSON-FILE>/project-name.json"))))'
Ensure to replace with your path to the saved file and your file name.
Copy the output of the above command, which is the stringified JSON, and then set the environment variables:
export GOOGLE_SERVICE_ACCOUNT_JSON='<PASTE_THE_STRING_HERE>'
export ENV=prod
Next, let's enable the Google Docs API for this project.
Enable Google Docs API
To enable the Google Docs API for the project:
- Go to APIs & Services > Enabled APIs & Services from the left menu.
- Select + Enable APIs and services.
- In the API Library, search for Google Docs API.
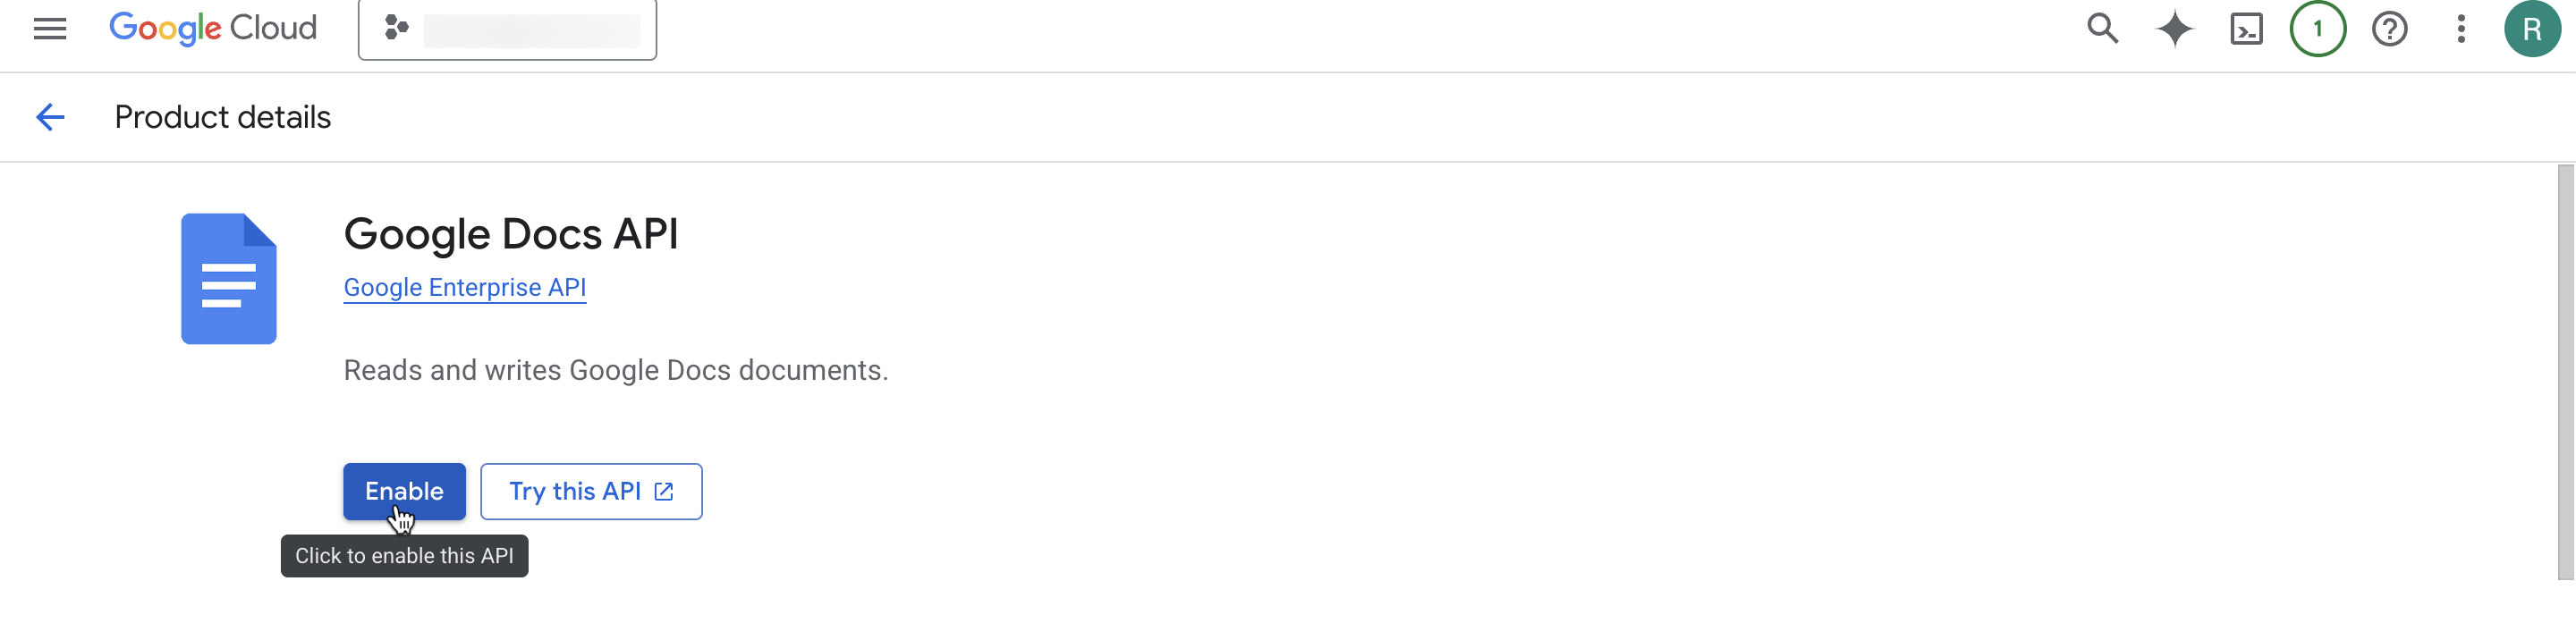
- Select Enable.
SendGrid API
The SendGrid API sends the candidate the final interview summary and transcript file. Before generating the API key, we need to verify the sender email address in your SendGrid account.
Verify sender identity
To verify your sender:
- Go to Marketing > Senders from the left menu.
- Select Create New Sender.
- Enter the following mandatory parameters:
- From Name
- From Email Address
- Reply to
- Company Address
- City
- Country
- Nickname
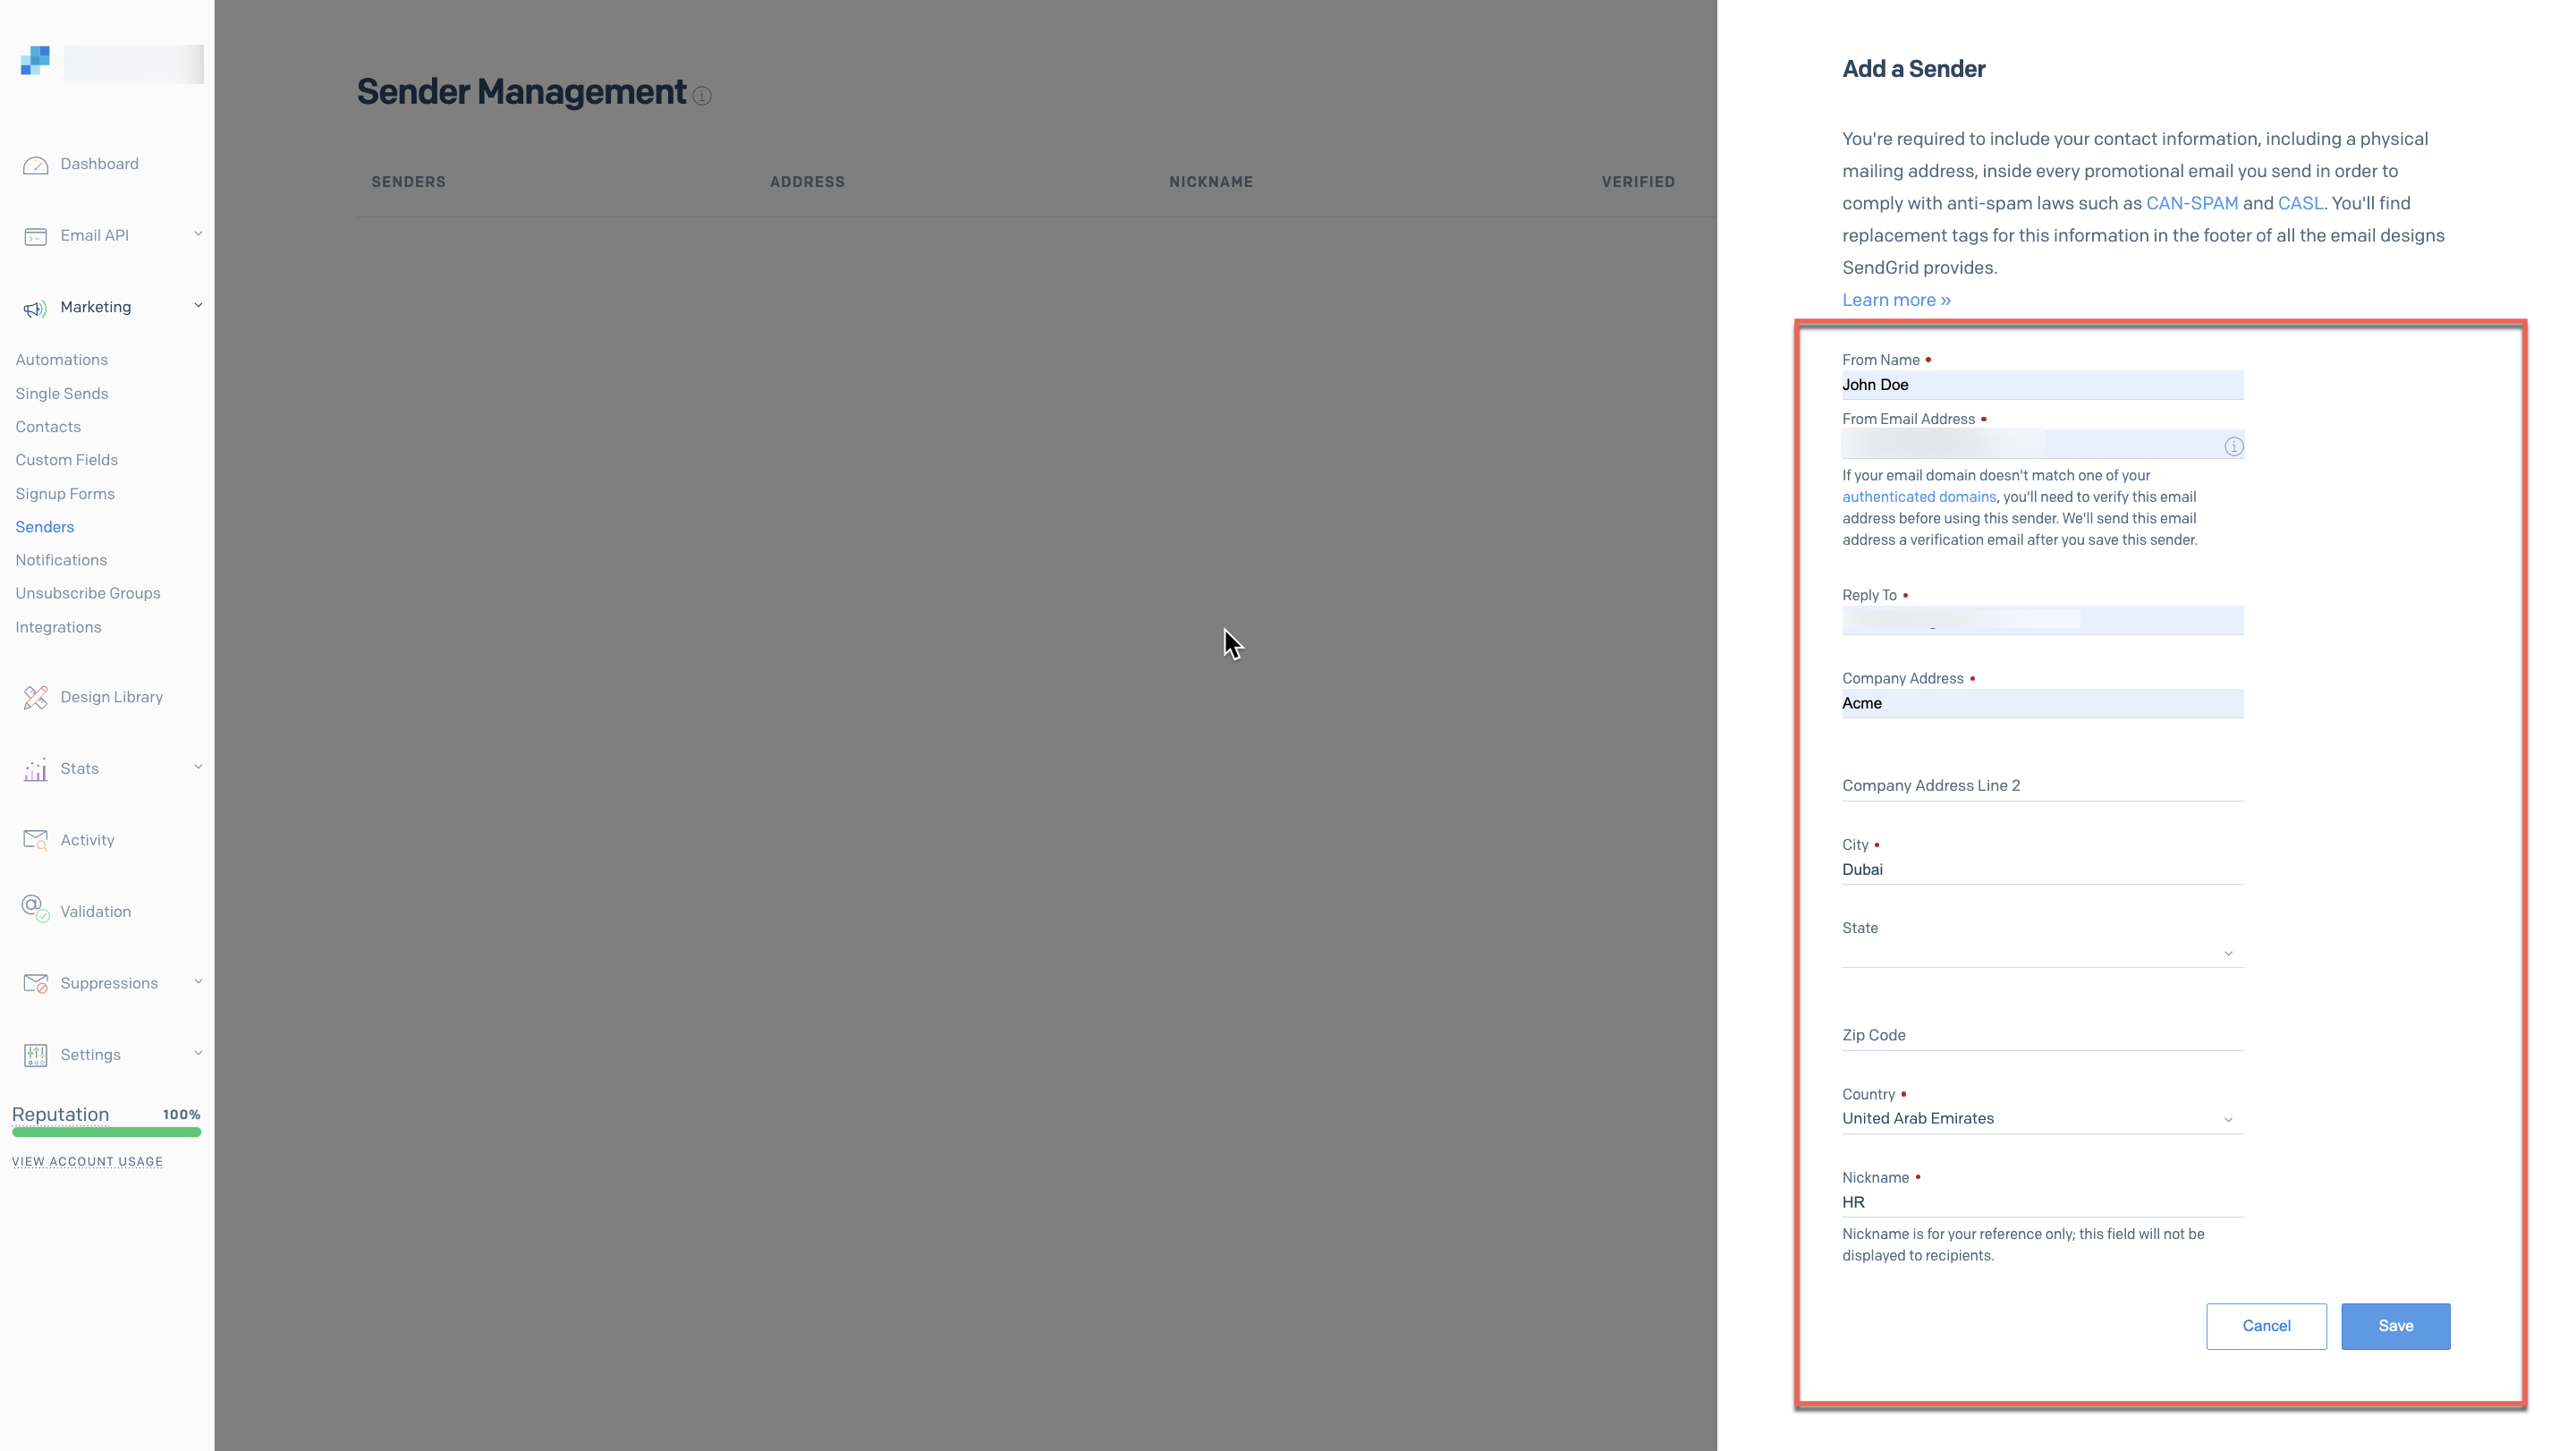
- Select Save.
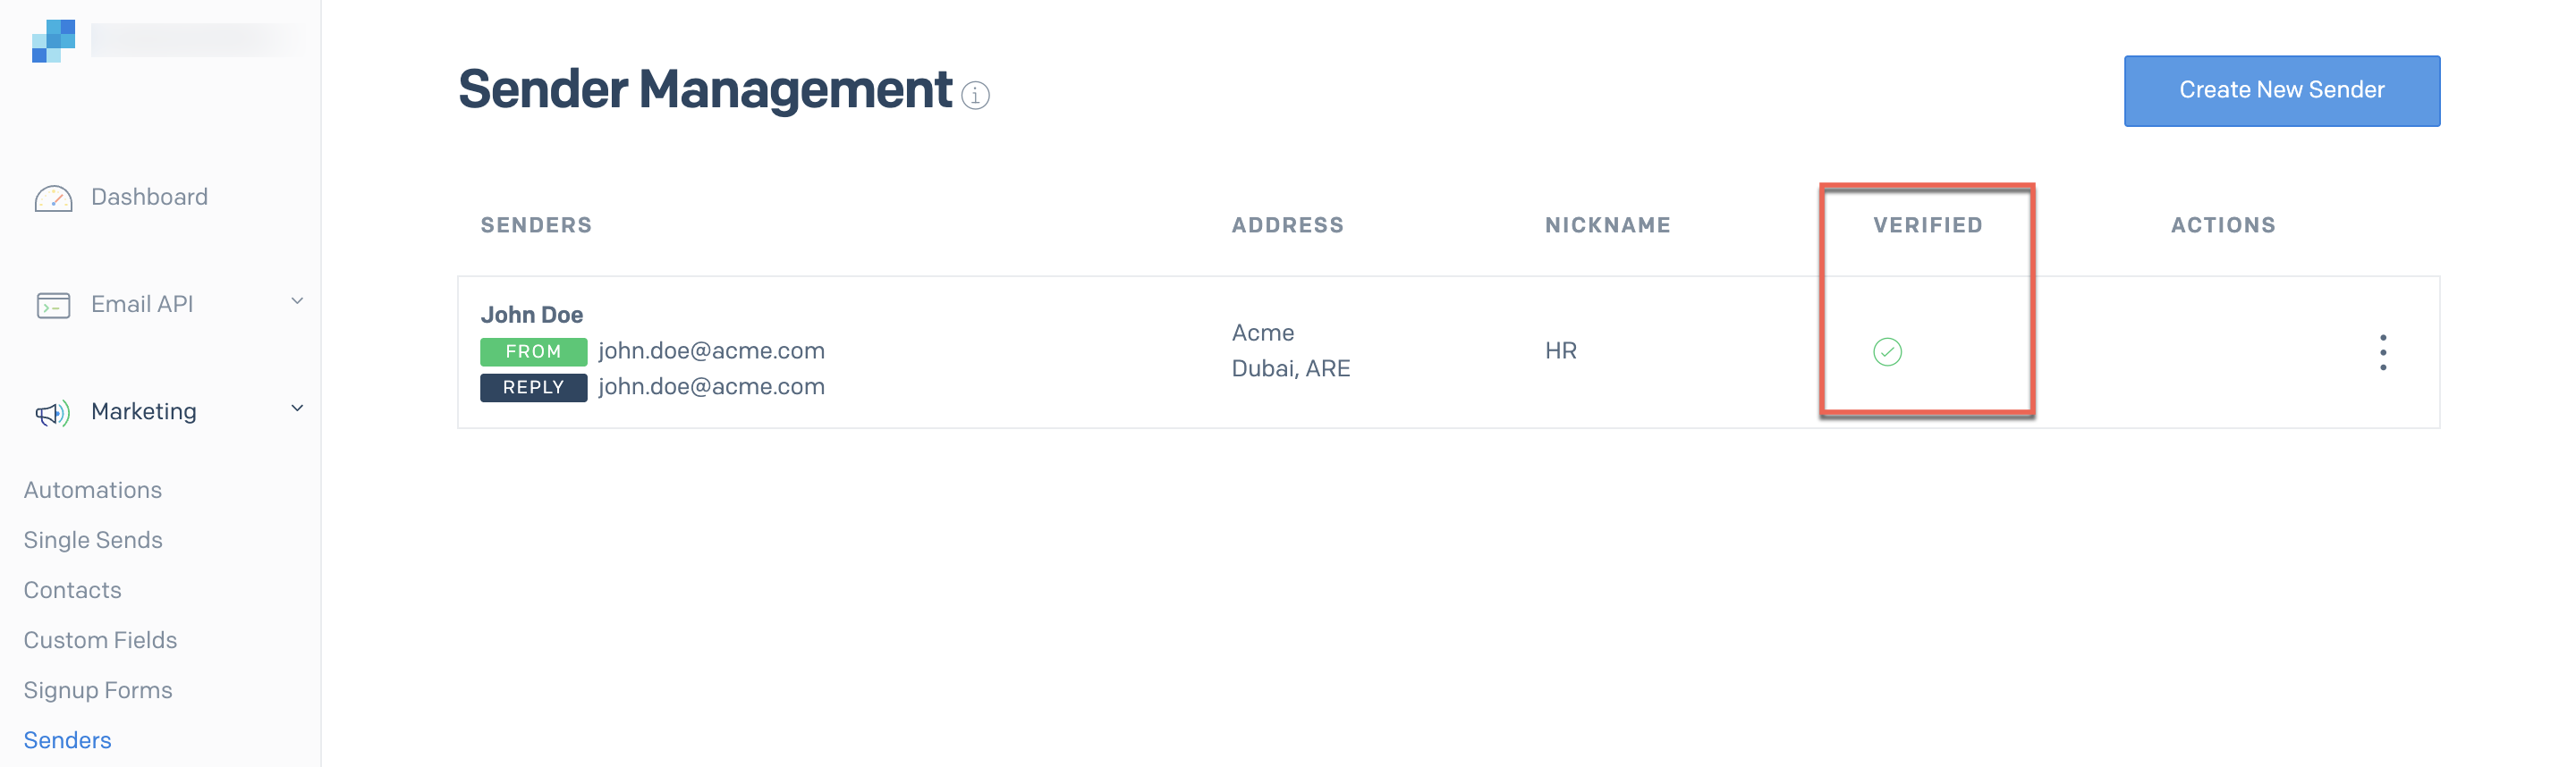
This saves the sender to your SendGrid portal and sends an email for verification. Once the sender clicks the verification link in the email, the sender’s status is updated to ‘verified’ within the portal.
Then, set the environment variable for your verified sender email:
export SEND_GRID_EMAIL_ADDRESS=<YOUR_SEND_GRID_VERIFIED_EMAIL_ADDRESS>
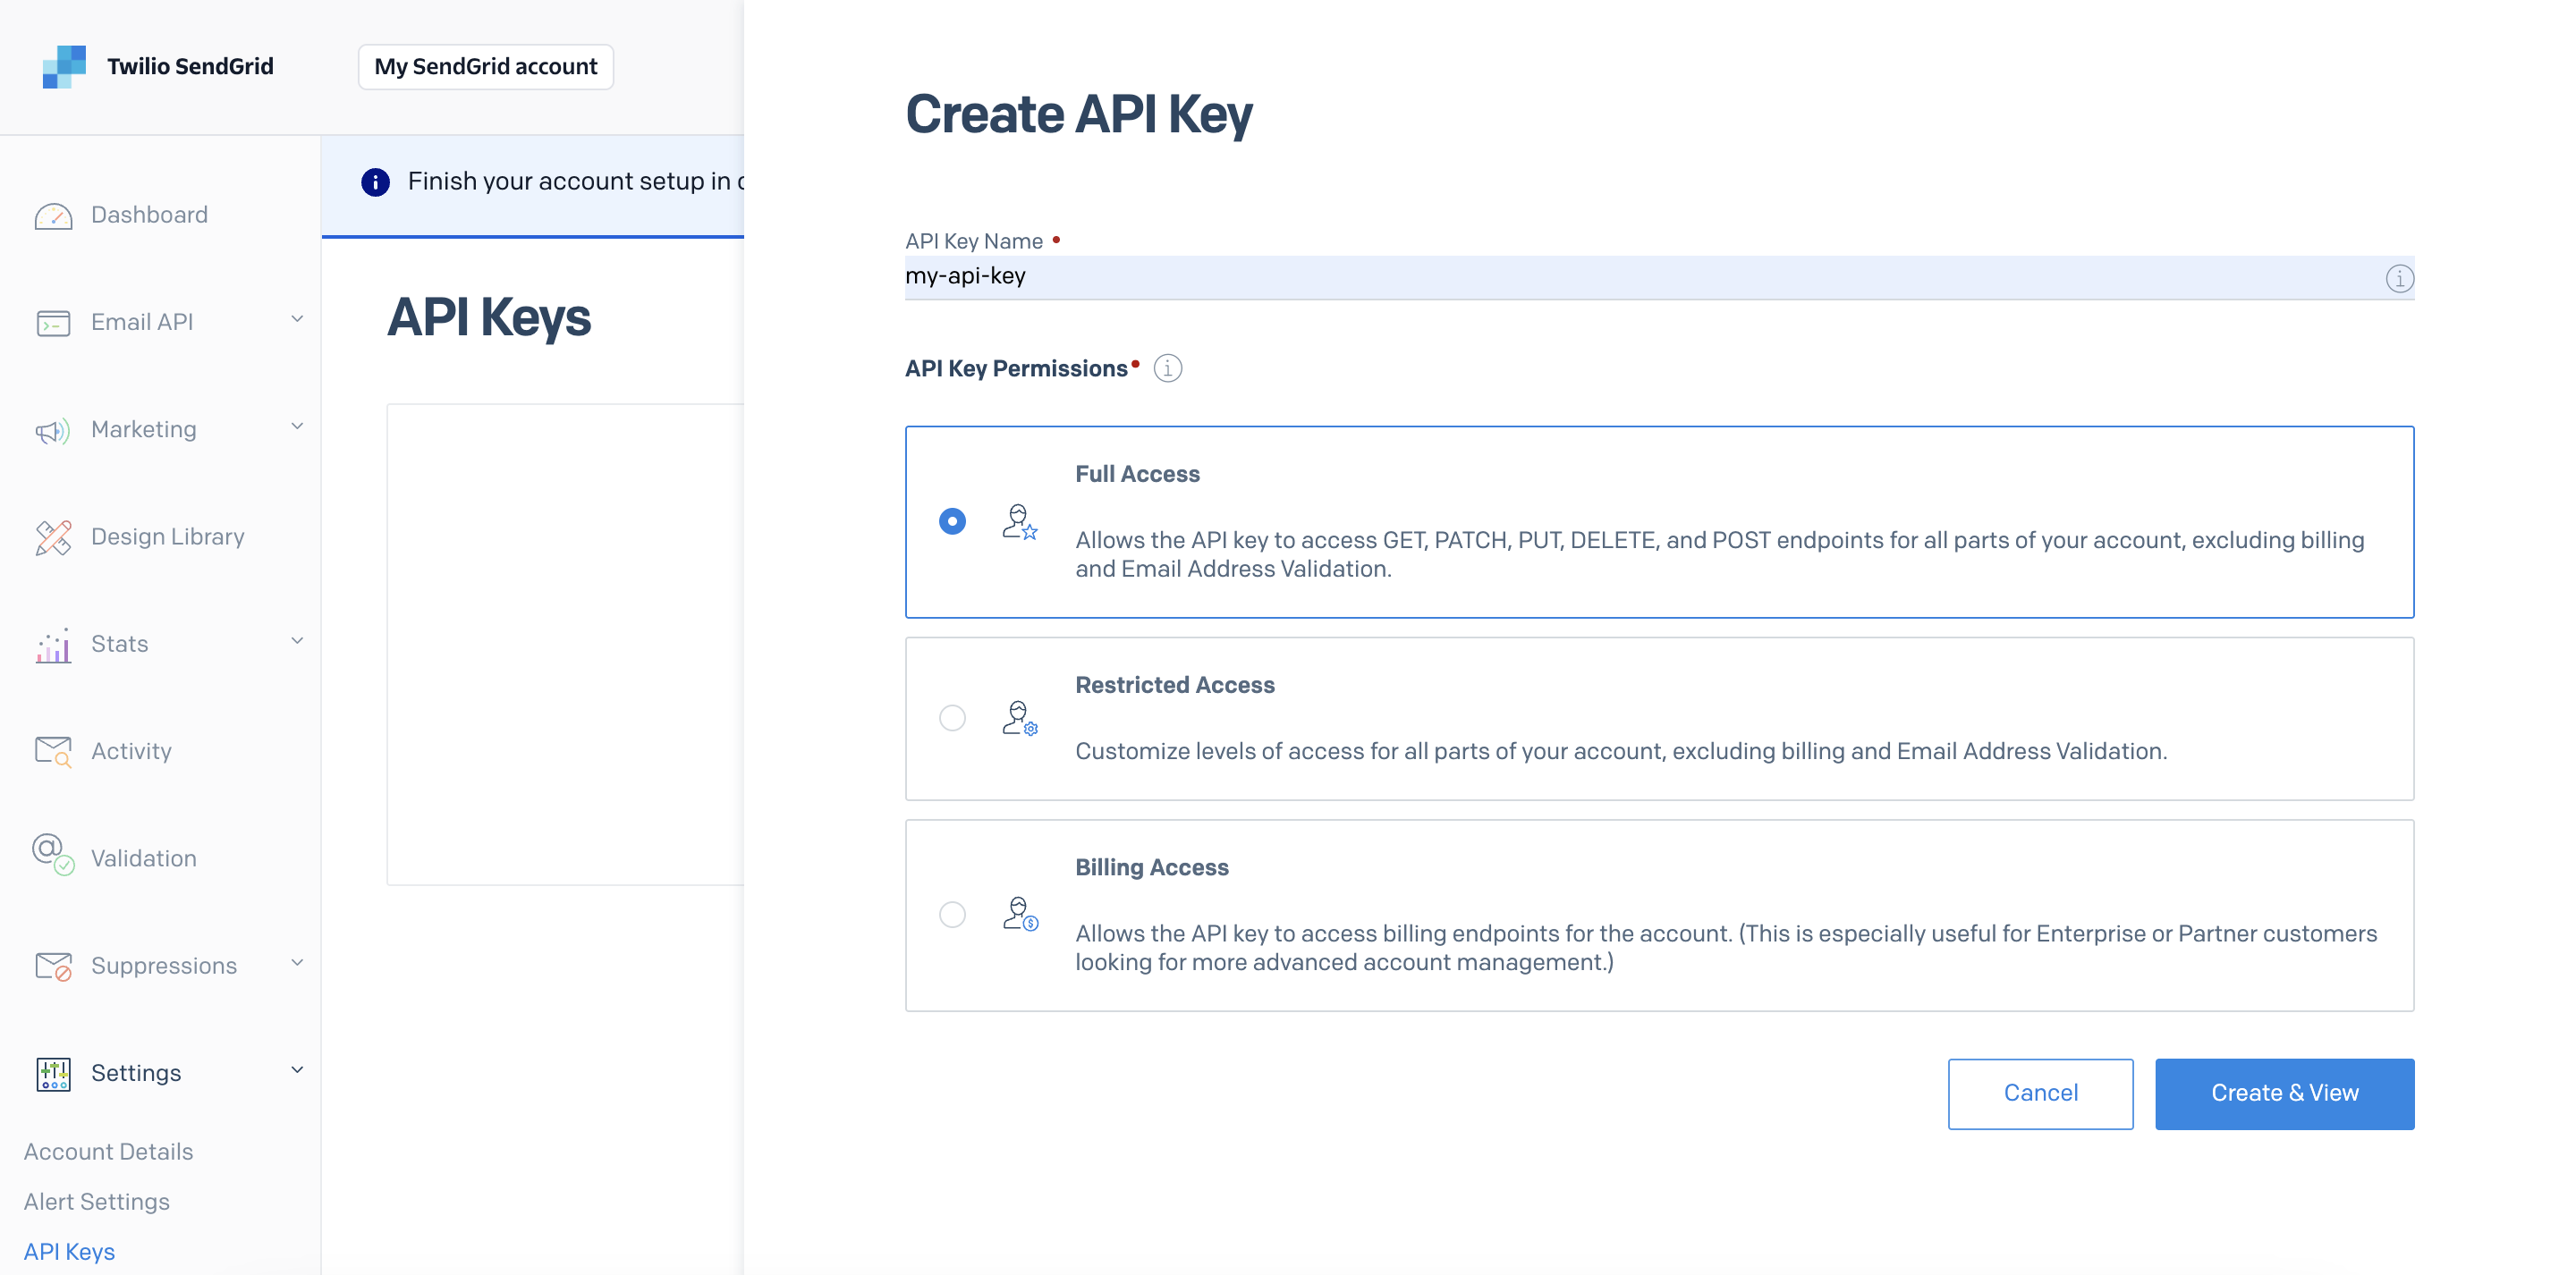
Generate API key
To generate an API key:
- Go to Settings > API Keys from the left menu.
- Select Create API Key.
- Enter an API Key Name.
- Select the required API Key Permissions.
- Select Create & View.
- Copy and store the generated API key.
Now, set the environment variable for your API Key:
export SEND_GRID_API_KEY=<YOUR_SEND_GRID_API_KEY>
Finally, update the workflow definition JSON to use this sender email. Go to the python/interview_agentic_app/resources/interviewAgenticWorkflow.json file.
Search and replace <SENDGRID_VERIFIED_SENDER_EMAIL> with your verified sender email in the following two instances:
//workflow JSON

 "from": {
                  "email": "<SENDGRID_VERIFIED_SENDER_EMAIL>" //Line 878
                },
                "subject": "Thank you ${workflow.variables.name} for interviewing with Orkes",
//workflow JSON
                "from": {
                  "email": "<SENDGRID_VERIFIED_SENDER_EMAIL>" //Line 996
                },
                "subject": "Thank you ${workflow.variables.name} for interviewing with Orkes",
Step 3: Start the backend server
Next, launch the Python-based backend server that listens for incoming requests and triggers the Conductor workflow.
Set the Python path:
export PYTHONPATH=/[PATH_TO_REPO]/awesome-conductor-apps/python/interview_agentic_app
Create and activate a virtual environment:
python3 -m venv venv
source venv/bin/activate
Install required dependencies:
pip3 install -r requirements.txt
Start the backend server:
cd workflow
python app.py
By default, the backend server runs on http://localhost:5000.
In your Conductor cluster, the OpenAI integration, AI prompts, and workflow definitions are auto-generated and do not require any additional modifications.
Step 4: Start the frontend server
Now, launch the Next.js frontend server where candidates can enter their information and take the interview in an interactive chat UI.
In a new terminal, go to the frontend directory:
cd python/interview_agentic_app/interview-chat
Install dependencies:
npm install --legacy-peer-deps
Start the frontend server:
npm run dev
The app should now be running locally.
Step 5: View the interview app in action
To launch the interview experience locally, go to http://localhost:3000 in your browser.
When the interview begins, the Interview Agentic Workflow is triggered first. Each interview question is handled separately using the Core Interview Loop workflow. For an interview with three questions, this workflow is run in sequence three times using the Start Workflow task in Conductor.

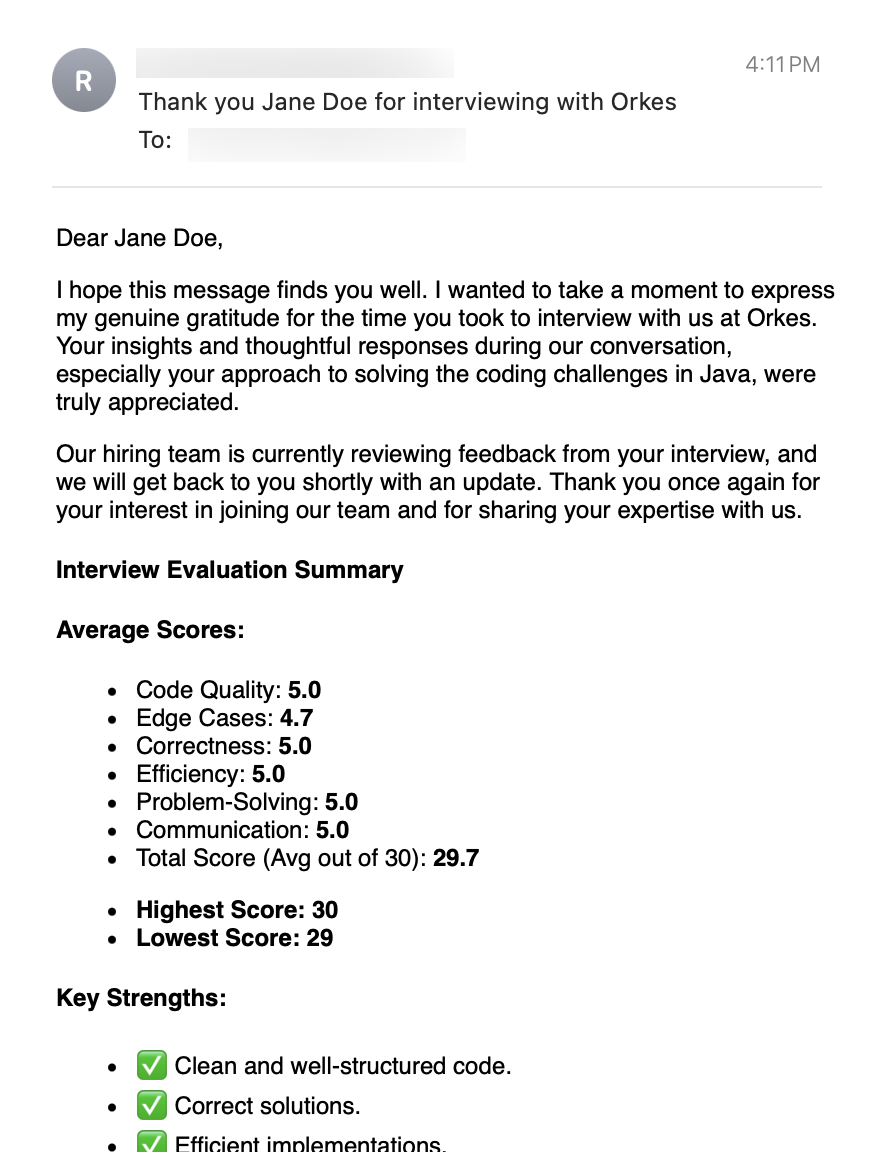
Once the interview is completed, a thank-you email with feedback and scores is sent to the candidate via SendGrid.
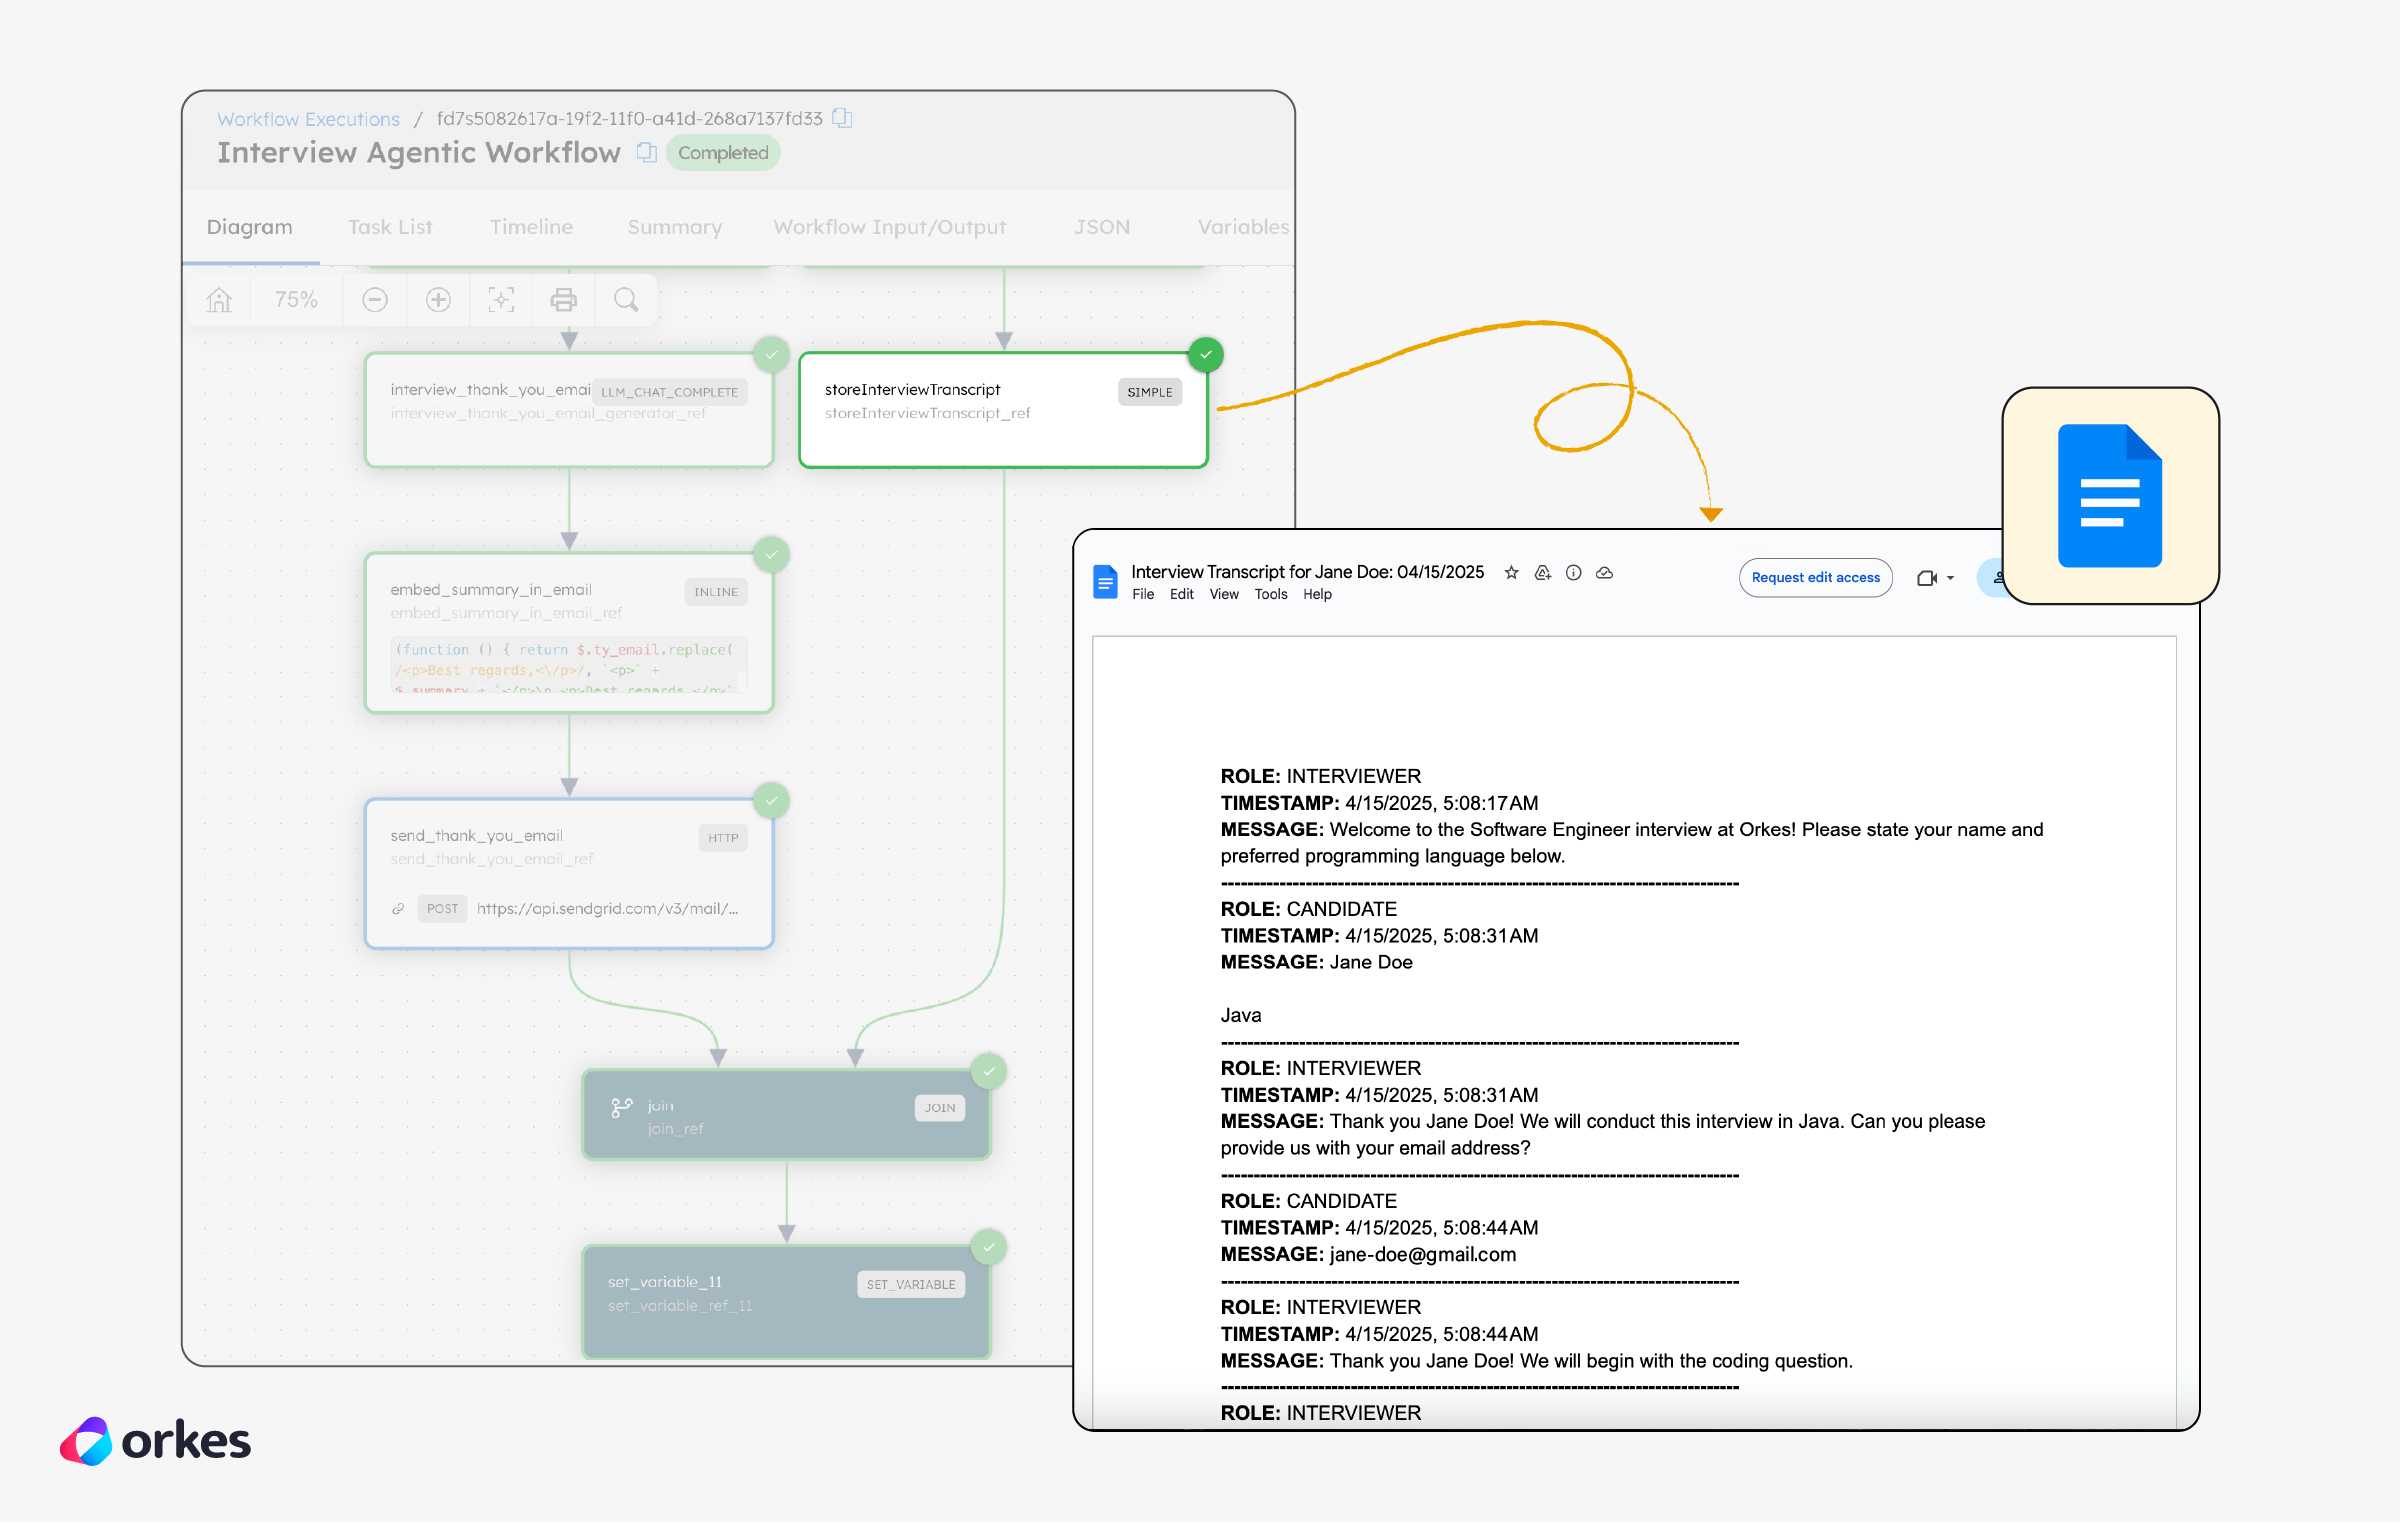
In parallel, a fully formatted Google Docs transcript is generated and stored in Google Drive. The interviewer and candidate are granted access, and a link is shared in a follow-up email after a fixed wait period.
You now have a fully functional agentic interview app that orchestrates candidate interactions, automates interview workflows, and delivers results seamlessly.
Troubleshooting
Here are a few common issues and how to fix them:
| Issues | Fixes |
|---|---|
| App doesn’t load |
|
| Transcript isn’t created |
|
| Emails aren’t delivered |
|
| Conductor workflows don’t start |
|
| OpenAI responses fail |
|
| Frontend displays a blank page or a 500 error |
|