SOLUTIONS
Build an AI Application for Document Classification: A Step-by-Step Guide

Riza Farheen
Developer Advocate
Last updated: February 5, 2025
February 5, 2025
9 min read


Join thousands of developers building the future with Orkes.
This is Part 2 of the AI App Development series, which will demonstrate how to build an application that uses LLMs to automate document classification. Check out Part 1 for a use case on summarizing an article.
In a modern data-driven world, organizations handle an ever-growing volume of documents, ranging from invoices and contracts to reports and records. Manually sorting and categorizing these documents is now a thing of the past—a daunting task that is time-consuming, resource-intensive, and prone to human error. Misclassifications can lead to operational inefficiencies, compliance risks, and increased costs.
AI-powered document classification automates this process, enabling organizations to handle large volumes of documents quickly and accurately.
This blog will demonstrate how to build an AI application that classifies your documents using Orkes Conductor.
Document classification is the process of classifying documents into predefined categories based on their content. It is widely used across industries to streamline the sorting, categorizing, and processing of large volumes of documents.
In this tutorial, we’ll create an AI application flow that:
Let’s break down the workflow logic.
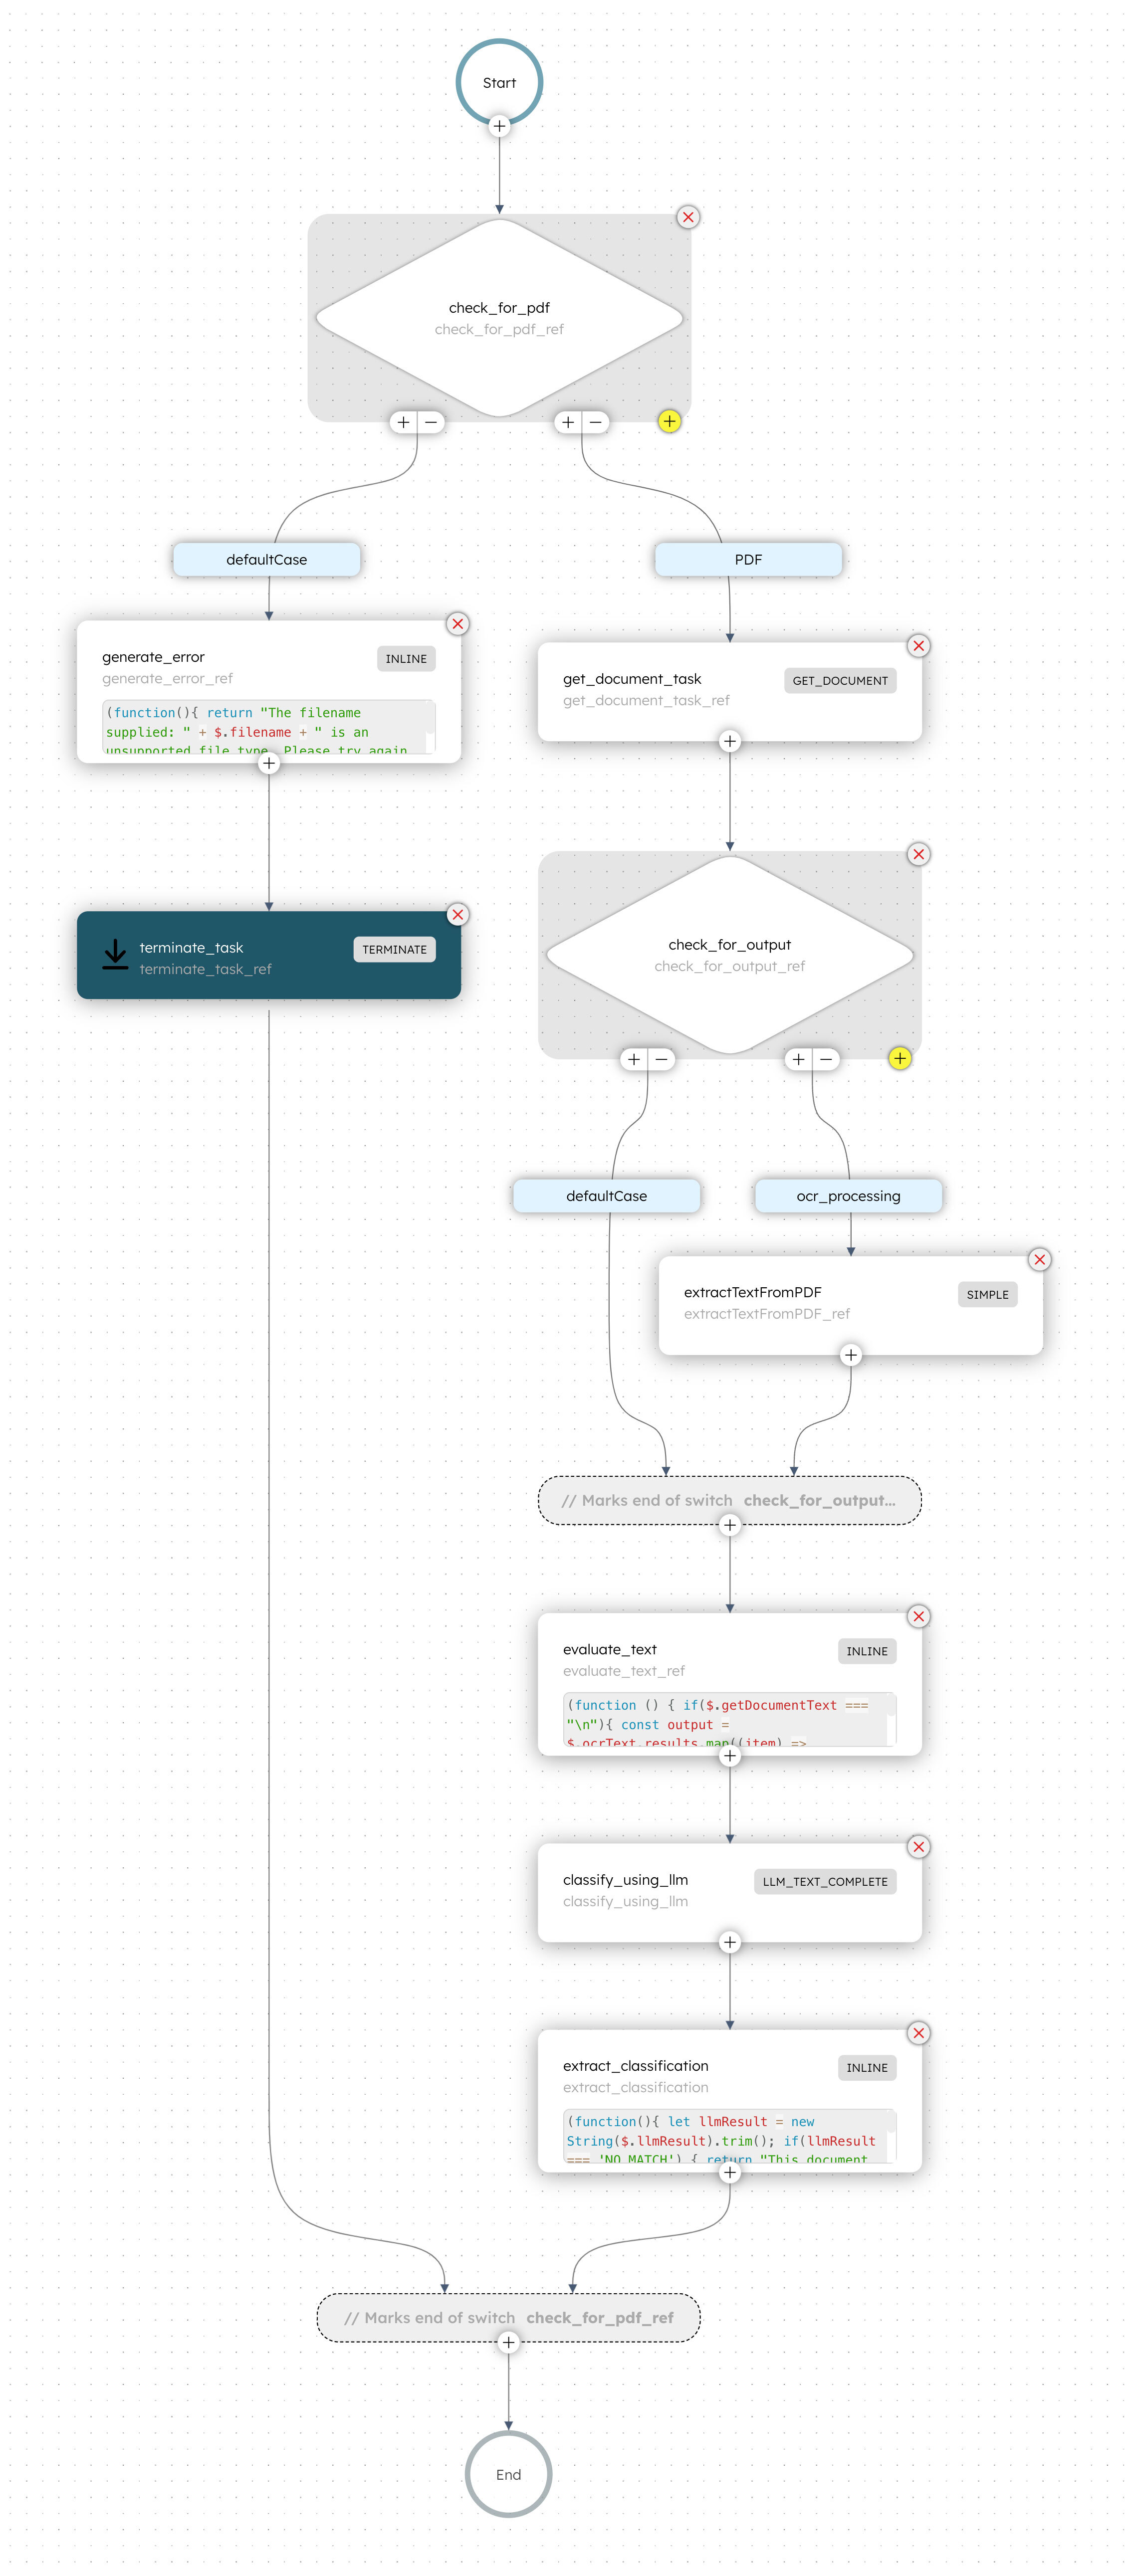
The workflow begins with a Switch task that evaluates whether the input document URL points to a PDF file (i.e., has a .pdf extension). Based on the evaluation, it then follows one of the two cases:
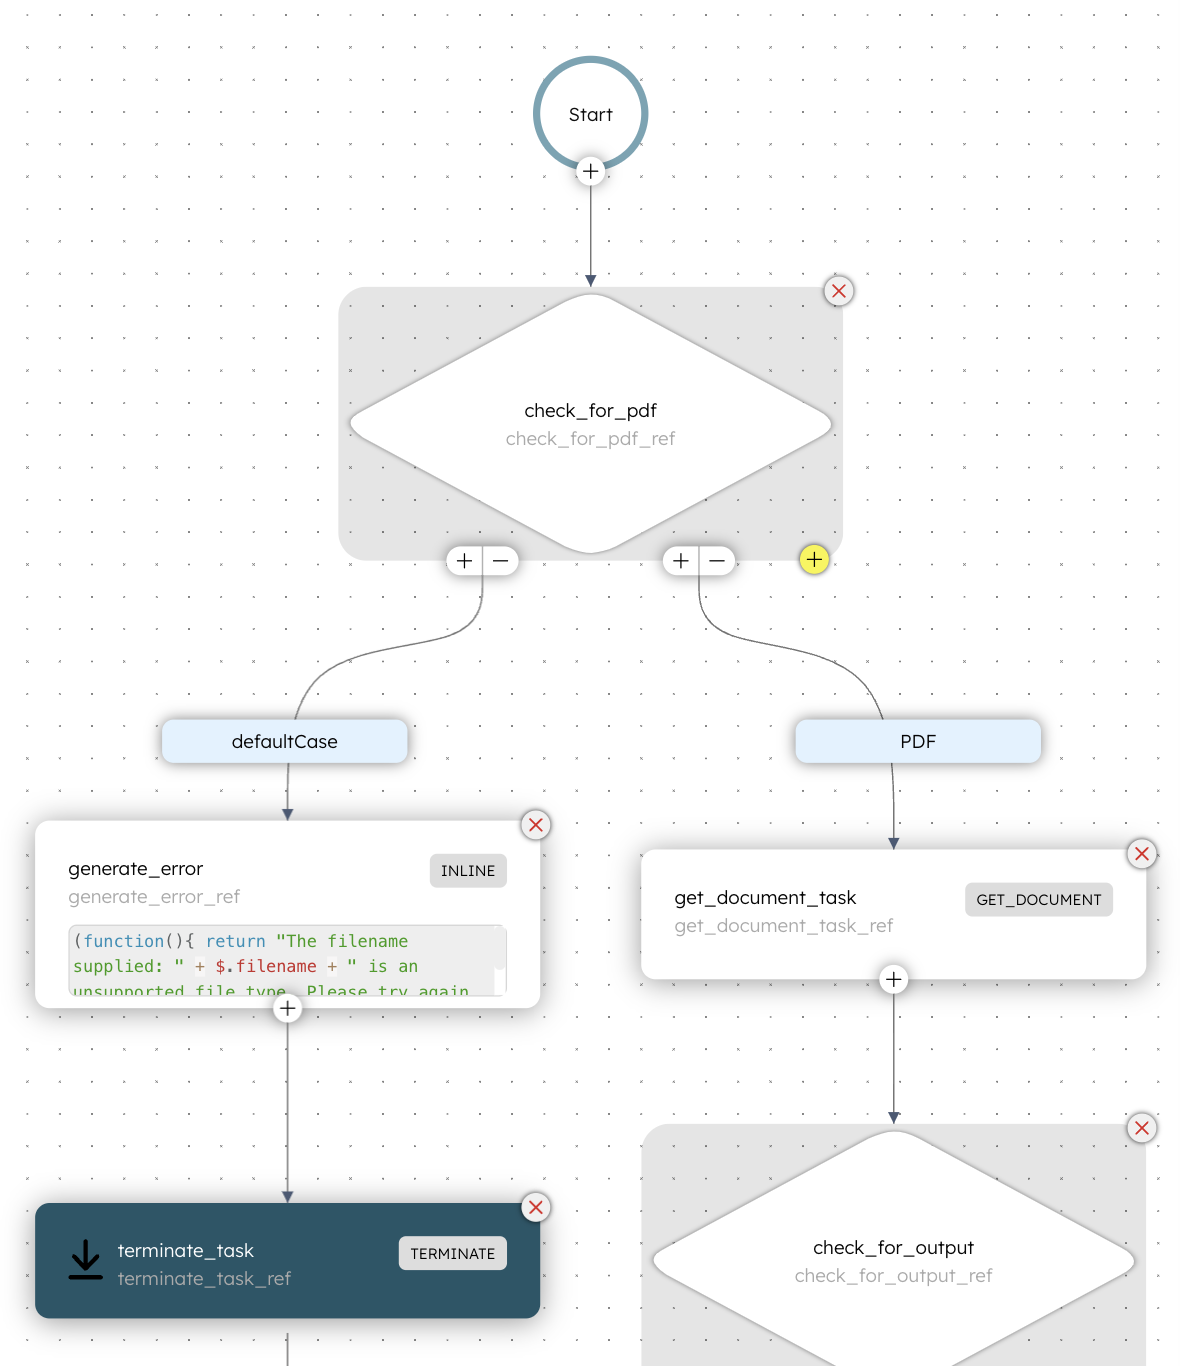
The next step involves another Switch task that evaluates the output from the Get Document task. If the document is text-based, the defaultCase is executed. If the document is non-text-based, the workflow routes to the ocr_processing case, which uses Optical Character Recognition (OCR) to process the image content in the PDF.
An OCR-based Worker task (Simple) then extracts the image content from the PDF. This task requires an external worker, set up outside the Conductor, to poll for the task.
Following that, an Inline task formats the extracted text, preparing it for the document classification process. The classification step involves an LLM Text Complete task that uses a prompt to categorize the document into different categories. The task leverages a prompt template created within Conductor to determine the file’s type,
Finally, the workflow concludes with an Inline task that extracts, formats, and publishes the classification results.
To follow the tutorial, let’s use the free Orkes Developer Edition. Create an account to get started.
You can create application flows as JSON workflows in Conductor using SDKs, APIs, or Conductor UI. For easier testing, let’s create a workflow in the Conductor UI.
First, let's define the worker task that will be part of the workflow.
To create a task definition:
Next, let's create a workflow that includes this task.
To create the workflow:
{
"name": "document_classifier_workflow",
"description": "LLM Powered PDF Document Classification Workflow",
"version": 1,
"tasks": [
  {
    "name": "check_for_pdf",
    "taskReferenceName": "check_for_pdf_ref",
    "inputParameters": {
      "url": "${workflow.input.document_url}"
    },
    "type": "SWITCH",
    "decisionCases": {
      "PDF": [
        {
          "name": "get_document_task",
          "taskReferenceName": "get_document_task_ref",
          "inputParameters": {
            "url": "${workflow.input.document_url}",
            "mediaType": "application/pdf"
          },
          "type": "GET_DOCUMENT"
        },
        {
          "name": "check_for_output",
          "taskReferenceName": "check_for_output_ref",
          "inputParameters": {
            "textOutput": "${get_document_task_ref.output.result}"
          },
          "type": "SWITCH",
          "decisionCases": {
            "ocr_processing": [
              {
                "name": "extractTextFromPDF",
                "taskReferenceName": "extractTextFromPDF_ref",
                "inputParameters": {
                  "pdfUrl": "${workflow.input.document_url}"
                },
                "type": "SIMPLE"
              }
            ]
          },
          "evaluatorType": "graaljs",
          "expression": "(function () {\n   if($.textOutput === \"\\n\") {\n    return \"ocr_processing\";\n   }\n   return \"defaultCase\";\n}())"
        },
        {
          "name": "evaluate_text",
          "taskReferenceName": "evaluate_text_ref",
          "inputParameters": {
            "expression": "(function () {\n  if($.getDocumentText === \"\\n\") {\n    const output = $.ocrText.results.map((item) => \n    \"PageNumber: \" + item.page + \"\\nContent: \" + item.text\n  ).join('');\n\n    return output;\n  }\n  return $.getDocumentText;\n})();",
            "evaluatorType": "graaljs",
            "getDocumentText": "${get_document_task_ref.output.result}",
            "ocrText": "${extractTextFromPDF_ref.output}"
          },
          "type": "INLINE"
        },
        {
          "name": "classify_using_llm",
          "taskReferenceName": "classify_using_llm",
          "inputParameters": {
            "promptName": "your-prompt-template",
            "promptVariables": {
              "text": "${evaluate_text_ref.output.result}"
            },
            "llmProvider": "your-llm-provider",
            "model": "your-llm-model"
          },
          "type": "LLM_TEXT_COMPLETE"
        },
        {
          "name": "extract_classification",
          "taskReferenceName": "extract_classification",
          "inputParameters": {
            "expression": "(function(){ \n  let llmResult = new String($.llmResult).trim();\n  if(llmResult === 'NO_MATCH') {\n    return \"This document couldn't be classified by the LLM\";\n  }\n  return \"LLM classified this document as: \" + llmResult;\n})();",
            "evaluatorType": "graaljs",
            "llmResult": "${classify_using_llm.output.result}"
          },
          "type": "INLINE"
        }
      ]
    },
    "defaultCase": [
      {
        "name": "generate_error",
        "taskReferenceName": "generate_error_ref",
        "inputParameters": {
          "expression": "(function(){ \n  return \"The filename supplied: \" + $.filename + \" is an unsupported file type. Please try again with a .pdf file\";\n})();",
          "evaluatorType": "graaljs",
          "filename": "${workflow.input.document_url}"
        },
        "type": "INLINE"
      },
      {
        "name": "terminate_task",
        "taskReferenceName": "terminate_task_ref",
        "inputParameters": {
          "terminationStatus": "TERMINATED",
          "terminationReason": "Unsupported file type",
          "workflowOutput": {
            "result": "${generate_error_ref.output}"
          }
        },
        "type": "TERMINATE"
      }
    ],
    "evaluatorType": "graaljs",
    "expression": "$.url.toLowerCase().trim().endsWith(\"pdf\") ? \"PDF\" : \"NOT_SUPPORTED\";"
  }
],
"inputParameters": [
  "document_url"
],
"schemaVersion": 2
}Now that your workflow is set up, the next step is configuring an OCR worker to extract content from non-text-based PDFs.
In this example, we will set up the OCR worker project using Node.js.
Prerequisites:
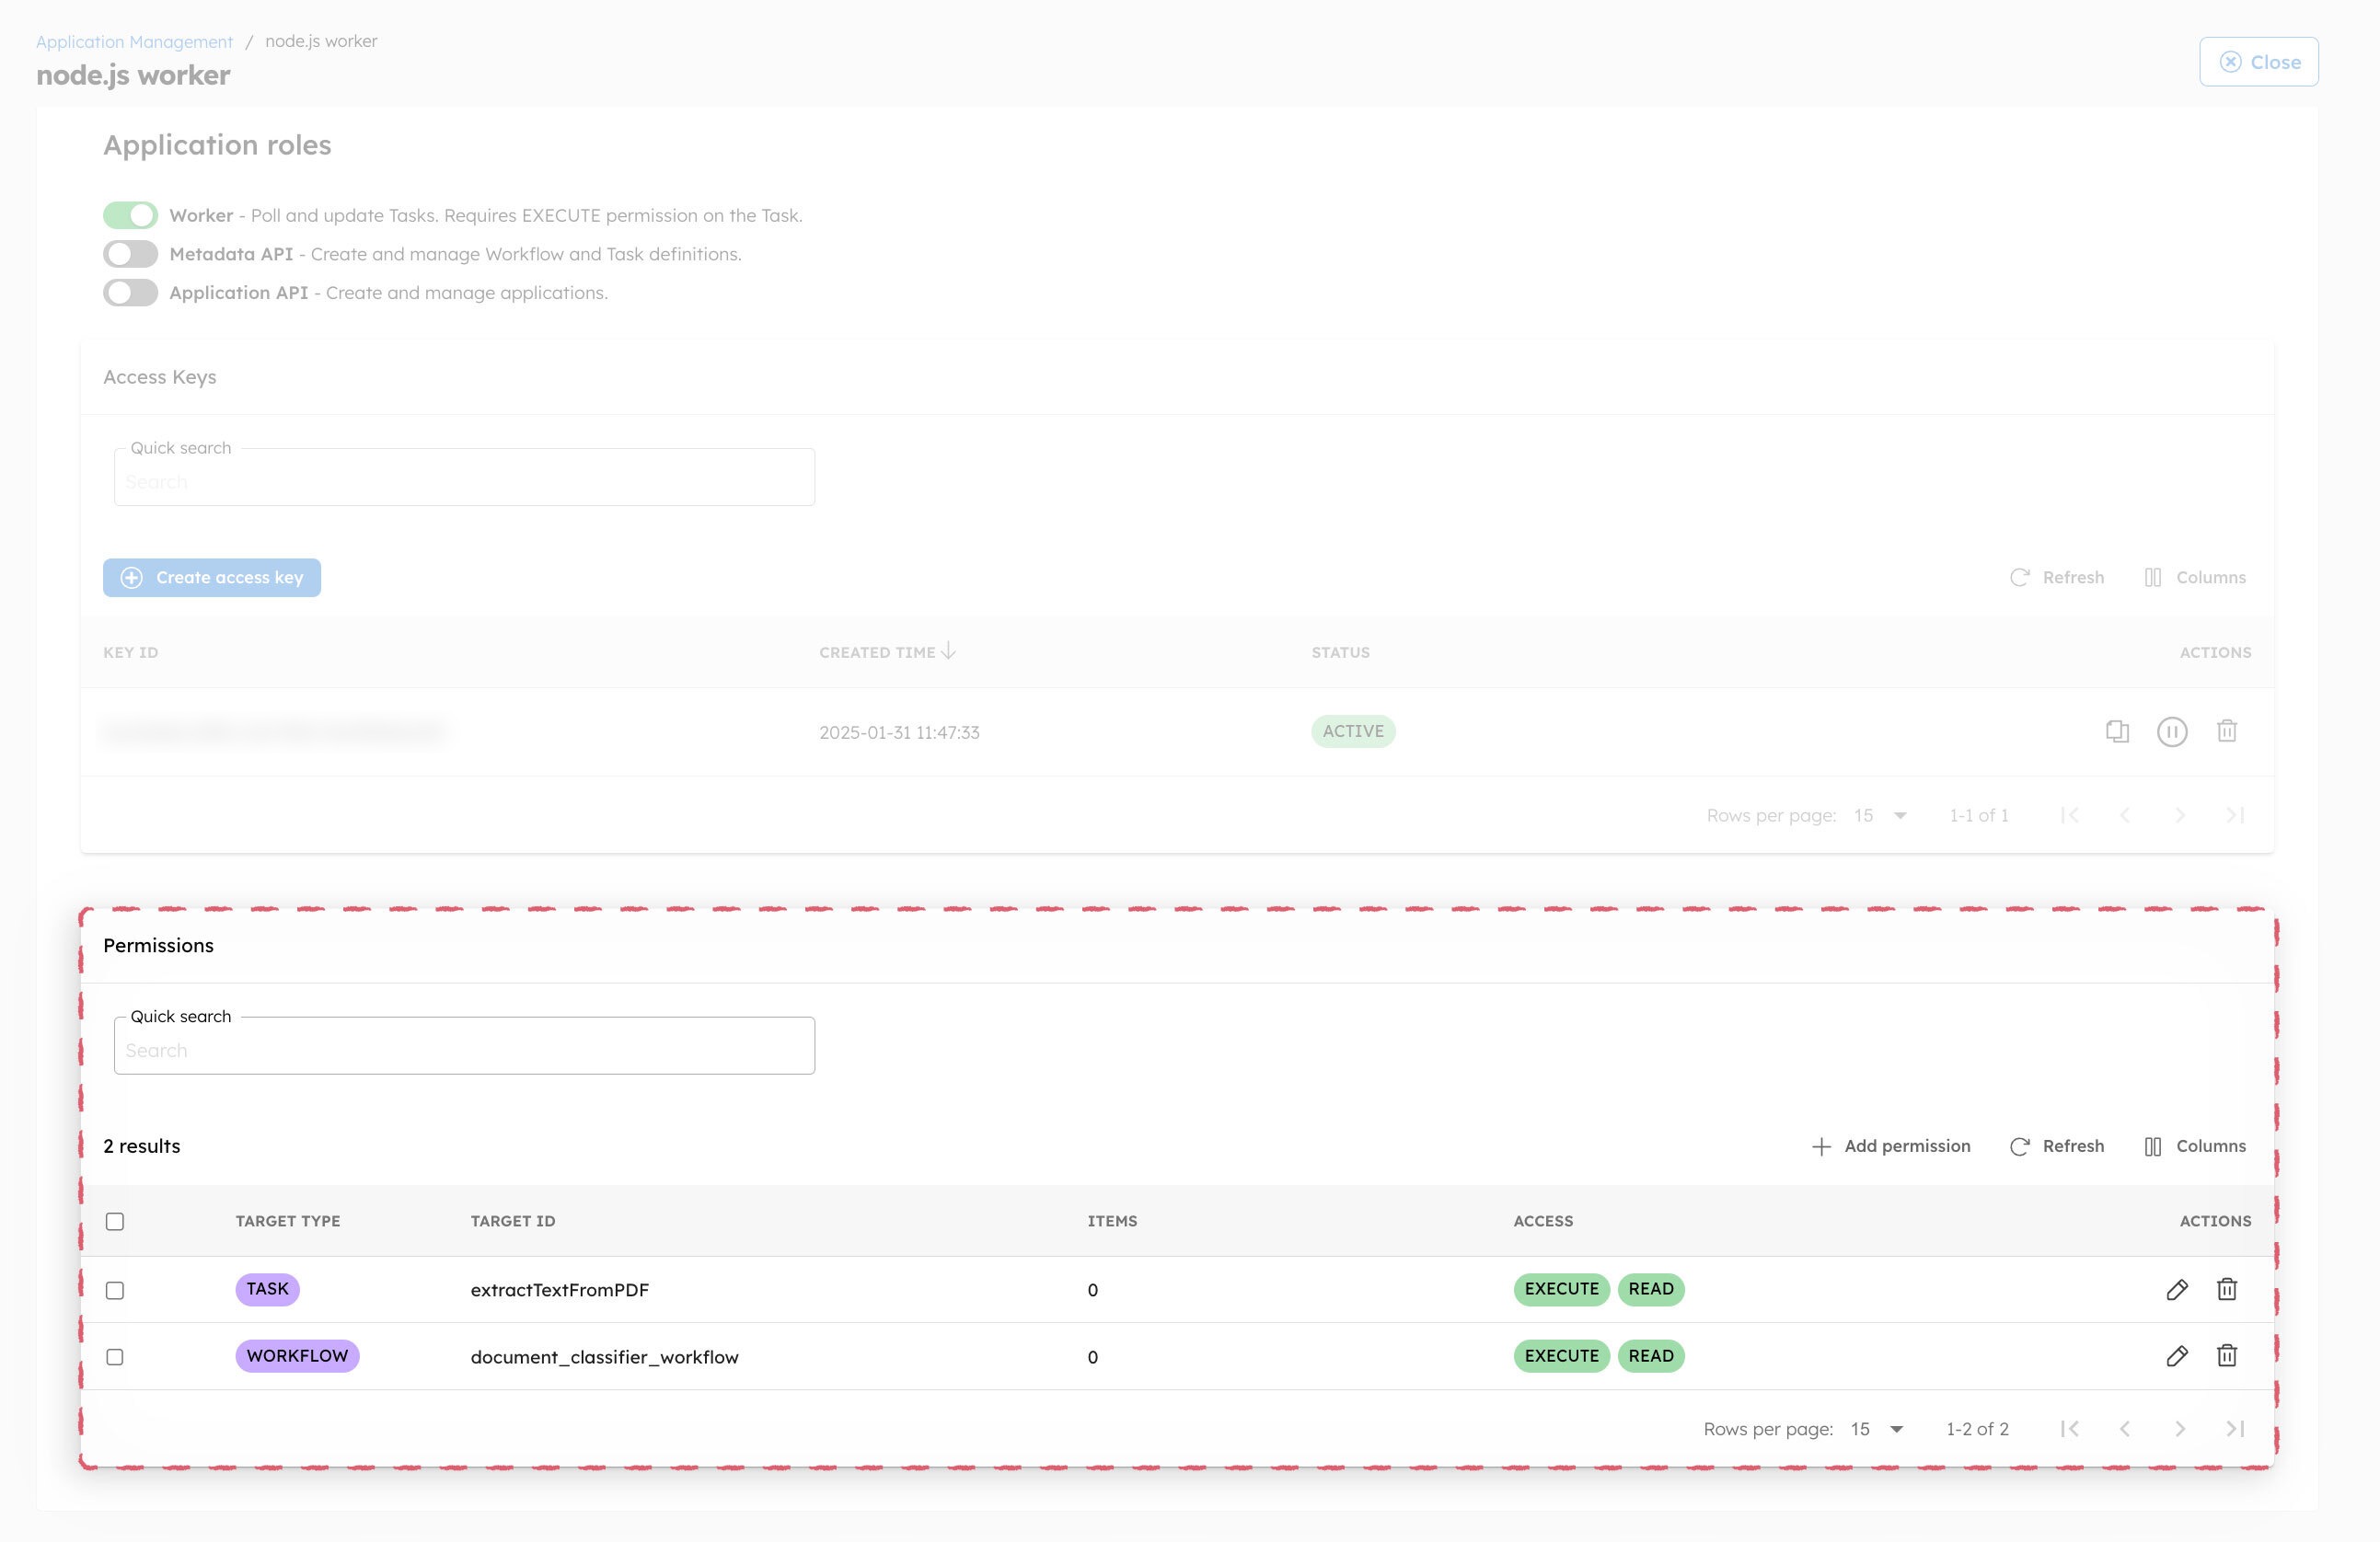
To connect your Node.js worker with Conductor, you need access keys from an application in Orkes Conductor.
To generate the access keys:
Note: If you're following this tutorial with Orkes Developer Edition, you can skip the steps below. However, if you're using your own Conductor cluster, you must enable additional permissions for tasks and workflows:
To set up a Node.js worker:
npm init -y
npm install @io-orkes/conductor-javascript @napi-rs/canvas pdfjs-dist tesseract.js
import Tesseract from "tesseract.js";
import https from "https";
import { createCanvas } from "@napi-rs/canvas";
import { getDocument } from "pdfjs-dist/legacy/build/pdf.mjs";
import {
orkesConductorClient,
TaskManager,
} from "@io-orkes/conductor-javascript";

async function extractTextFromPDF(pdfUrl) {
try {
const pdfBuffer = await new Promise((resolve, reject) => {
https
.get(pdfUrl, response => {
if (response.statusCode !== 200) {
reject(new Error(`HTTP ${response.statusCode}`));
return;
}

        if (!response.headers["content-type"]?.includes("application/pdf")) {
          reject(new Error("Not a PDF file"));
          return;
        }

        const chunks = [];
        response.on("data", chunk => chunks.push(chunk));
        response.on("end", () => resolve(Buffer.concat(chunks)));
      })
      .on("error", reject);
  });

  const pdfDoc = await getDocument(new Uint8Array(pdfBuffer)).promise;
  const results = [];

  for (let pageNum = 1; pageNum <= pdfDoc.numPages; pageNum++) {
    const page = await pdfDoc.getPage(pageNum);
    const viewport = page.getViewport({ scale: 2.0 });
    const canvas = createCanvas(viewport.width, viewport.height);

    await page.render({
      canvasContext: canvas.getContext("2d"),
      viewport: viewport,
    }).promise;

    const {
      data: { text },
    } = await Tesseract.recognize(canvas.toBuffer("image/png"), "eng");

    results.push({ page: pageNum, text: text.trim() });
  }

  return results;

} catch (error) {
throw new Error(`PDF processing failed: ${error.message}`);
}
}

// Conductor worker configuration

async function startWorker() {
const clientPromise = orkesConductorClient({
keyId: "YOUR-KEY-ID",
keySecret: "YOUR-KEY-SECRET",
serverUrl: "YOUR-CONDUCTOR-CLUSTER-URL/api",
});

const client = await clientPromise;

const pdfWorker = {
taskDefName: "extractTextFromPDF",
execute: async ({ inputData: { pdfUrl }, taskId }) => {
try {
if (!pdfUrl) {
return {
status: "FAILED",
outputData: { error: "PDF URL is required" },
};
}

      const results = await extractTextFromPDF(pdfUrl);

      return {
        status: "COMPLETED",
        outputData: {
          results,
          processedPages: results.length,
        },
      };
    } catch (error) {
      return {
        status: "FAILED",
        outputData: { error: error.message },
      };
    }
  },

};

const manager = new TaskManager(client, [pdfWorker], {
options: { pollInterval: 100, concurrency: 1 },
});

console.log("Starting PDF extraction worker...");
manager.startPolling();

// Handle graceful shutdown
process.on("SIGINT", () => {
console.log("Stopping worker...");
manager.stopPolling();
process.exit(0);
});
}
startWorker();node index.js
Now that your workflow and worker are ready, it’s time to get it up and running by adding your LLM integration.
Orkes Conductor offers integration with many LLM providers. The next step is to add an integration in the Conductor cluster with your preferred LLM provider.
To add an integration:
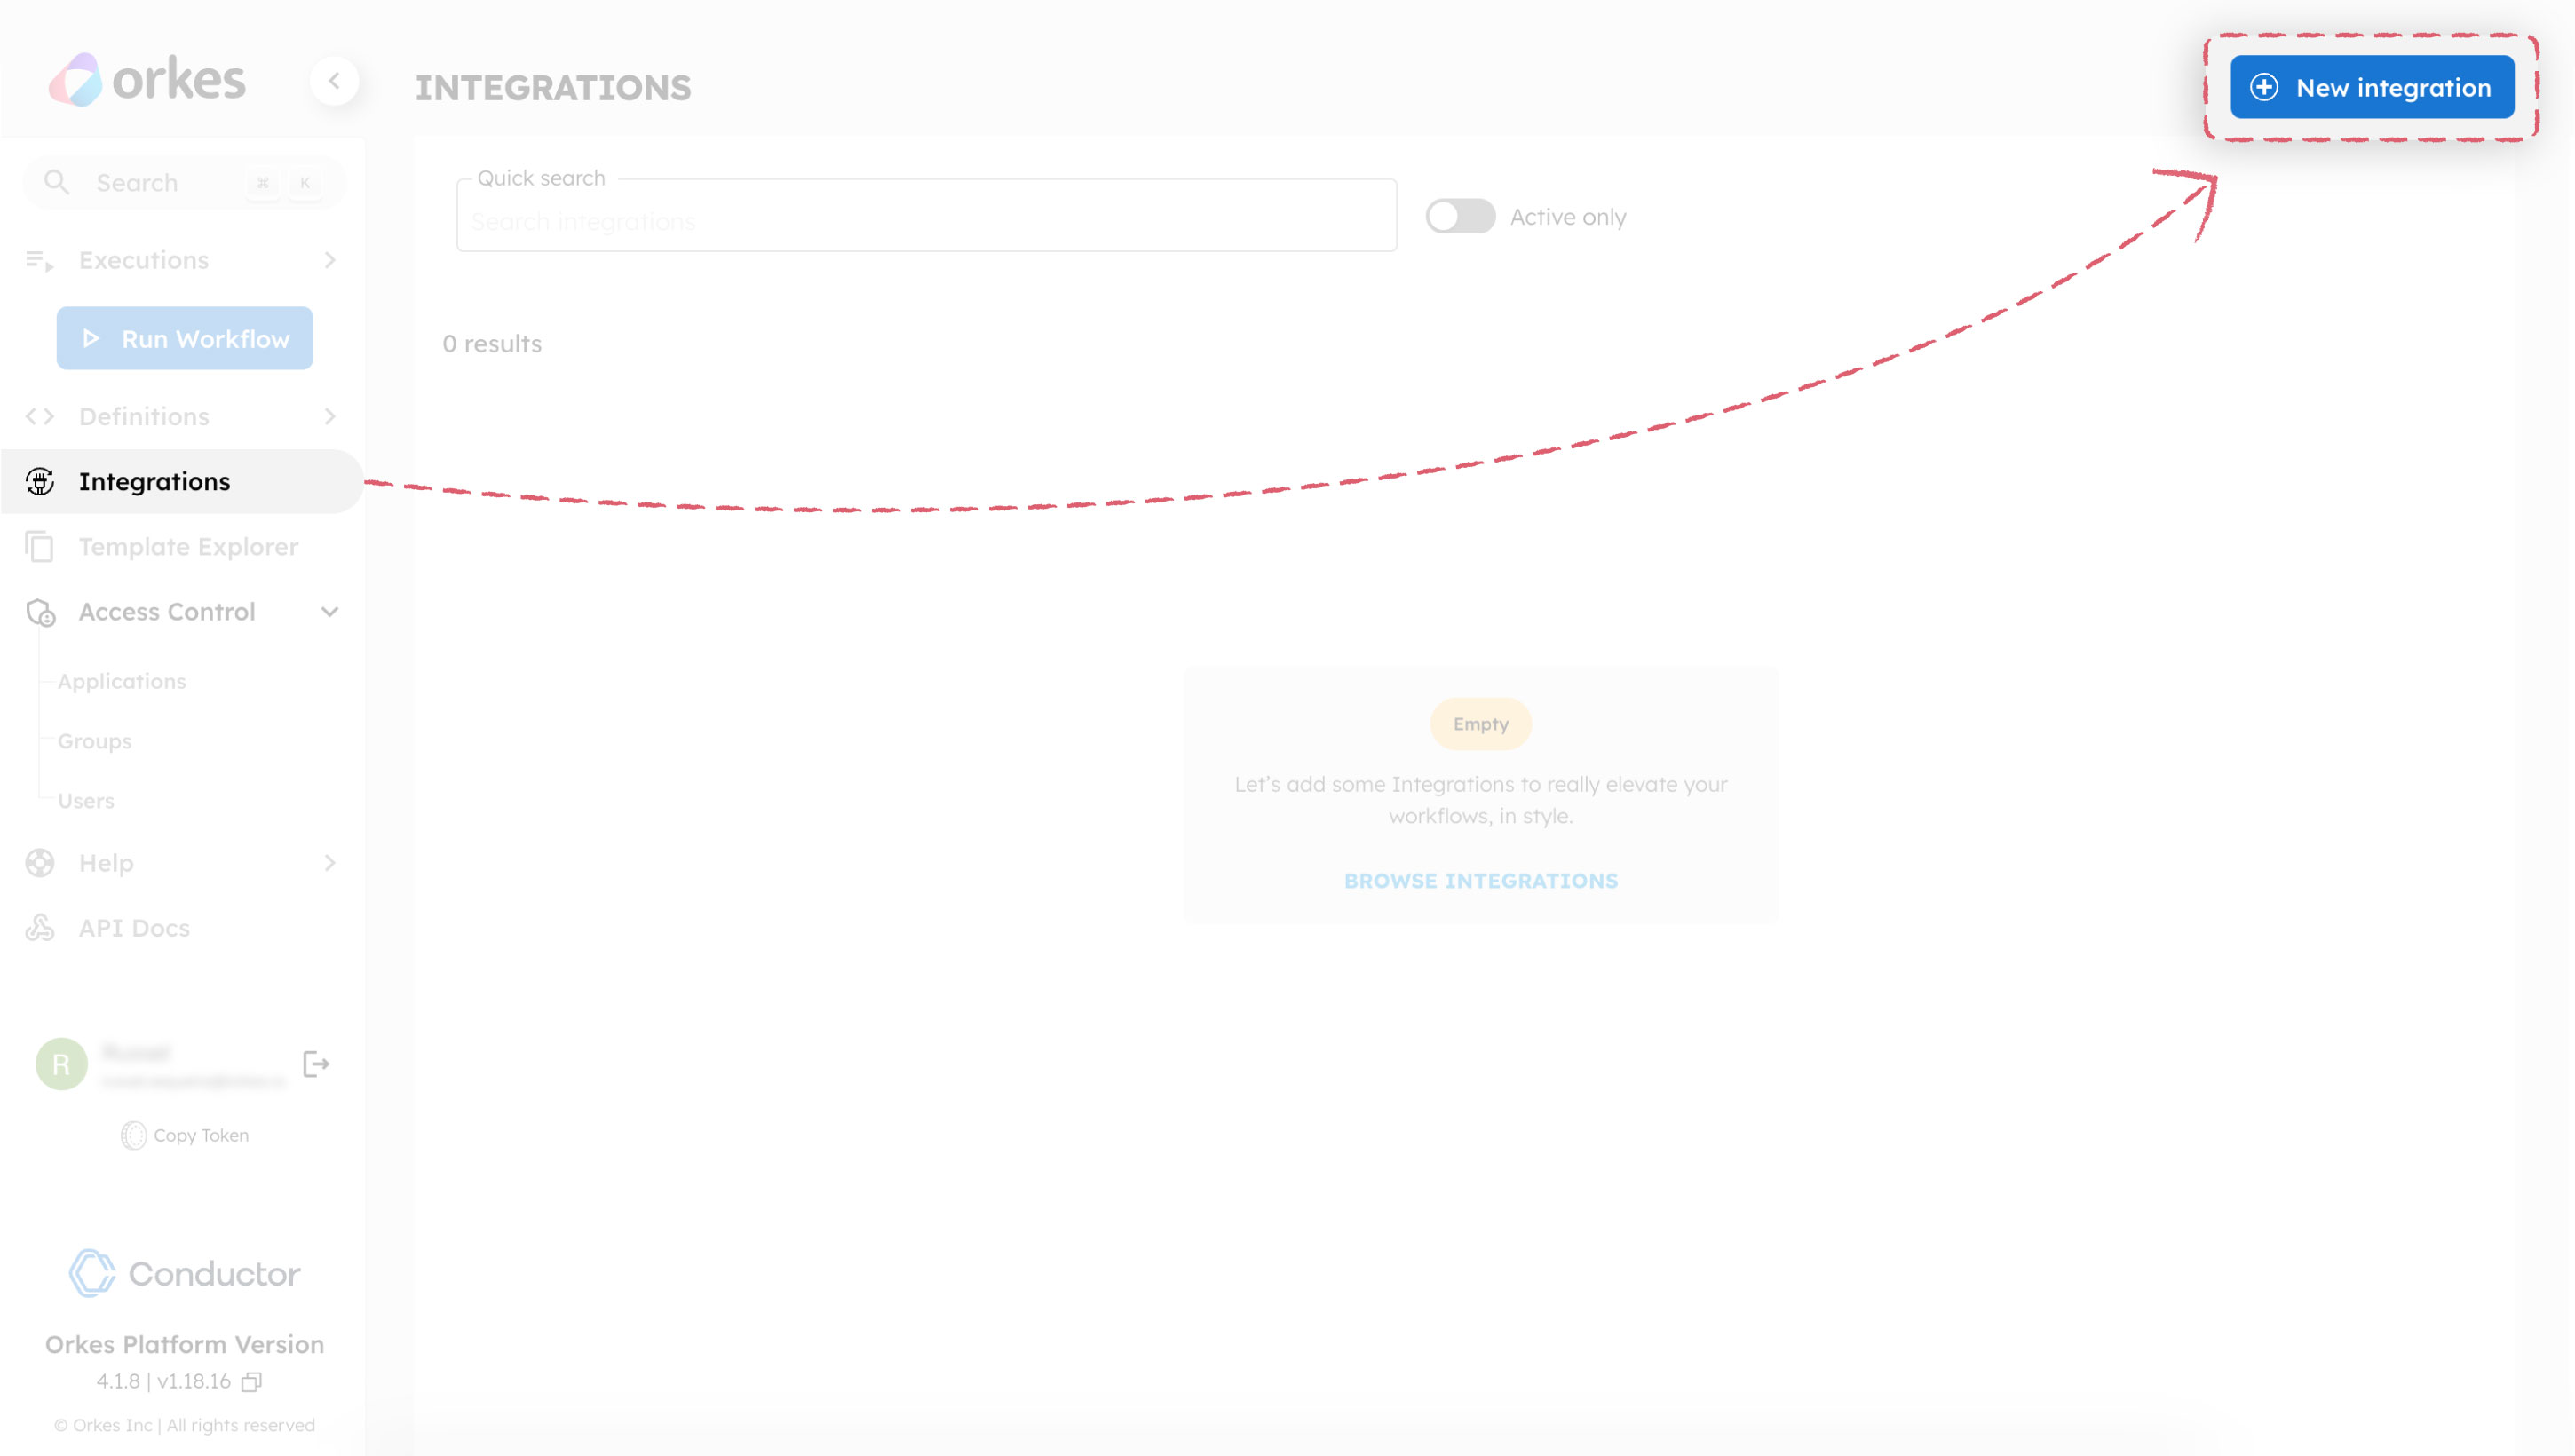
The configuration parameters vary depending on the AI/LLM platform being integrated. Refer to the respective integration guides to obtain the parameters.
The LLM integration has been added. The next step is to add a specific model. It's important to choose a model that aligns with your use case.
To add a model to your integration:
The integrations are now set up and ready to use. Let's create an AI prompt that will utilize this integration to classify the documents into appropriate categories.
A prompt plays a crucial role in guiding the LLM model to act in a specific manner. For our document classification workflow, the prompt should be carefully crafted to enable the model to identify and categorize the document into appropriate groups.
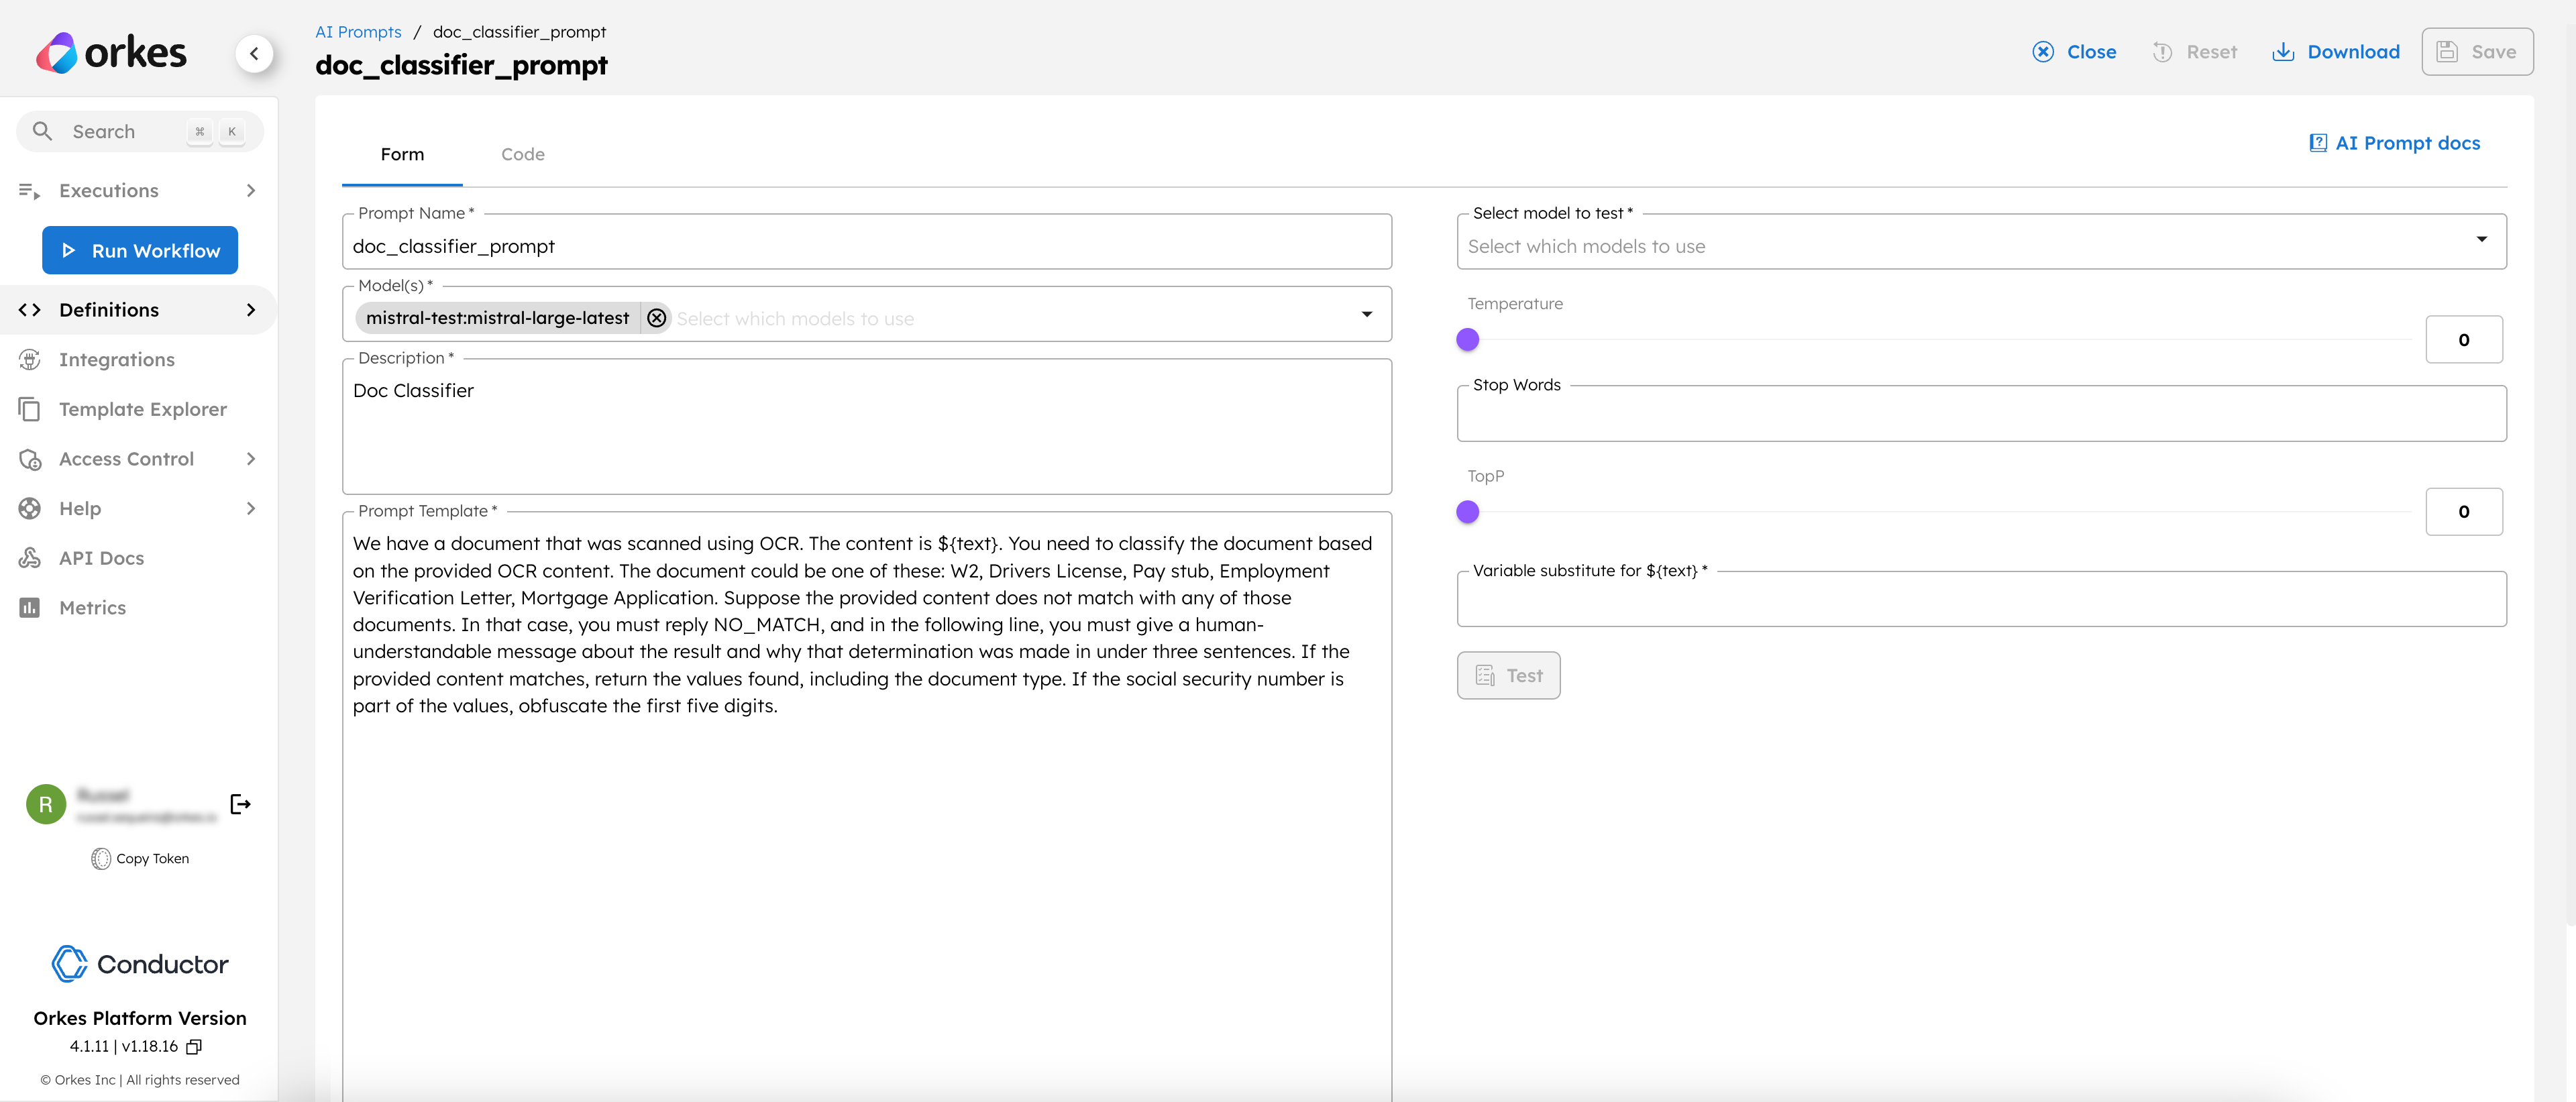
To create an AI prompt:
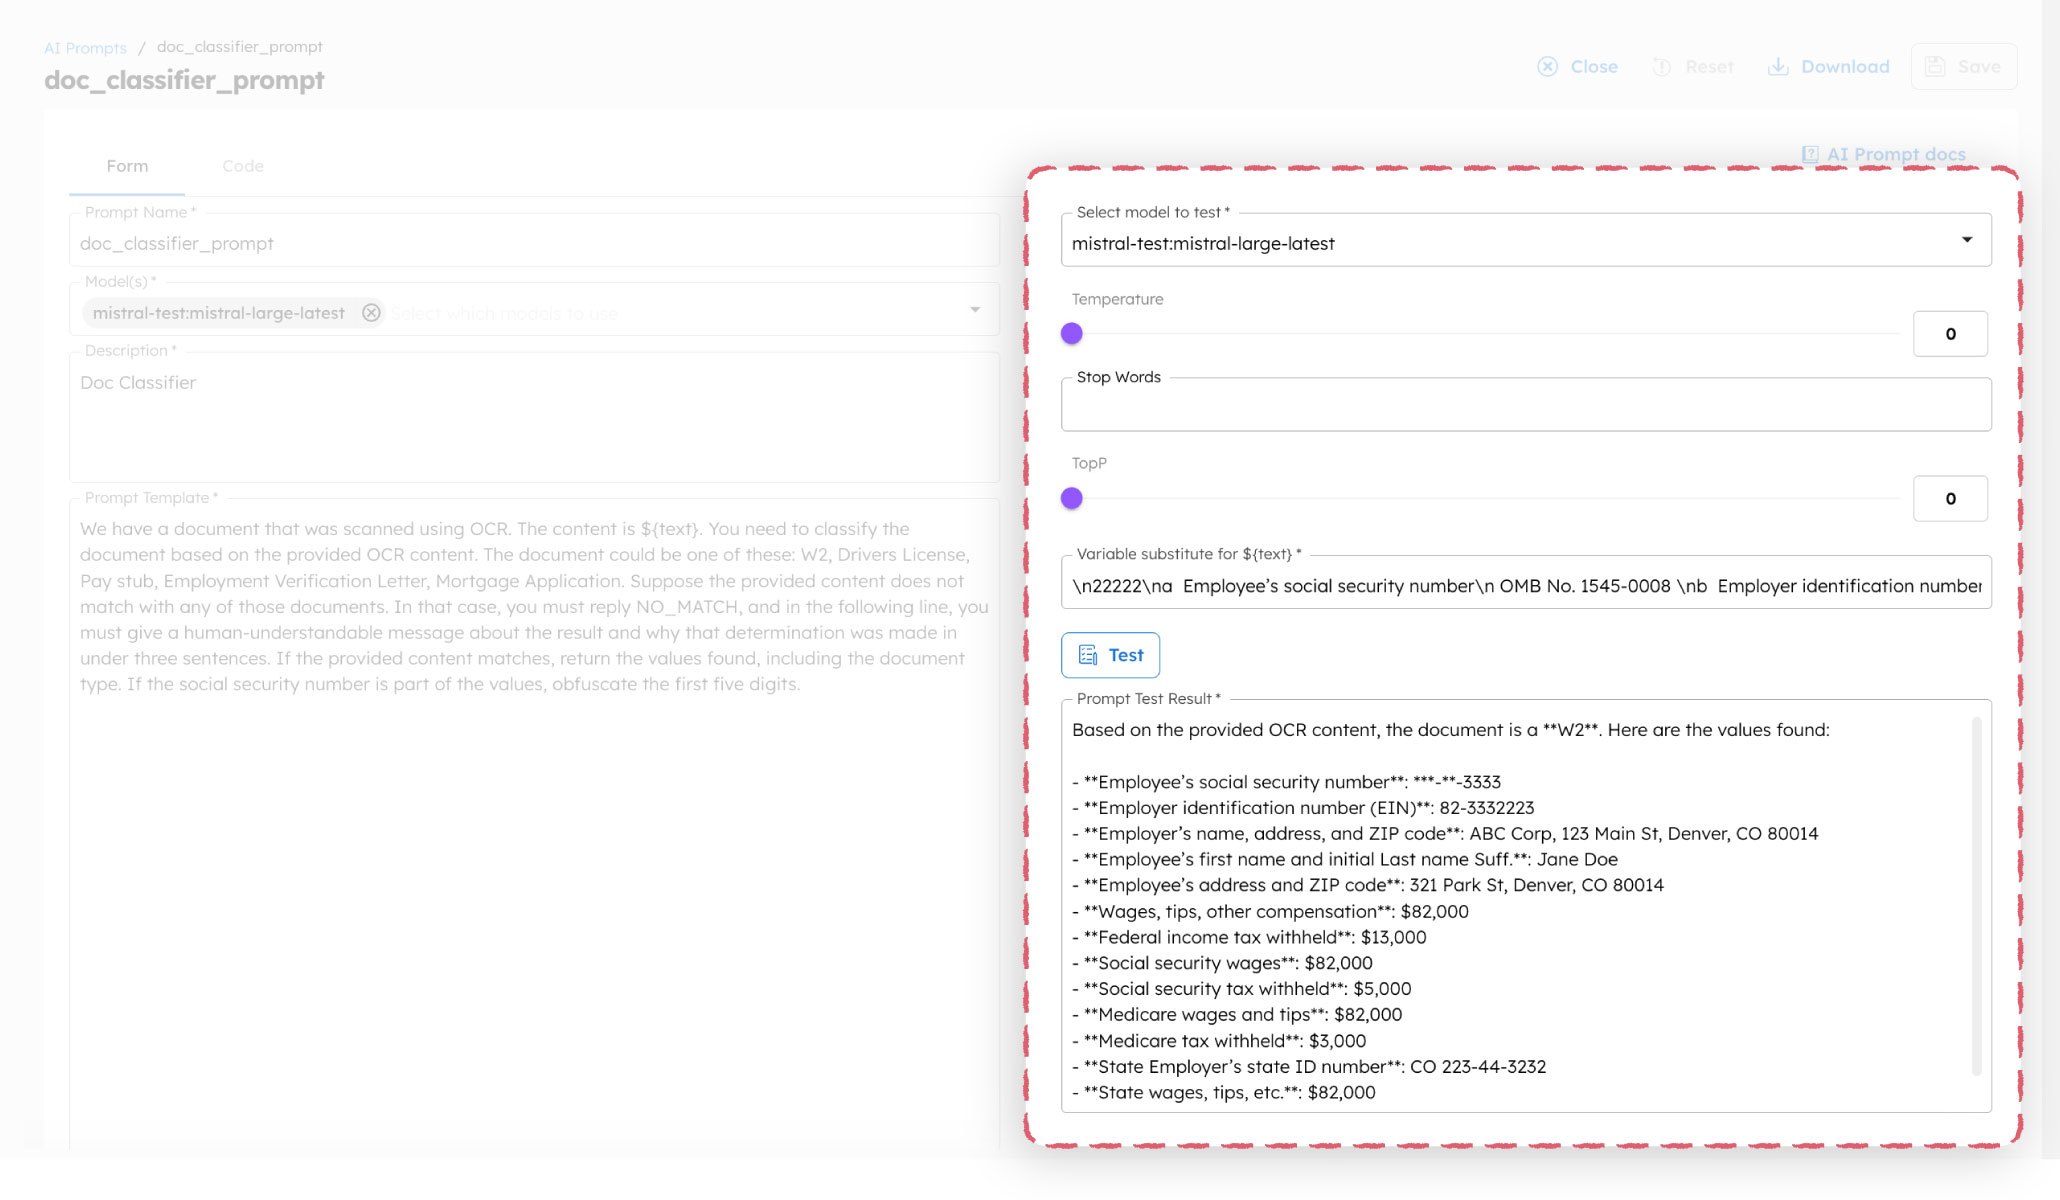
We have a document that was scanned using OCR. The content is `${text}`. You need to classify the document based on the provided OCR content. The document could be one of these: W2, Drivers License, Pay stub, Employment Verification Letter, or Mortgage Application. Suppose the provided content does not match with any of those documents. In that case, you must reply NO_MATCH, and in the following line, you must give a human-understandable message about the result and why that determination was made in under three sentences. If the provided content matches, return the values found, including the document type. If the social security number is part of the values, obfuscate the first five digits.
In the prompt, we have defined ${text} as a variable that will be derived from the output of the previous task. This will become clearer once we incorporate this prompt into the workflow.
This saves your prompt template. Orkes Conductor provides a built-in testing interface to test and validate your prompt before adding it to the workflow. In our example, we have defined the ${text} variable to be derived from the output of the preceding text extraction task. For example, here’s what a test run looks like with sample data.
Now that everything is in place, let’s bring it all together and get the workflow running.
Let’s go back to the workflow created:

your-llm-provider with your integrated LLM provider.your-llm-model with your chosen model.your-prompt-template with your prompt.text parameter as ${evaluate_text_ref.output.result}.You can see that the text variable is set to ${evaluate_text_ref.output.result}, which is the output result of the evaluate_text task that retrieves the content of the PDF document.
Now, let's test run your workflow:
// example input params
{
  "document_url": "<https://<YOUR-DOCUMENT-URL>/.pdf>" // Publicly available document URL
}
Upon running the workflow, you will be directed to the workflow execution page. If you select the Workflow Input/Output tab, you will see the category in which the document has been classified.
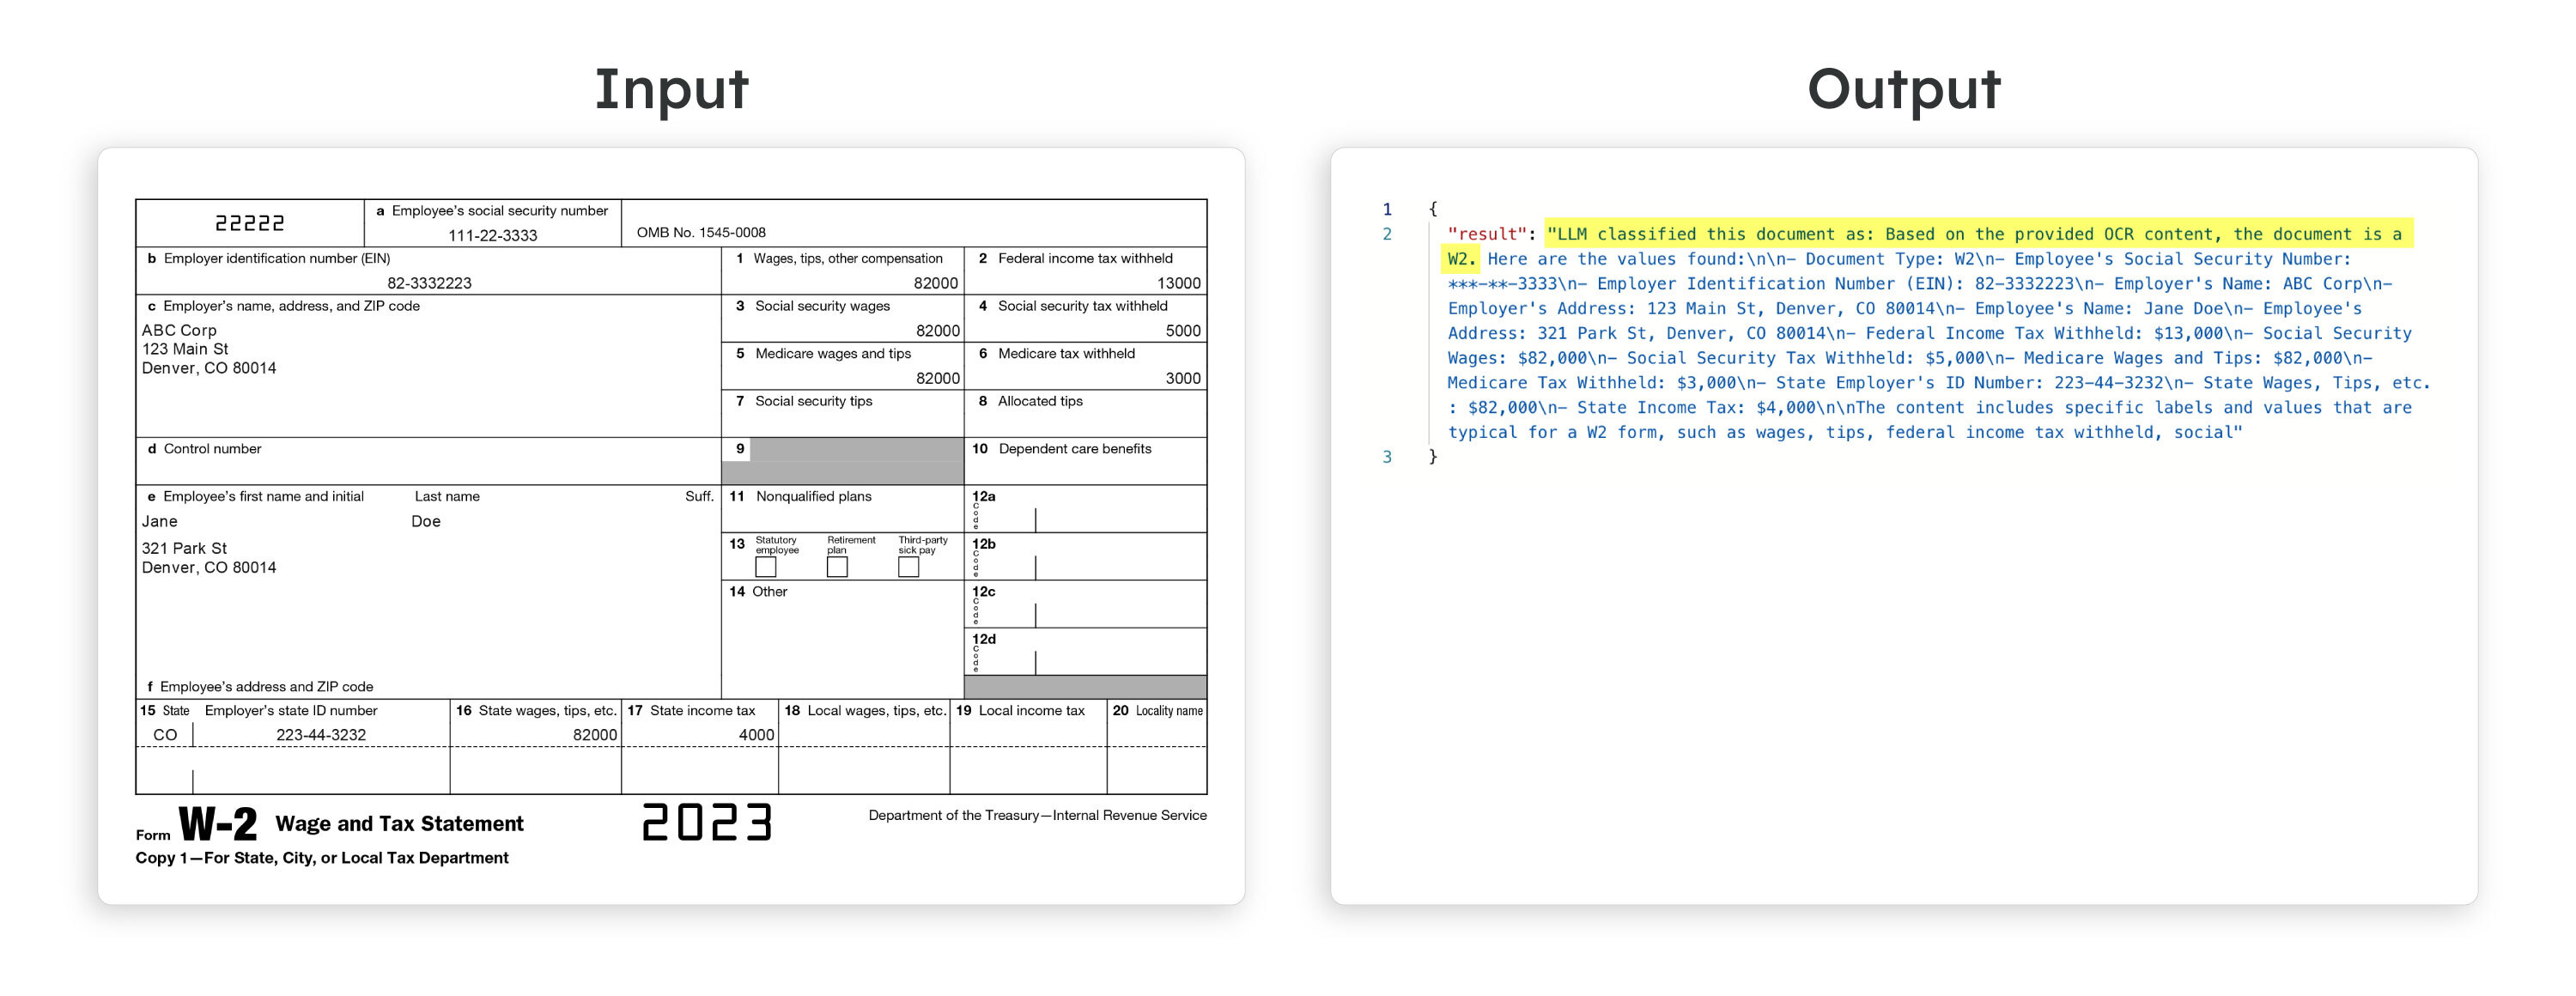
Here is a sample test run results with a W2 document passed as the input:
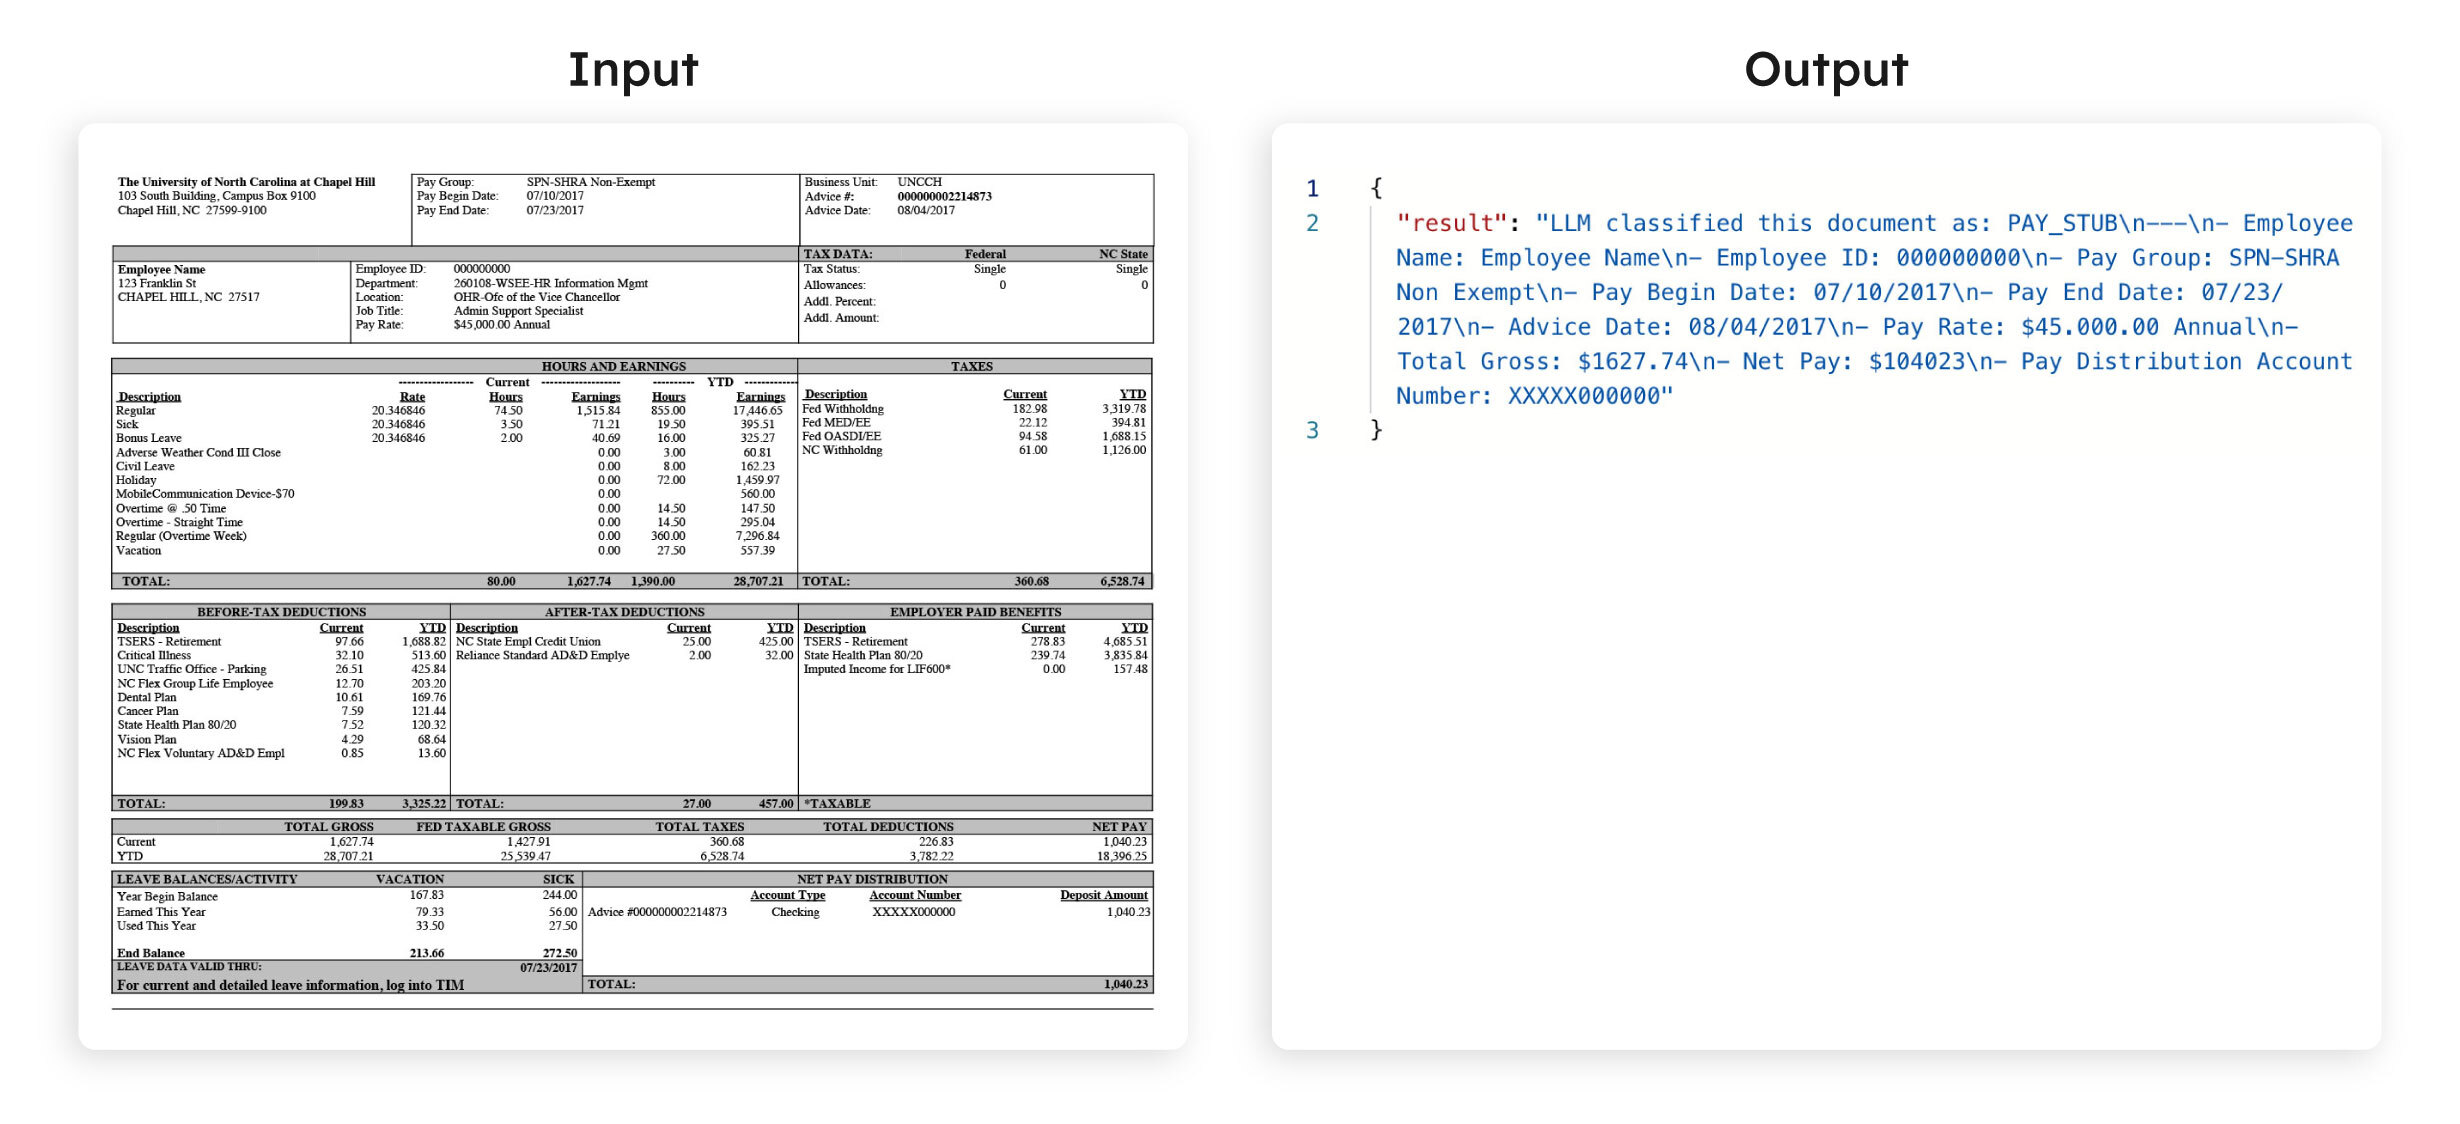
Here is a sample test run results with a pay stub passed as the input:
Ta-da! You have successfully created an application flow that accurately classifies your documents.
You can either develop your application from the ground up using Conductor or wire the necessary application flow into your existing applications through Conductor SDKs or APIs.
Let’s see what happens when an image file with a .jpg extension is passed as input.
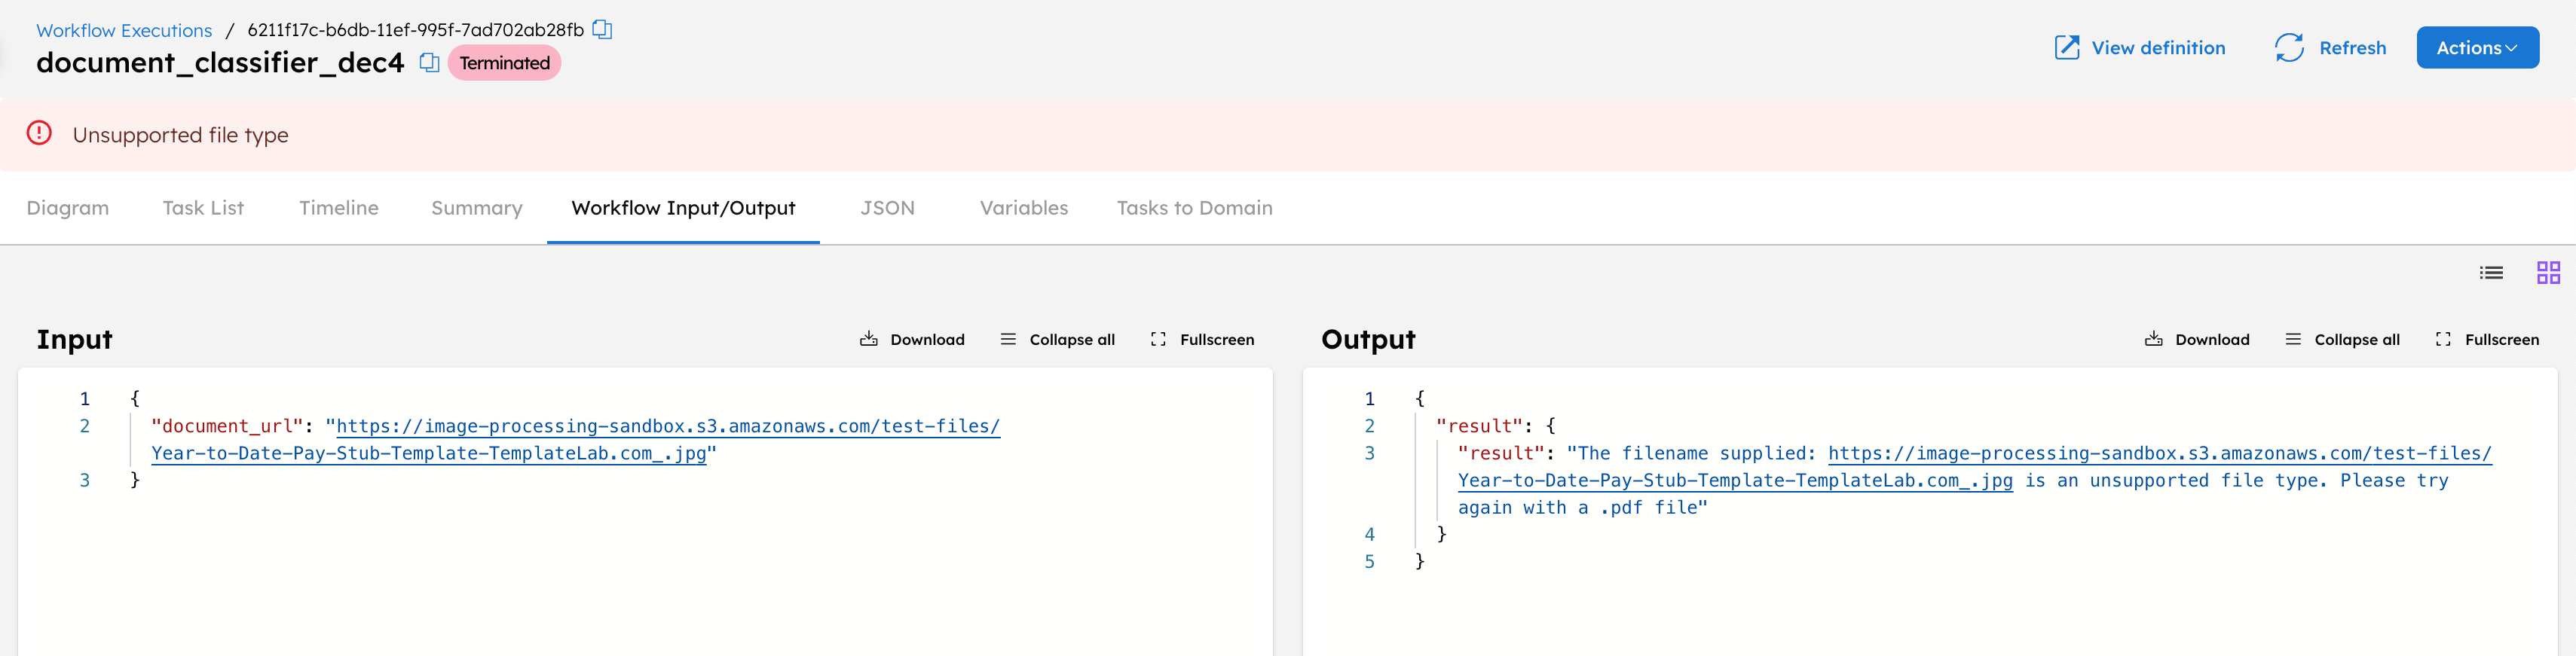
The workflow will terminate, and you’ll receive an output message indicating that the file type is unsupported.
This workflow is currently designed to work with input URLs with a .pdf extension. But what if your input is an image file or the document falls into a category not listed, requiring manual verification without disrupting the workflow?
No worries—Orkes Conductor has got you covered! We have developed an advanced version of this workflow to handle these scenarios seamlessly. Ready to explore it? Stay tuned for the upcoming tutorials.
In the meantime, if you have any ideas for improving this workflow to support additional file types, feel free to join our community on Slack.
In summary, Orkes Conductor stands out as the best choice for creating application flows. It offers flexibility in prompt customization and prioritizes data privacy, ensuring your data stays secure while allowing private LLM configurations with Conductor.
Conductor is an enterprise-grade orchestration platform for process automation, API and microservices orchestration, agentic workflows, and more. Check out the full set of features, try it yourself using our Developer Edition sandbox, or get a demo of Orkes Cloud, a fully managed and hosted Conductor service.