Scheduling Workflows
The Scheduler allows you to trigger a workflow at a specific schedule. You can configure workflows to run at any desired frequency using cron expressions. A single workflow can be associated with multiple schedules. If there are many schedules, ensure the server has sufficient capacity to handle the load.
A schedule can be used for various cases, such as:
- Running a workflow at a fixed cadence, such as every hour.
- Running the same workflow at various cadences using different fixed inputs.
- Scheduling a workflow to run between specific dates.
- Running the workflow once at a future date.
Examples include:
- Renewing a TLS certificate for infrastructure components.
- Sending notifications ahead of renewals.
- Scanning of S3 or Blob storage daily to verify compliance with policies.
- Monitoring the health of a server, such as every 30 seconds.
Non-admin users can only view and interact with schedules they have READ access to. Creators are automatically granted full access to schedules they create.
Schedule parameters
Configure these parameters when creating a schedule.
| Parameter | Description | Required/ Optional |
|---|---|---|
| name | The name of the schedule. Must be alphanumeric and can include underscores. Renaming an existing schedule creates a new one. | Required. |
| description | A description of the schedule. | Optional. |
| cronExpression | A 6-field string defining the cadence using cron syntax. For configuration details, refer Using cron expression. | Required. |
| zoneId | The timezone in which the schedule runs. Default is UTC. | Required. |
| startWorkflowRequest | A JSON object containing the details of the workflow to be scheduled. | Required. |
| startWorkflowRequest. name | The name of the workflow to run. The creator of the schedule must have execute permission for this workflow. | Required. |
| startWorkflowRequest. version | The version of the workflow to run. If not specified, the latest version will be used. | Optional. |
| startWorkflowRequest. input | The input parameters for the workflow, provided as a JSON object. | Optional. |
| startWorkflowRequest. correlationId | A unique identifier for the workflow execution, used to correlate the current workflow instance with other workflows. | Optional. |
| startWorkflowRequest. idempotencyKey | A unique, user-generated key to prevent duplicate workflow executions. Idempotency data is retained throughout the life of the workflow execution. | Optional. |
| startWorkflowRequest. idempotencyStrategy | The idempotency strategy for handling duplicate requests. Supported values:
| Required if idempotencyKey is used. |
| startWorkflowRequest. priority | The priority of the workflow. Supports values from 0-99 and can be passed as a variable. | Optional. |
| startWorkflowRequest. taskToDomain | A mapping of task reference names to domain-specific values to route the task to defined workers. | Optional. |
| scheduleStartTime | The start time for the schedule in Unix timestamp format (in milliseconds), based on the local timezone. | Optional. |
| scheduleEndTime | The end time for the schedule in Unix timestamp format (in milliseconds), based on the local timezone. | Optional. |
| paused | Whether the schedule is paused upon saving. If set to true, the schedule will not run. Set to false to start the schedule immediately upon saving. Default is false. | Optional. |
| runCatchupScheduleInstances | If true, executes any pending schedules, such as when the server starts after downtime. | Optional |
Using cron expression
The cronExpression defines the cadence of the scheduler using a 6-field string. An asterisk (*) denotes a blank entry.
* * * * * *
The terms, listed from left to right, are as follows:
- Second: Allowed values are 0-59.
- Minute: Allowed values are 0-59.
- Hour: Allowed values are 0-23.
- Day of Month: Allowed values are 1-31.
- Month: Allowed values are 1-12 or JAN-DEC.
- Day of Week: Allowed values are 1-7 or MON-SUN.
You can also use macros for common schedules, such as:
- @yearly or @annually: Executes once a year at Midnight on January 1st (0 0 0 1 1 *).
- @monthly: Executes once a month at midnight on the first day of the month (0 0 0 1 * *).
- @weekly: Executes once a week at midnight on Sunday (0 0 0 * * 0).
- @daily or @midnight: Executes once a day at midnight (0 0 0 * * *).
- @hourly: Executes once every hour (0 0 * * * *).
Orkes Conductor uses Quartz cron syntax, which is a 6-field format with seconds as the first field. This differs from standard 5-field cron syntax.
When the schedule triggers the workflow, the following fields are automatically injected as input to the workflow:
{
   "_executedTime": <EPOCH EXECUTED TIME>,
   "_startedByScheduler": "<SCHEDULE NAME>",
   "_executionId": "<SCHEDULE EXECUTION ID>",
   "_scheduledTime": <EPOCH SCHEDULED TIME>
}
Schedule configuration
This is the JSON schema for a workflow schedule.
{
 "paused": false,
 "runCatchupScheduleInstances": false,
 "name": "schedule_a",
 "description": "Sample schedule",
 "cronExpression": "0 0 * ? * *",
 "scheduleStartTime": 1735606800000,
 "scheduleEndTime": 1738285200000,
 "startWorkflowRequest": {
   "name": "demo-feb",
   "version": "",
   "input": {
     "id": "xyz"
   },
   "correlationId": "45",
   "idempotencyKey": "8",
   "idempotencyStrategy": "RETURN_EXISTING",
   "taskToDomain": {
     "task_x": "test"
   },
   "priority": 0
 },
 "zoneId": "UTC"
}
Configuring a schedule
Schedules can be configured directly using the scheduler functionality, from a completed workflow execution, or through the API.
- Using Conductor UI (Scheduler)
- Conductor UI (Workflow Execution)
- Using API
To create a schedule:
- Go to Definitions > Scheduler from the left menu on your Conductor cluster.
- Select + Define schedule.
- Enter a Name and Description.
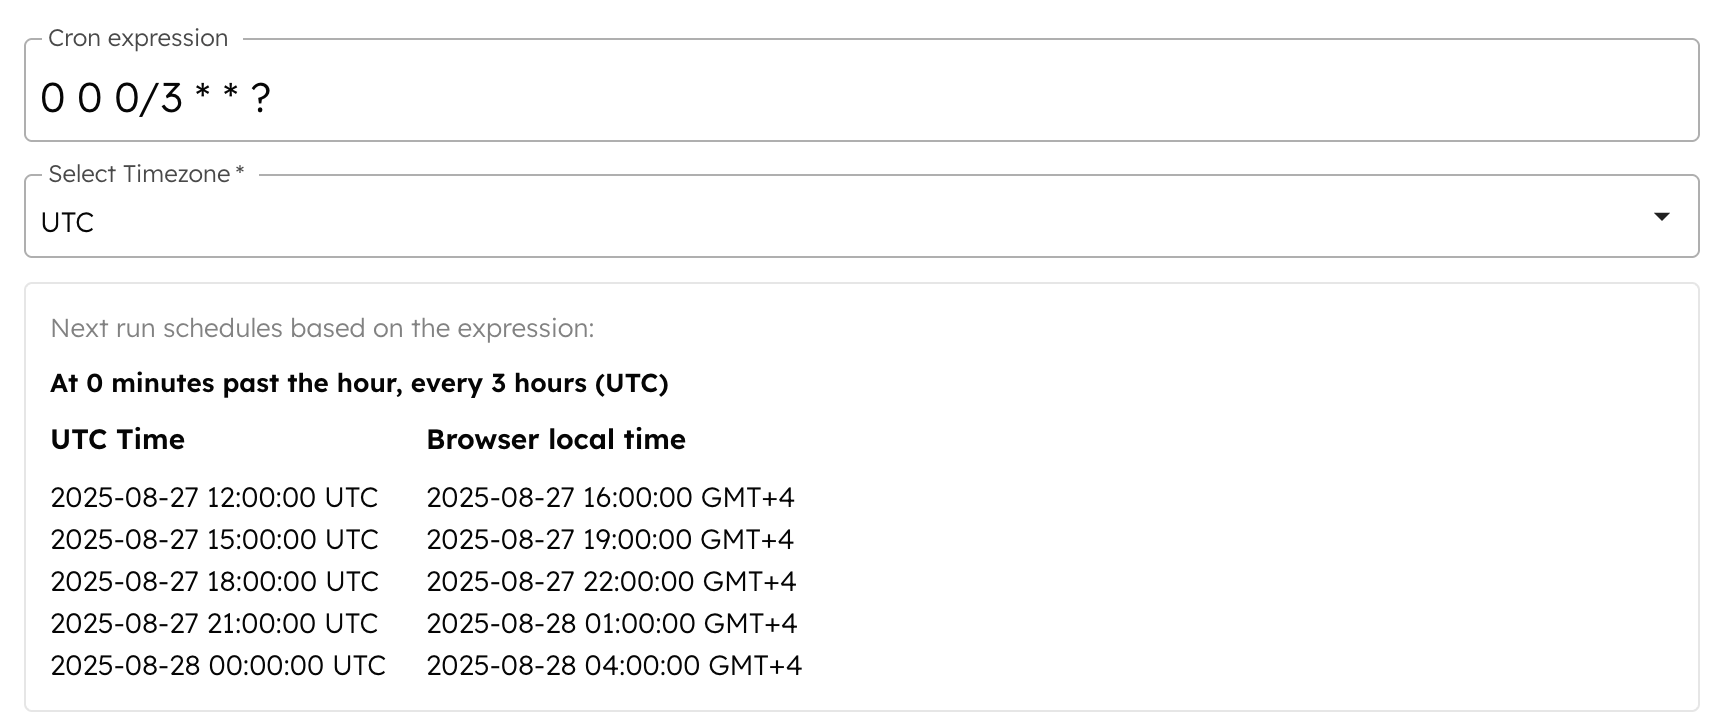
- In Choose a template to get started, select a cron expression template or manually enter it. Use the Cron Expression Help to verify your expression.
- In Select Timezone, select your preferred timezone for the schedule. The UI will display the next five scheduled runs in both the selected timezone and the browser’s local time.
- Select the Workflow name and Workflow version to be scheduled.
- Enter any additional parameters such as Input params, Correlation Id, Idempotency key, Idempotency strategy, and Task to domain mapping.
- In Schedule start/end, specify when the schedule begins and ends. Enter the date and local time in YYYY-MM-DD hh:mm am/pm format, or select them using the date picker.
- (Optional) Enable Pause schedule to prevent it from running upon creation. You can unpause the schedule later to resume.
- Select Save > Confirm.
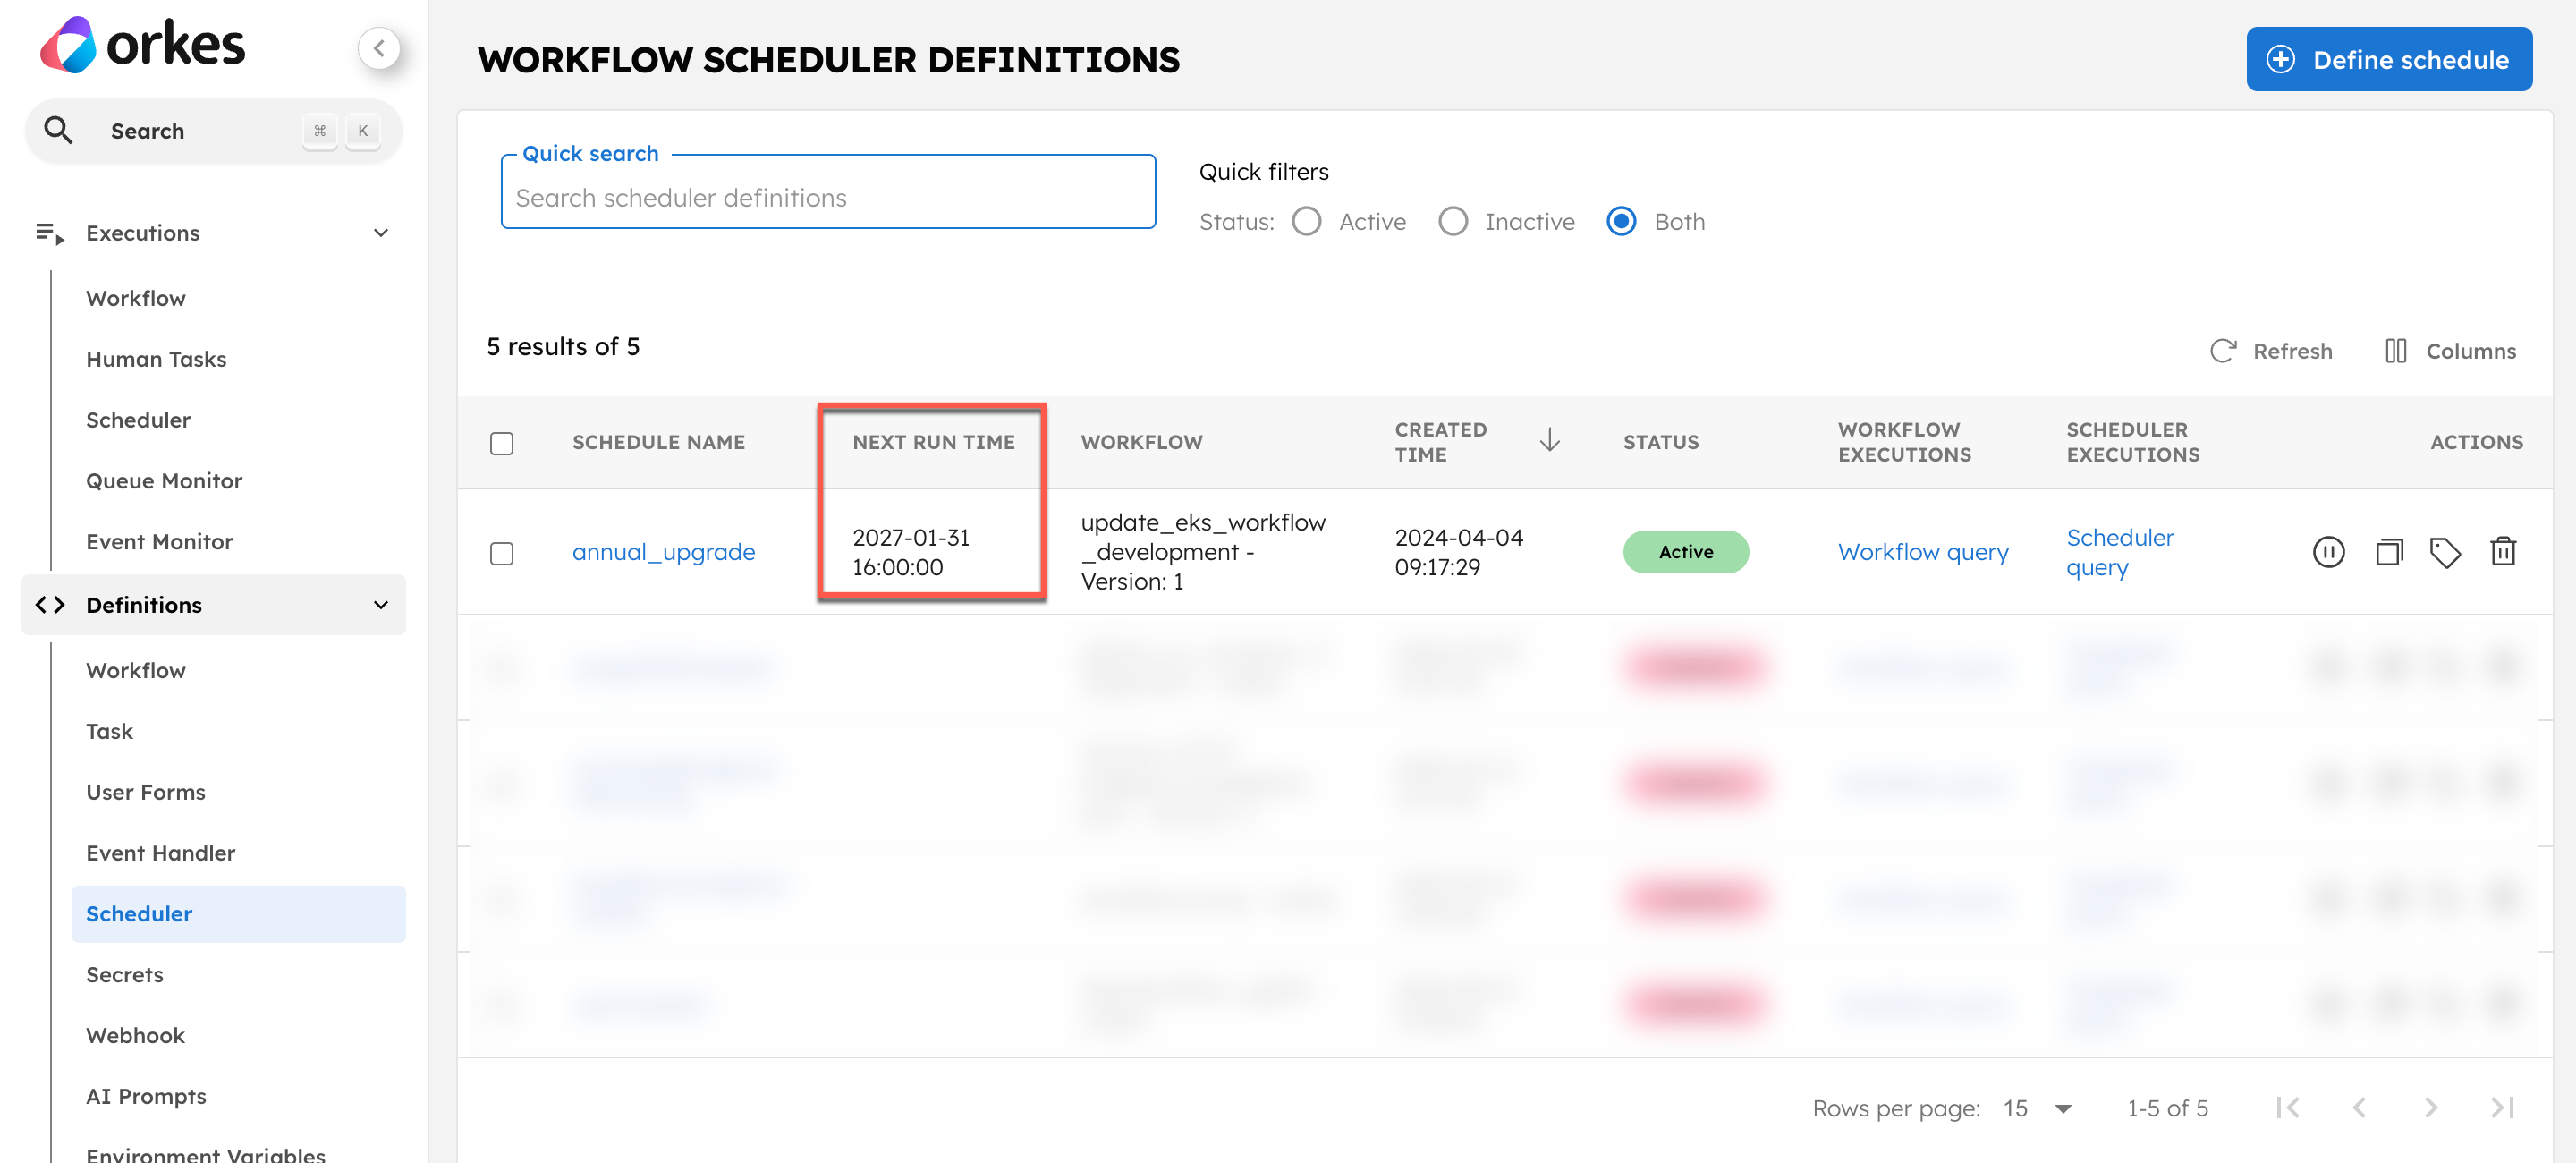
This saves the schedule. The schedule definitions page lists the following functionalities in the Conductor UI:
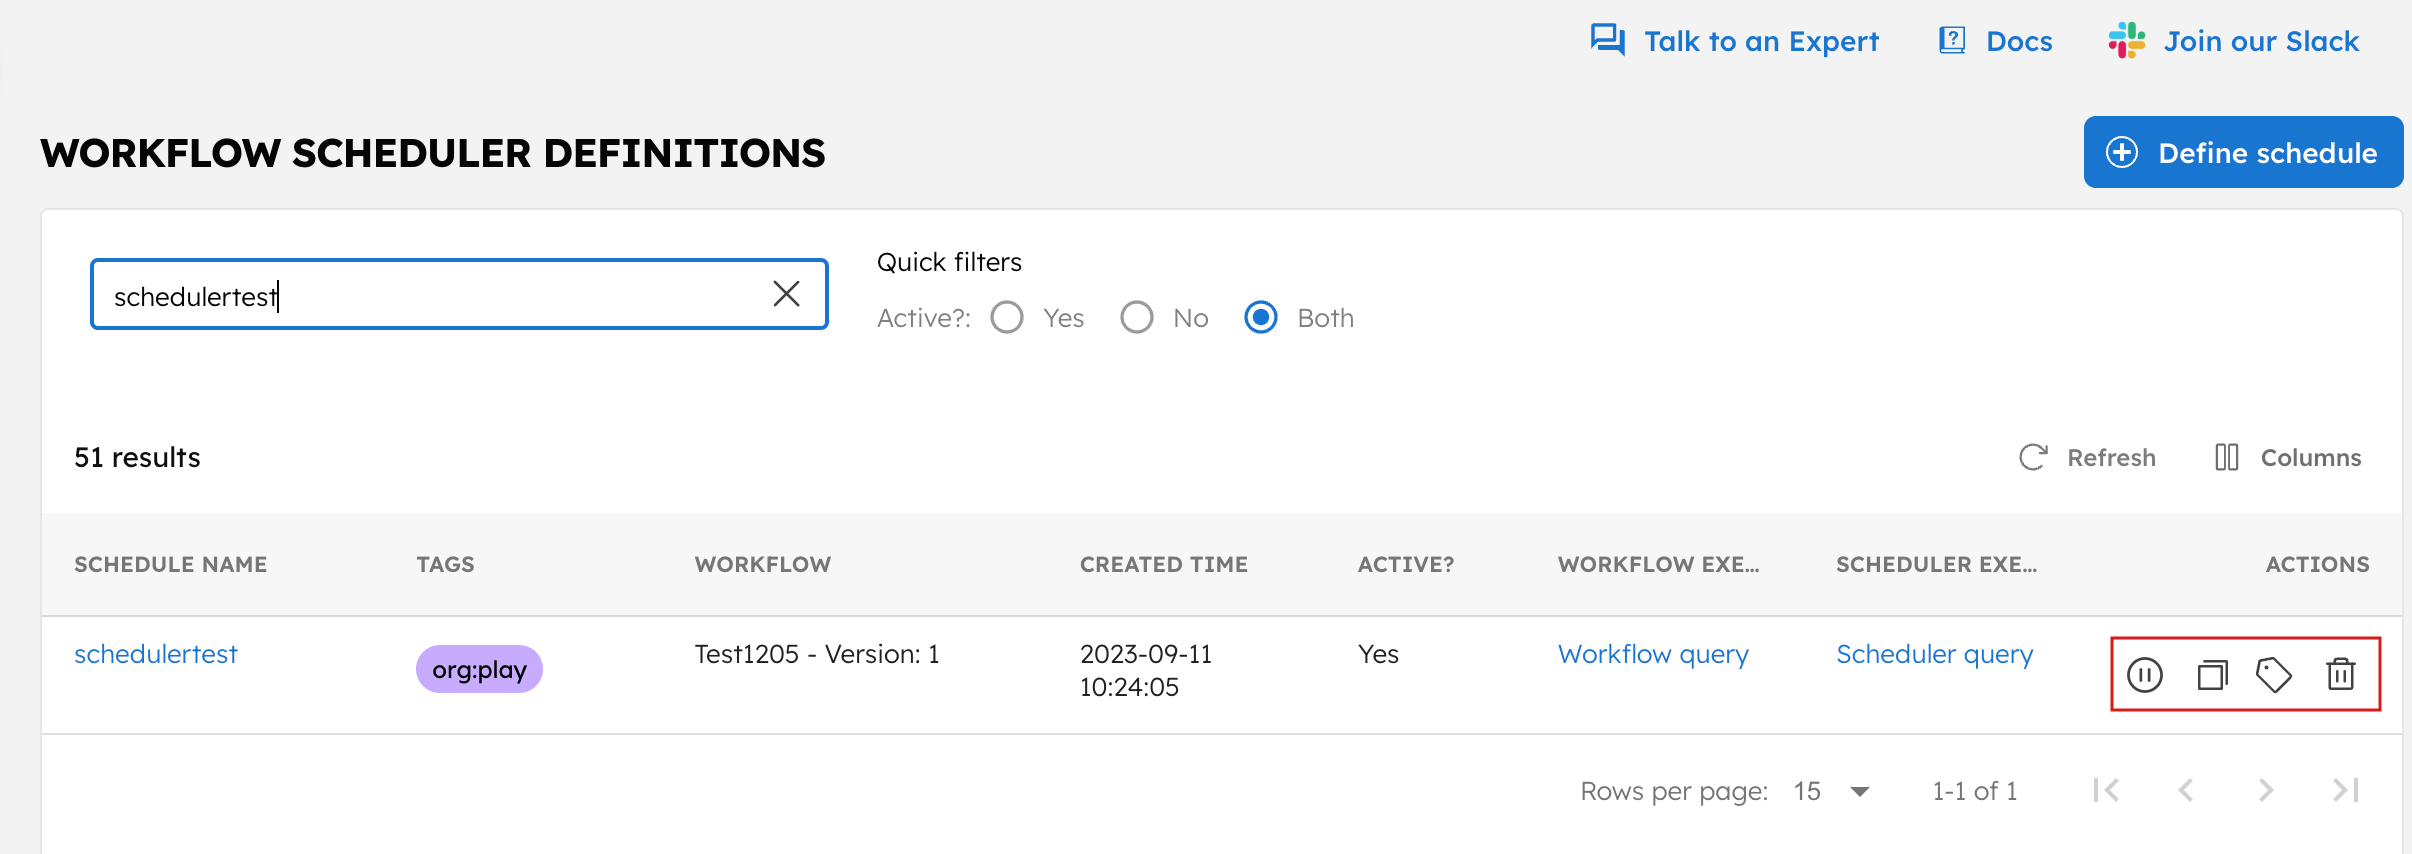
- Pause: Pause the schedule, useful for situations like maintenance. Resume it once you're ready.
- Clone: Duplicate the schedule, allowing you to reuse existing schedule settings easily.
- Add/Edit Tags: Add new tags or modify existing ones for the schedule.
- Delete: Permanently remove the schedule from the Conductor cluster.
- If the schedule is active (not paused), you can view the next run time:
- Use the Quick filters option to filter between active and inactive schedules.
- Use the Quick search to search by schedule name or tag. To search using tags, use the format
tagKey:tagValue; for example;team:marketing.
You can also easily create a schedule from a completed workflow execution.
To schedule a workflow from a workflow execution page:
- Go to Executions > Workflow from the left navigation menu.
- Select the required workflow execution.
- From Actions, select Create Schedule.
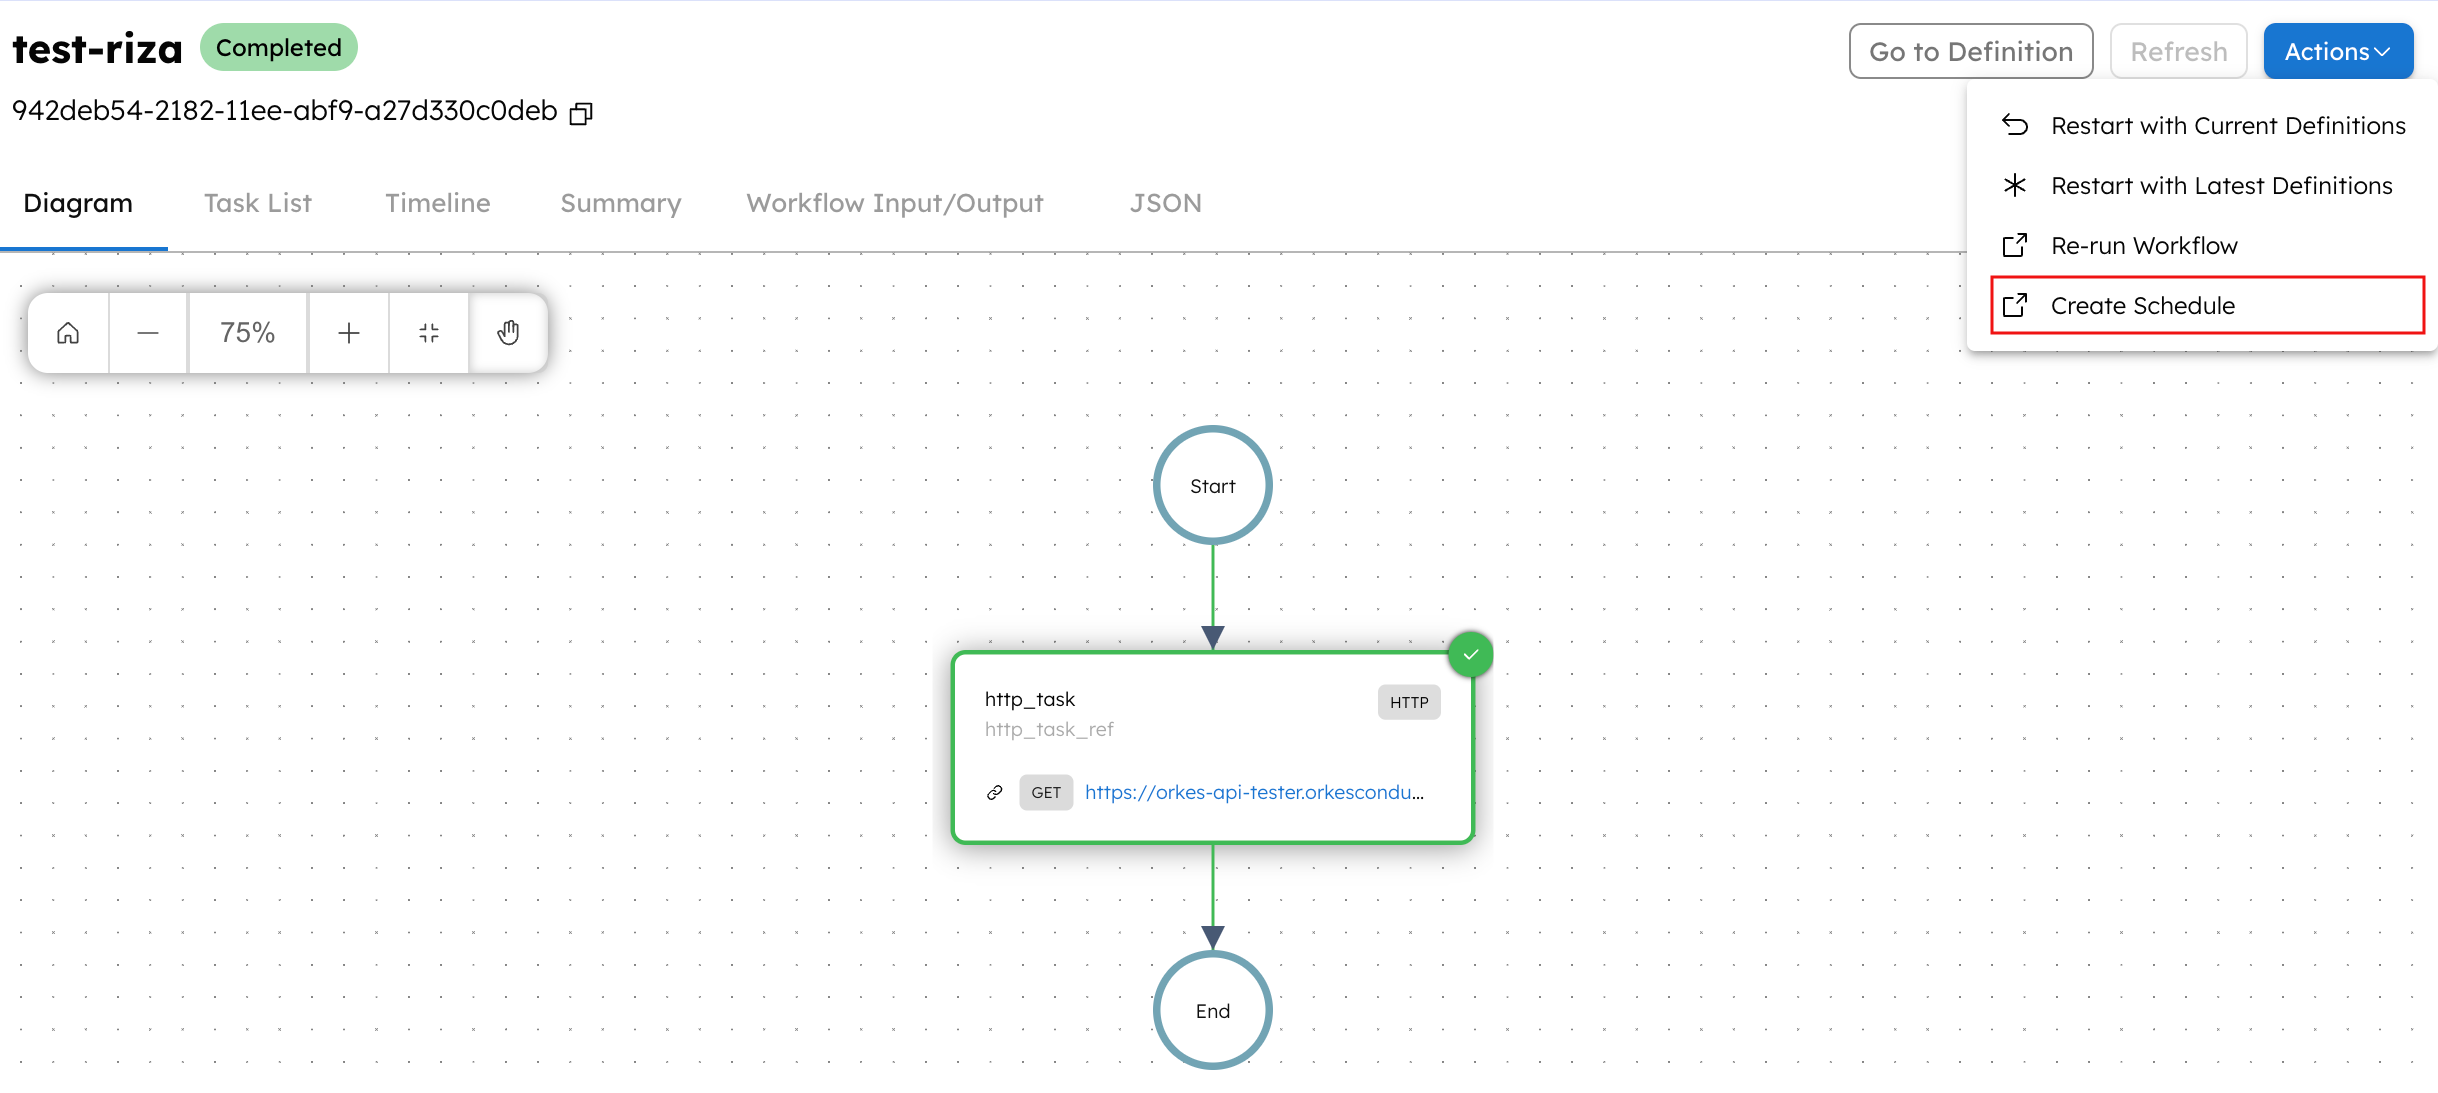
This automatically populates a schedule definition with workflow details, including name, version, input parameters, correlation ID, idempotency key, and task-to-domain mapping. You only need to provide a name for the schedule, set cron expressions, and set the schedule time.
Use the Create Schedule API to create a new schedule:
POST /api/scheduler/schedules
For non-admin users to access schedules created by an admin, they must be granted permissions to the required schedules and workflows. This can be done using user groups and tags. Here’s how:
- Add the necessary tag to the schedule and workflow to which non-admins need access.
- Create a user group and grant execute and read access to the tag.
Example: A data engineering team needs to manage ETL schedules:
- Tag the ETL workflow and its schedules with the tag
data-etl - Create a "Data Engineers" user group
- Grant the group execute and read permissions on the
data-etltag
This ensures the group members have the necessary permissions to interact with the tagged schedule and workflows.
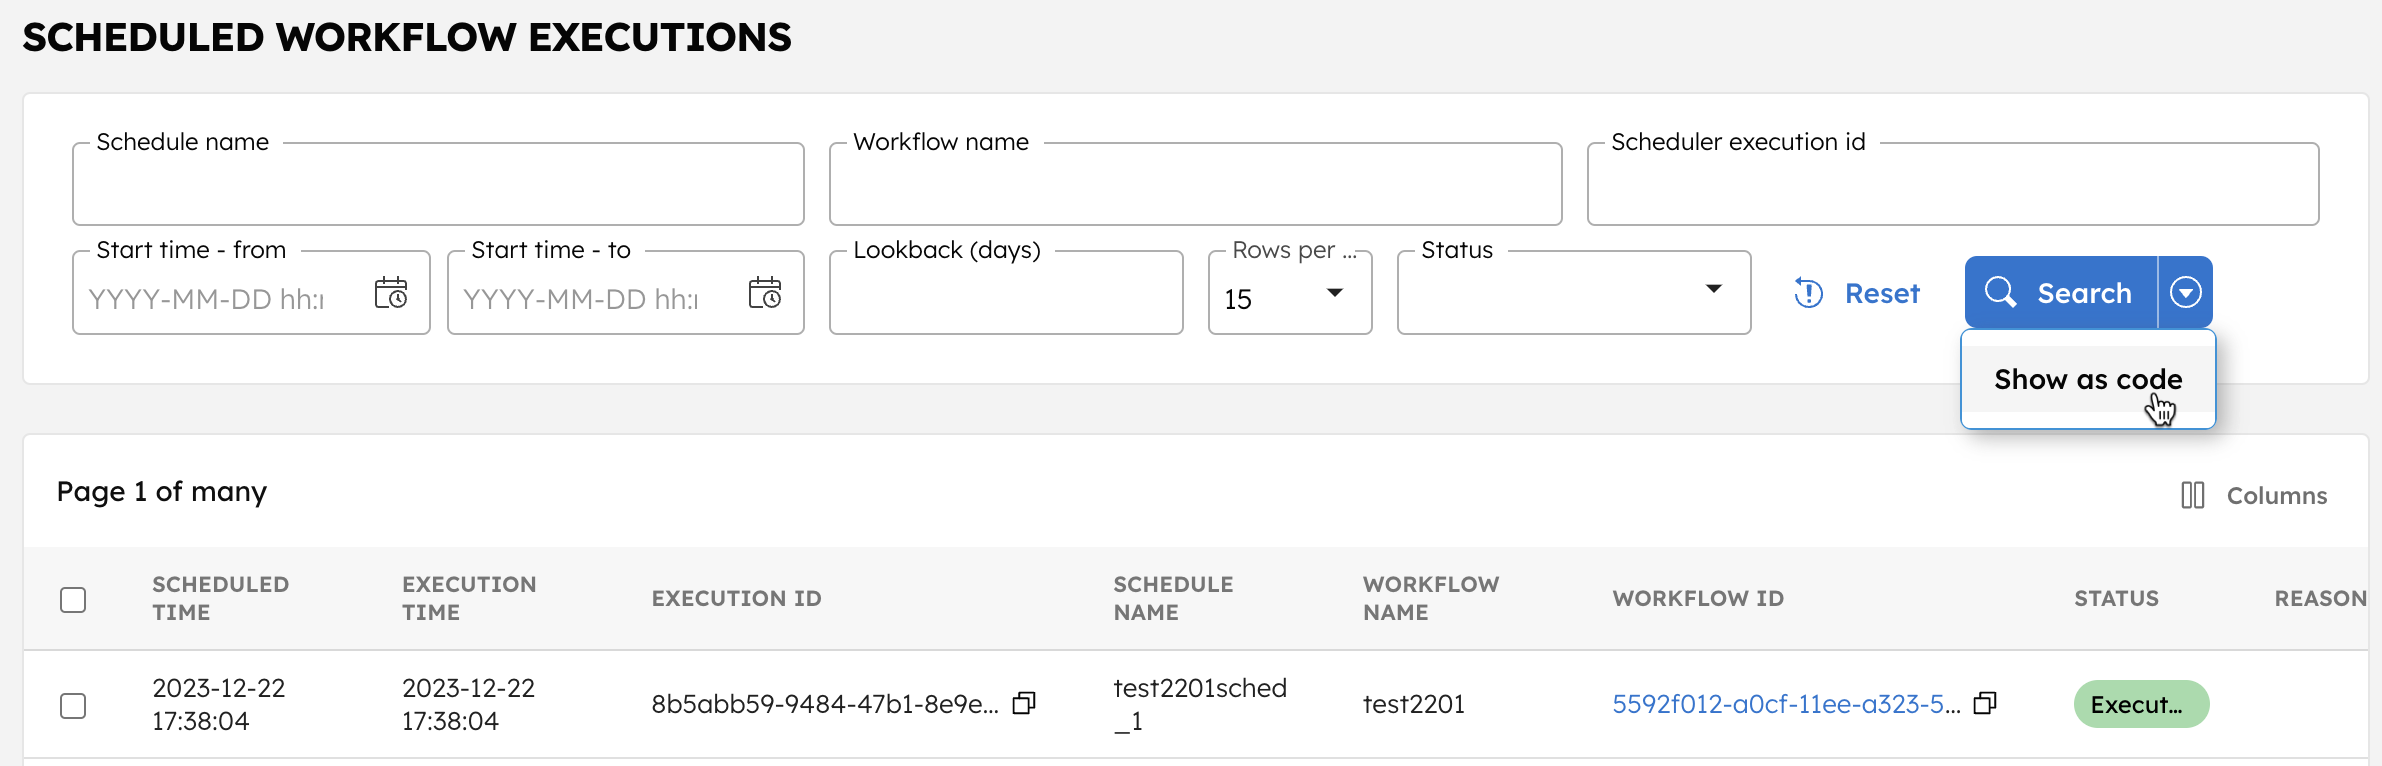
Monitoring scheduled executions
To monitor the scheduled executions:
Go to Executions > Scheduler from the left navigation menu.
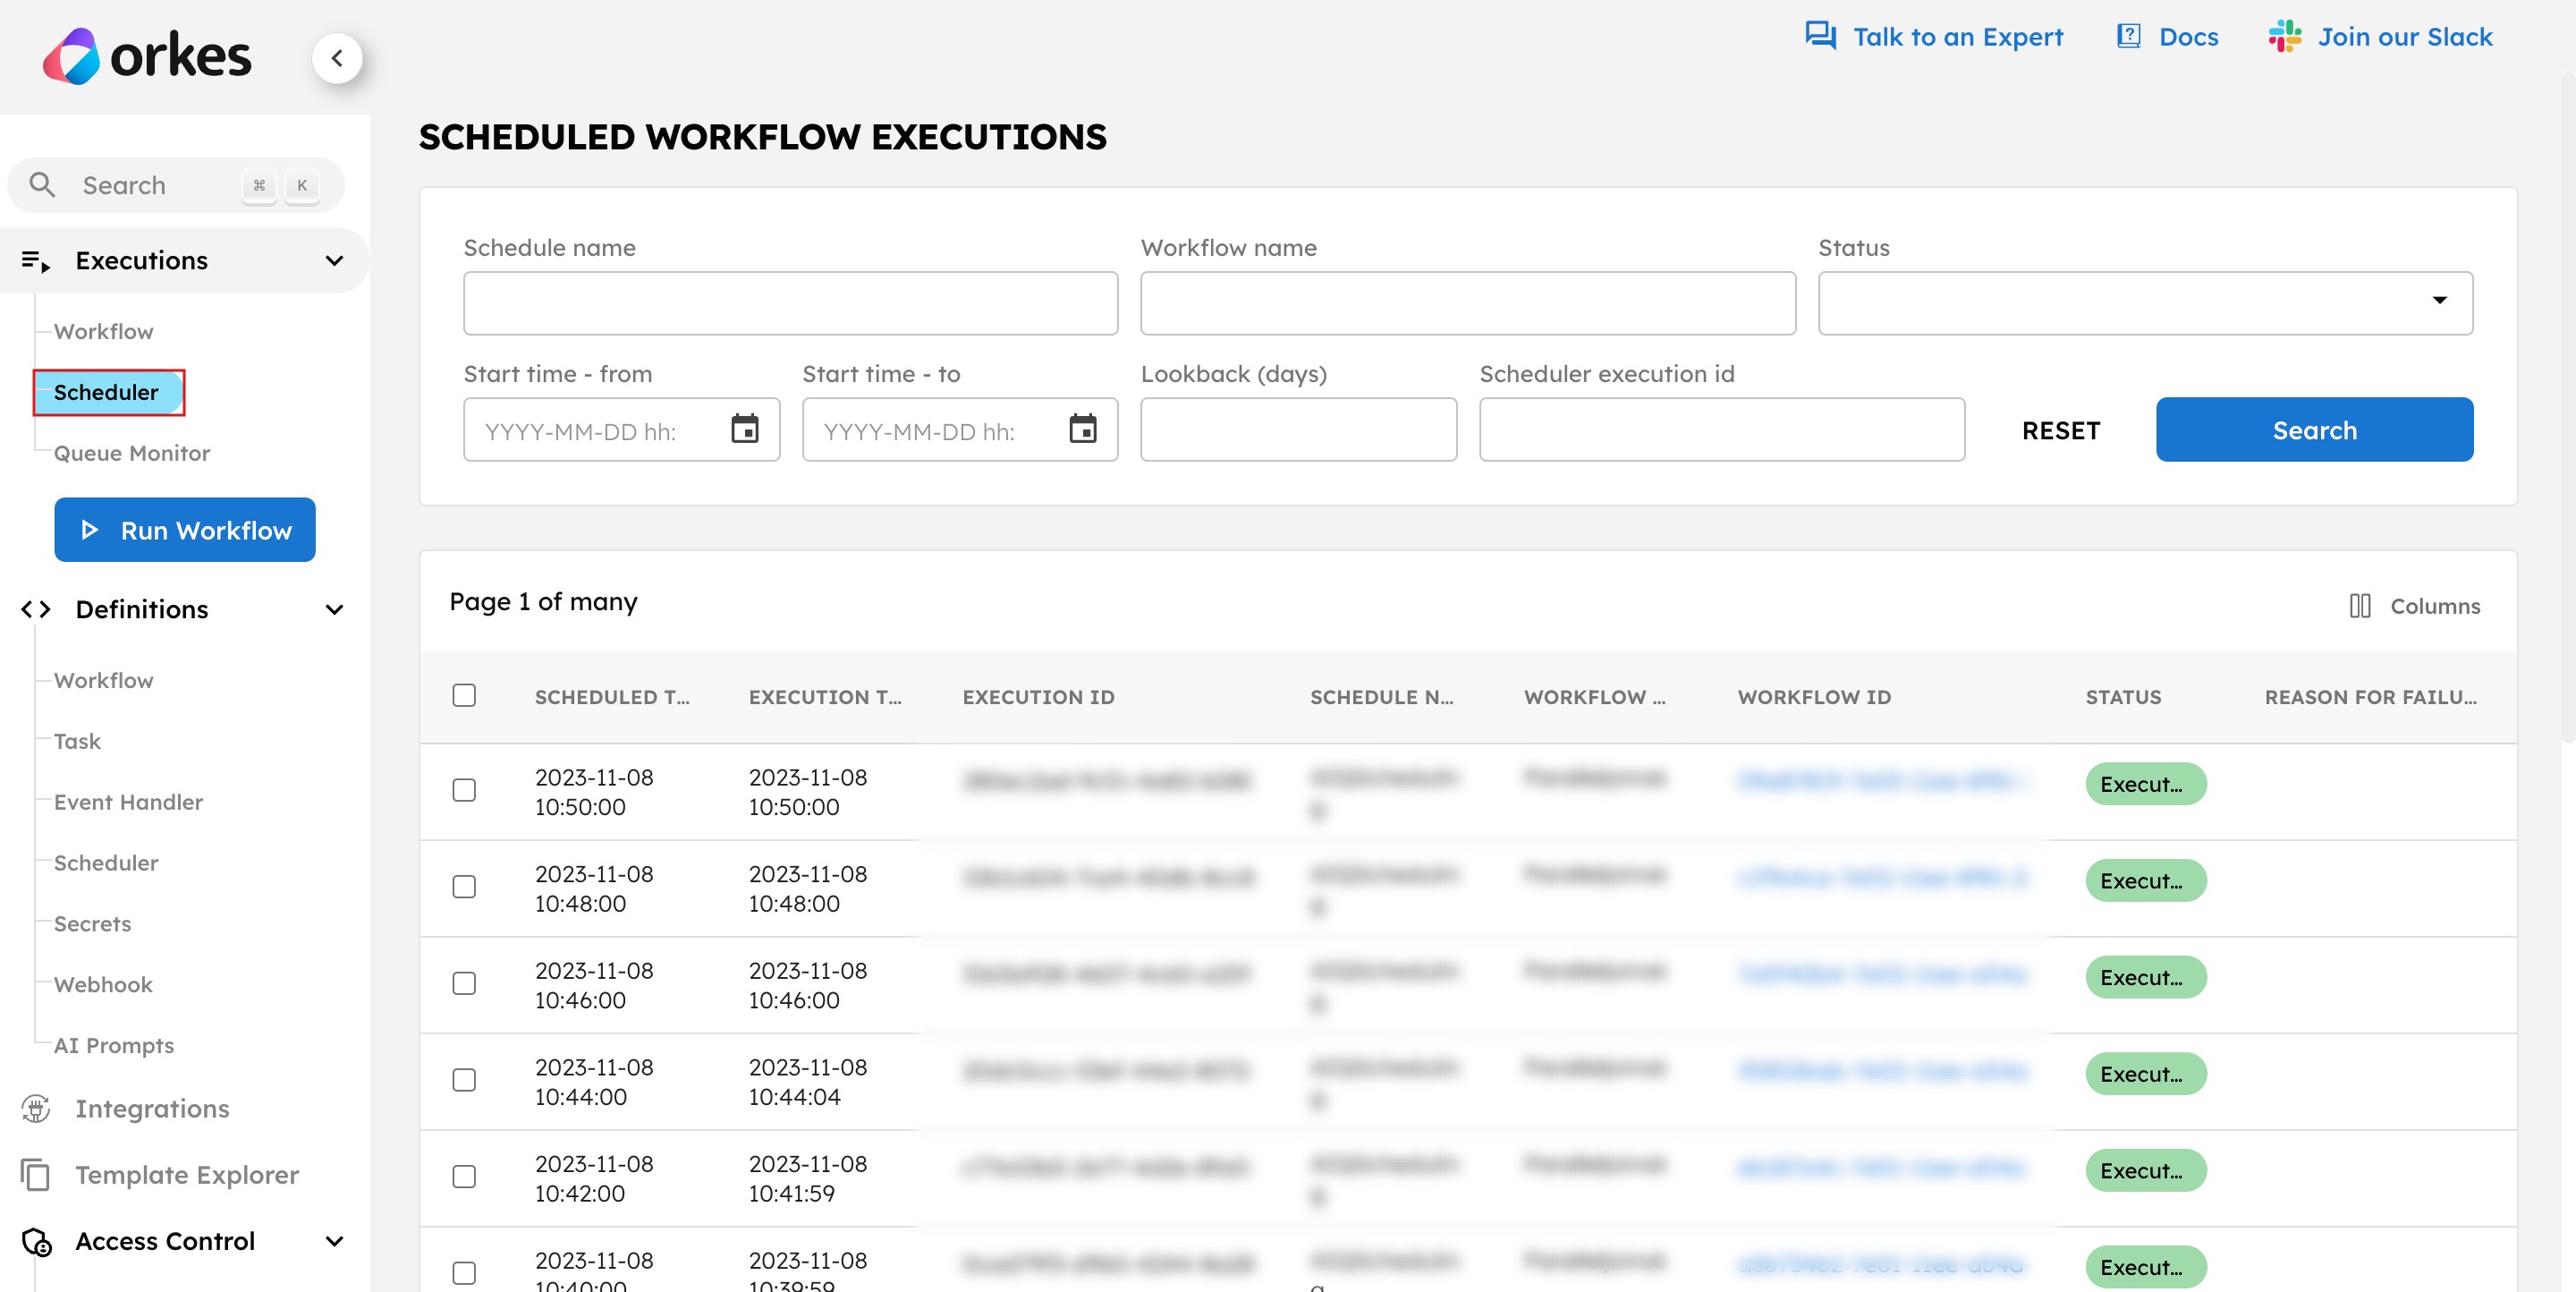
- The execution page displays the details for all scheduled executions, including scheduled time, execution time, execution ID, schedule name, workflow name, workflow ID, status, failure reason, and error details.
- You can view the workflow execution by directly clicking the workflow ID.
- Additional filtering options are available to refine your search.
- Use Bulk Actions to pause, resume, restart, retry, or terminate multiple items at once.
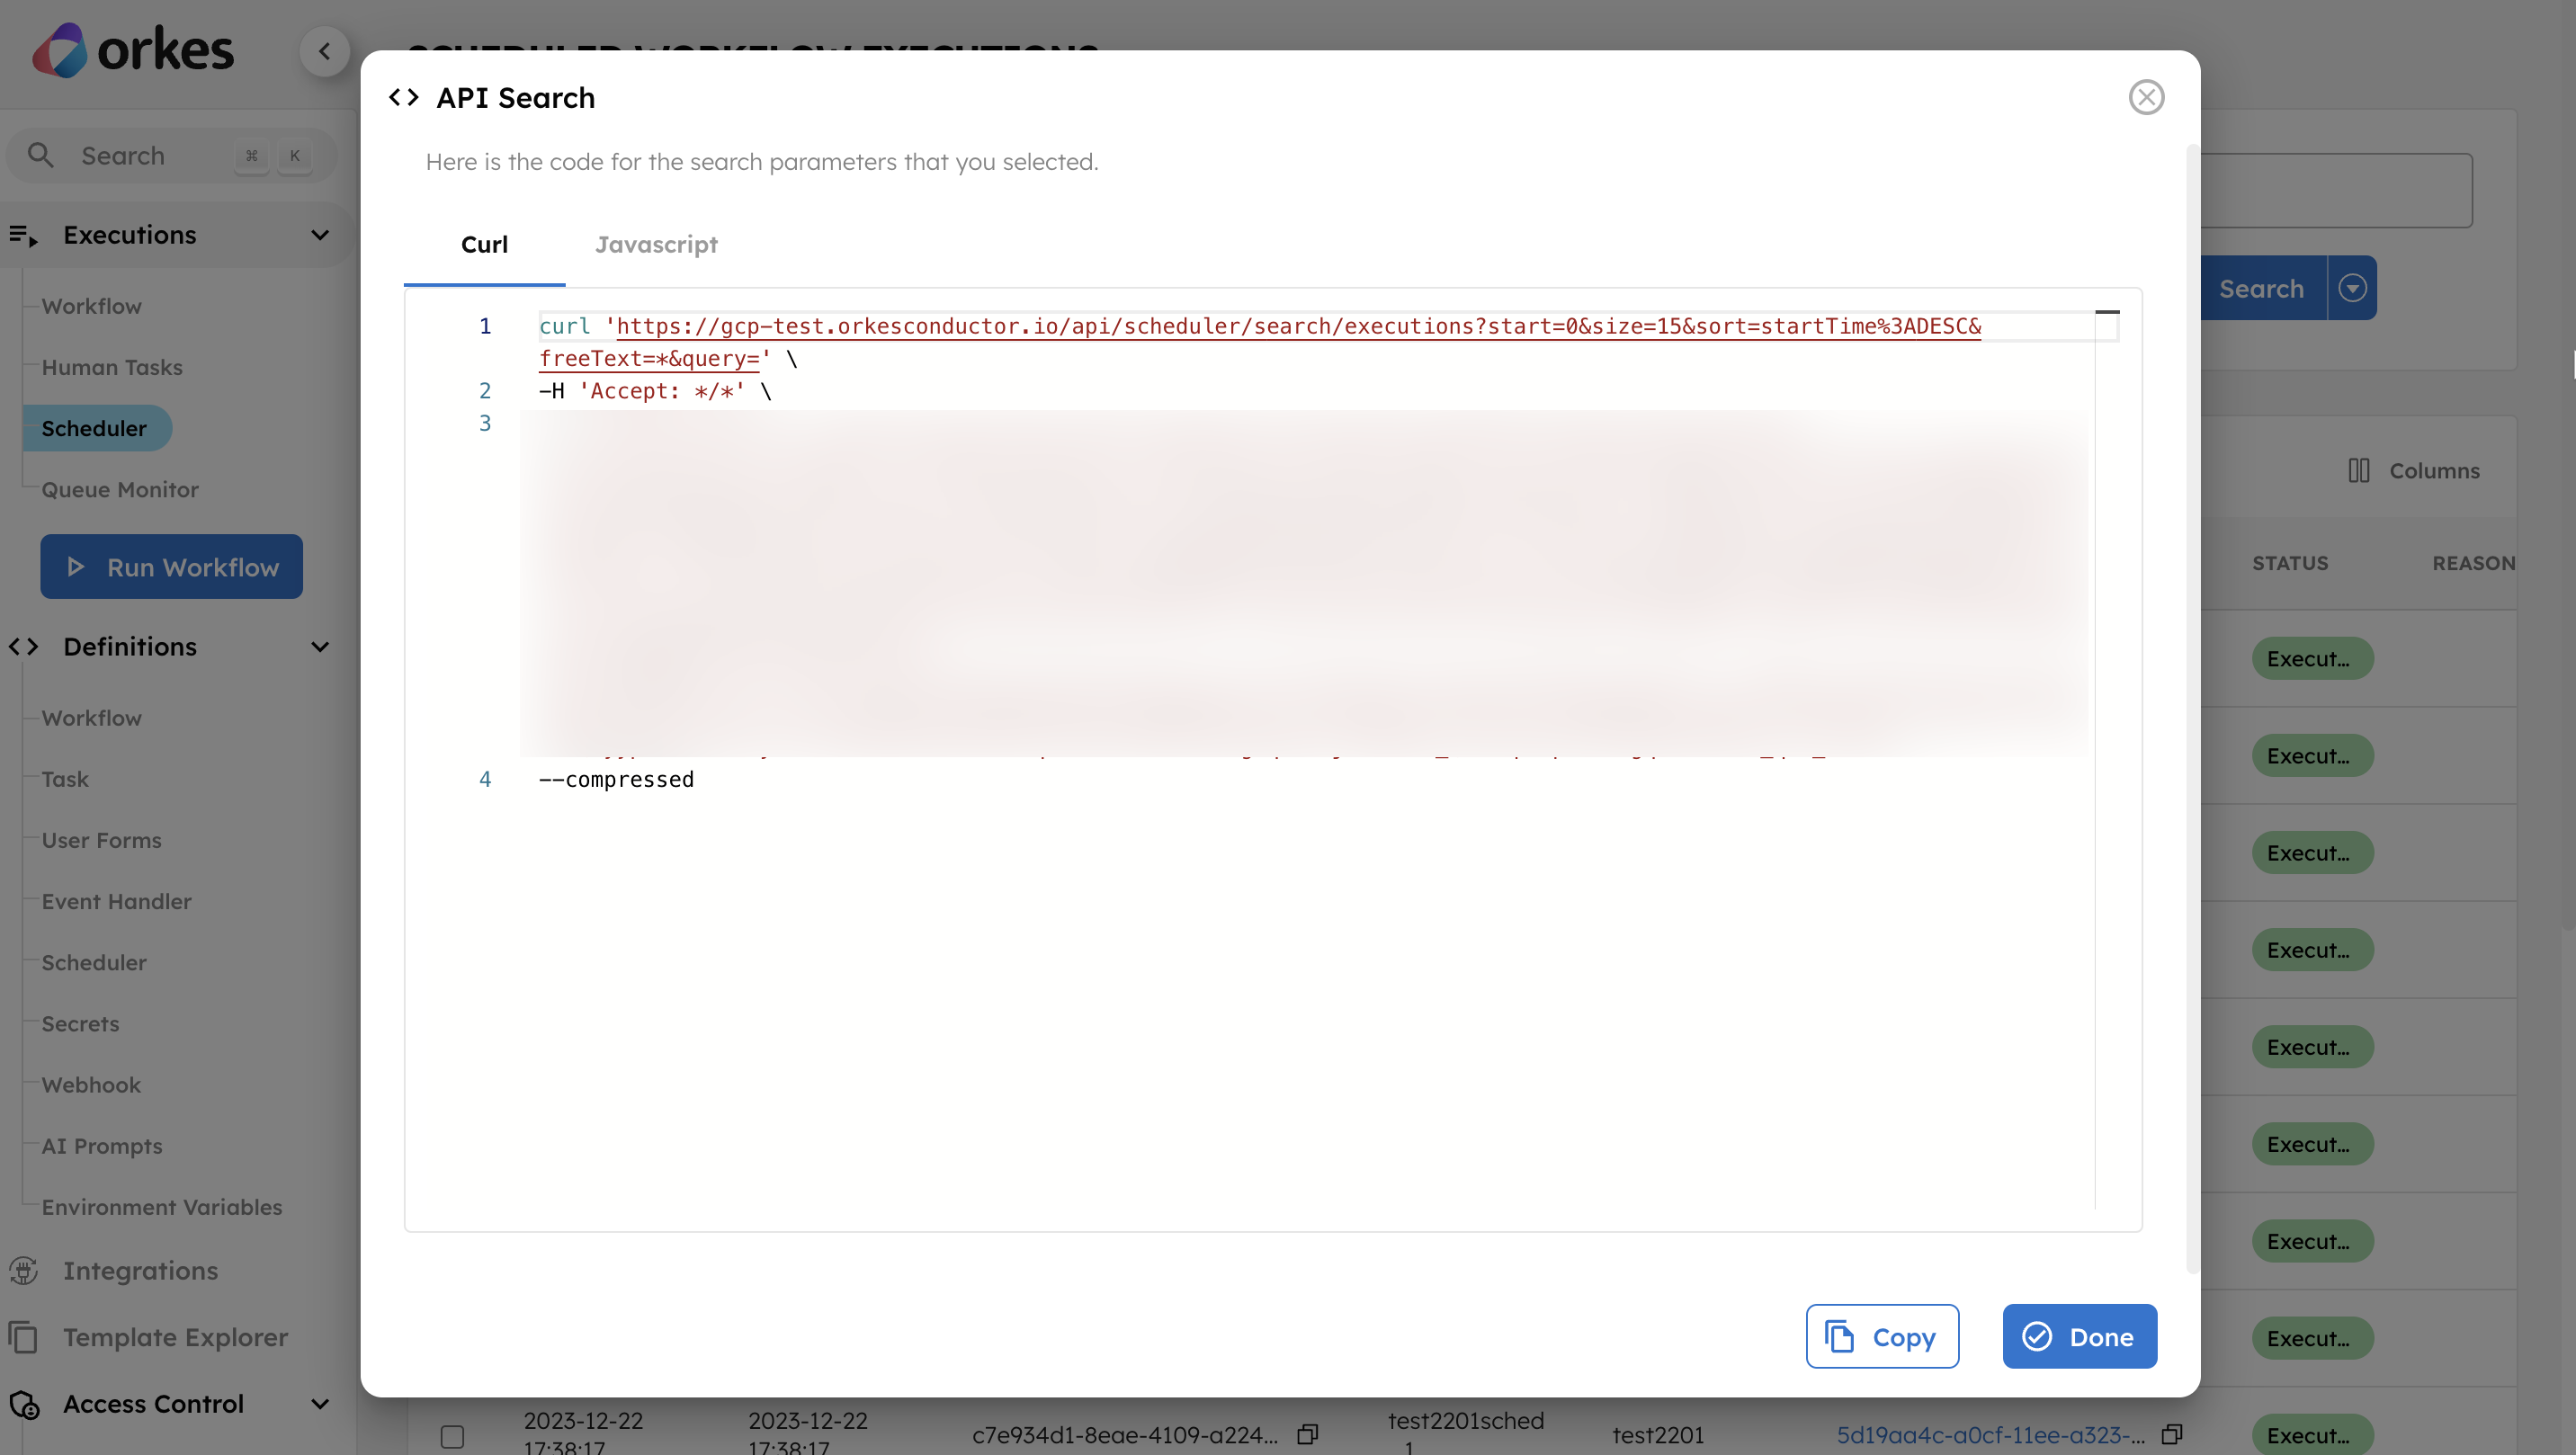
To get the scheduled workflow execution details as code in the UI, select the arrow next to the Search button and select Show as Code.
This will display the execution search data in cURL and JavaScript.
Troubleshooting schedules
Auto-pause on permission loss
Orkes Conductor automatically pauses a schedule if the schedule creator loses EXECUTE permission on the associated workflow. This is a security measure to prevent unauthorized workflow executions.
Identifying an auto-paused schedule
To confirm a schedule was paused due to a permission loss, retrieve the schedule using the API:
GET /api/scheduler/schedules/{name}
In the response, check the pausedReason field. If the schedule was auto-paused due to a security violation, the value will follow this format:
Security Error: <message>
Resolving an auto-paused schedule
To resume the schedule:
- Restore EXECUTE permission on the workflow for the schedule's creator.
- Manually resume the schedule.
How do I set up a crontab to schedule a workflow every 15 minutes?
Using the crontab expression (0 */15 * ? * *), you can schedule a workflow to run every 15 minutes.What is the smallest granularity to set up a schedule?
The scheduler supports up to a second granularity; however, this is done on a best-effort basis. A minimum of a 30-second gap is recommended as the cadence for workflow scheduling.Can I get a summary view of all the schedules that ran in a given period, like last month, last week, etc.?
Yes. From the Scheduler executions page, you can leverage the time filtering options. You can provide the start and end times to view the schedules that ran within the stipulated period. In addition, the Lookback (days) field can give the number of schedules that ran on the specified days.A schedule is created for a workflow for version 1. The workflow definition for that version changed later and now has new or updated input parameters. The schedule should also pass in the updated input parameter. Is there a way to find this?
When creating a schedule, you can choose a specific workflow version. If no version is selected, the latest version runs by default. If a version is chosen, you must manually update the schedule to use the latest version and the updated input parameters.How do I set up a crontab to schedule a workflow every 90 minutes?
Cron expression does not directly support scheduling workflows every 90 minutes, as the minute field only supports values between 0 and 59. However, you can achieve this using two separate schedules:
Schedule 1:
0 0 0/3 * * ?
Schedule 2:
0 30 1/3 * * ?
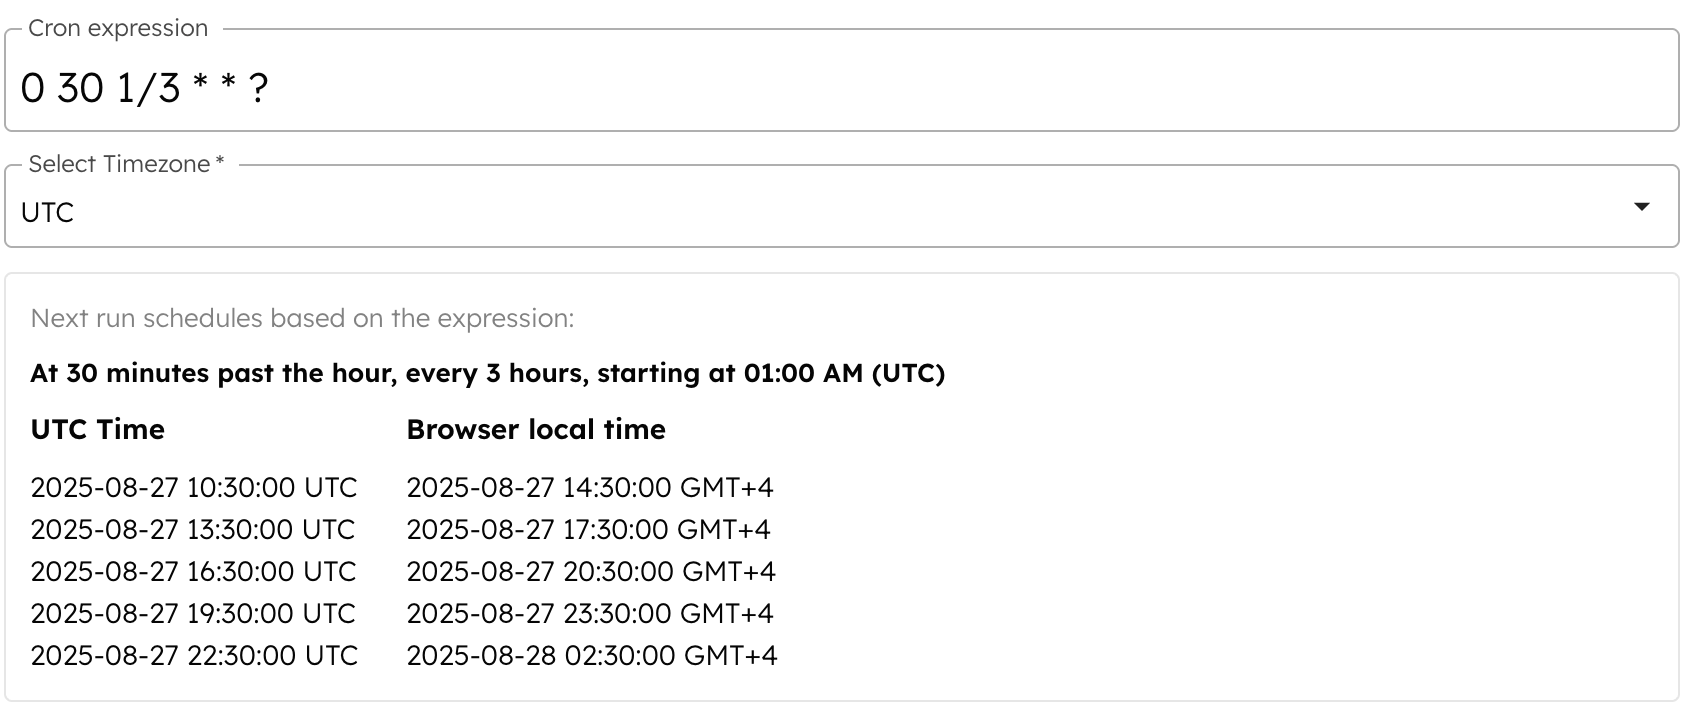
With both schedules, the workflow runs every 90 minutes. For example:
- The second schedule runs at 14:30 and the first schedule runs at 16:00, which is 90 minutes apart.
- The next run for the second schedule is at 17:30, and for the first schedule, it is at 19:00, which are again 90 minutes apart.
Timeline: 14:30 (Schedule 2) > 16:00 (Schedule 1) > 17:30 (Schedule 2) > 19:00 (Schedule 1) ......