Build a Feedback API Using Orkes Conductor API Gateway
This tutorial shows how to expose an Orkes Conductor workflow as a public API by using the API Gateway. You will build a simple feedback API that accepts a user rating and comment, validates the input using a schema, and triggers a workflow to process the feedback.
In this tutorial, you will:
- Create a feedback workflow in Orkes Conductor.
- Define an input schema for the workflow.
- Create an application.
- Configure authentication settings for the API service.
- Create a feedback service.
- Create a route.
- Test the endpoint.
By the end of this tutorial, you will have a working API endpoint backed by an Orkes Conductor workflow.
To follow along, ensure you have access to the free Orkes Developer Edition.
Step 1: Create a feedback workflow in Orkes Conductor
In this step, you create a workflow that processes feedback submitted through an API request.
To create a workflow:
- Go to Definitions > Workflow from the left navigation menu on your Conductor cluster.
- Select + Define workflow.
- In the Code tab, paste the following code:
{
 "name": "Feedback",
 "description": "Workflow to process user feedback ",
 "version": 1,
 "tasks": [
   {
     "name": "feedback_inline",
     "taskReferenceName": "formatFeedback",
     "inputParameters": {
       "evaluatorType": "graaljs",
       "rating": "${workflow.input.rating}",
       "comment": "${workflow.input.comment}",
       "expression": "(function () {\n  return {\n    message: 'Feedback received with rating ' + $.rating + ' and comment: \"' + $.comment + '\".'\n  };\n})();"
     },
     "type": "INLINE"
   }
 ],
 "inputParameters": [
   "rating",
   "comment"
 ],
 "outputParameters": {
   "message": "${formatFeedback.output.result.message}"
 },
 "schemaVersion": 2
}
- Select Save > Confirm.
Your workflow looks like this:
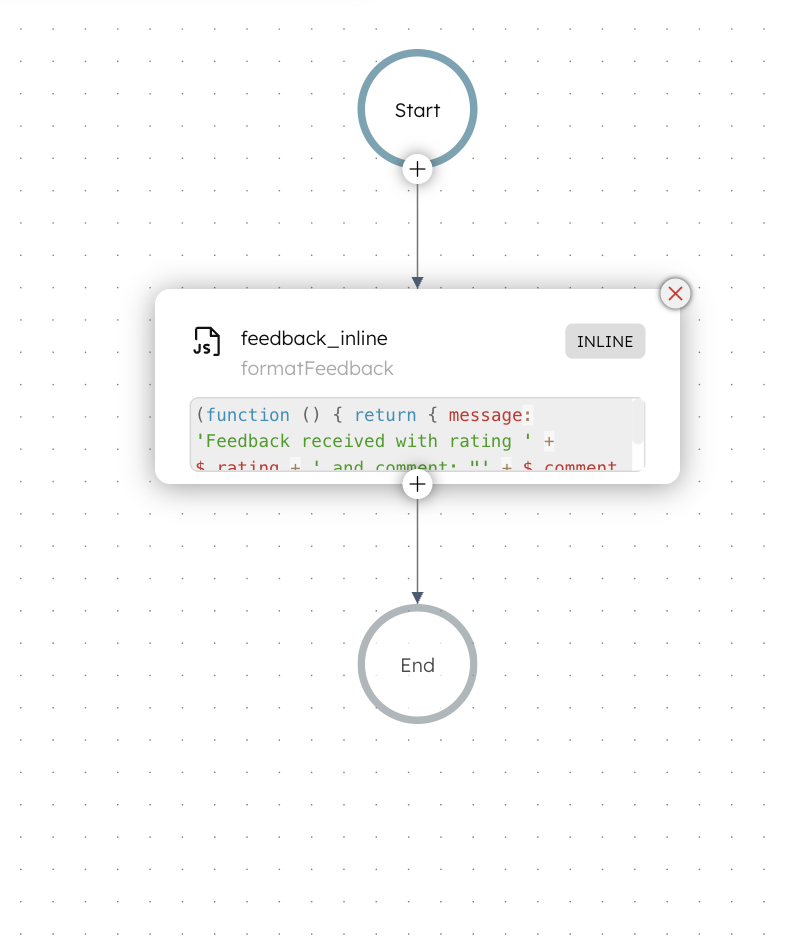
In this workflow, you define the backend logic that the API Gateway will execute when a request is received.
The workflow accepts a rating and comment as input, processes the values using a simple Inline task, and returns a formatted confirmation message.
The workflow is now ready. The next step is to define a schema that validates incoming API requests.
Step 2: Define input schema for the workflow
The input schema ensures that only valid API requests can trigger the workflow.
To define an input schema:
- Go to Definitions > Schema from the left navigation menu on your Conductor cluster.
- Select + New schema.
- In the Code tab, paste the following schema:
{
 "name": "FeedbackSchema",
 "version": 1,
 "type": "JSON",
 "data": {
   "$schema": "http://json-schema.org/draft-07/schema",
   "type": "object",
   "properties": {
     "rating": {
       "type": "integer",
       "minimum": 1,
       "maximum": 5
     },
     "comment": {
       "type": "string"
     }
   },
   "required": [
     "rating",
     "comment"
   ]
 }
}
- Select Save > Confirm.
The next step is to create an application with permission to execute the workflow.
Step 3: Create an application
Skip the step if you are using Orkes Developer Edition. If you are using Orkes Developer Edition, you do not need to create a separate application, as it has a Default Orkes Application, which is automatically available and has permission to execute workflows.
Applications act as service accounts that control which workflows the API Gateway can execute.
To create an application:
- Go to Access Control > Applications, from the left navigation menu on your Conductor cluster.
- Select + Create application.
- Enter a Name for the application.
- In Permissions, select + Add permission.
- In the Workflow tab, select the workflow created in Step 1.
- Enable the EXECUTE permission.
- Select Add permissions.
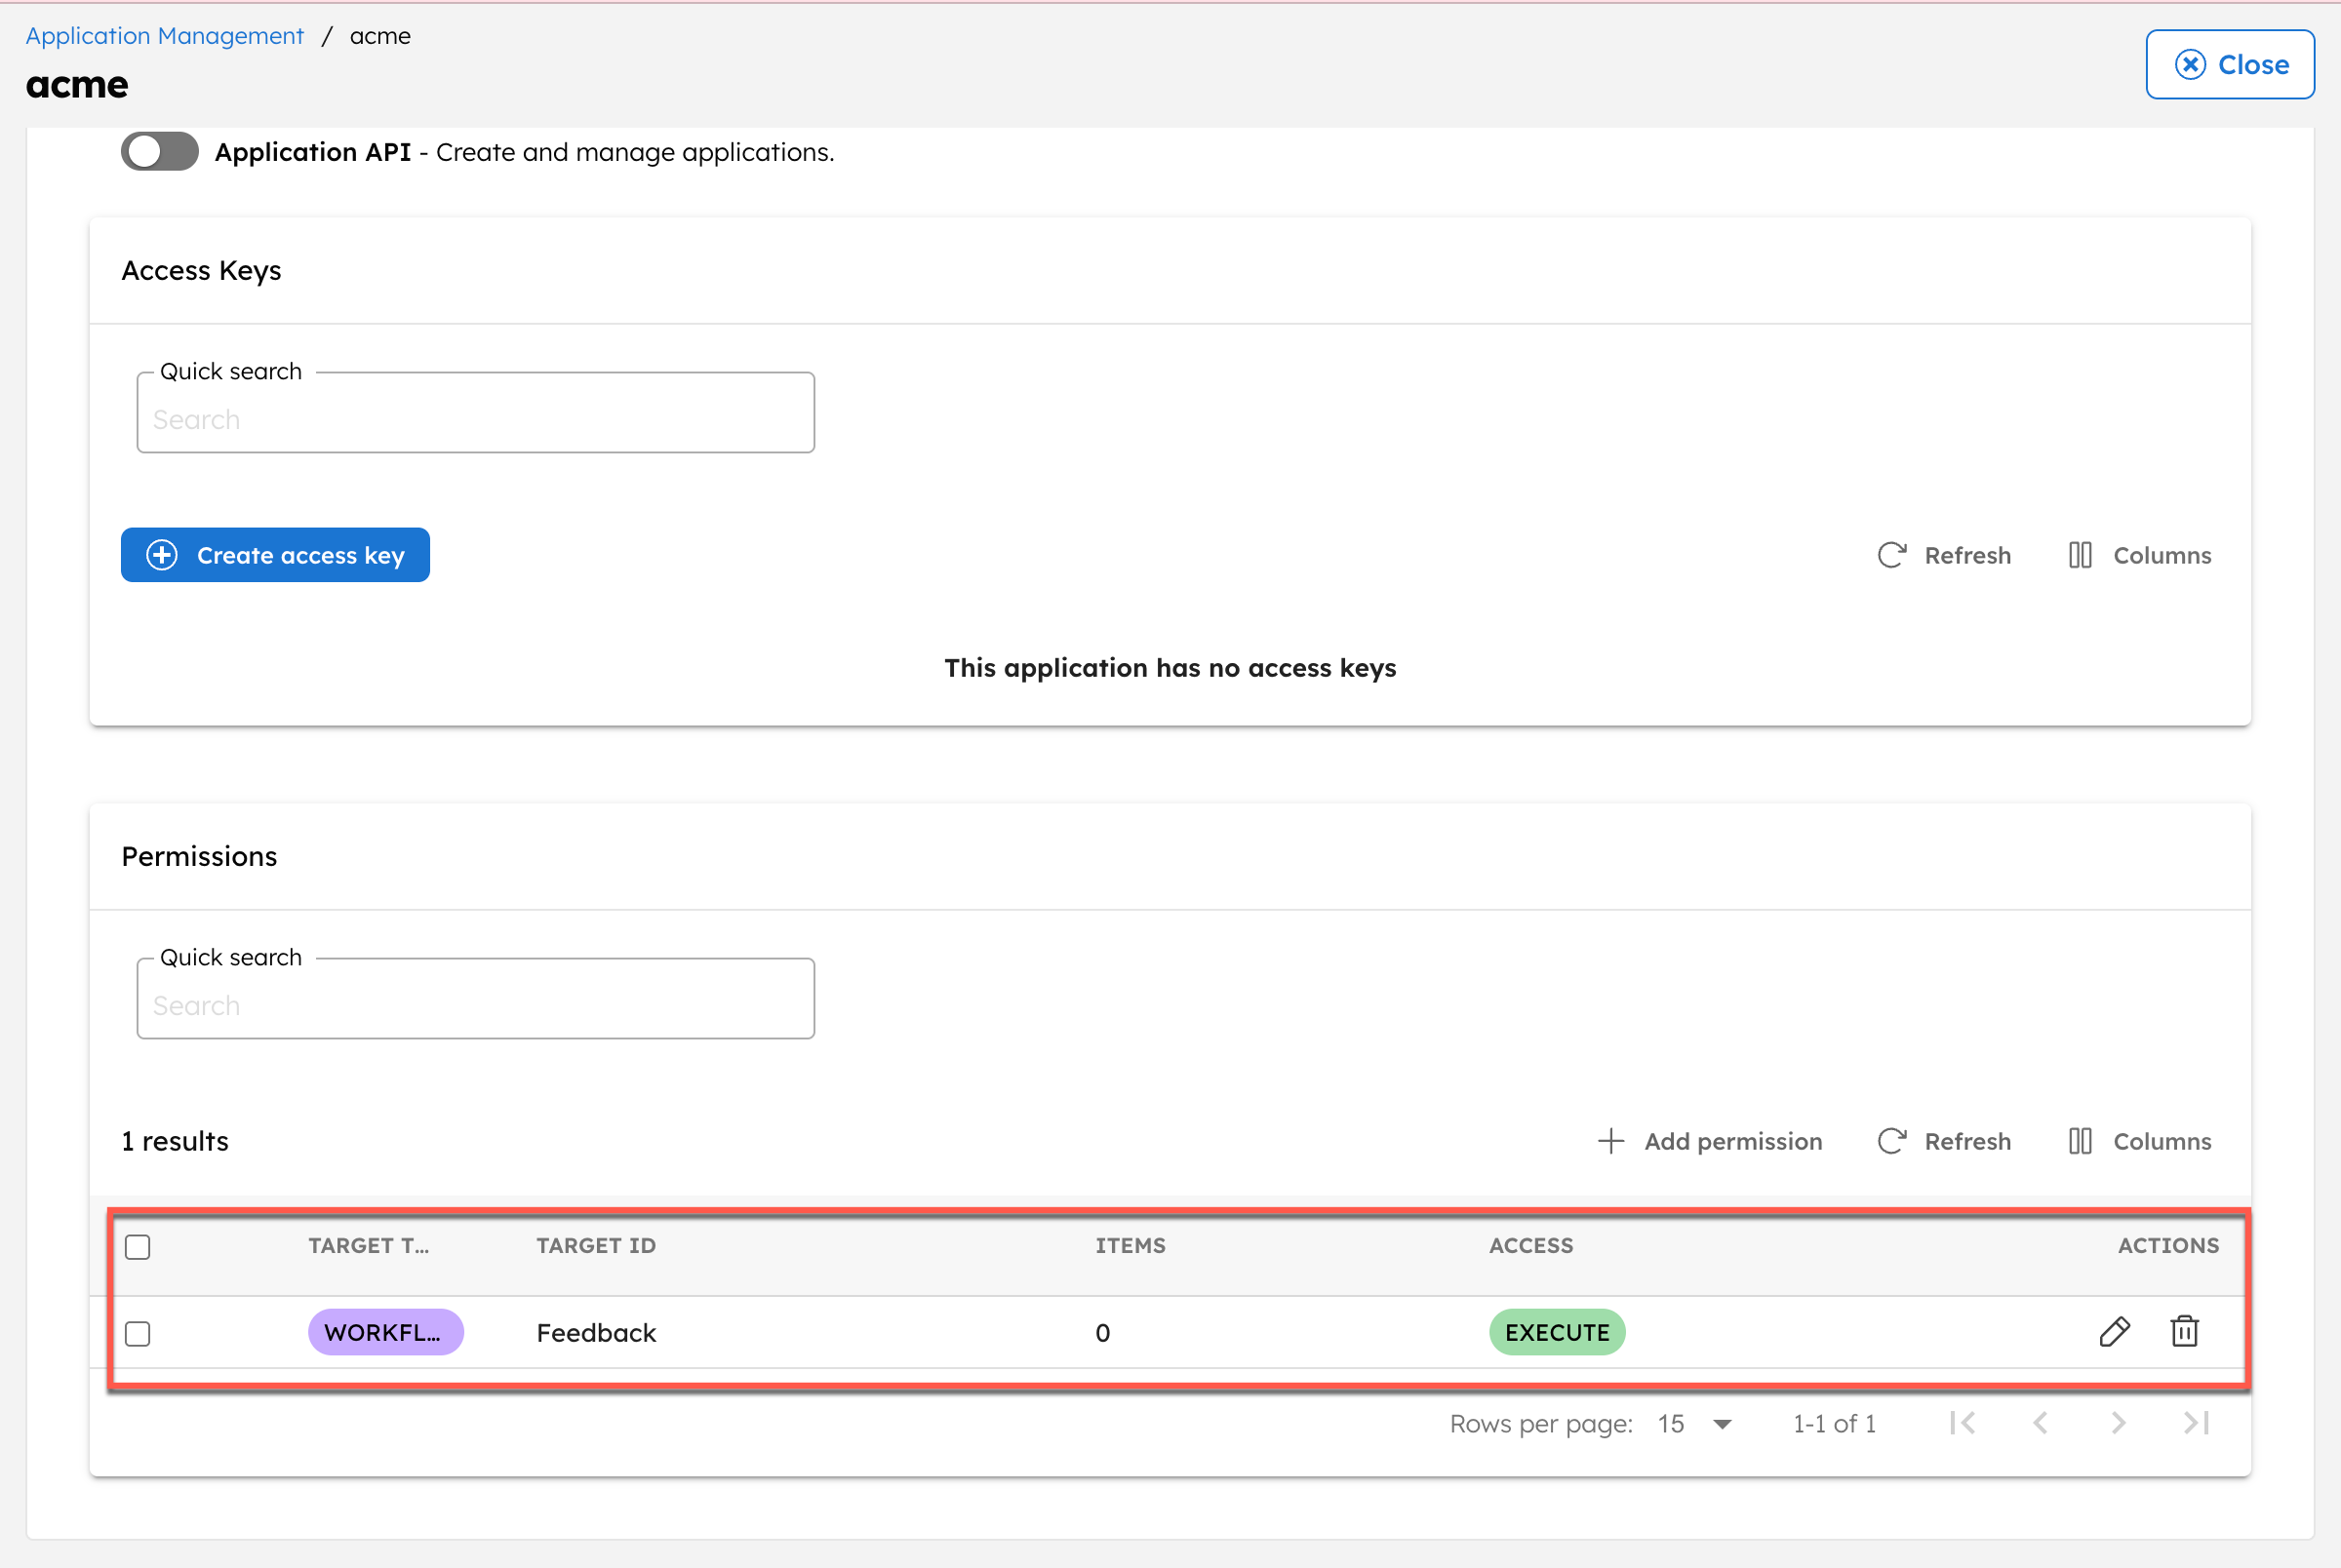
The application now has permission to execute the feedback workflow.
Step 4: Configure authentication settings
Authentication settings define how clients are authorized to access the API. You can configure authentication without a key, or you can authenticate requests by using an API key. In this example, the service uses no authentication.
To configure authentication settings:
- Go to APIs > Authentication, from the left navigation menu on your Conductor cluster.
- Select + New authentication.
- Enter a unique name as the ID and select Authentication Type as No Authentication.
- In Application, select the application created in the previous step. If you are using Orkes Developer Edition, use the application Default Orkes Application here.

- Select Save.
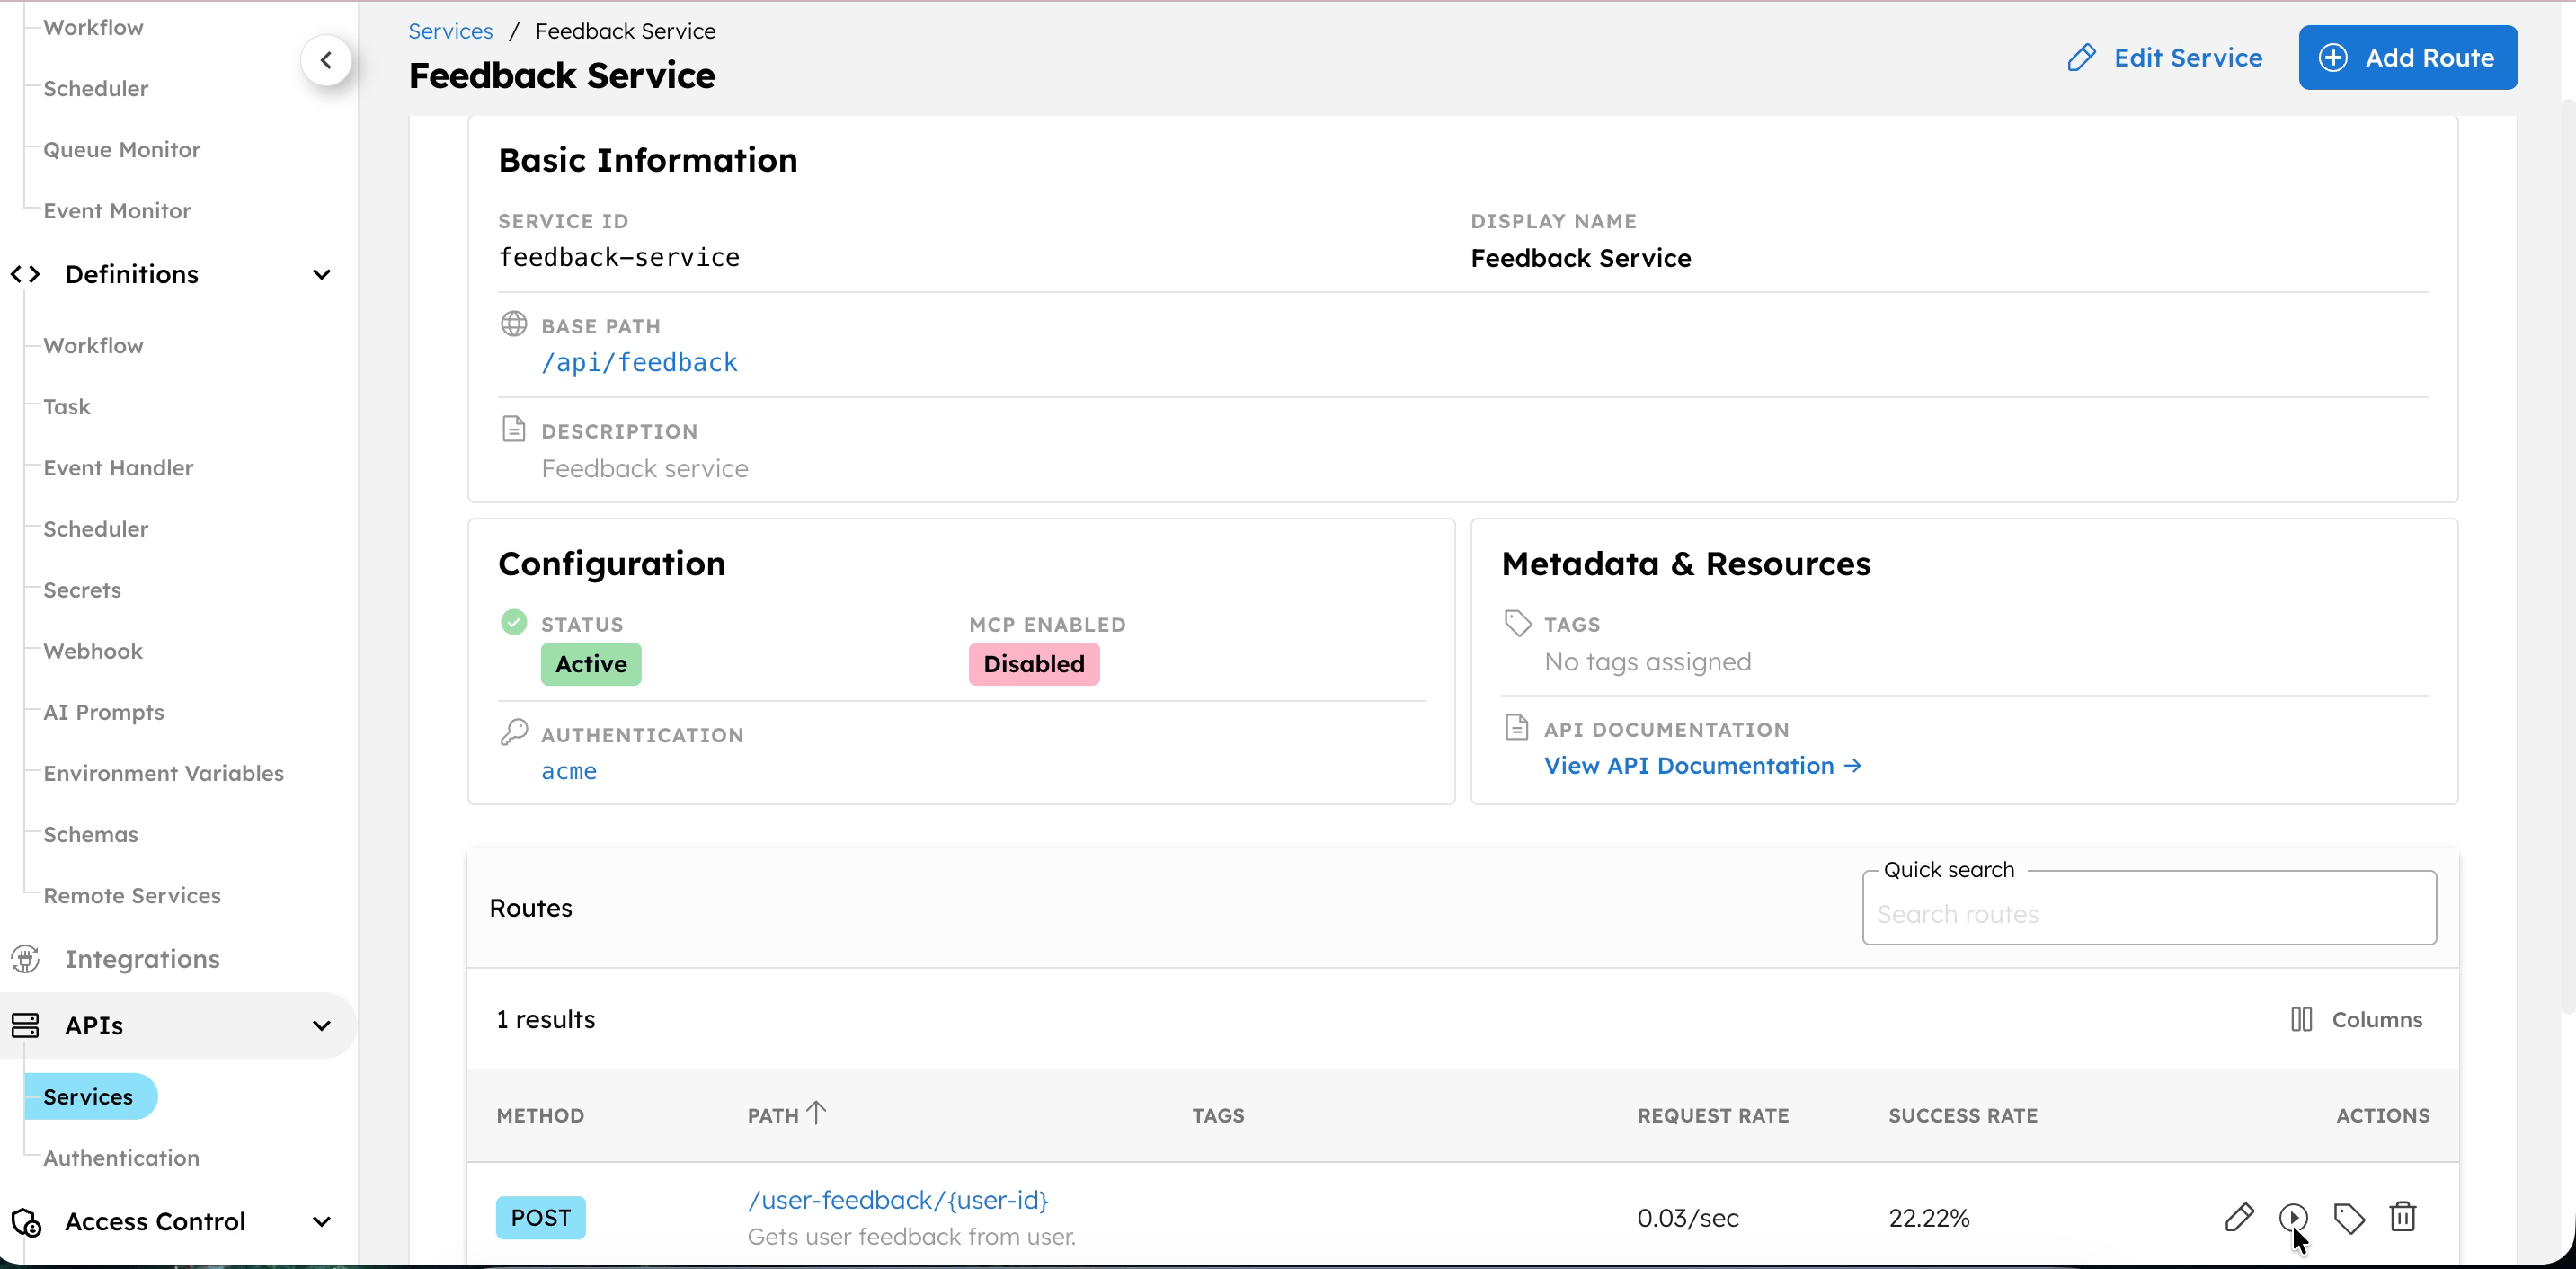
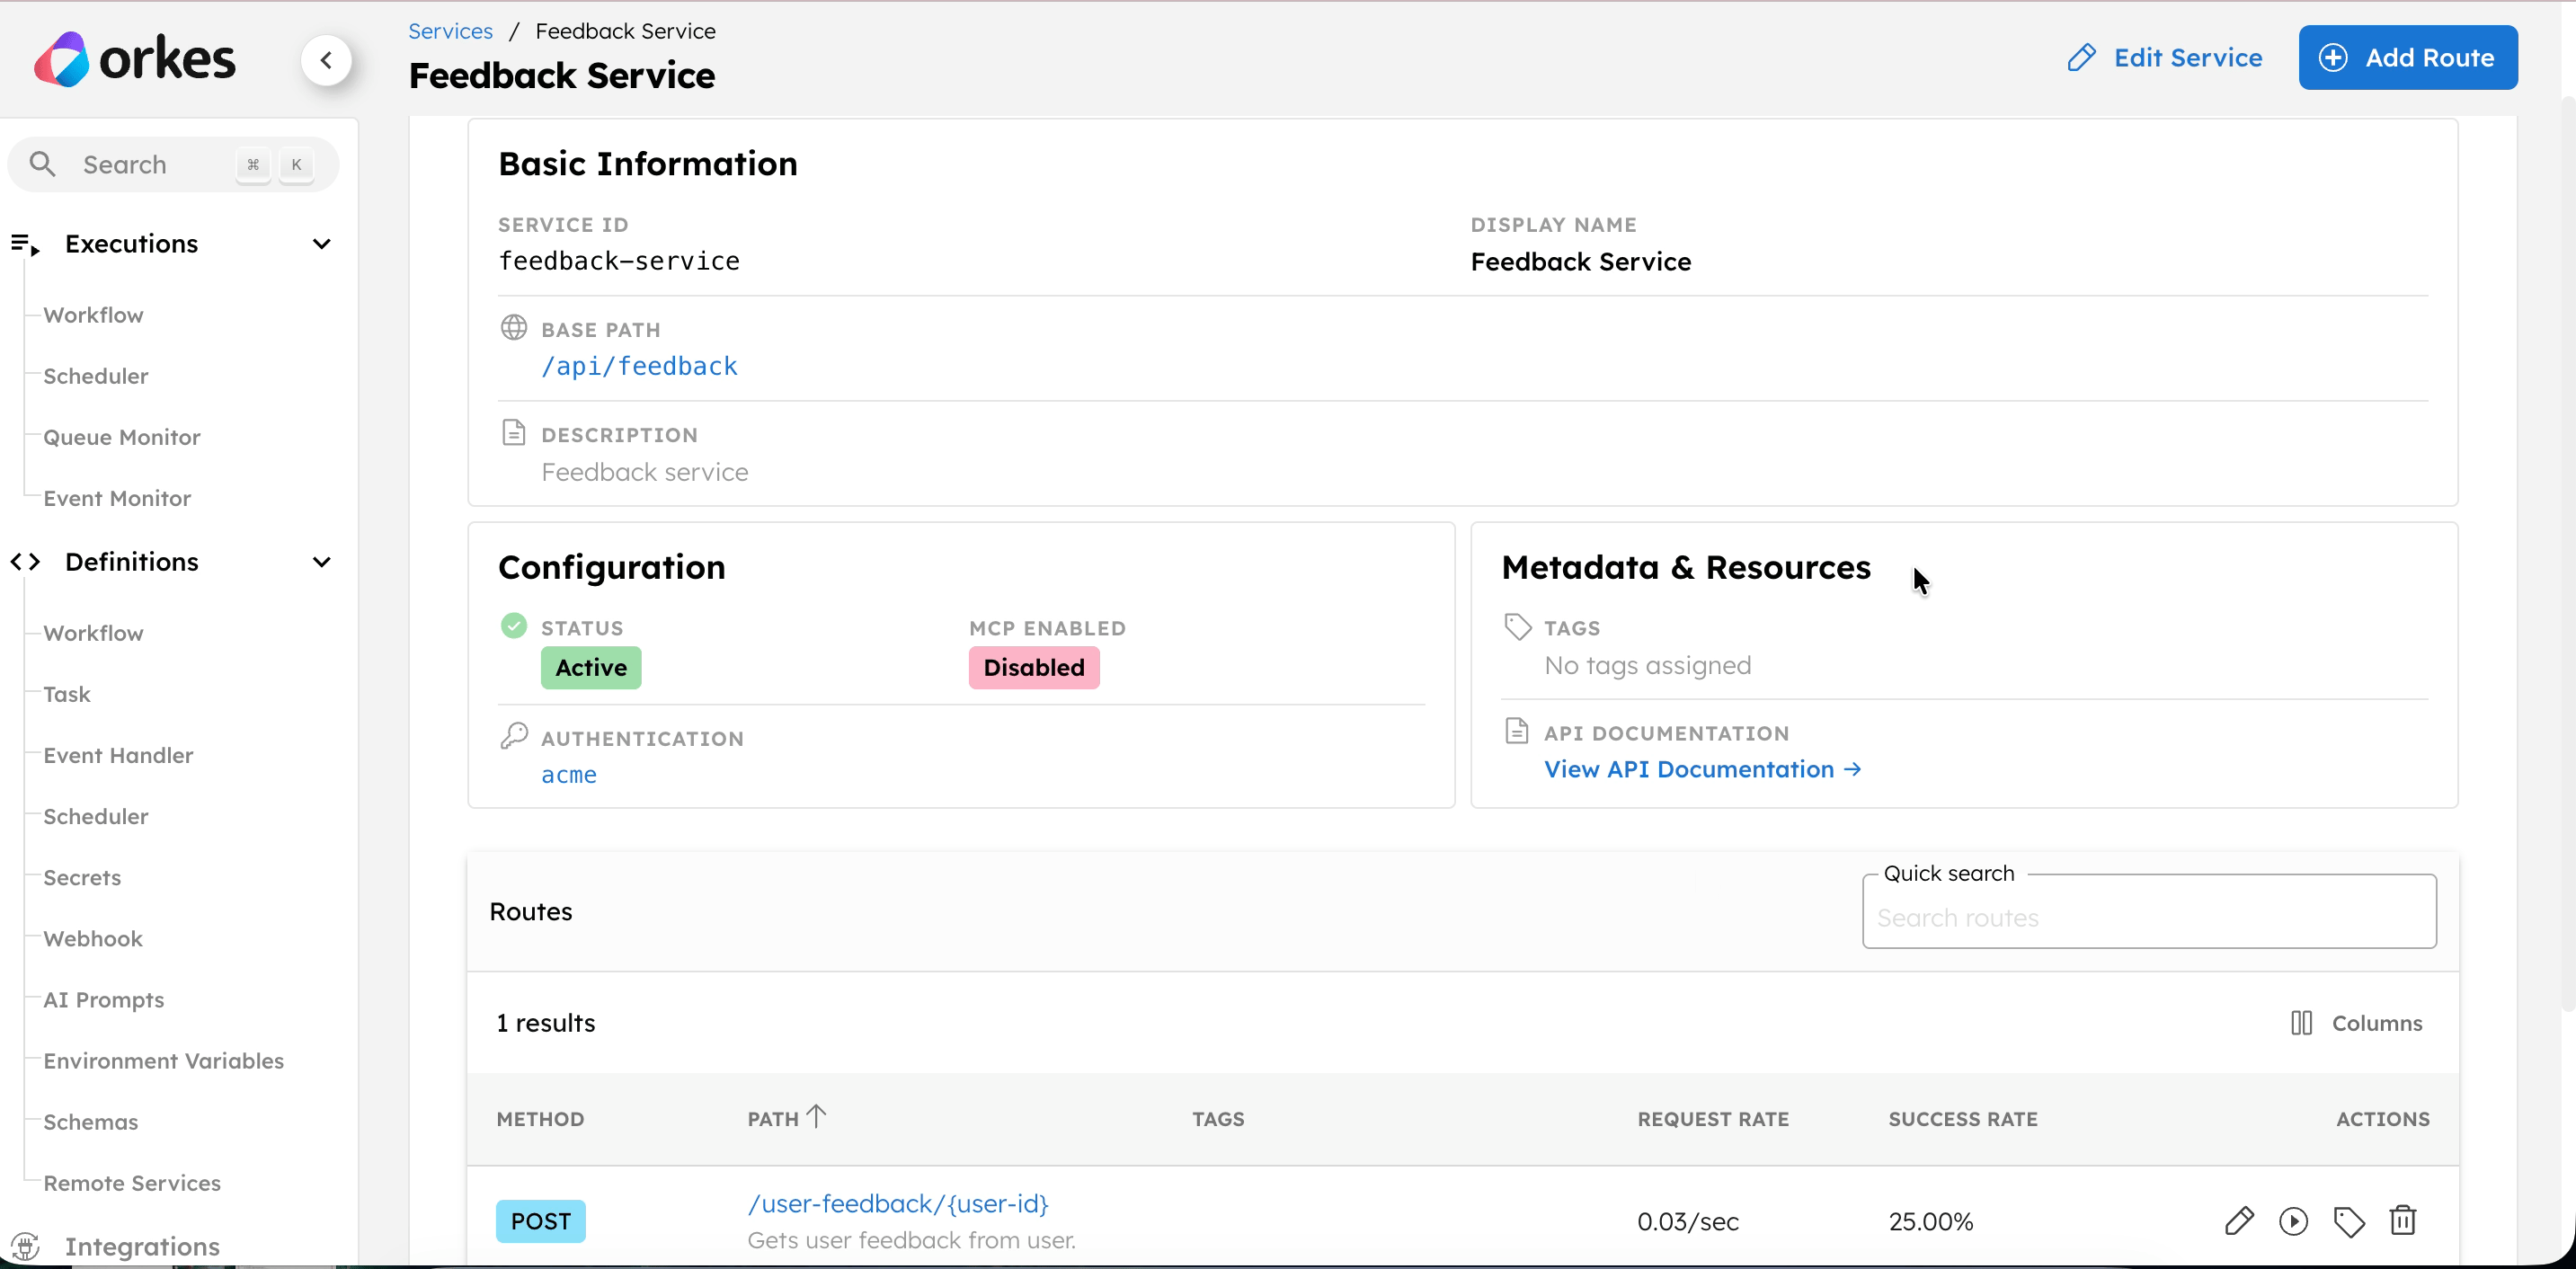
Step 5: Create a feedback service
A service represents a logical grouping of API routes that share common configuration settings.
To create a service:
- Go to APIs > Services, from the left navigation menu on your Conductor cluster.
- Select + New service.
- In Service ID, enter feedback-service.
- Enter the Display Name as Feedback Service.
- Disable the field MCP Enabled.
- Enter the Base Path as /api/feedback.
- Set the Auth Config to the authentication setting created in the previous step.
- In CORS Configuration,
- Set Allowed Origins as *.
- Set Allowed Methods to Select All.
- Set Allowed Headers as *.
- Set an optional Description for the service.

- Select Save.
The service is now ready. Next, create a route to connect it to the workflow.
Step 6: Create a route
Routes define individual API endpoints and map them to workflows.
To create a route:
- Go to the Services and select the + button next to the service created.

- In Route Definition, set:
- HTTP Method to POST.
- Path to
/user-feedback/{user-id}.
- In Workflow Configuration, set the Workflow Name to the one created in Step 1.
- In Schema, set the Input Schema to the schema created in Step 2.
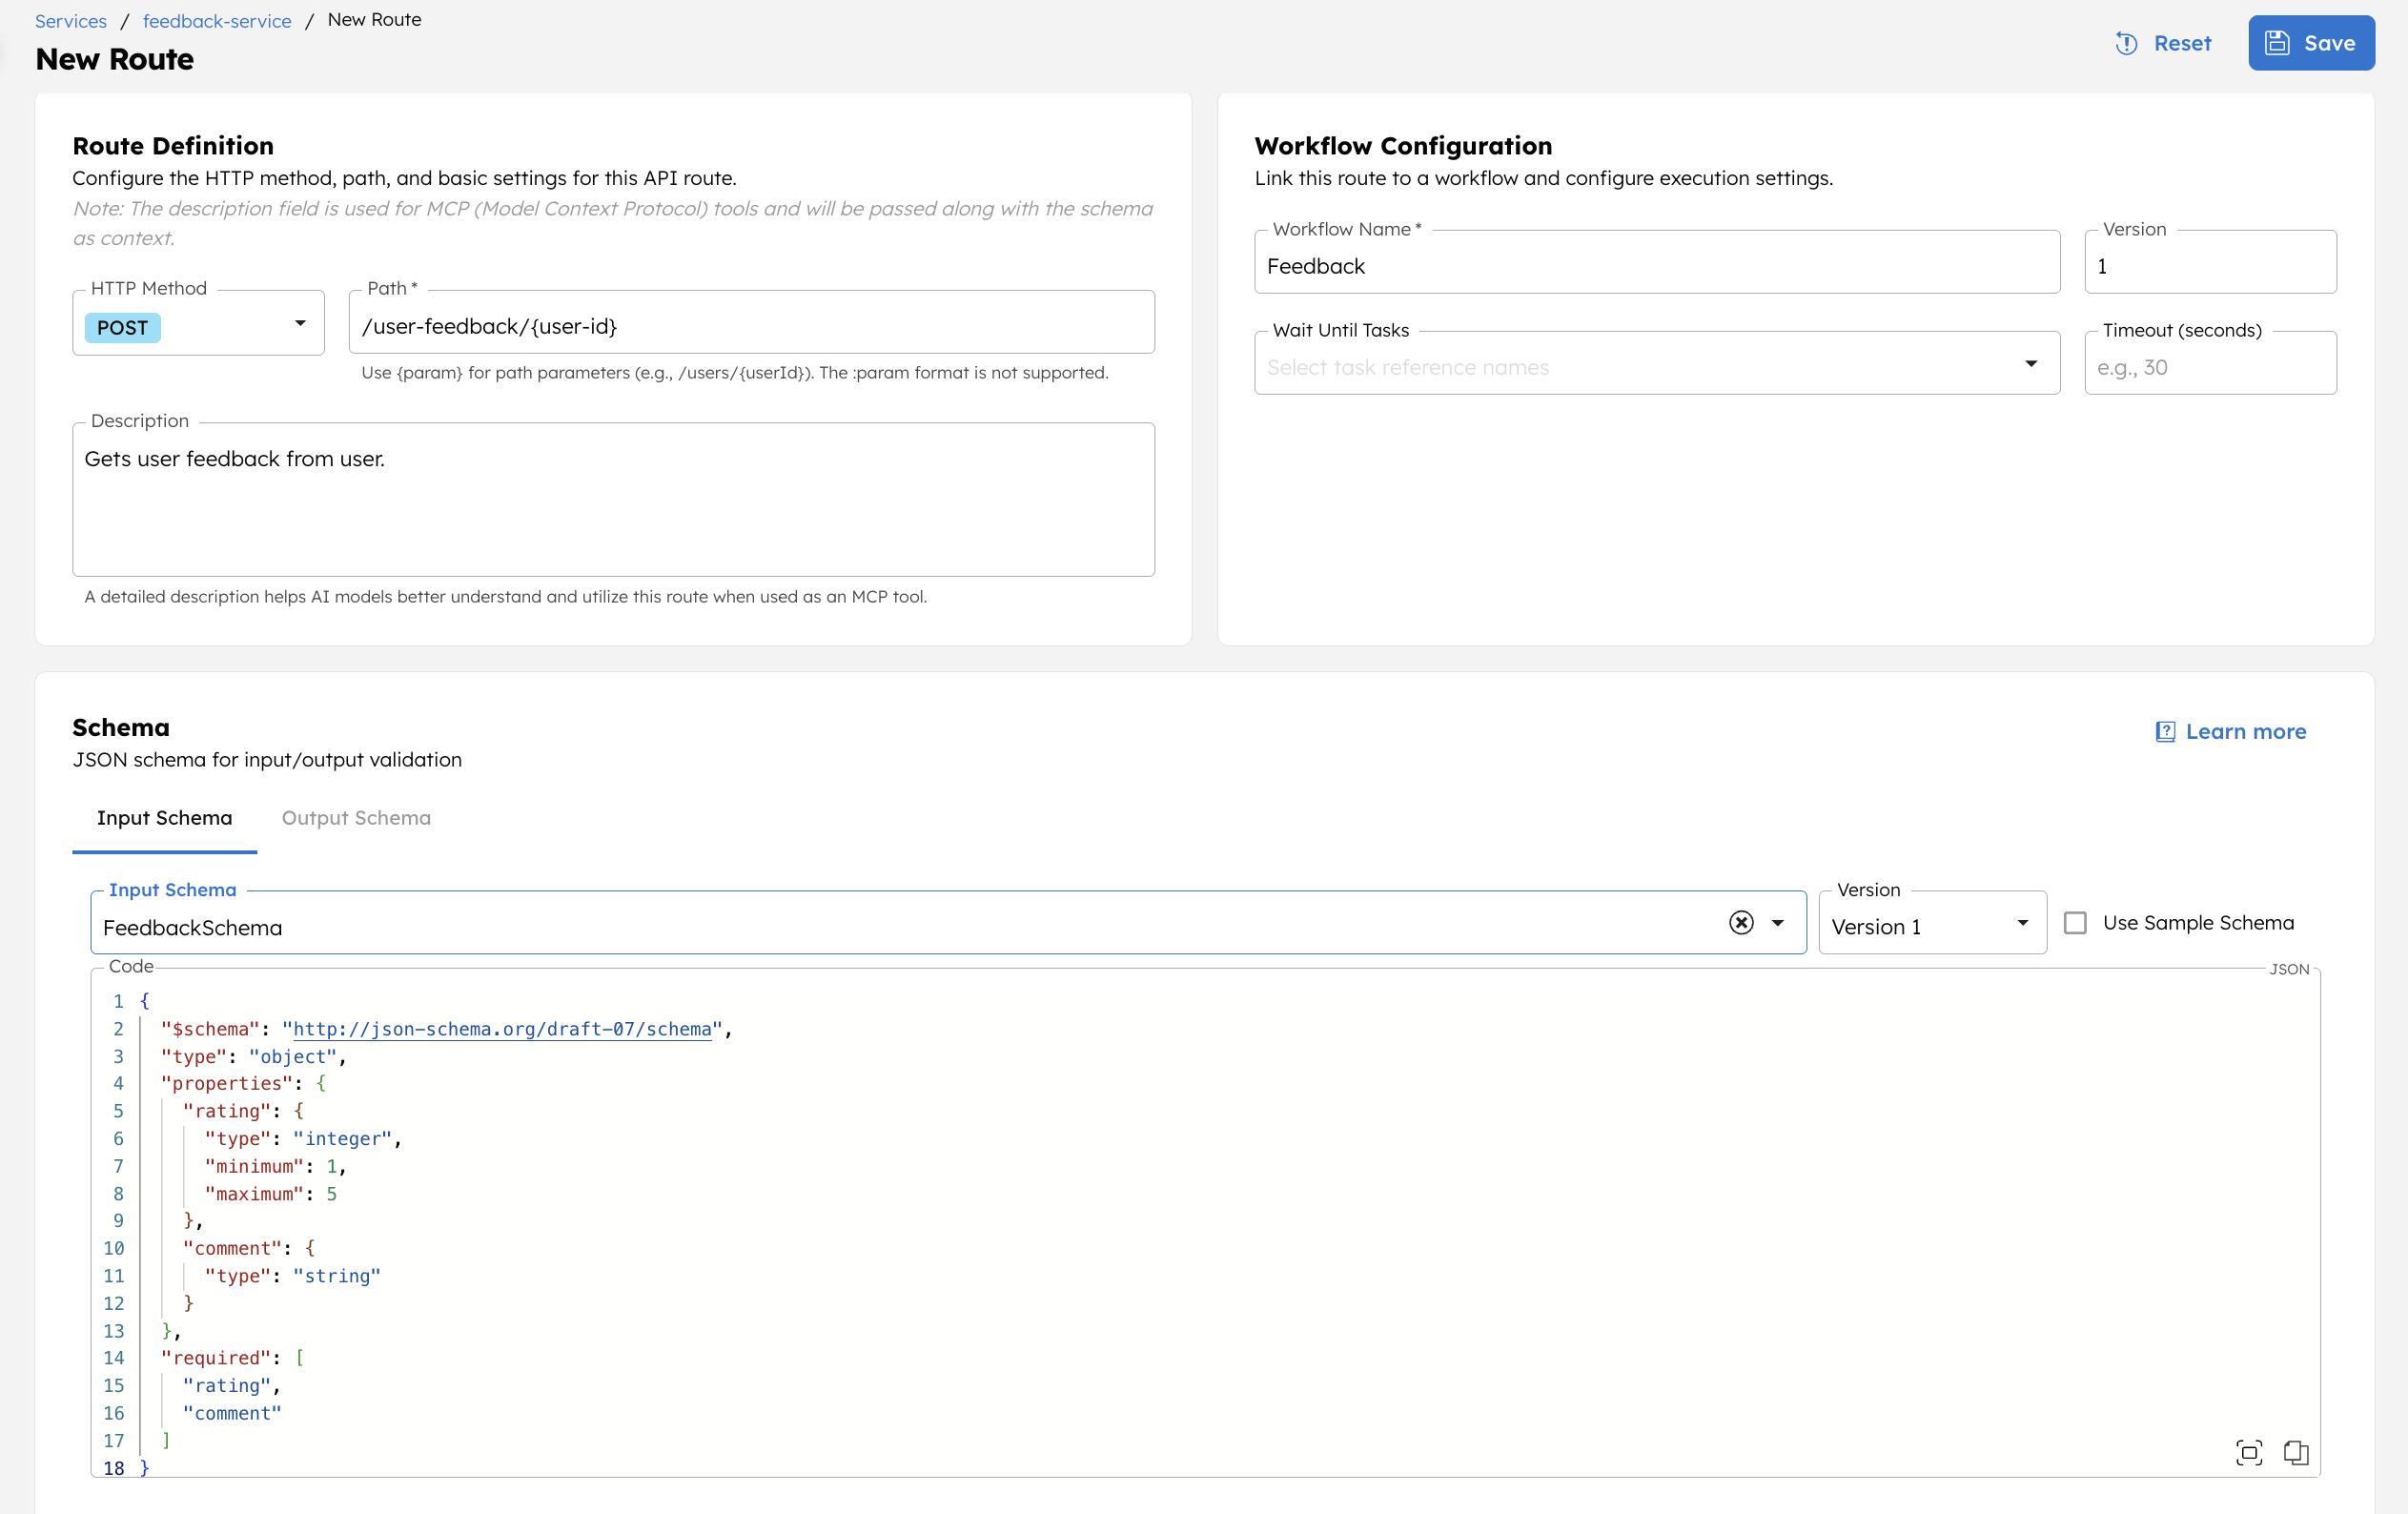
- Select Save.
Step 7: Test the endpoint
You can test the route directly from the Conductor UI.
Test endpoint from Conductor UI
To test a route:
- Go to the APIs > Services, and select the service.
- In Routes, select the play icon next to the route to test.
- In Path Parameters, enter a sample
user-id. - In Body, enter the request payload as defined in the workflow. For example:
{
 "rating":4,
 "comment":"Good service"
}
- Select Test Route.
- Review the Response to verify the route works as expected.
Verify workflow execution
To confirm that the workflow was triggered:
- Go to Executions > Workflow.
- Select the latest execution of the Feedback workflow.
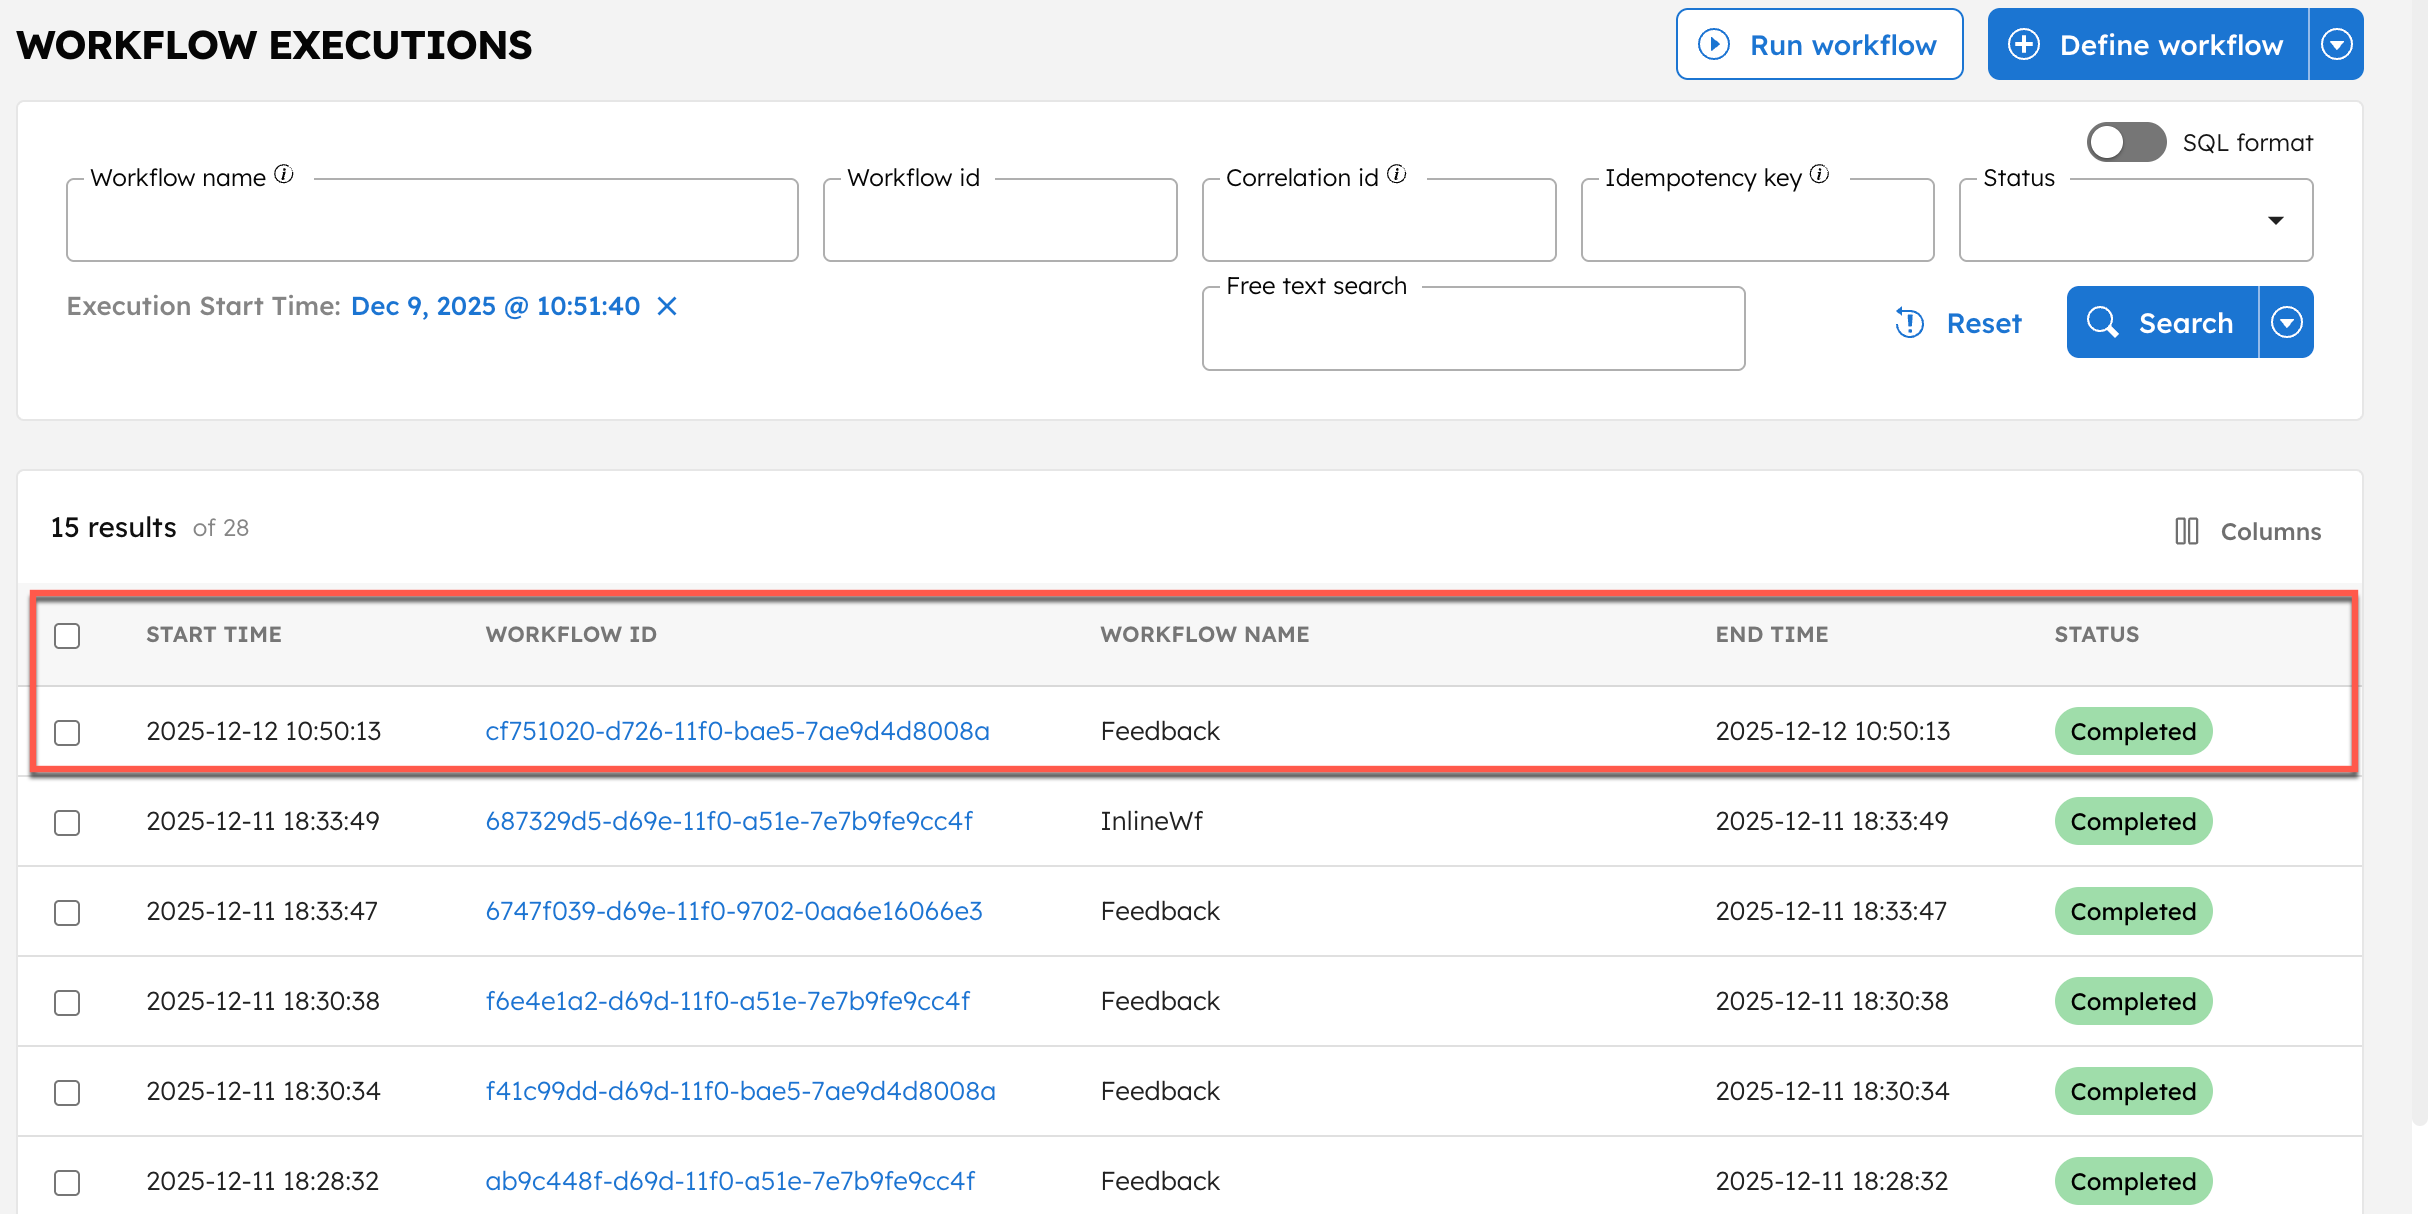
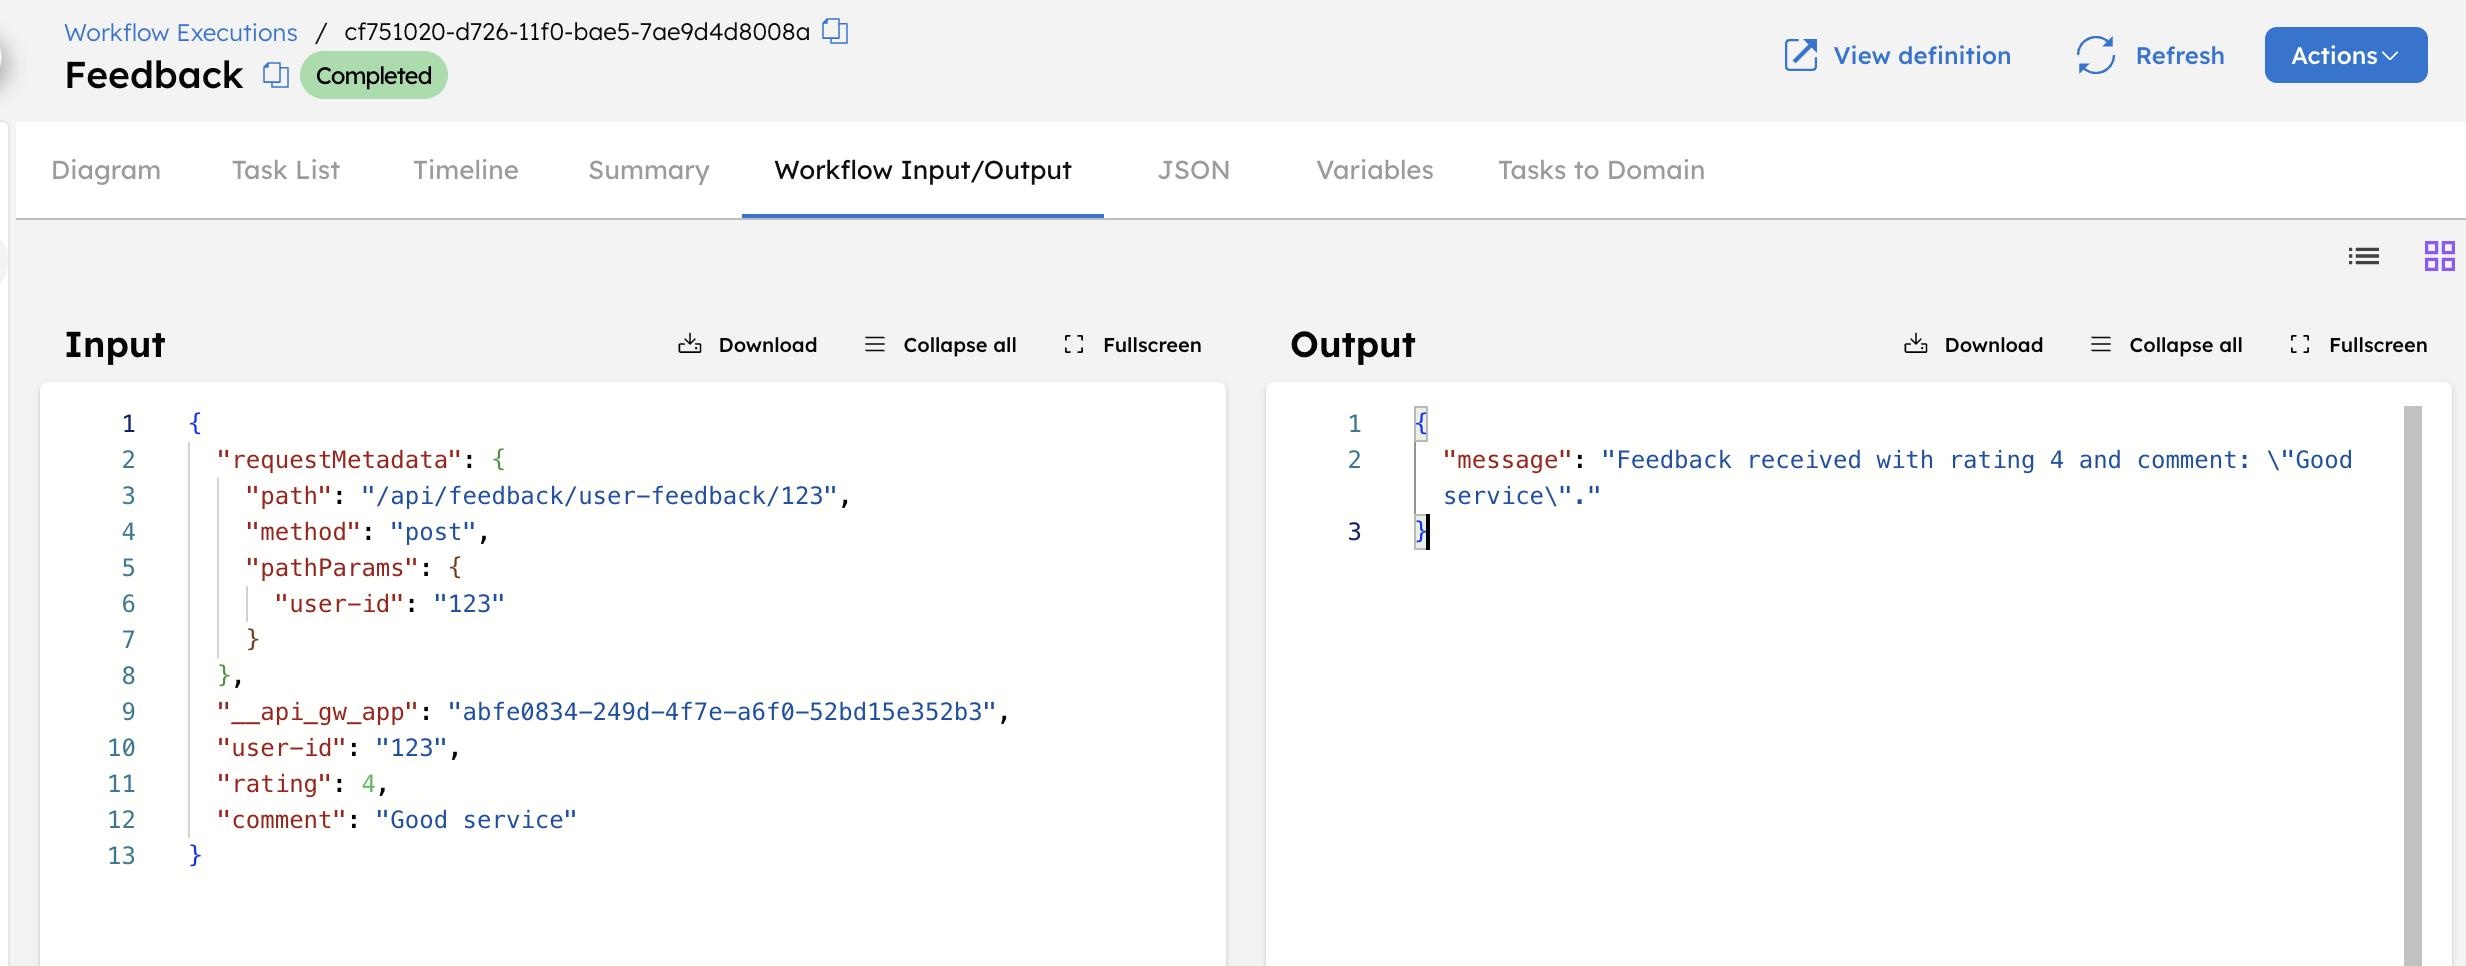
- Select the Workflow ID to view the execution details.
- In the Workflow Input/Output tab, verify that the metadata was passed correctly.
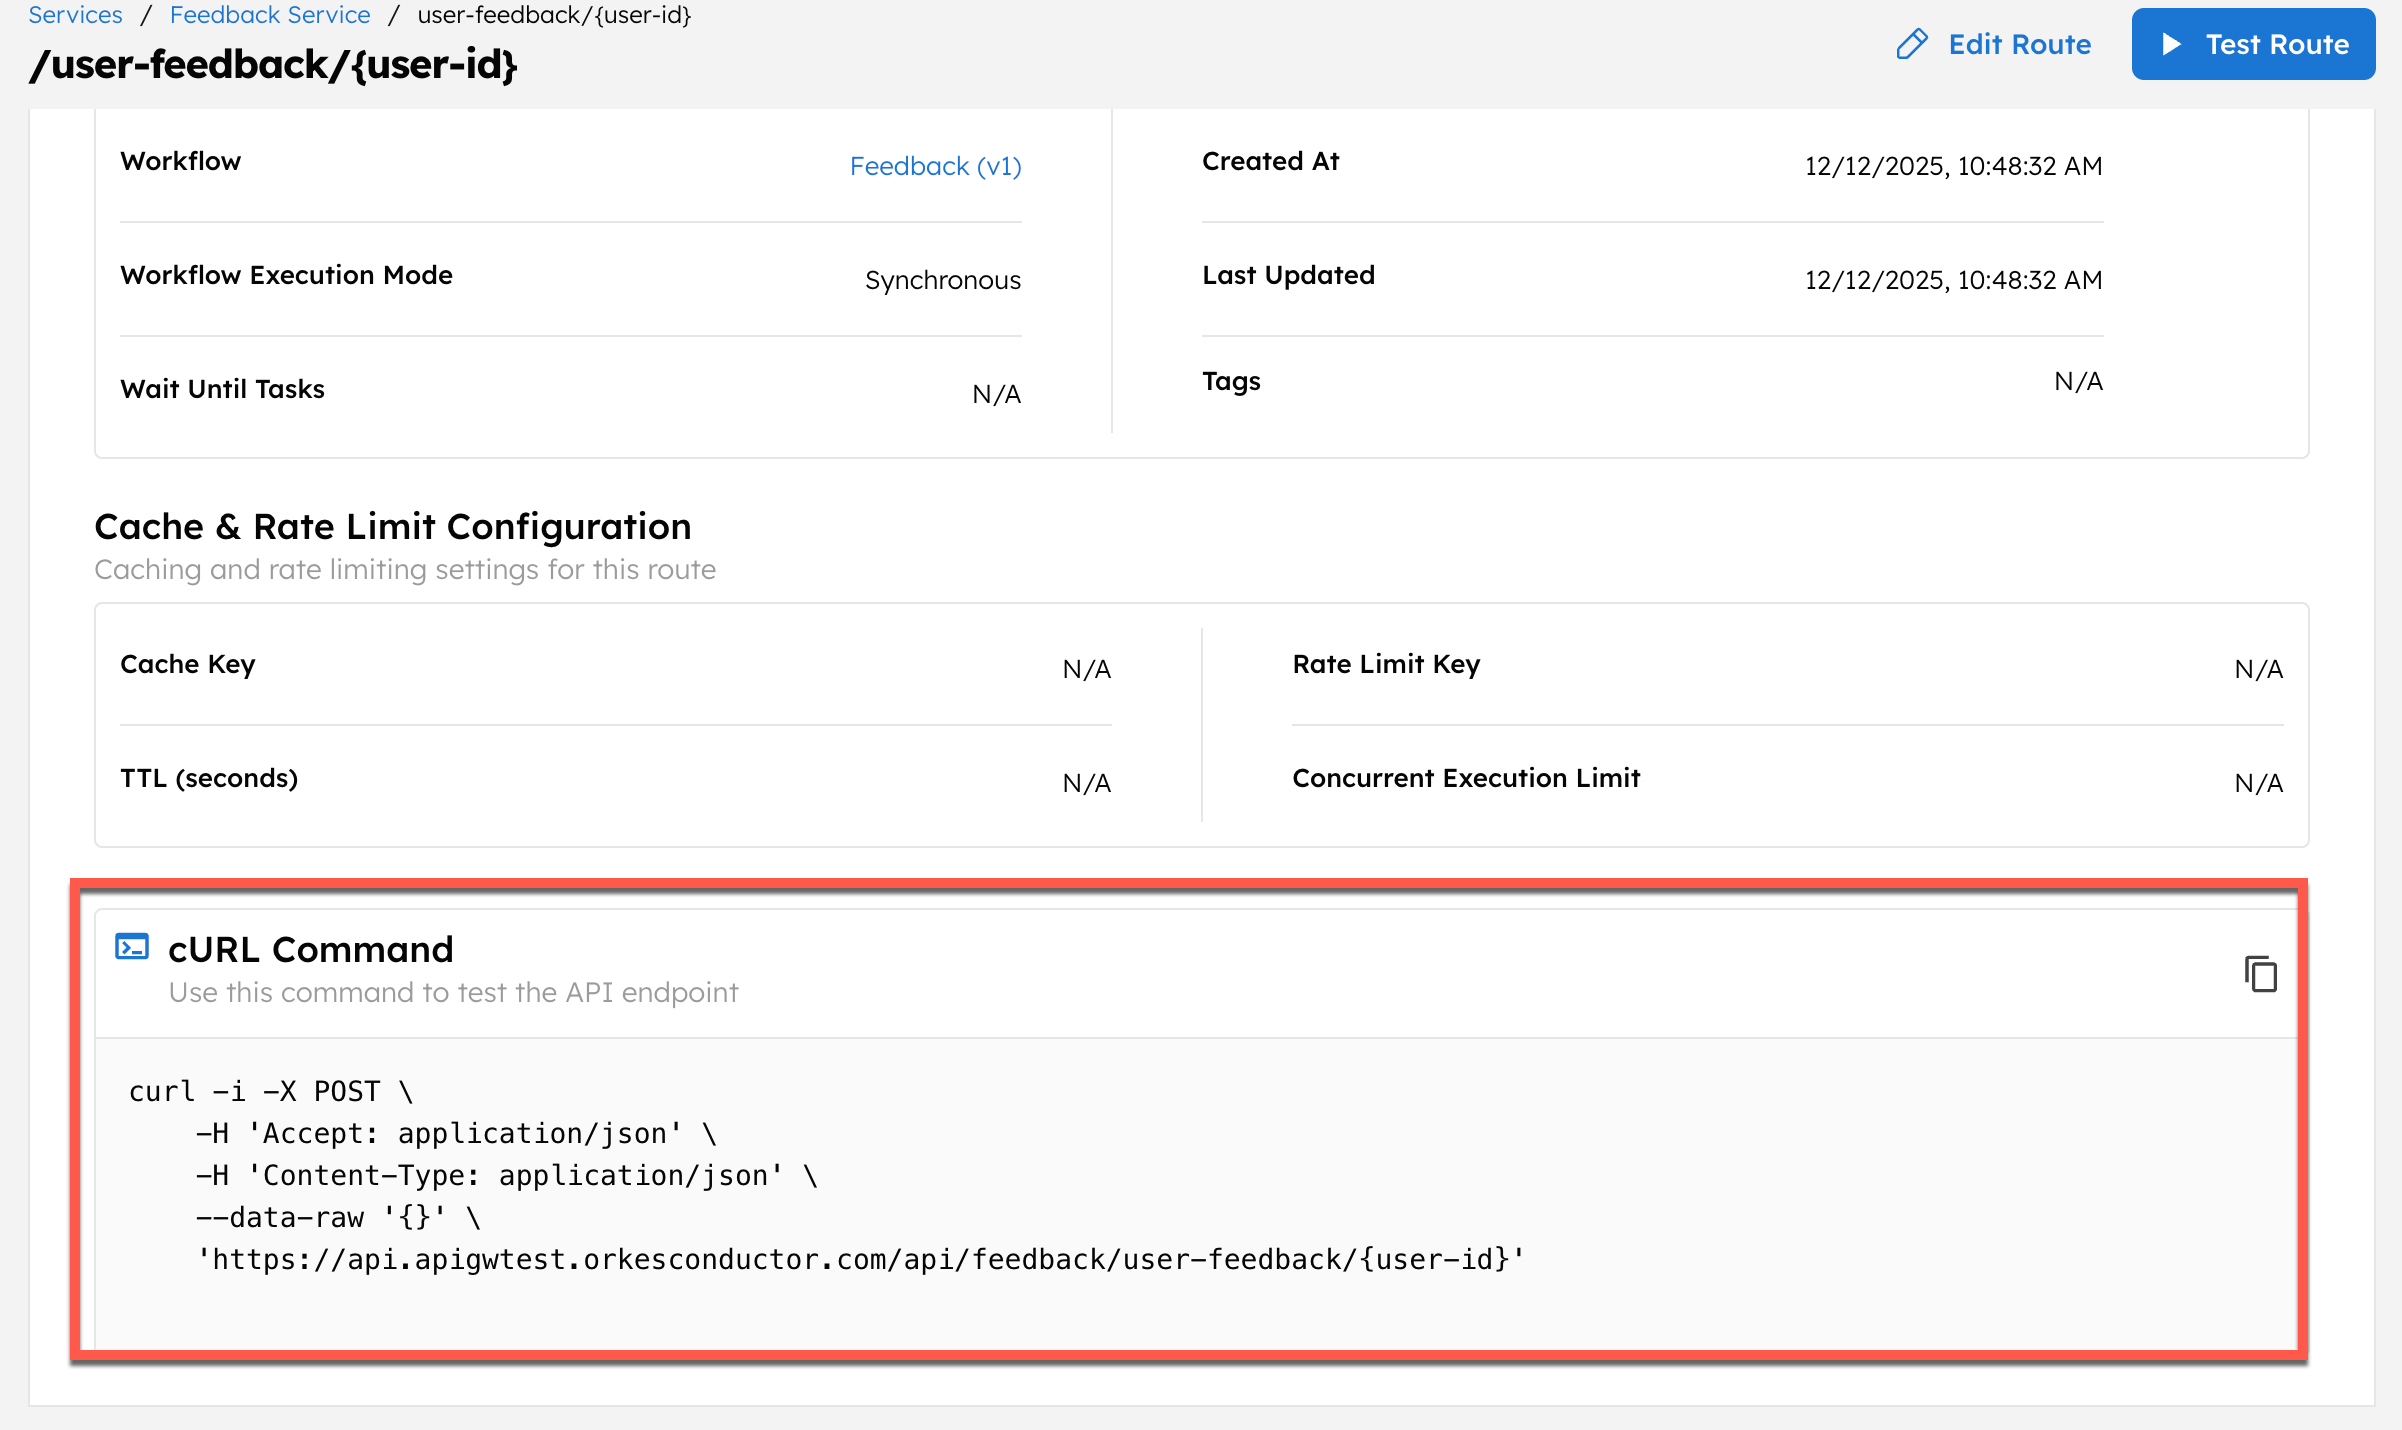
Access the endpoint details
To view the endpoint details and supporting resources:
- Go to APIs > Services, and select your service.
- Select a route to open its details.
- You can get the cURL command for the actual endpoint here.
You can also get the OpenAPI documentation for the service. Go to APIs > Services, and select your service. In Metadata & Resources, select View API Documentation.
When the endpoint is invoked, the workflow runs automatically. You can extend the workflow to add logic such as storing feedback, sending notifications, or triggering downstream processes.