Using Variable Idempotency Keys in Webhook-Triggered Workflows
This tutorial demonstrates how to use a workflow input variable as an idempotency key in a webhook-triggered workflow in Orkes Conductor. Using an idempotency key ensures that repeated webhook events do not trigger duplicate workflow executions.
The tutorial uses Jira ticket creation as an example to show how idempotency prevents duplicate side effects when webhook events are retried or duplicated.
This approach is useful for integrating alerting systems, bug reporters, or internal tools with downstream systems where duplicate processing must be avoided.
In this tutorial, you will:
- Generate an API token in Jira.
- Save the token as a secret in Orkes Conductor.
- Create the ticket automation flow.
- Create a webhook in Orkes Conductor.
- Test the workflow using cURL
To follow along, make sure you have access to the following:
- A free account in Developer Edition.
- An Atlassian account with access to Jira with permission to create tickets.
Ticket automation workflow
You’ll create an automation that:
- Accepts bug reports via a custom webhook.
- Triggers a Conductor workflow to create a Jira ticket.
- Prevents duplicate ticket creation for the same bug report using idempotency keys.
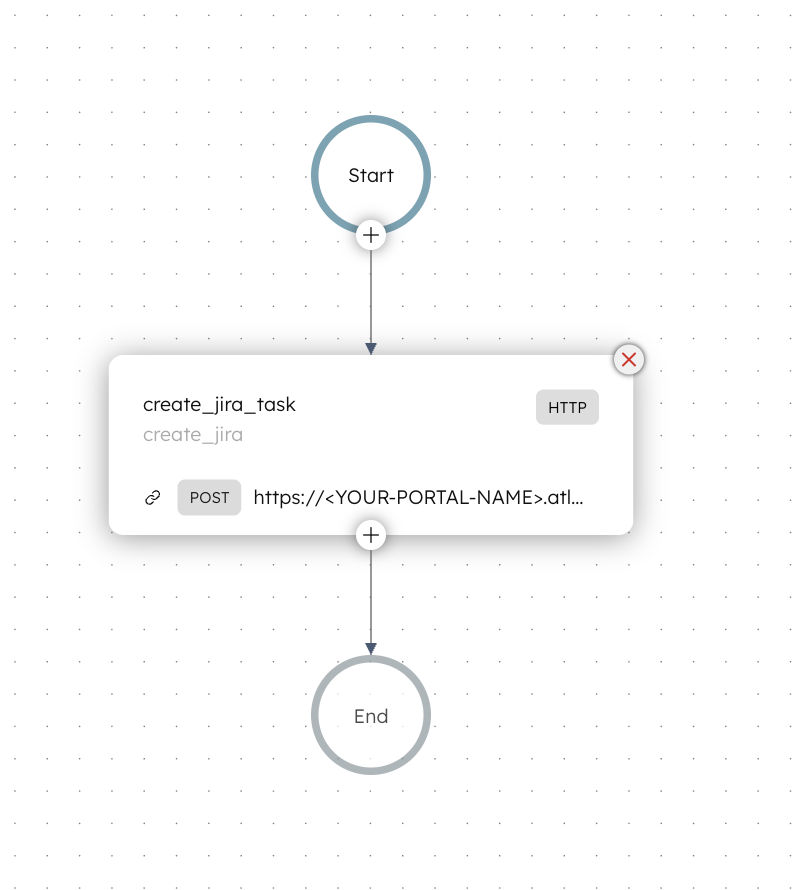
Here is the ticket automation workflow that you’ll build in this tutorial:
Concept: Variable idempotency keys in webhook workflows
Webhooks are often retried by the source system. Without protection, each retry can start a new workflow and create duplicate side effects, such as multiple Jira tickets for the same bug.
Orkes Conductor prevents this by allowing you to configure an idempotency key in a Conductor webhook. An idempotency key is a value that uniquely identifies an event.
In this tutorial, the webhook uses a workflow input variable (bug_id) as the idempotency key. If a webhook event arrives with a bug_id that was already processed, Conductor does not start a new workflow execution. Instead, it returns the existing execution.
Step 1: Generate an API token
This tutorial uses Jira to create tickets from event payloads received through a custom webhook. To authenticate the workflow against Jira, generate an API token from your Atlassian account. This token enables API access to Jira.
To generate an API token:
- Log in to the Atlassian account.
- Go to Security > API tokens.
- Select Create API token.
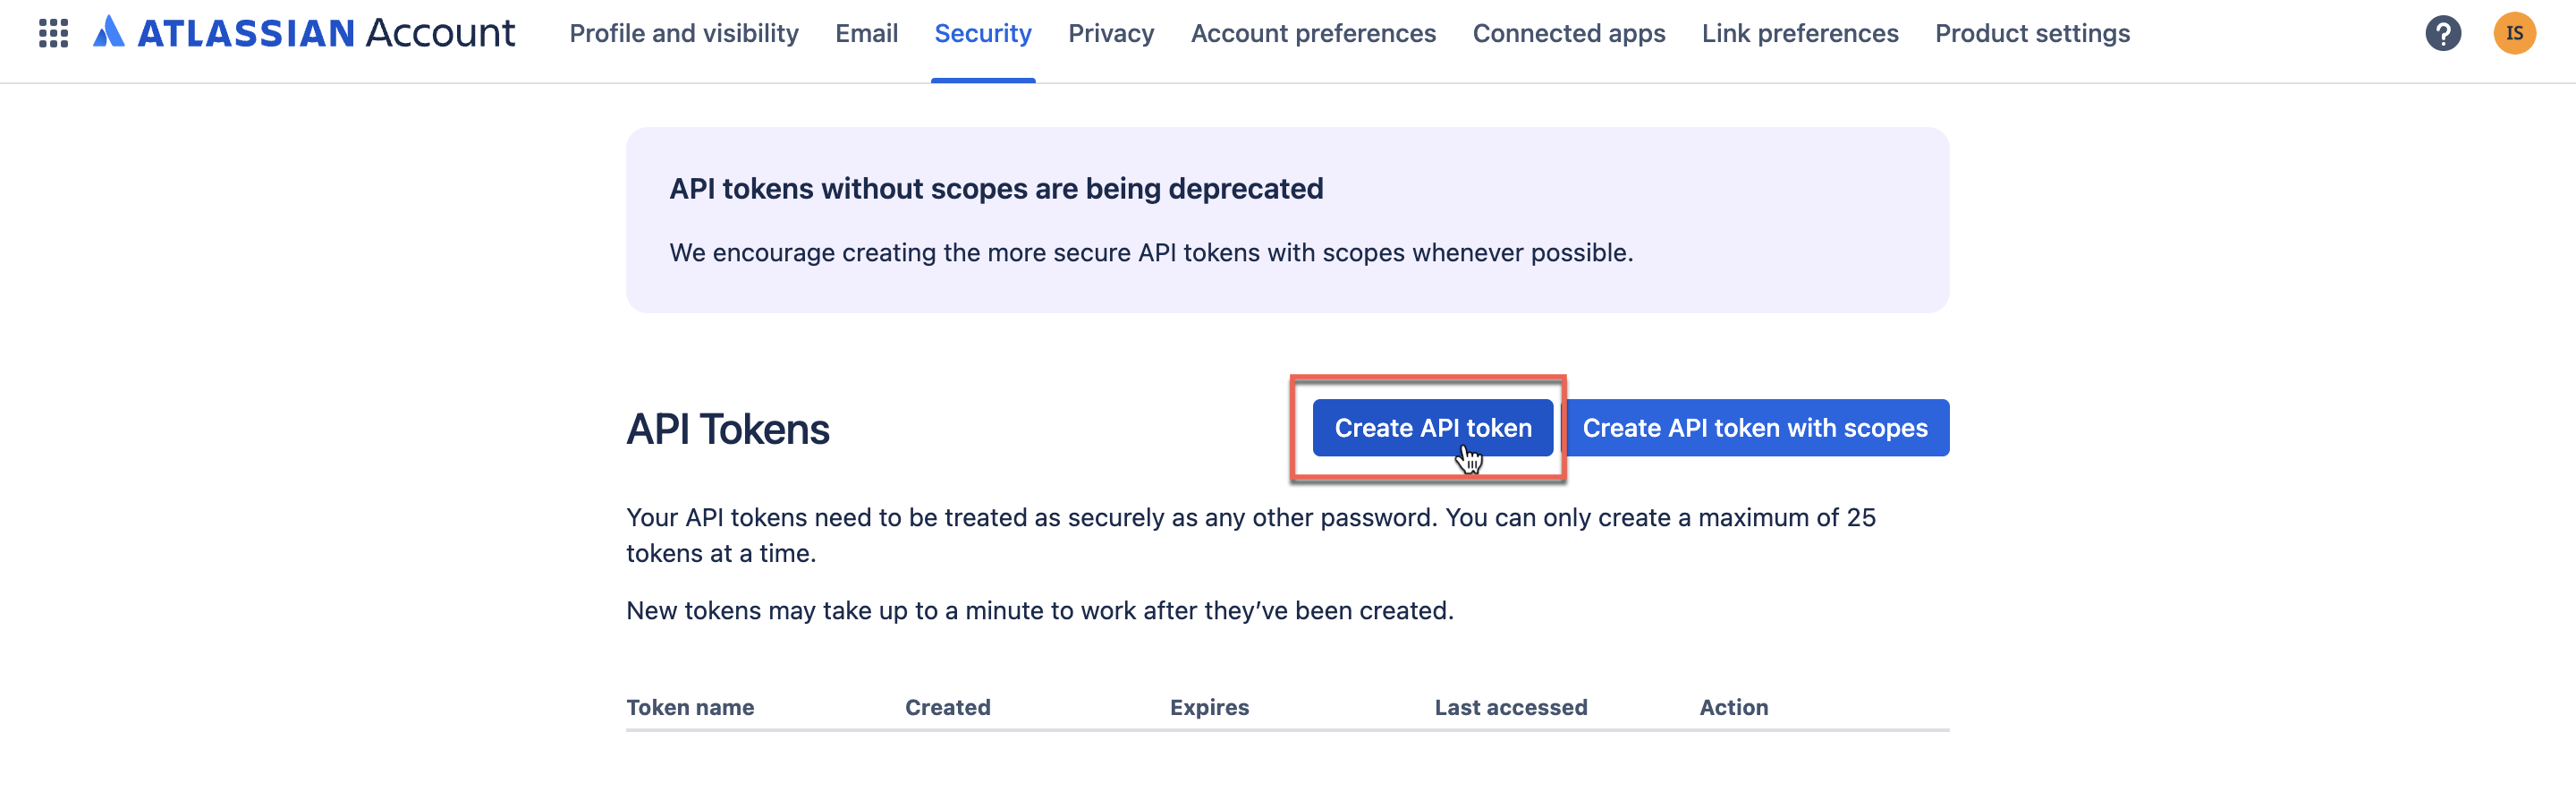
- Enter a name for the token and set an expiration.
- Select Create.
- Copy and securely store the token.
Step 2: Store the token as a secret in Orkes Conductor
After generating the API token, you must encode it with Base64 and store it securely as a secret in Orkes Conductor so it can be used for authentication without being exposed during execution.
Jira uses Basic Authentication, which requires a Base64-encoded string containing your Atlassian email address and the API token.
Encode the token with Base64
To create the basic authentication string:
- Open a Terminal.
- Run the following command, replacing the placeholders with your credentials:
echo -n "your-email@example.com:<your_api_token>" | base64
- Copy the output, which is your Base64-encoded authentication string.
Store as a secret in Orkes Conductor
To store the basic authentication token as a secret:
- Go to Definitions > Secret from the left navigation menu on your Conductor cluster.
- Select + Add secret.
- Set the Secret name as atlassian-token.
- Paste the Base64 encoded string as the Secret value.
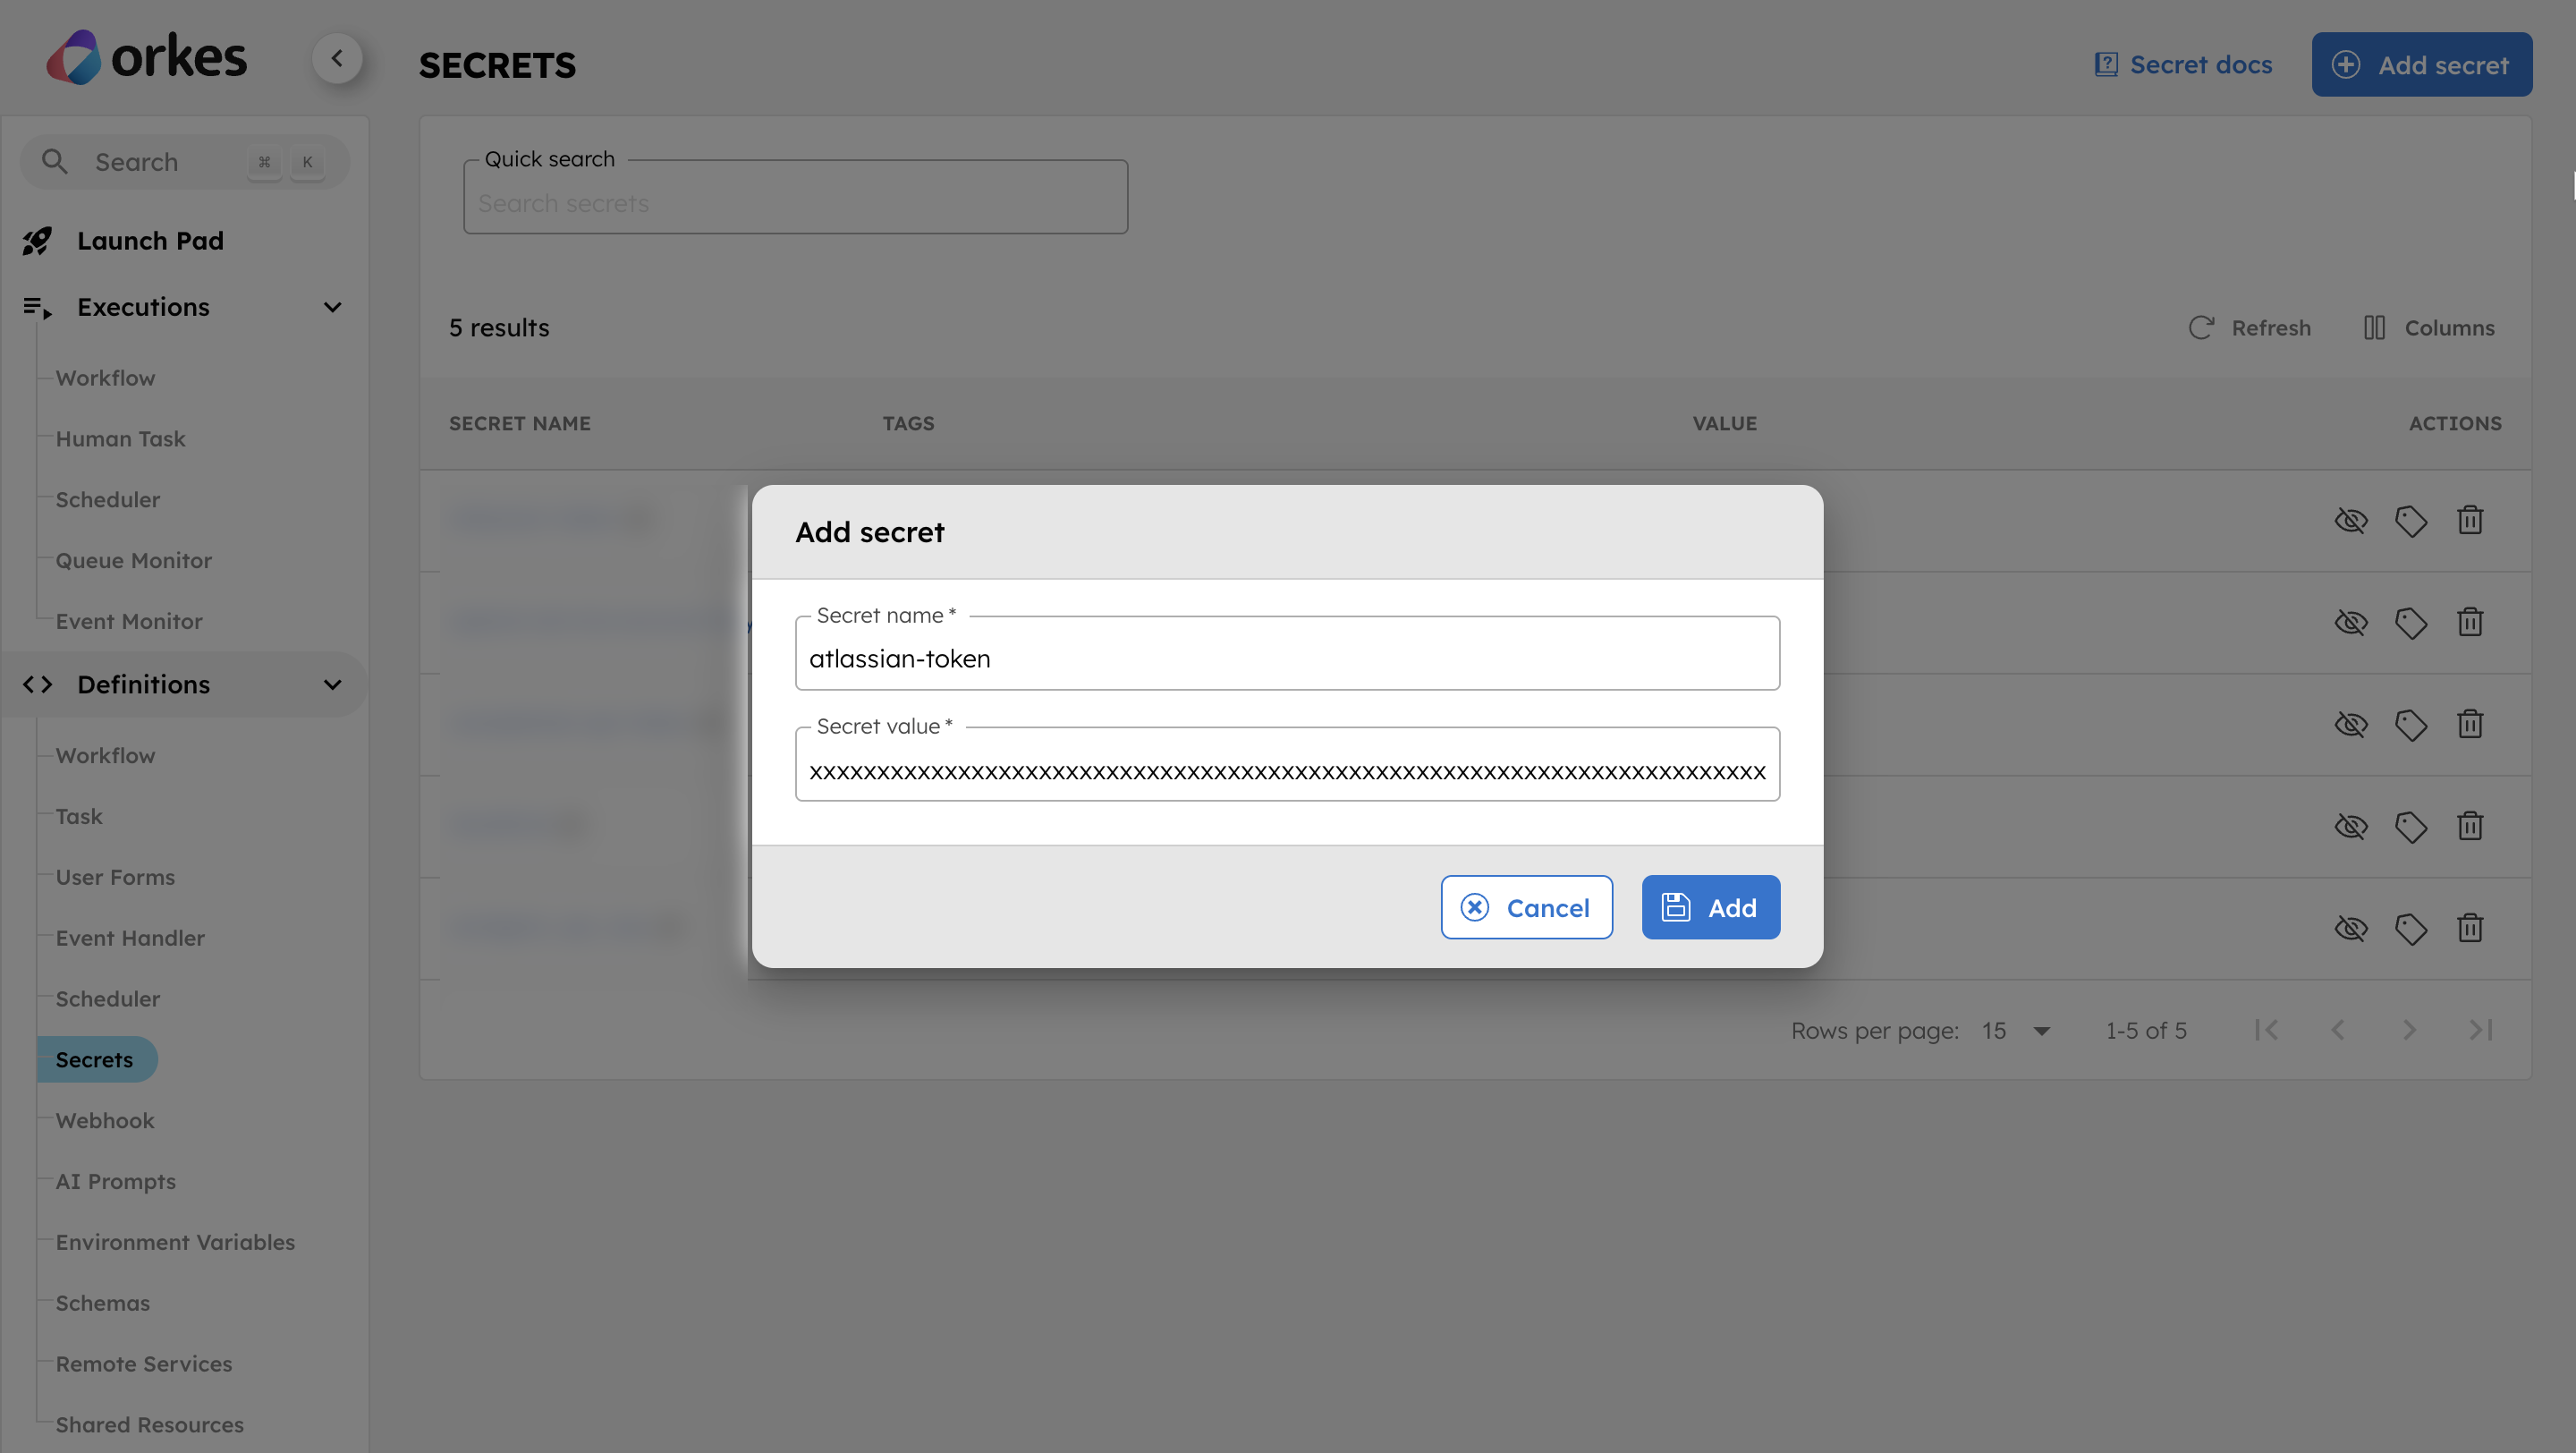
- Select Add to save the secret.
Step 3: Create the ticket automation workflow
Next, define a workflow in Orkes Conductor that creates a Jira ticket when triggered by a webhook. The workflow includes an HTTP task that sends an API request to Jira.
Create workflow
To create the ticket automation workflow:
- Go to Definitions > Workflows and select + Define workflow.
- In the Code tab, paste the following JSON:
{
 "name": "ticket-automation-workflow",
 "description": "Creates a Jira task for a new bug reported via webhook.",
 "version": 1,
 "tasks": [
   {
     "name": "create_jira_task",
     "taskReferenceName": "create_jira",
     "inputParameters": {
       "http_request": {
         "uri": "<YOUR-ATLASSIAN-PORTAL-URL>/rest/api/3/issue",
         "method": "POST",
         "headers": {
           "Authorization": "Basic ${workflow.secrets.atlassian-token}",
           "Content-Type": "application/json"
         },
         "body": {
           "fields": {
             "project": {
               "key": "<YOUR-PROJECT-KEY>"
             },
             "summary": "${workflow.input.title}",
             "issuetype": {
               "name": "Task"
             },
             "description": {
               "type": "doc",
               "version": 1,
               "content": [
                 {
                   "type": "paragraph",
                   "content": [
                     {
                       "text": "Reported by: ${workflow.input.reported_by}\nBug ID: ${workflow.input.bug_id}",
                       "type": "text"
                     }
                   ]
                 }
               ]
             }
           }
         }
       }
     },
     "type": "HTTP"
   }
 ],
 "inputParameters": [
   "bug_id",
   "title",
   "reported_by"
 ],
 "schemaVersion": 2
}
- Select Save > Confirm.
Edit workflow
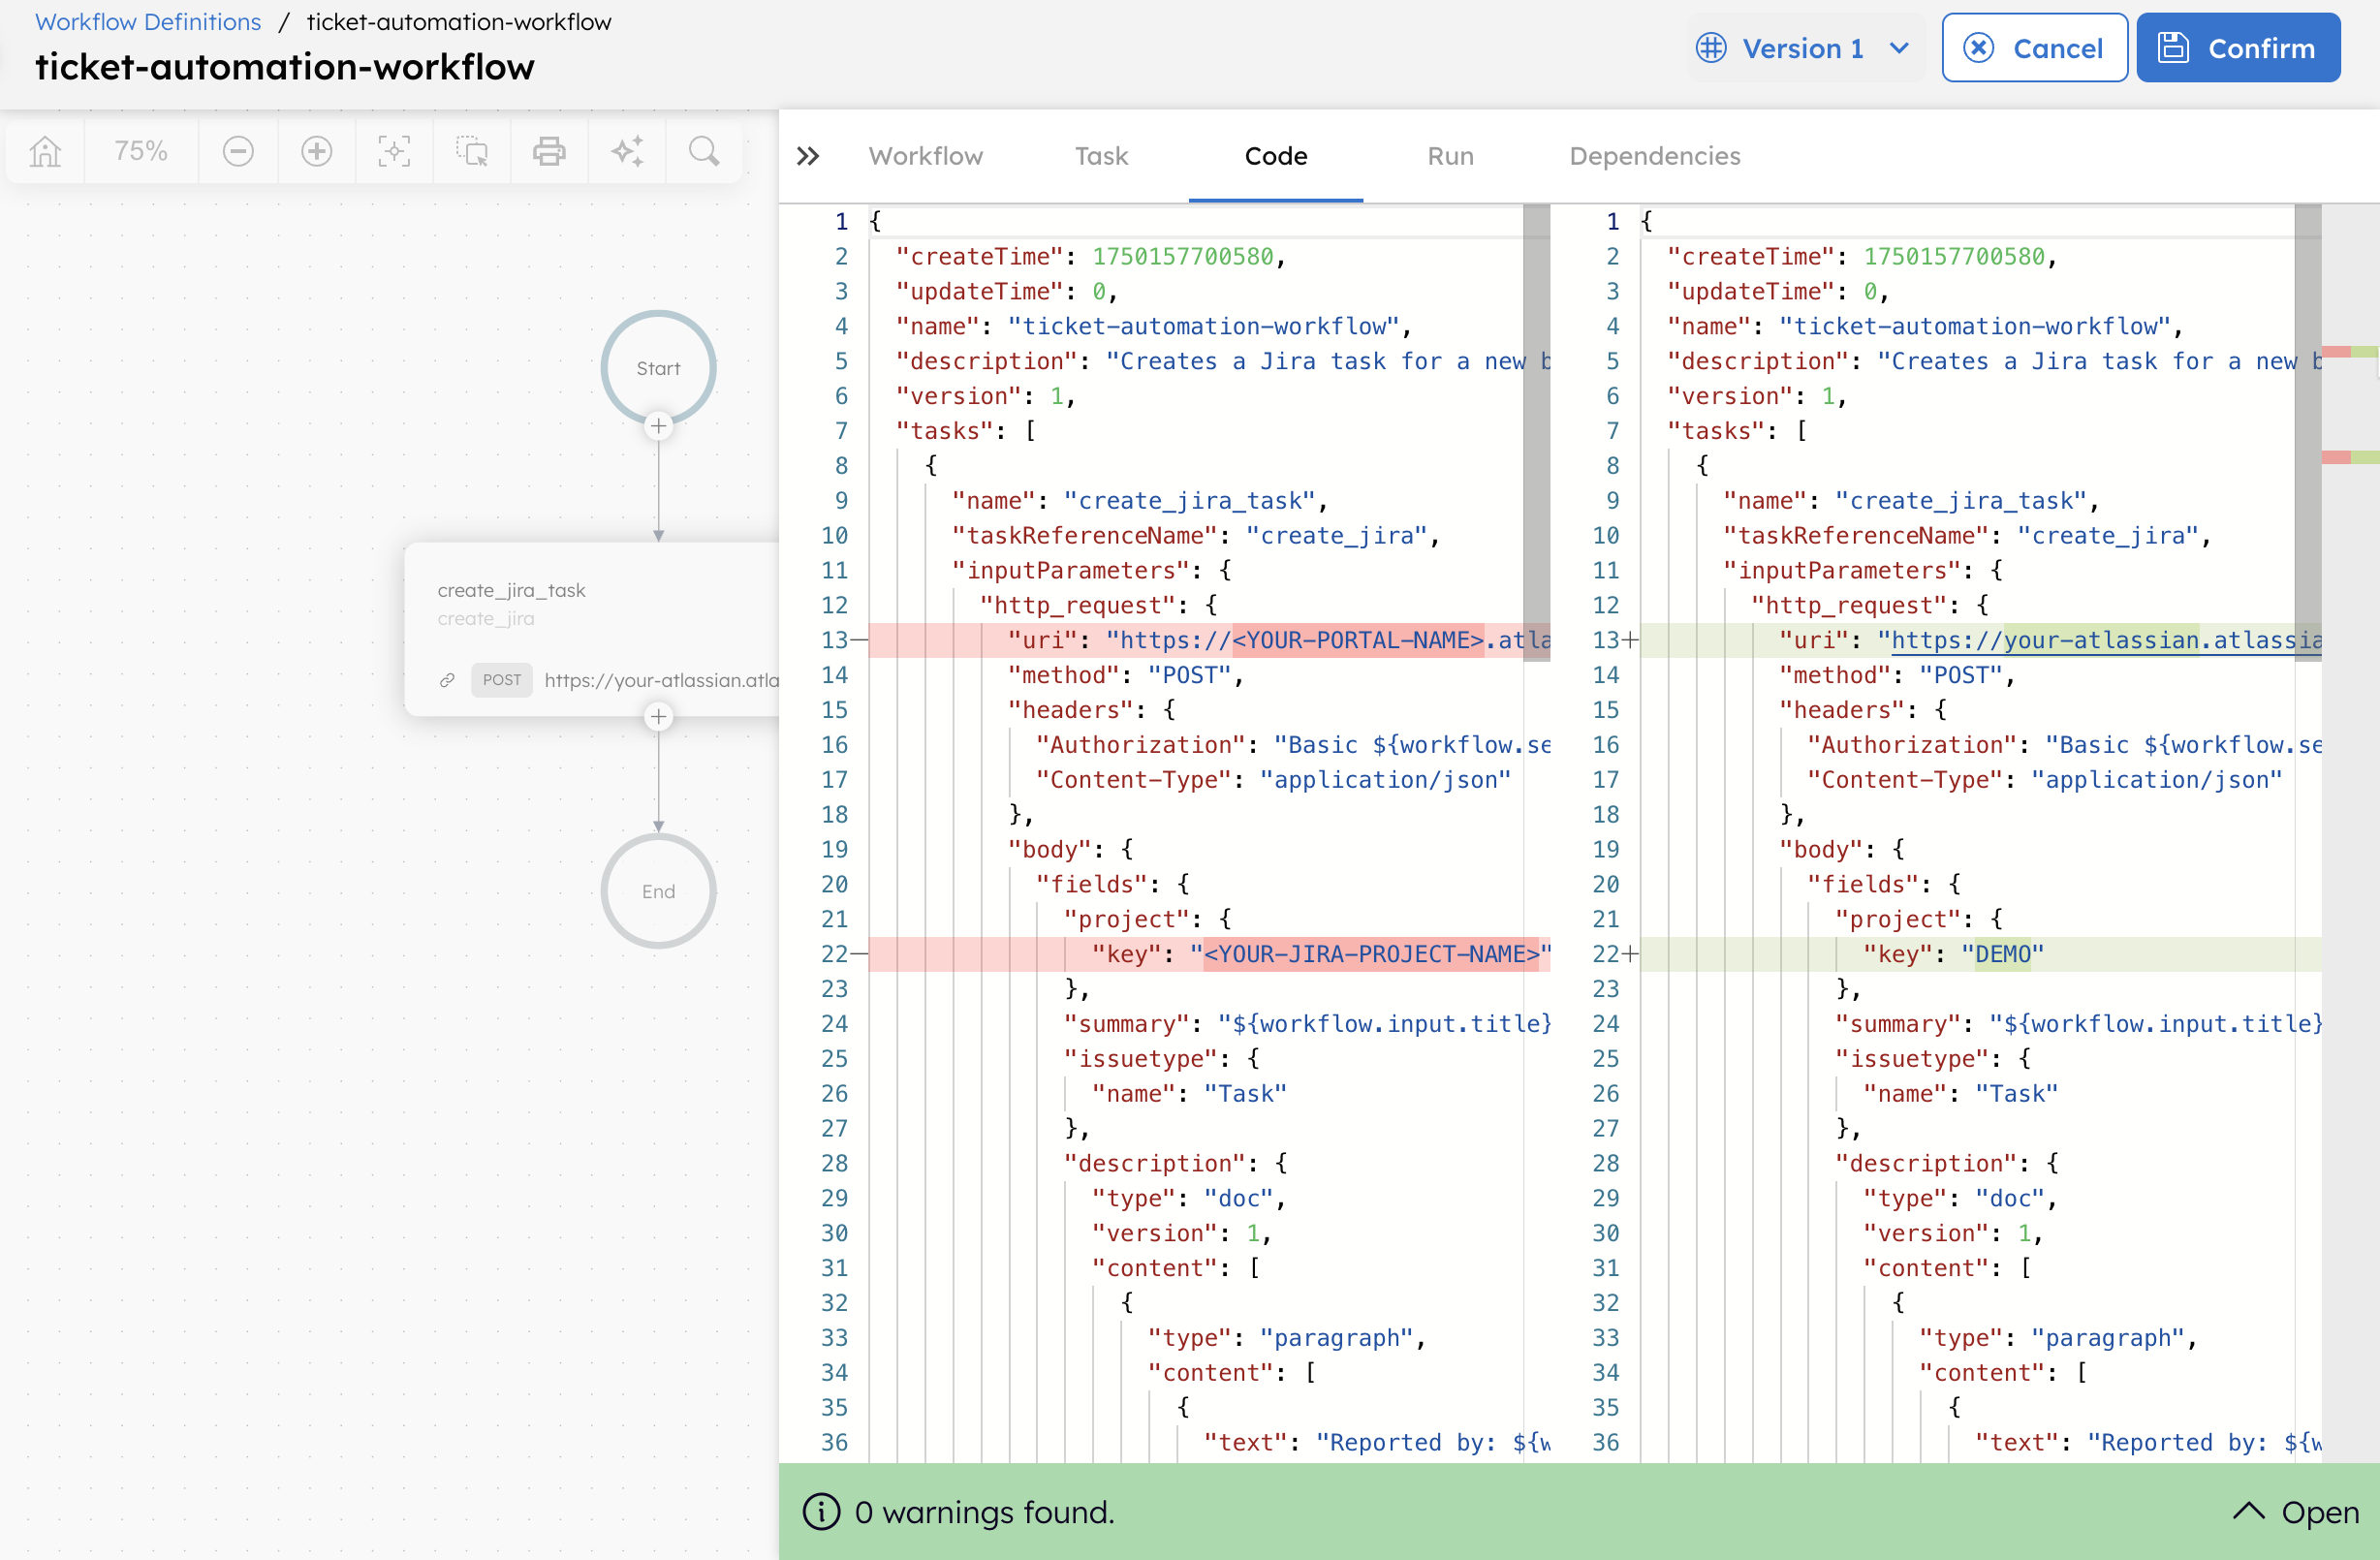
Next, update the placeholders in your workflow definition:
- Select the HTTP task and update
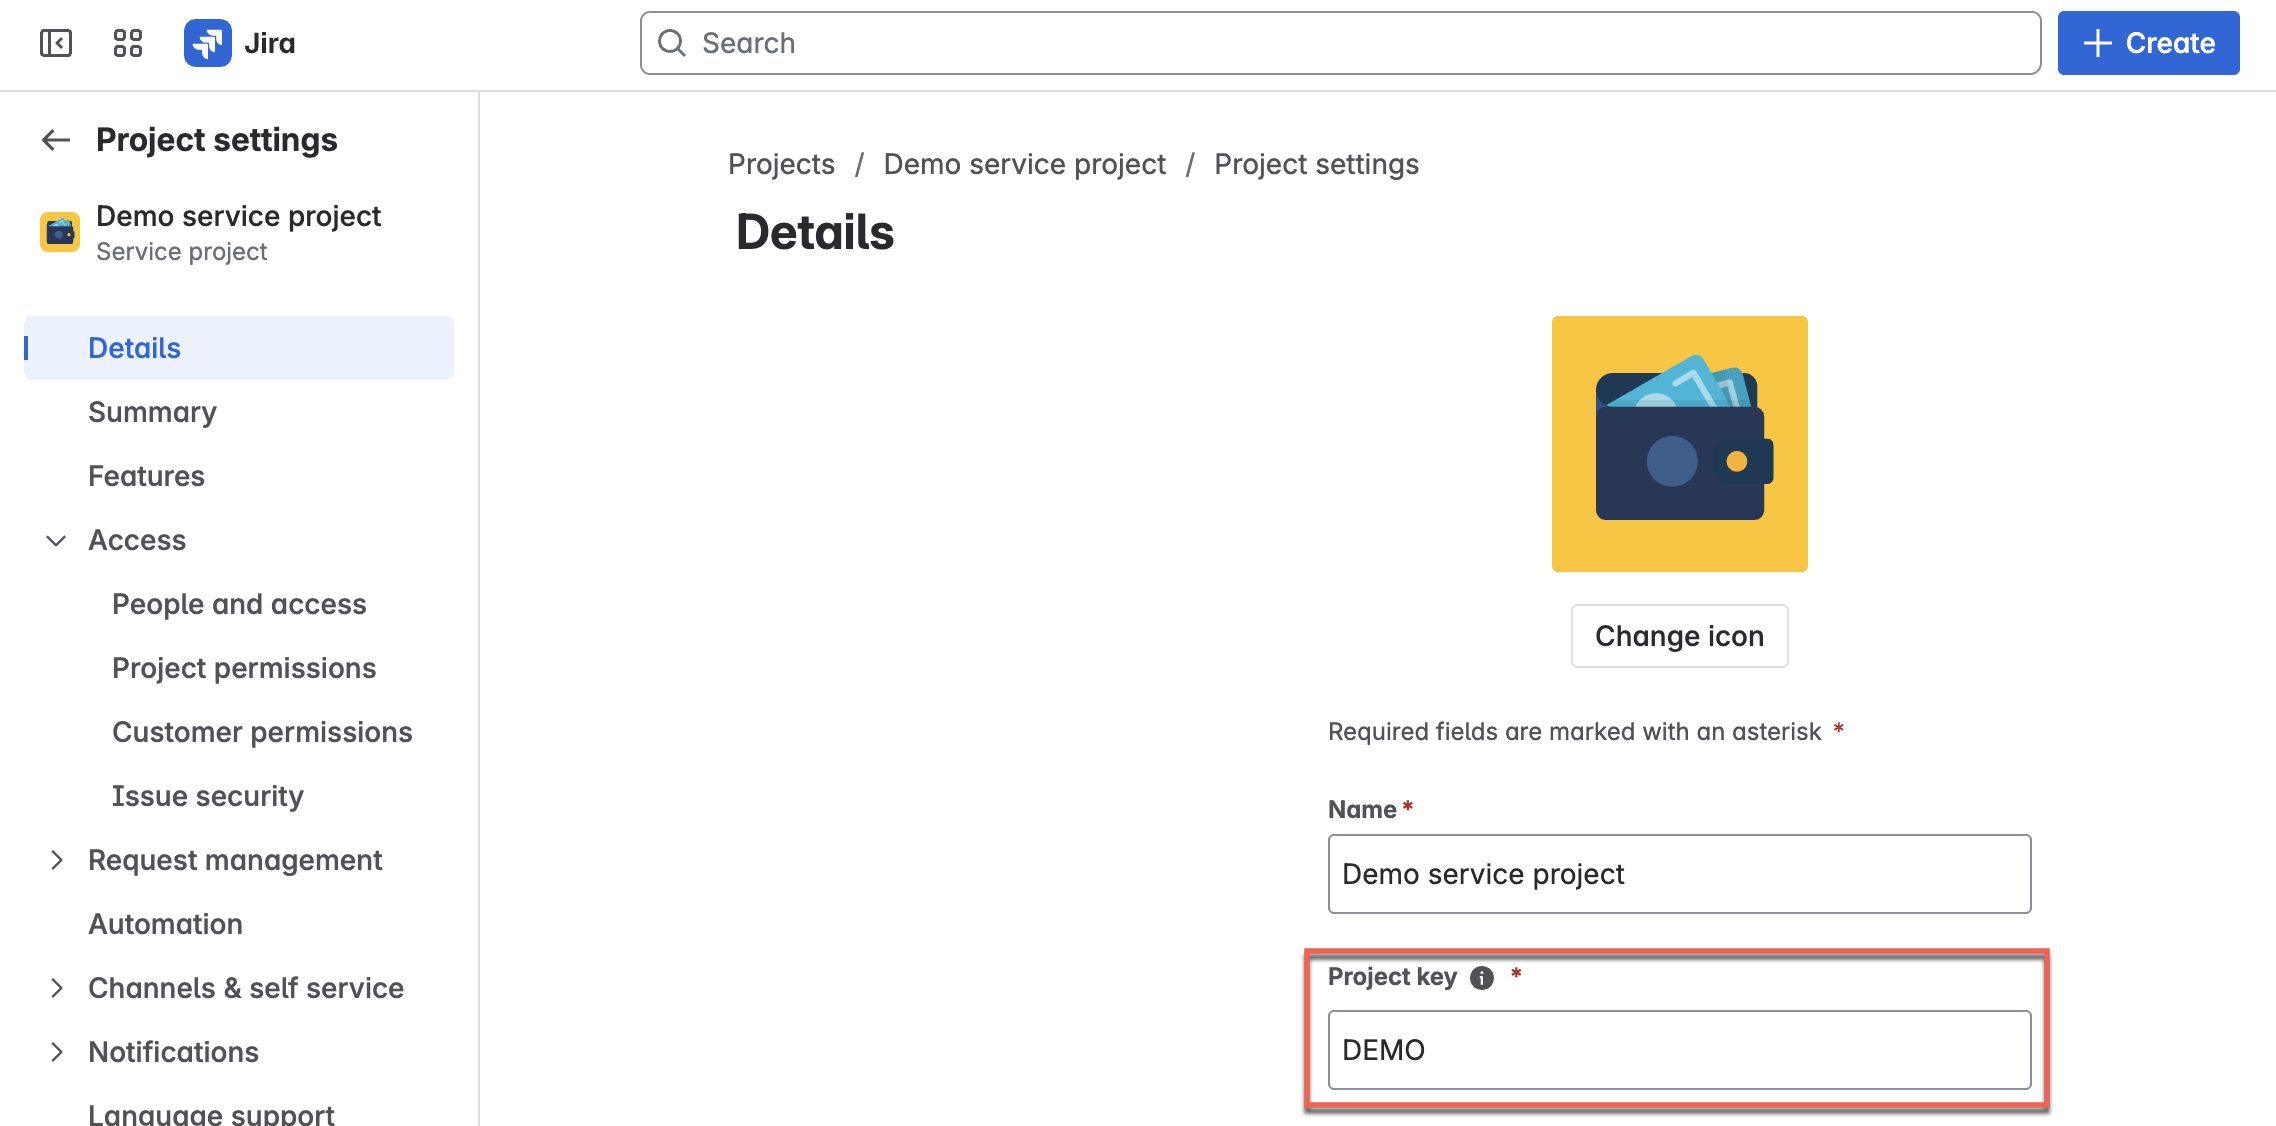
<YOUR-ATLASSIAN-PORTAL-URL>with your Jira portal URL. For example, if your Jira URL is https://your-atlassian.atlassian.net/, the endpoint URL will be https://your-atlassian.atlassian.net/rest/api/3/issue. - In the JSON body, update
<YOUR-JIRA-PROJECT-KEY>with your Jira space key. You can find your project key on the Jira project settings page.
Select Save to update the workflow. The Conductor UI highlights the changes in real-time, making it easier to review and understand the edits before saving the workflow.
Step 4: Create a webhook in Orkes Conductor
In this example, we use a Custom webhook to simulate input from an internal system. However, you can create a webhook based on your requirements using any supported platforms or a Custom webhook for integration with other systems.
Create a webhook that triggers the workflow you defined. Configure it to use the bug_id input variable as the idempotency key to prevent duplicate executions for the same event.
To create a webhook:
- Go to Definitions > Webhook from the left navigation menu on your Conductor cluster.
- Select + New webhook.
- Configure the following parameters:
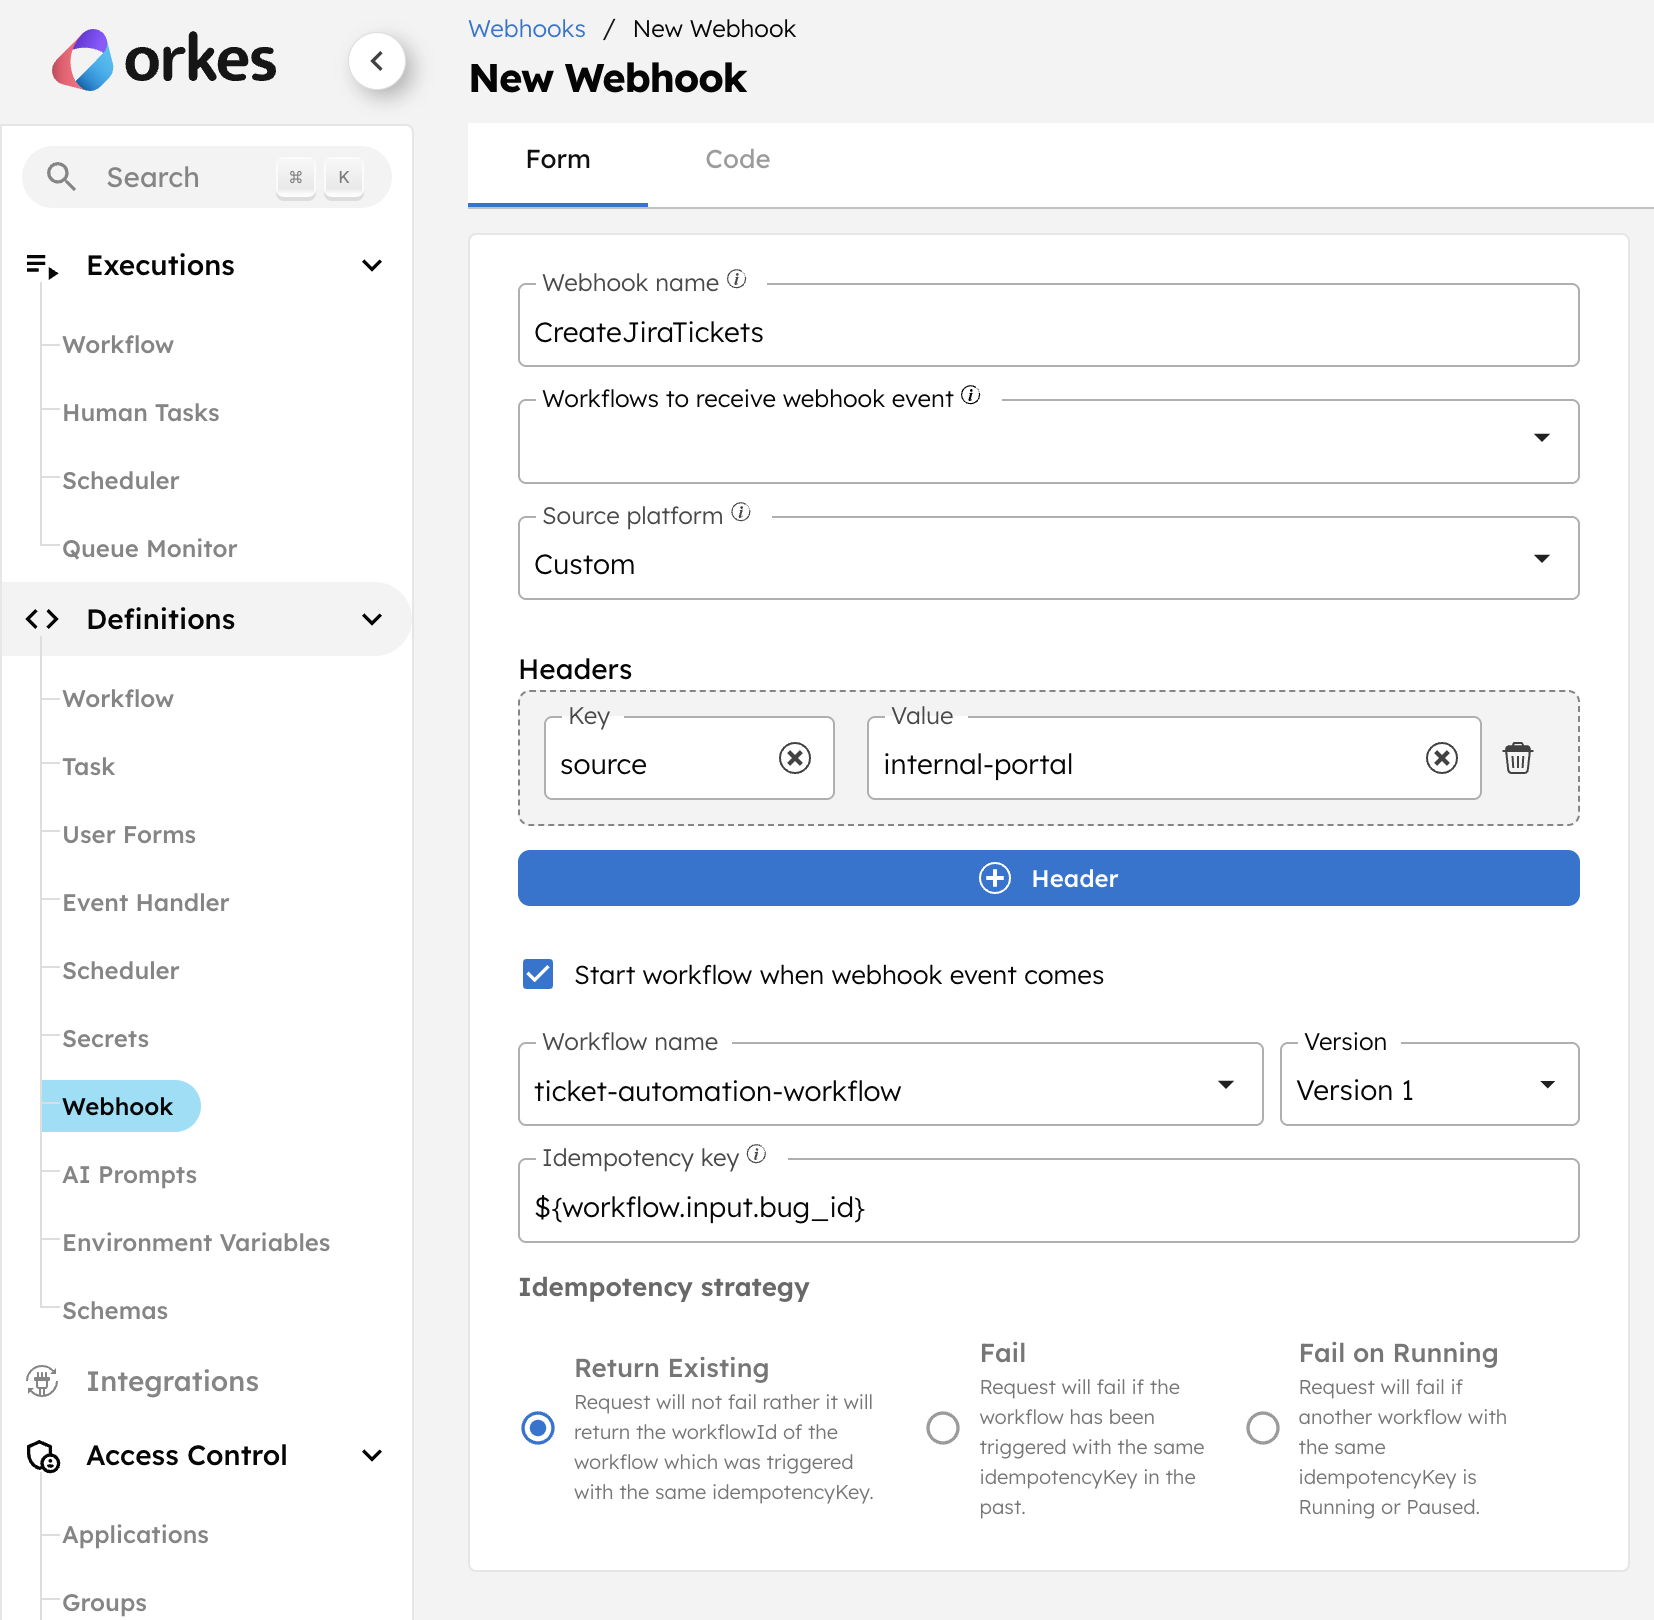
- In Webhook name, enter a webhook name such as CreateJiraTickets.
- Select Source platform as Custom.
- Set a request Header for the webhook.
- Enable Start workflow when webhook event comes.
- In the Workflow name, select ticket-automation-workflow.
- In the Idempotency key, enter
${workflow.input.bug_id}. - Set the Idempotency strategy as Return Existing.
- Select Save.
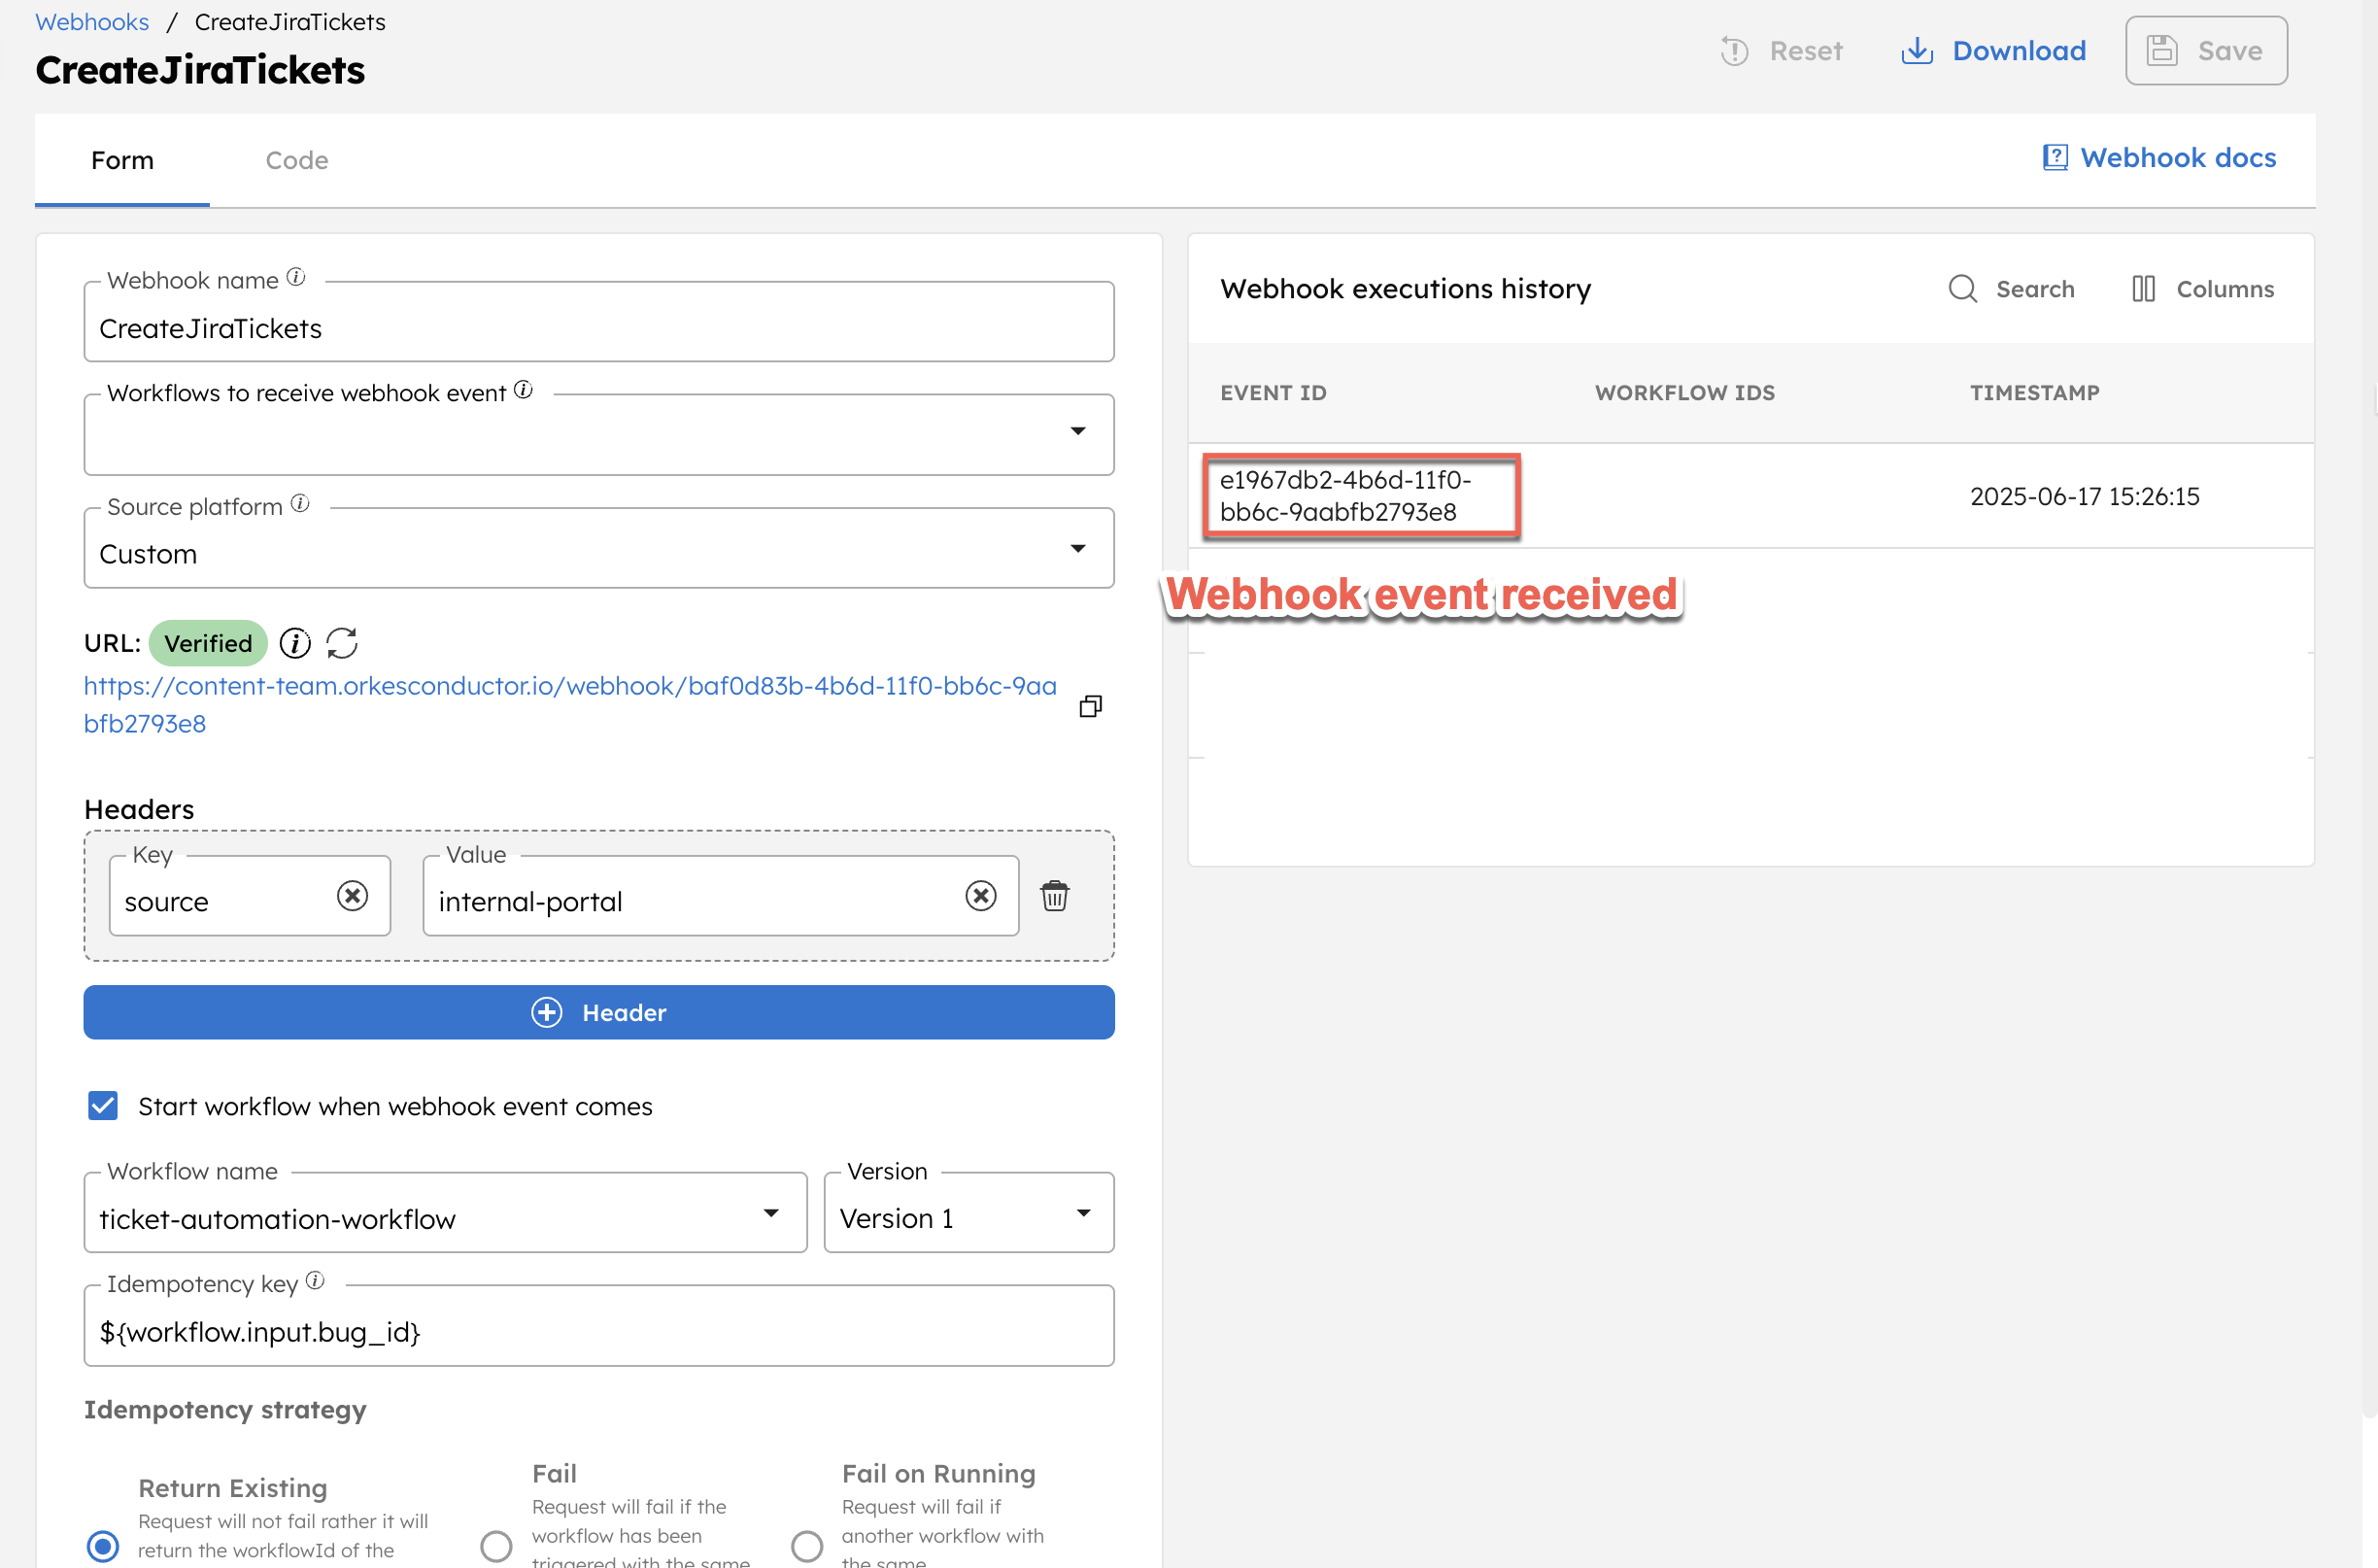
After saving, Conductor generates an unverified webhook URL.
URL verification depends on the type of webhook. For Custom webhooks, Conductor uses header-based verification. This means incoming requests must include headers that match the exact names and values specified during configuration. If the request doesn’t match all required headers, it will be ignored. The URL is marked as verified when the first valid request with matching headers is received.
By using ${workflow.input.bug_id} as the idempotency key, Conductor will prevent duplicate workflow executions for the same bug report, even if the webhook is triggered multiple times.
Step 5: Test the workflow using cURL
Simulate a sample input using a cURL command. You can adapt this to accept inputs from various internal sources, such as email systems, monitoring tools, or internal bots.
To send a cURL request:
- Open Terminal.
- Run the following command, replacing the placeholders with your actual values:
curl -X POST "<YOUR-CONDUCTOR-WEBHOOK-URL>" \
  -H "Content-Type: application/json" \
  -H "<YOUR-HEADER-NAME>: <YOUR-HEADER-VALUE>" \
  -d '{
    "bug_id": "BUG-2045",
    "title": "Java SDK workflow execution bug",
    "reported_by": "Internal Bot"
  }'
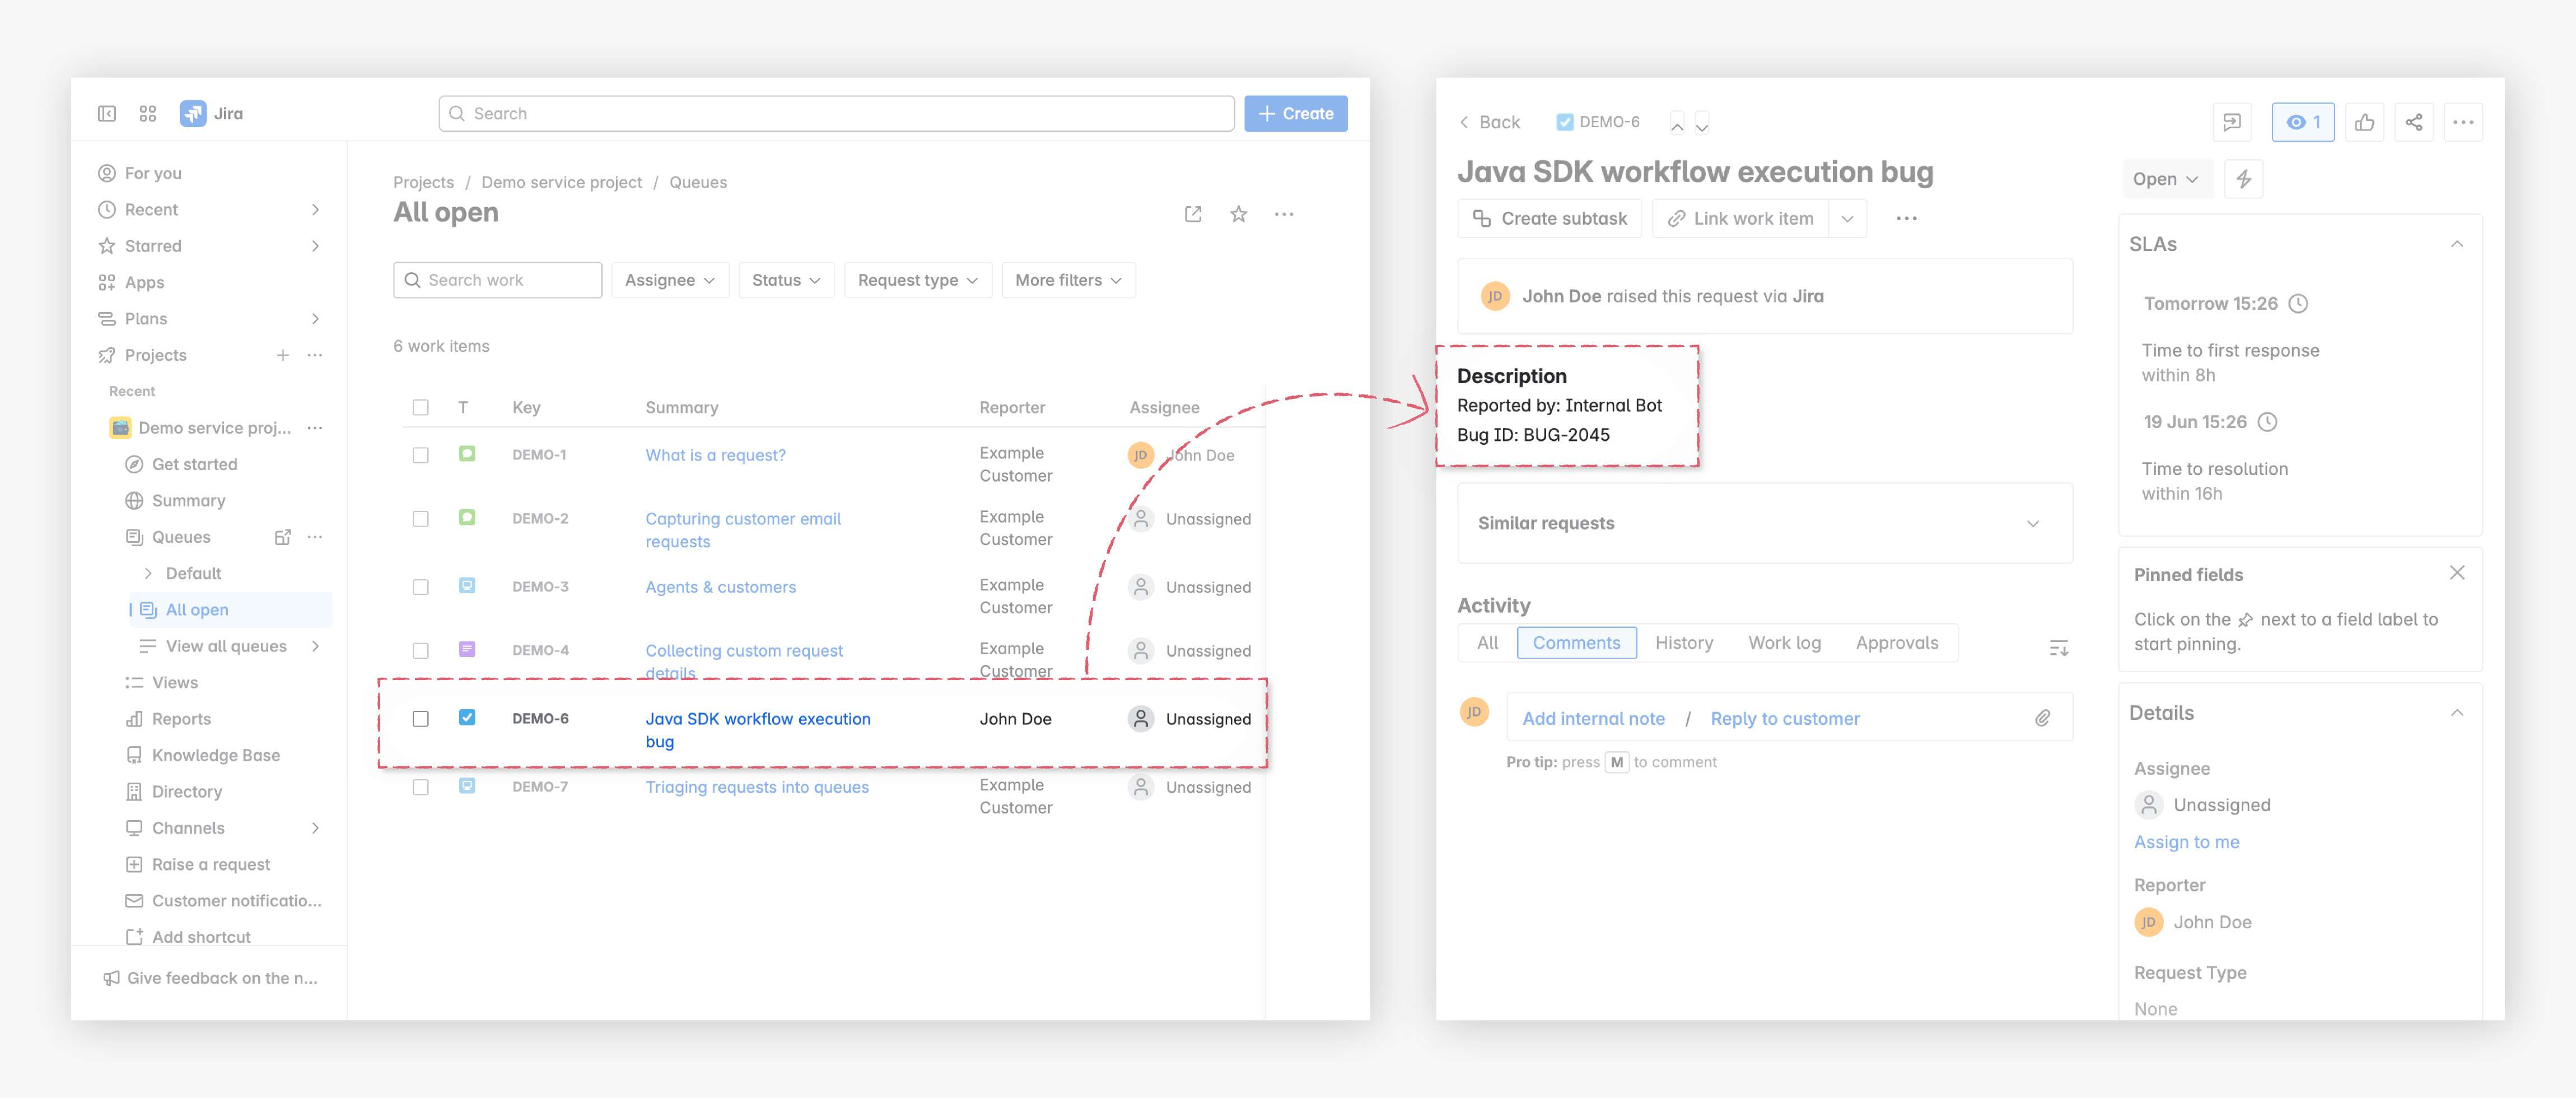
This verifies the Webhook URL in Conductor and triggers the ticket-automation-workflow.
To confirm the workflow execution, navigate to Executions > Workflow in Orkes Conductor and verify the execution.
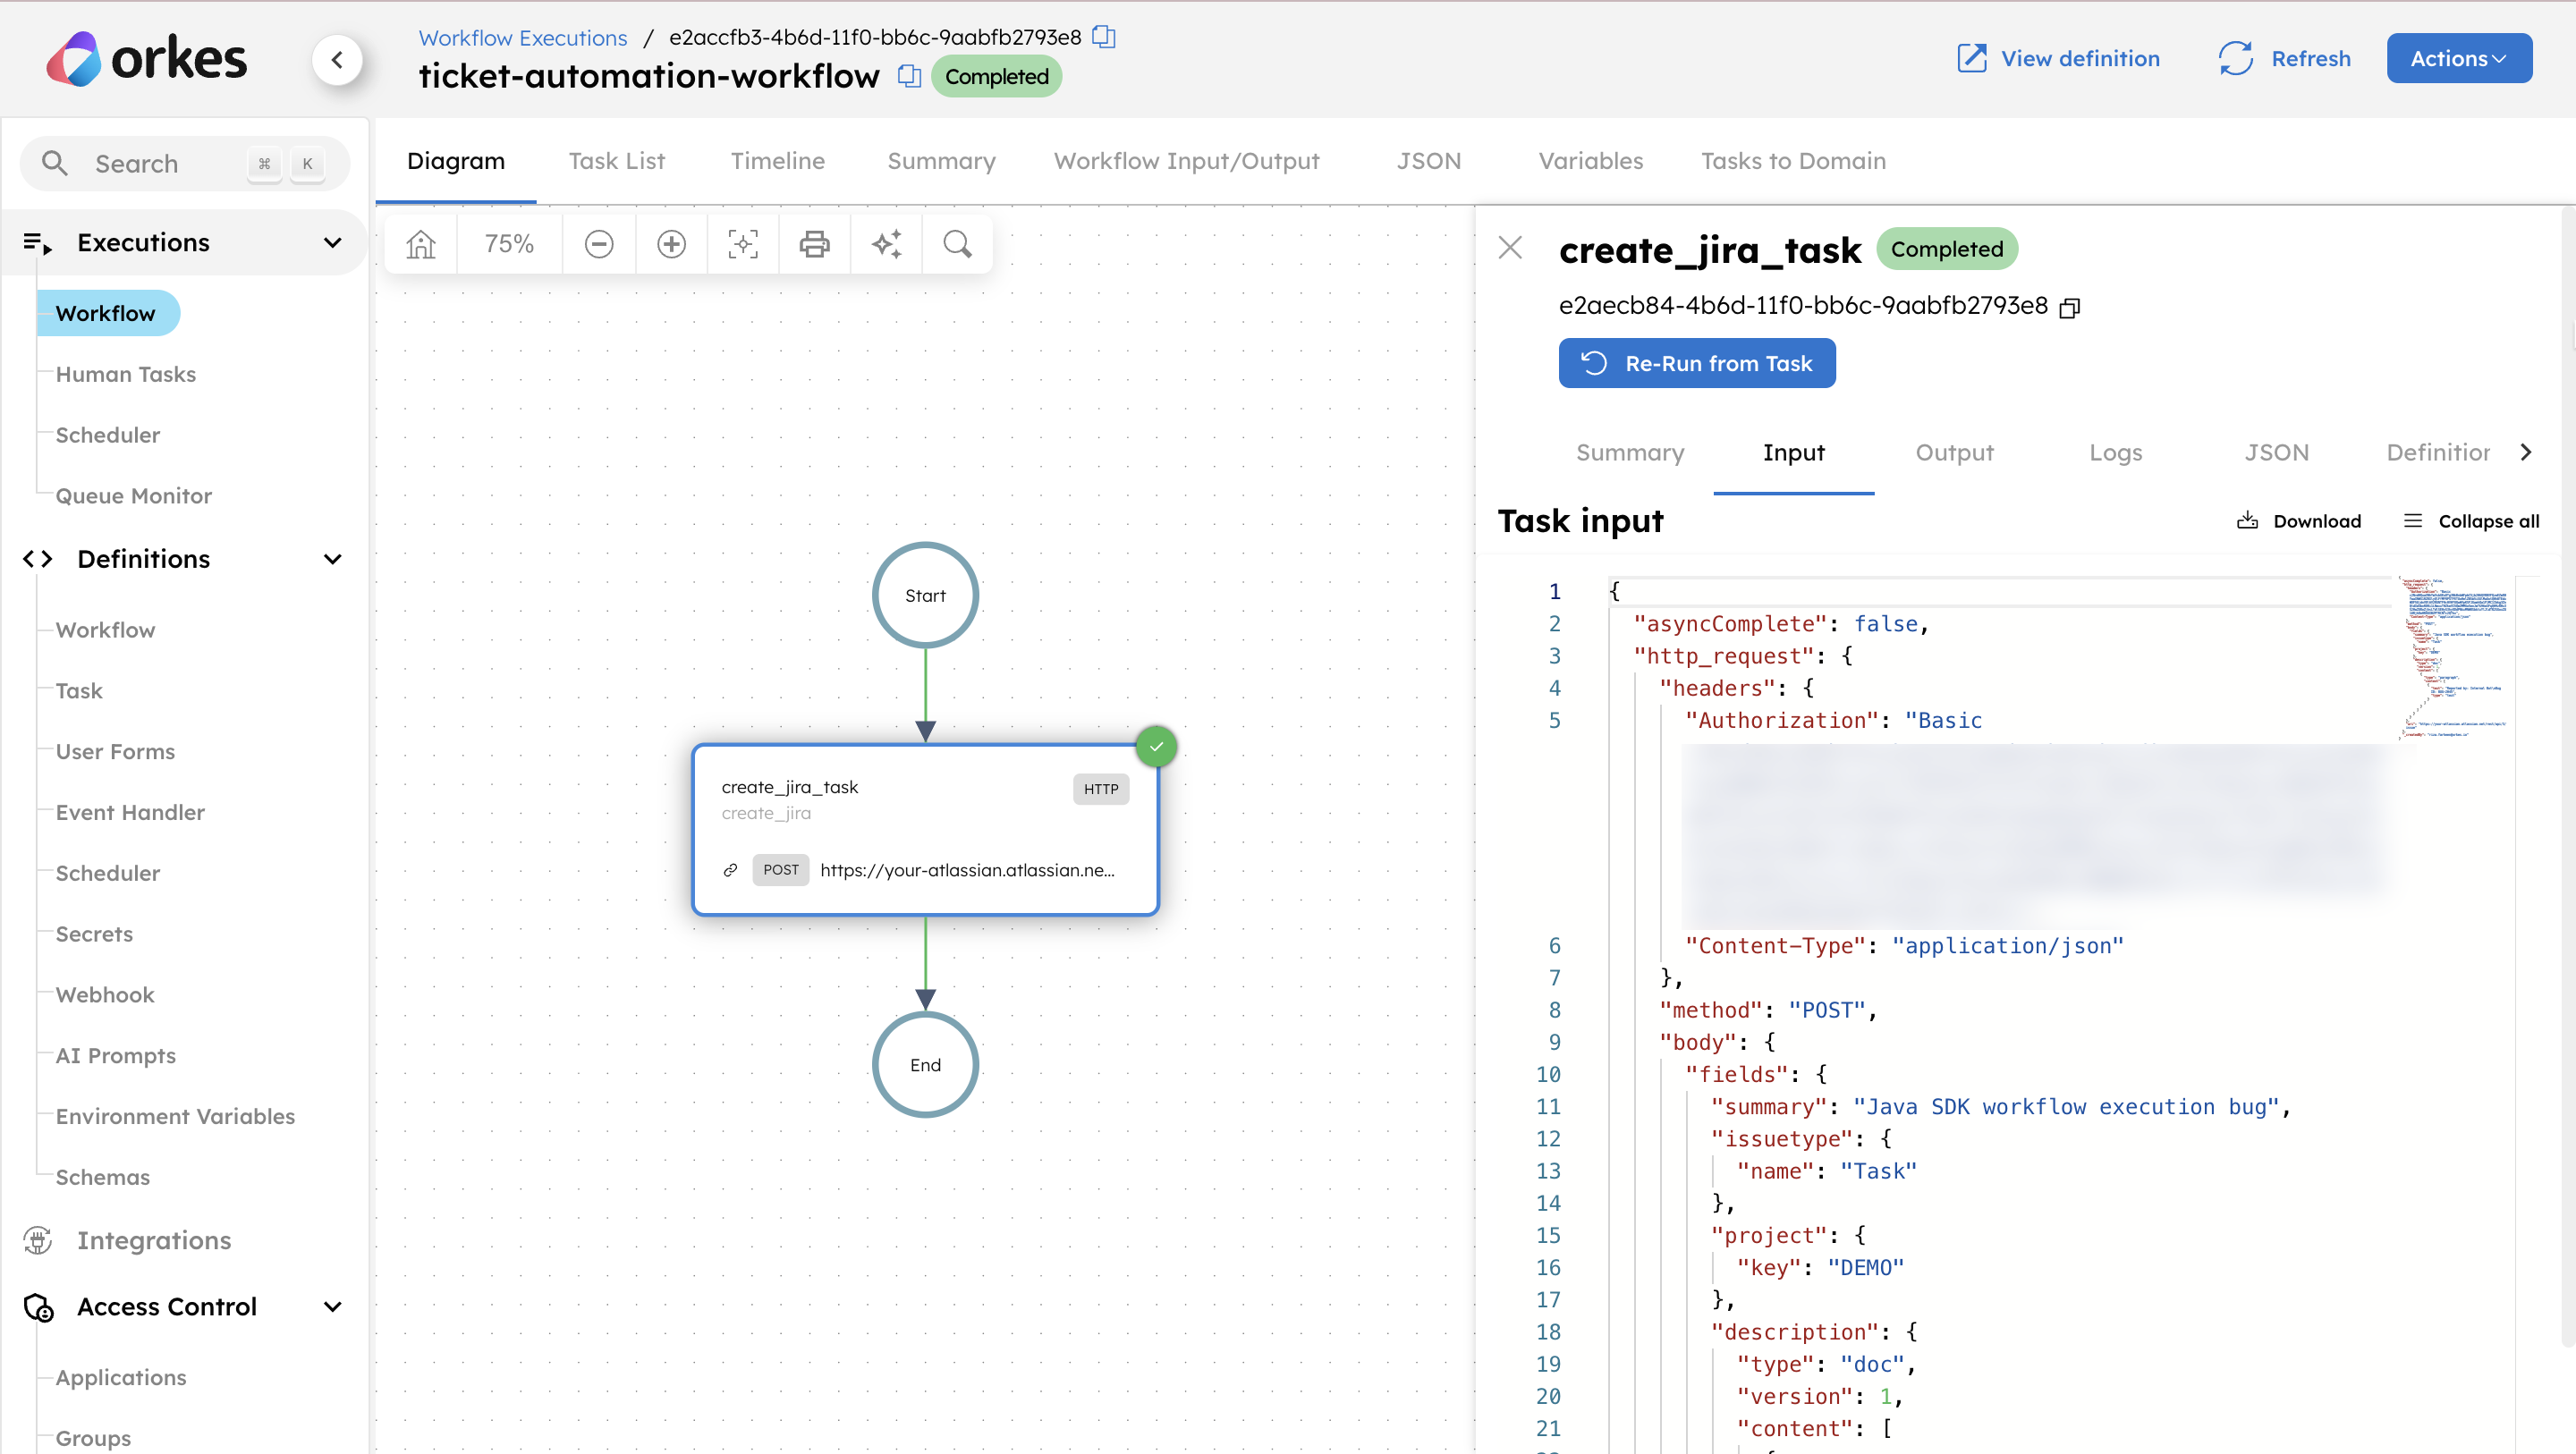
In your Jira project, confirm that the ticket has been created. Then, open the ticket to verify that the description has been passed through the webhook correctly.
Test the idempotency behavior
Consider a scenario where the same bug report is submitted multiple times due to a system glitch or network retry. If not handled properly, this could lead to hundreds or thousands of duplicate tickets in large systems.
To simulate this behavior:
- Re-run the same cURL request using the same bug_id value as before.
curl -X POST "<YOUR-CONDUCTOR-WEBHOOK-URL>" \
  -H "Content-Type: application/json" \
  -H "<YOUR-HEADER-NAME>: <YOUR-HEADER-VALUE>" \
  -d '{
    "bug_id": "BUG-2045",
    "title": "Java SDK workflow execution bug",
    "reported_by": "Internal Bot"
  }'
- Check the webhook activity in Conductor. A new event is received, but no new workflow is triggered. You can verify this by comparing timestamps.
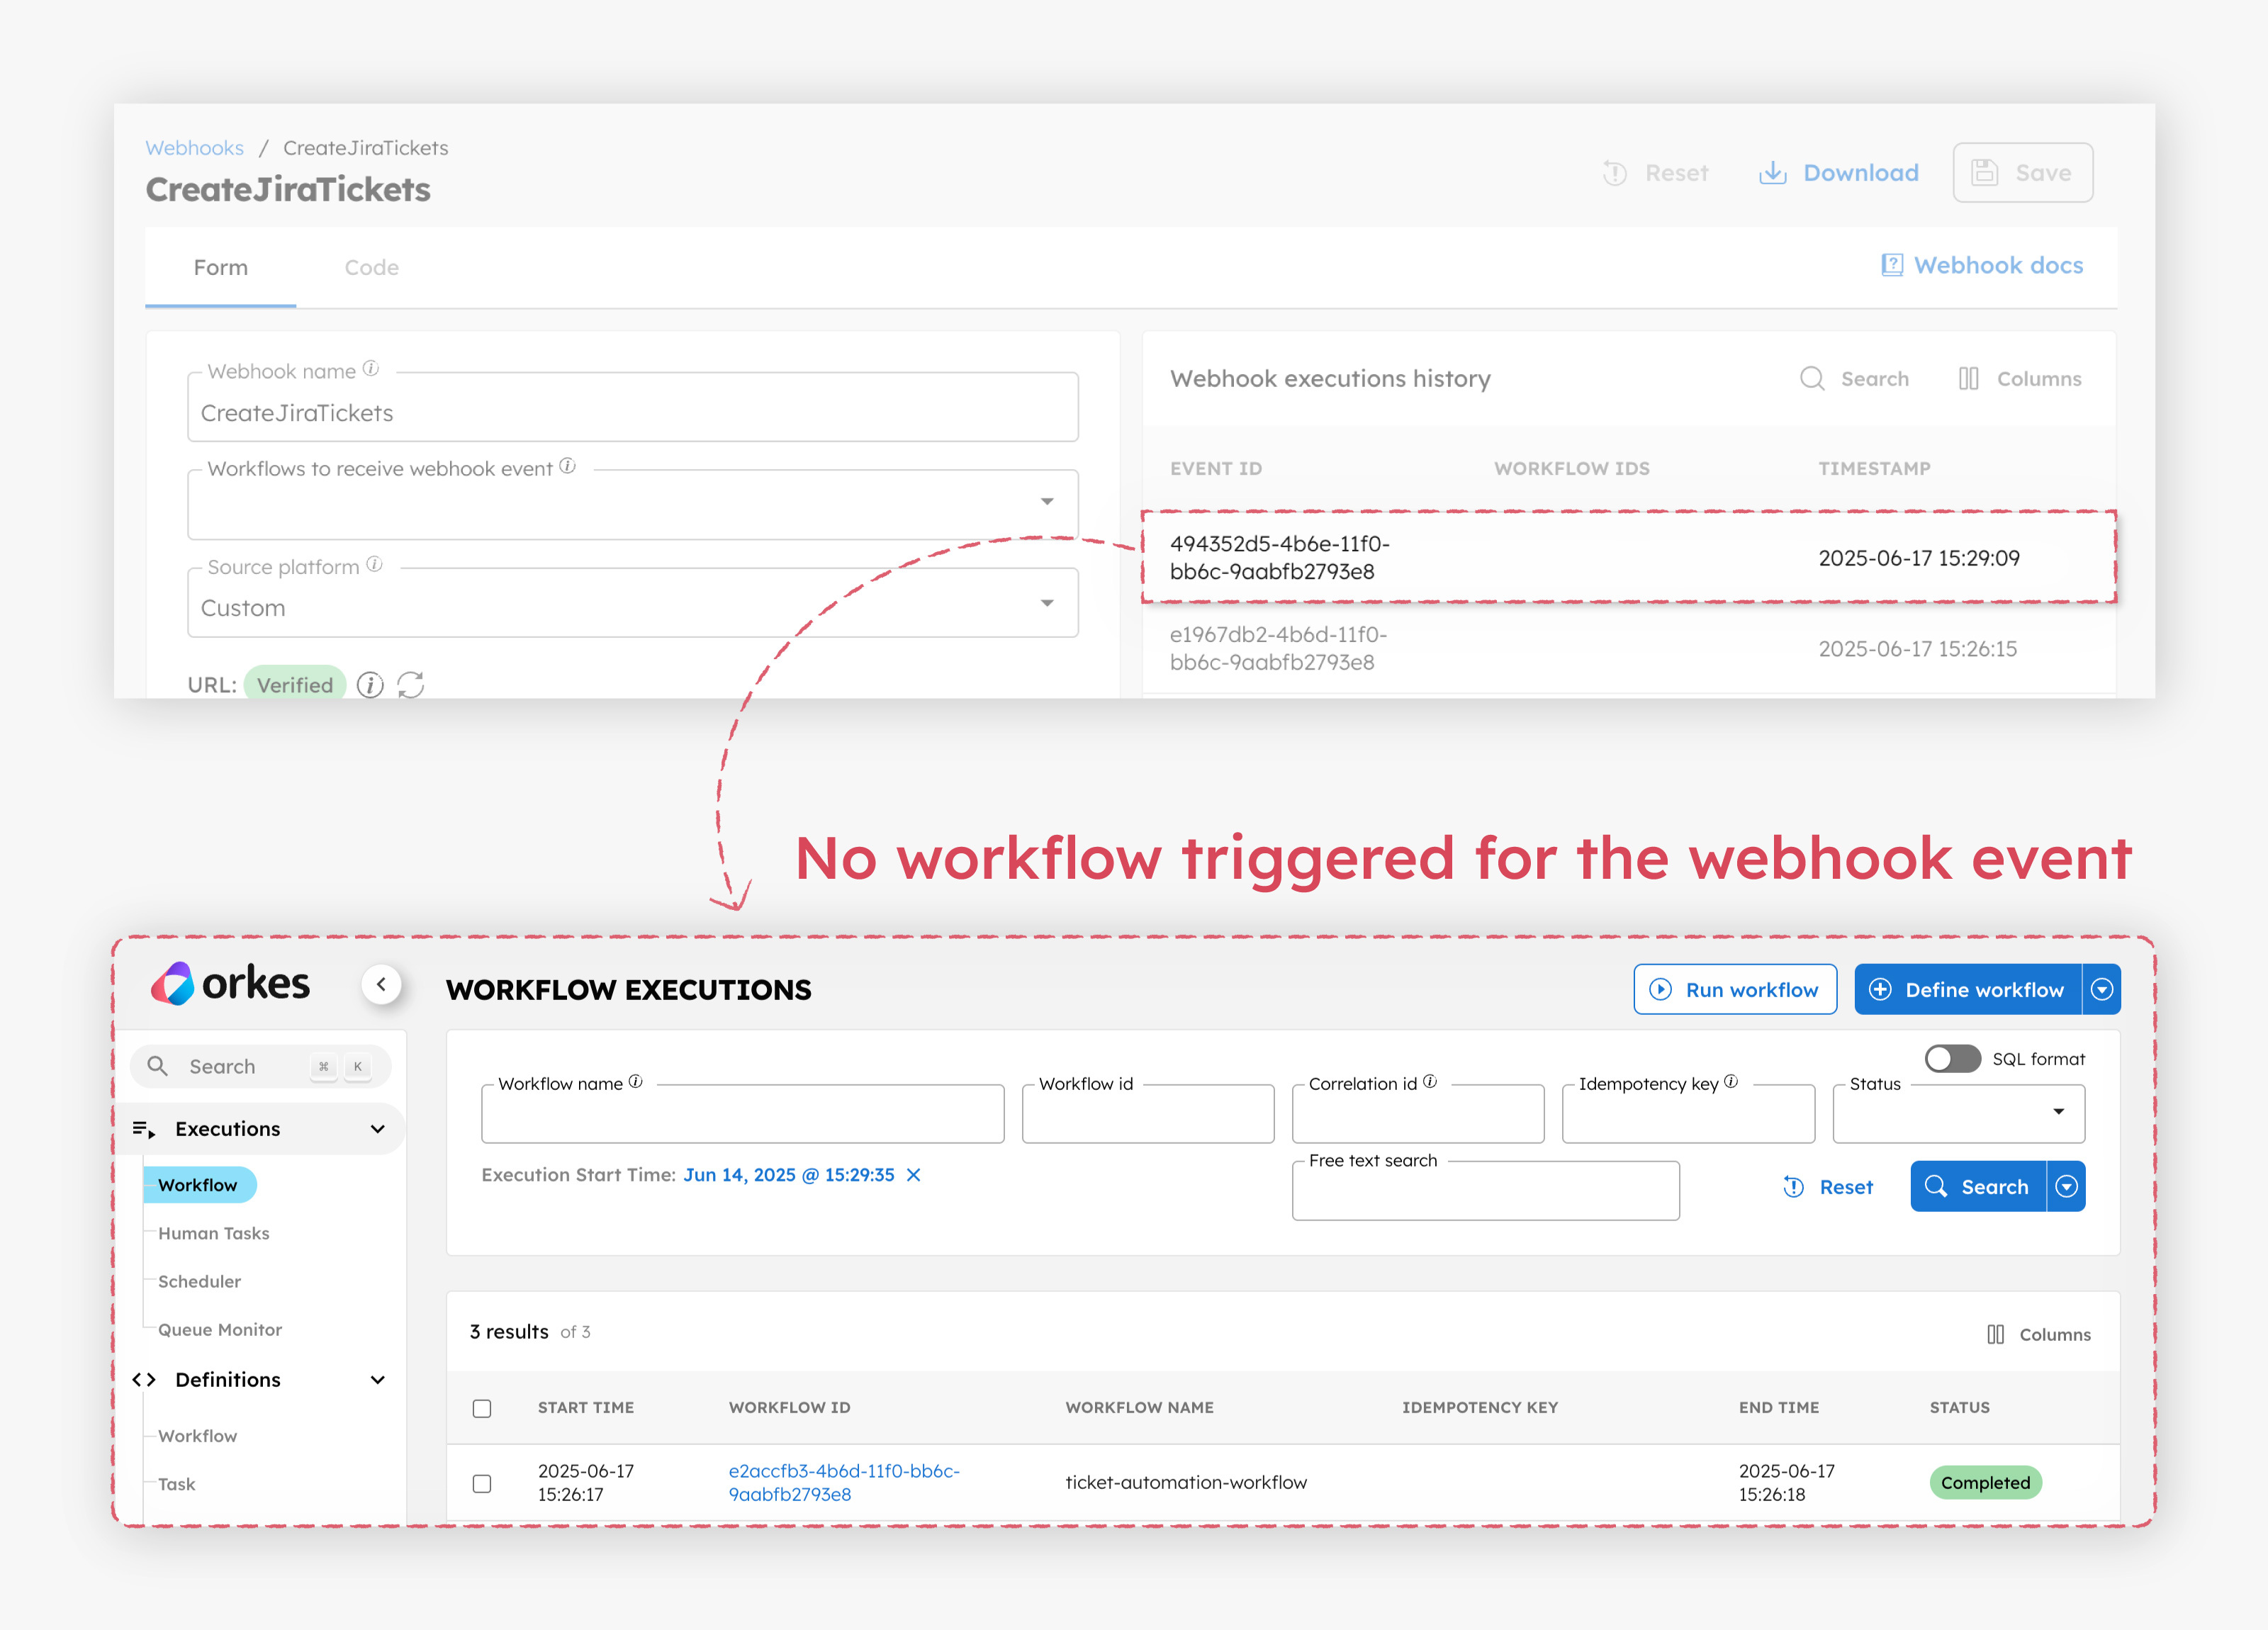
This confirms that Orkes Conductor correctly recognized the event as a duplicate. Since the webhook was configured with bug_id as the idempotency key and the strategy set to Return Existing, it avoids initiating a new workflow and instead references the original execution.
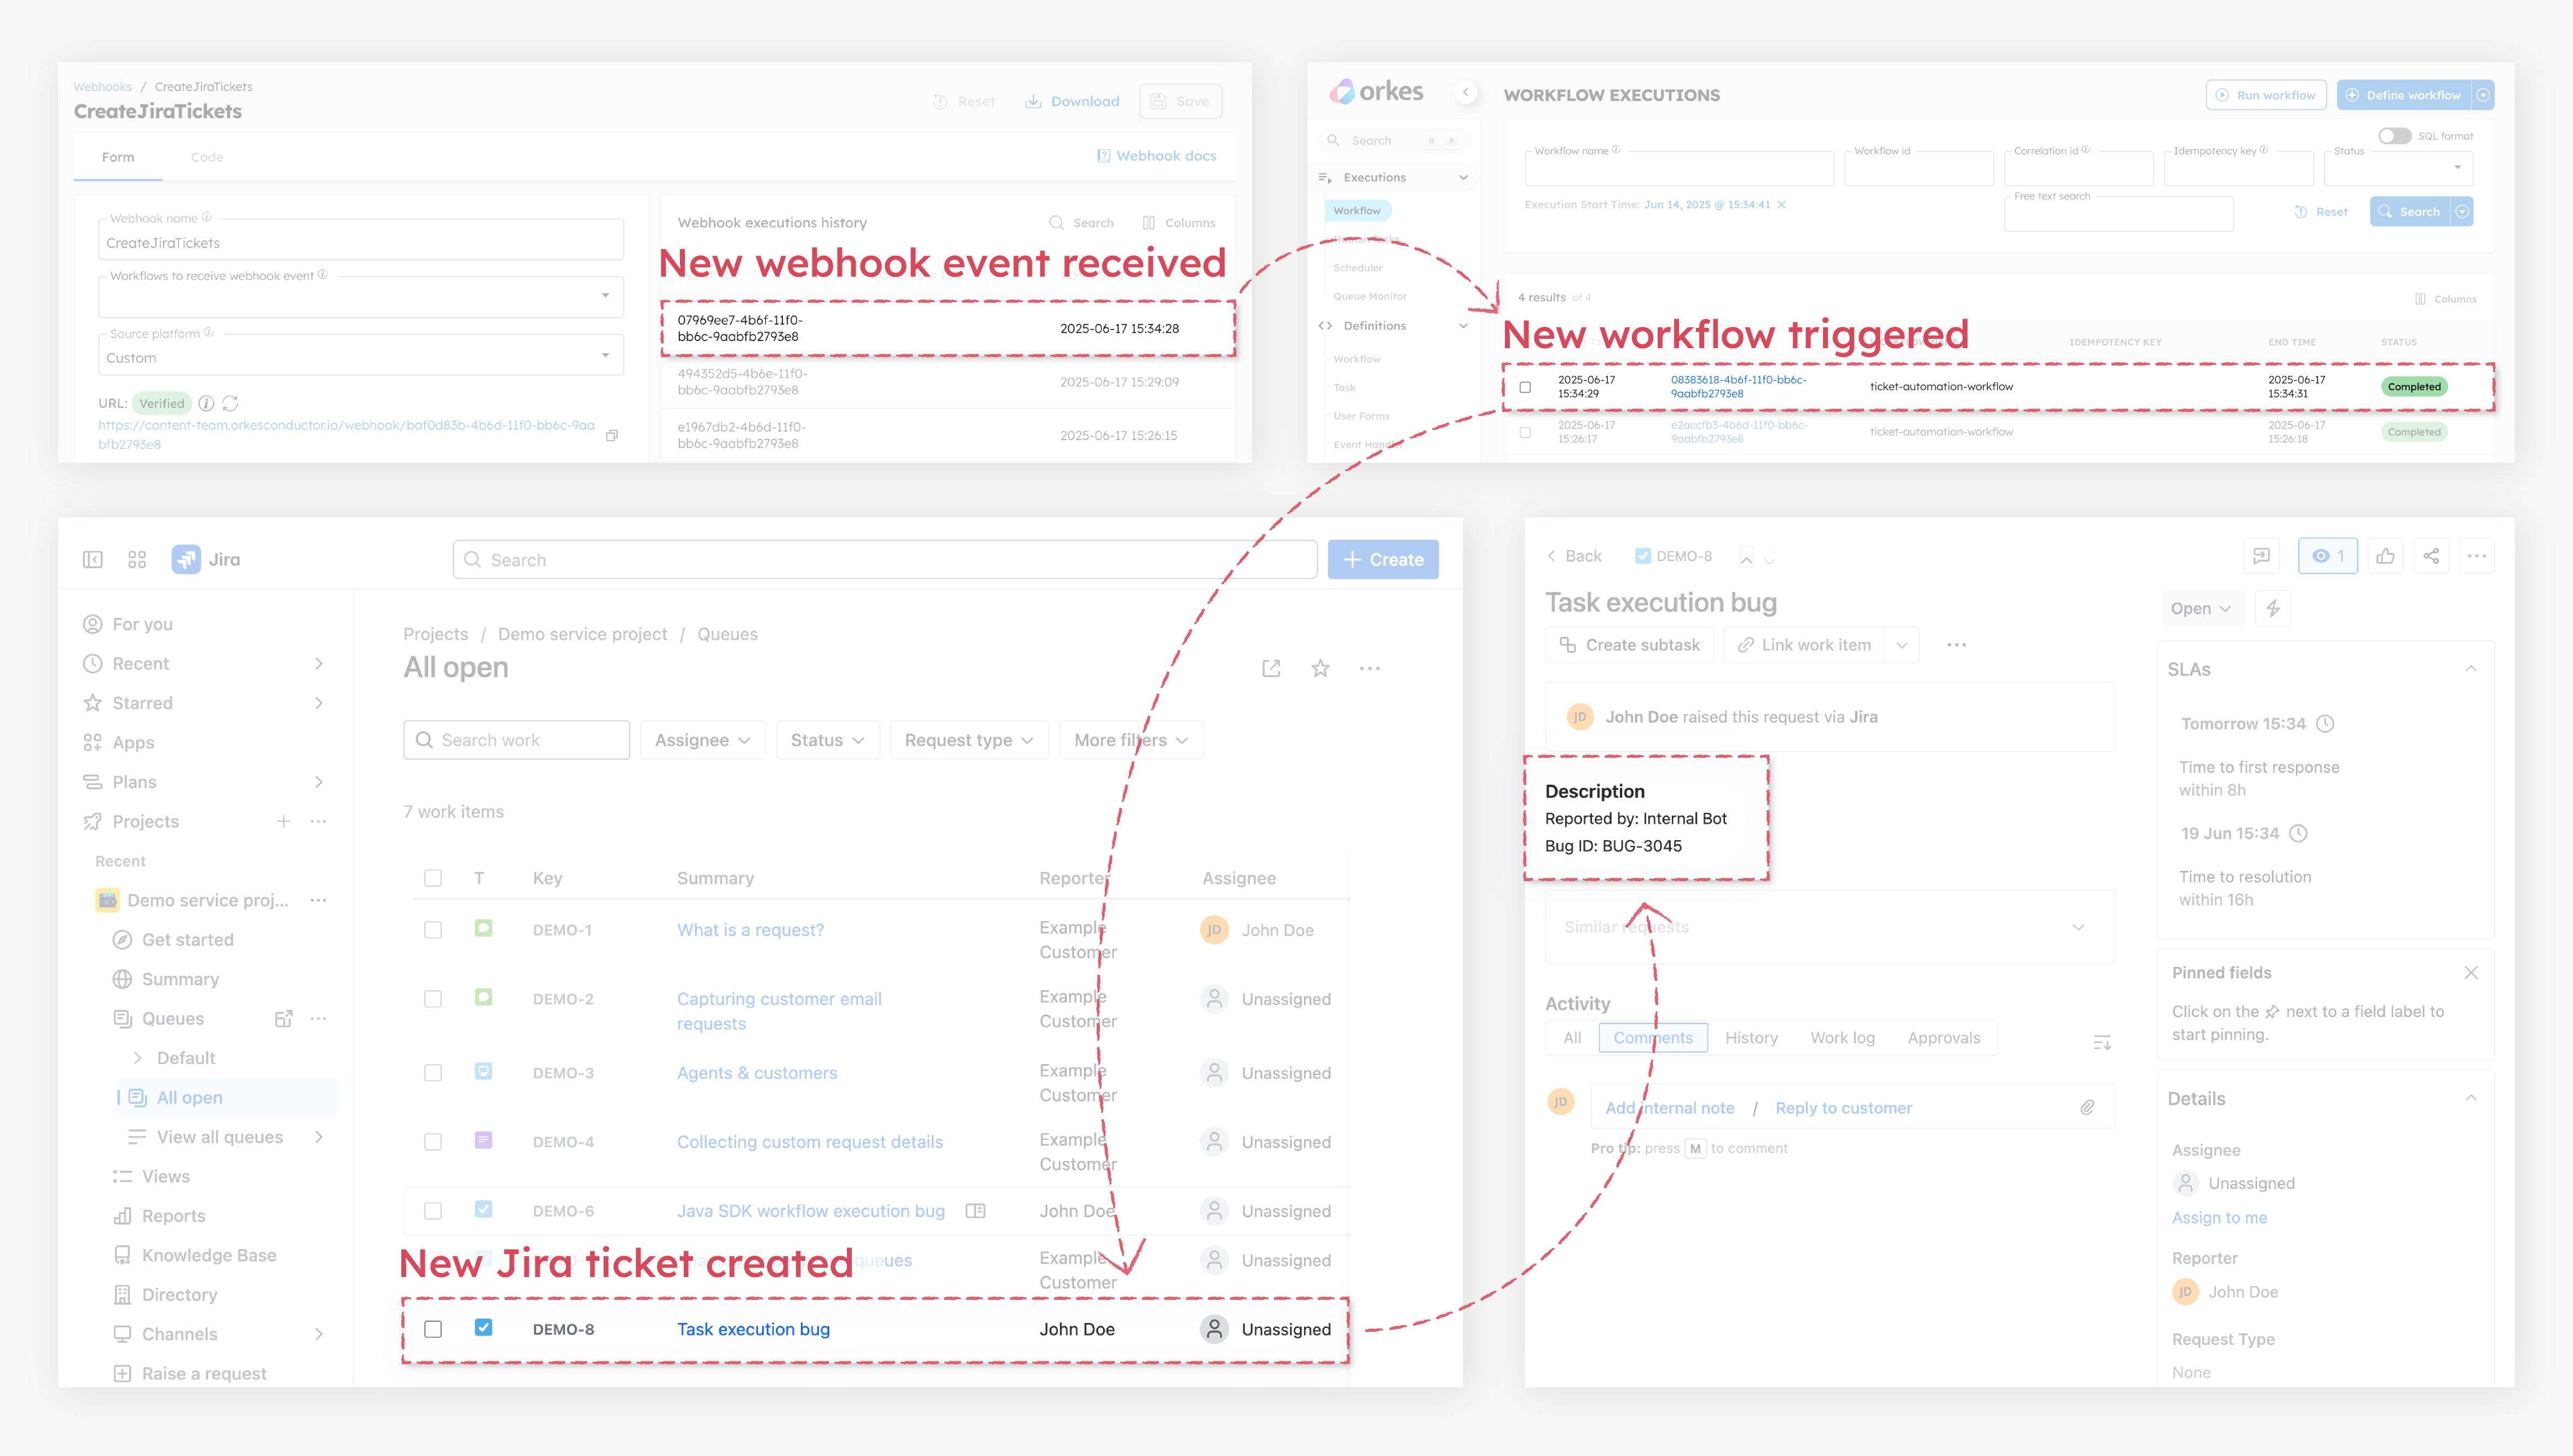
If you send a request with a different bug_id, Conductor treats it as a new event:
curl -X POST "<YOUR-CONDUCTOR-WEBHOOK-URL>" \
  -H "Content-Type: application/json" \
  -H "<YOUR-HEADER-NAME>: <YOUR-HEADER-VALUE>" \
  -d '{
    "bug_id": "BUG-3045",
    "title": "Task execution bug",
    "reported_by": "Internal Bot"
  }'
This triggers a new webhook event, starts a new workflow instance, and creates a new Jira ticket.
This approach keeps your system clean, reliable, and free from duplicate ticket noise, even under high-load or retry-heavy conditions.
Troubleshooting
Here are a few common issues you might encounter while setting up the Jira ticket automation workflow and how to resolve them:
| Issue | Possible causes and fixes |
|---|---|
| Webhook doesn’t trigger the workflow |
|
| Jira ticket isn’t created |
|
| Authentication fails with Jira API |
|
| Workflow execution fails |
|