Build a Standup Bot using Slack Webhooks in Orkes Conductor
This tutorial demonstrates how to build a standup bot that automates the daily standup process using Slack webhooks and Orkes Conductor. The bot collects updates from team members via personalized Slack messages, waits for a set timeframe, and compiles the responses. Once individual updates are received or the app timeout is reached, the bot posts them to a shared team channel, streamlining your team’s standup routine.
In this tutorial, you will:
- Create standup bot workflows in Orkes Conductor.
- Create a webhook to receive Slack events.
- Create a Slack app.
- Modify workflow.
- Run the workflow.
To follow along, ensure you have access to the free Orkes Developer Edition.
The standup updates workflow
This tutorial includes two workflows:
- standup_updates_main: The main workflow, triggered at the scheduled standup time
- individual_updates: A sub workflow invoked for each employee to collect their update
Parent workflow logic:
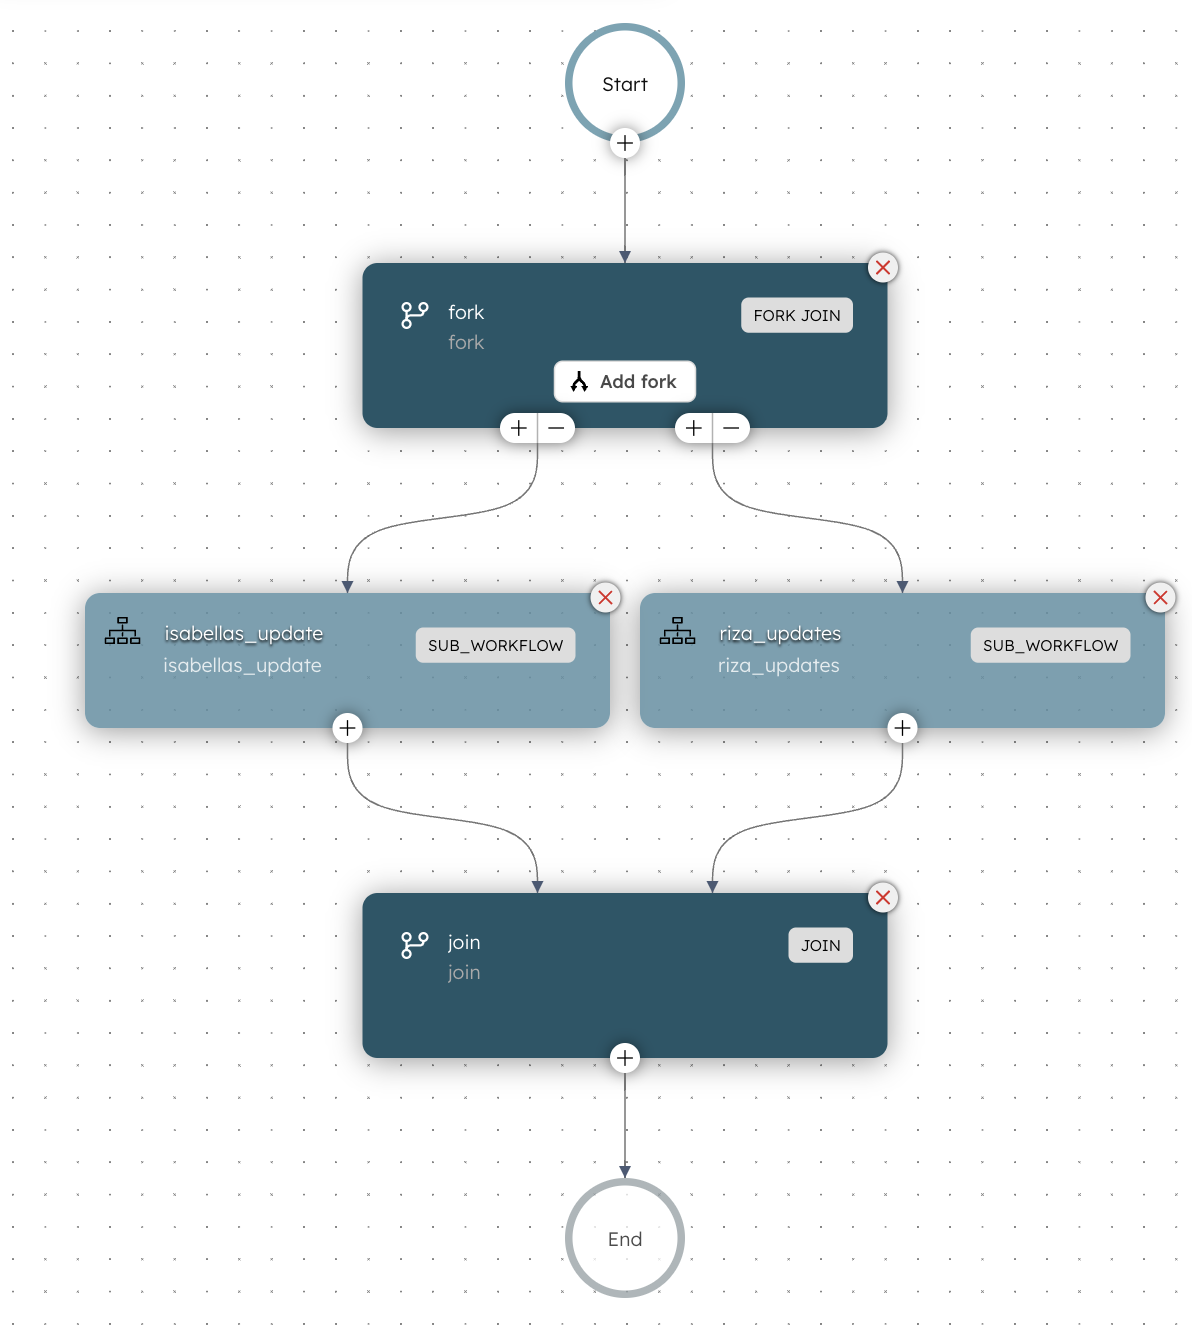
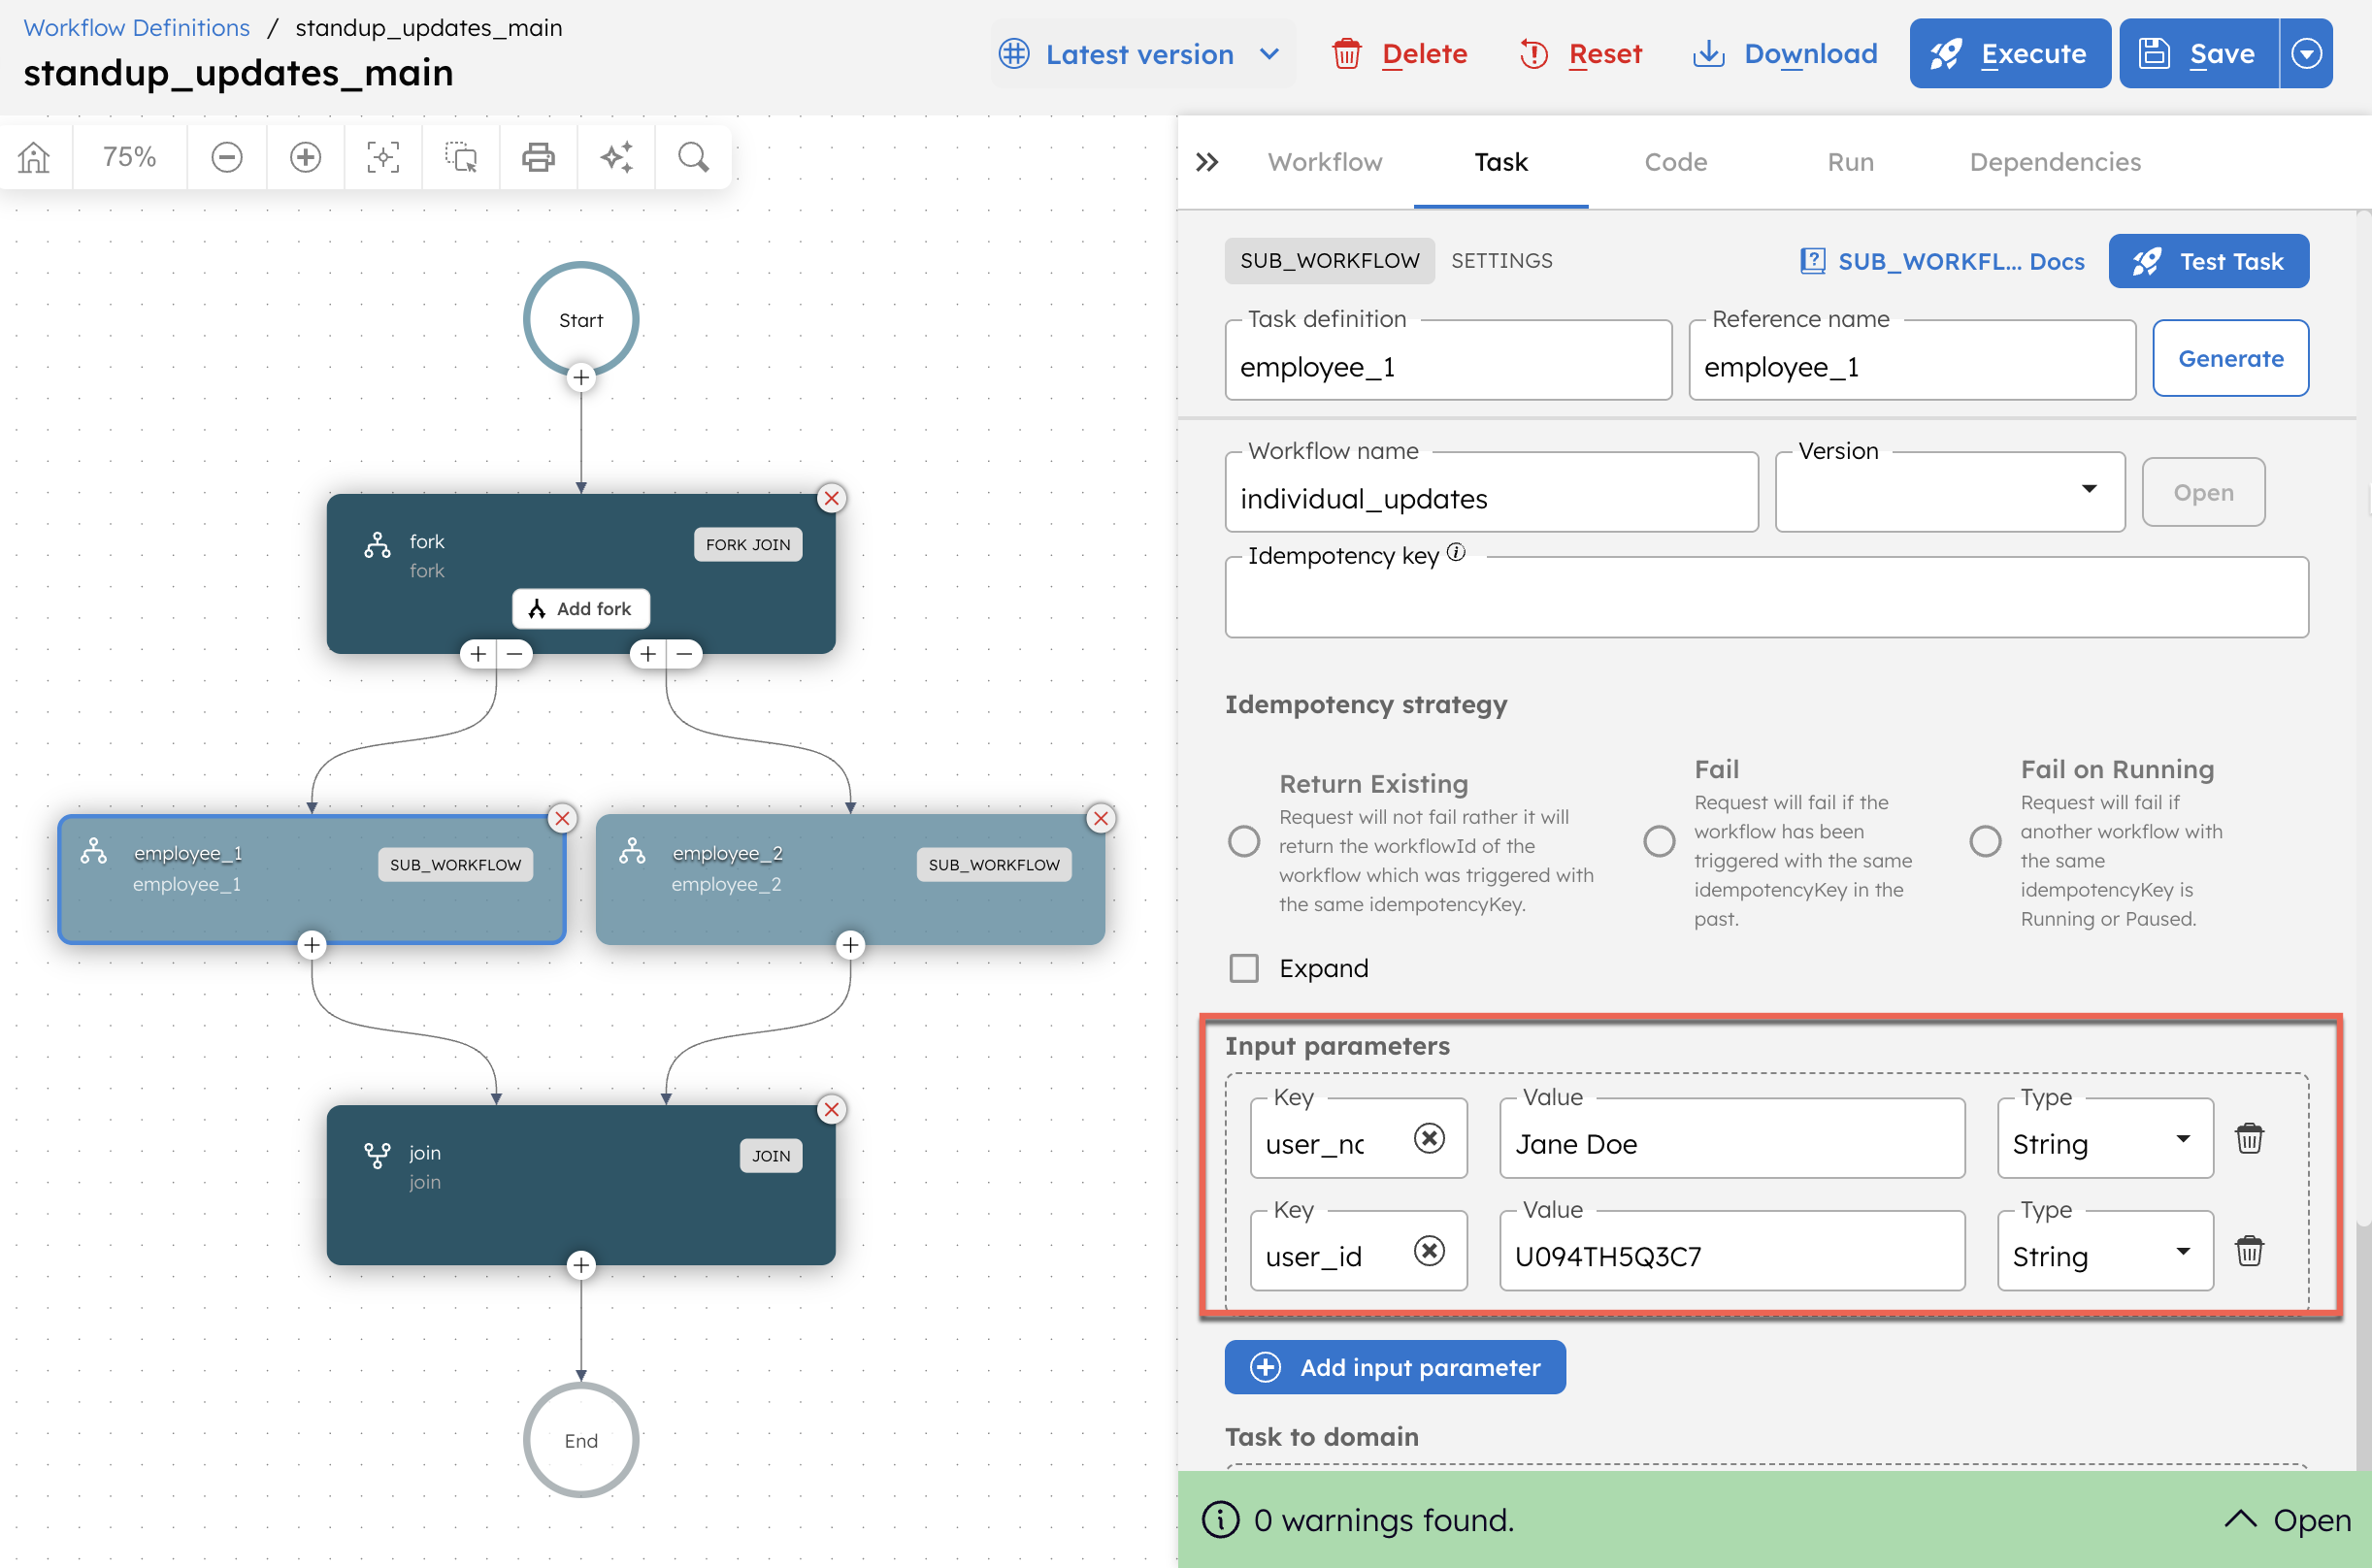
- The standup_updates_main workflow begins with a Fork/Join task that splits into multiple parallel forks. The number of forks is determined based on the number of users the bot serves.
- Each fork contains a Sub Workflow task that invokes the individual_updates workflow.
- Once the forks are completed, the Join task combines all the forks, and the workflow is completed.
Sub-workflow logic:
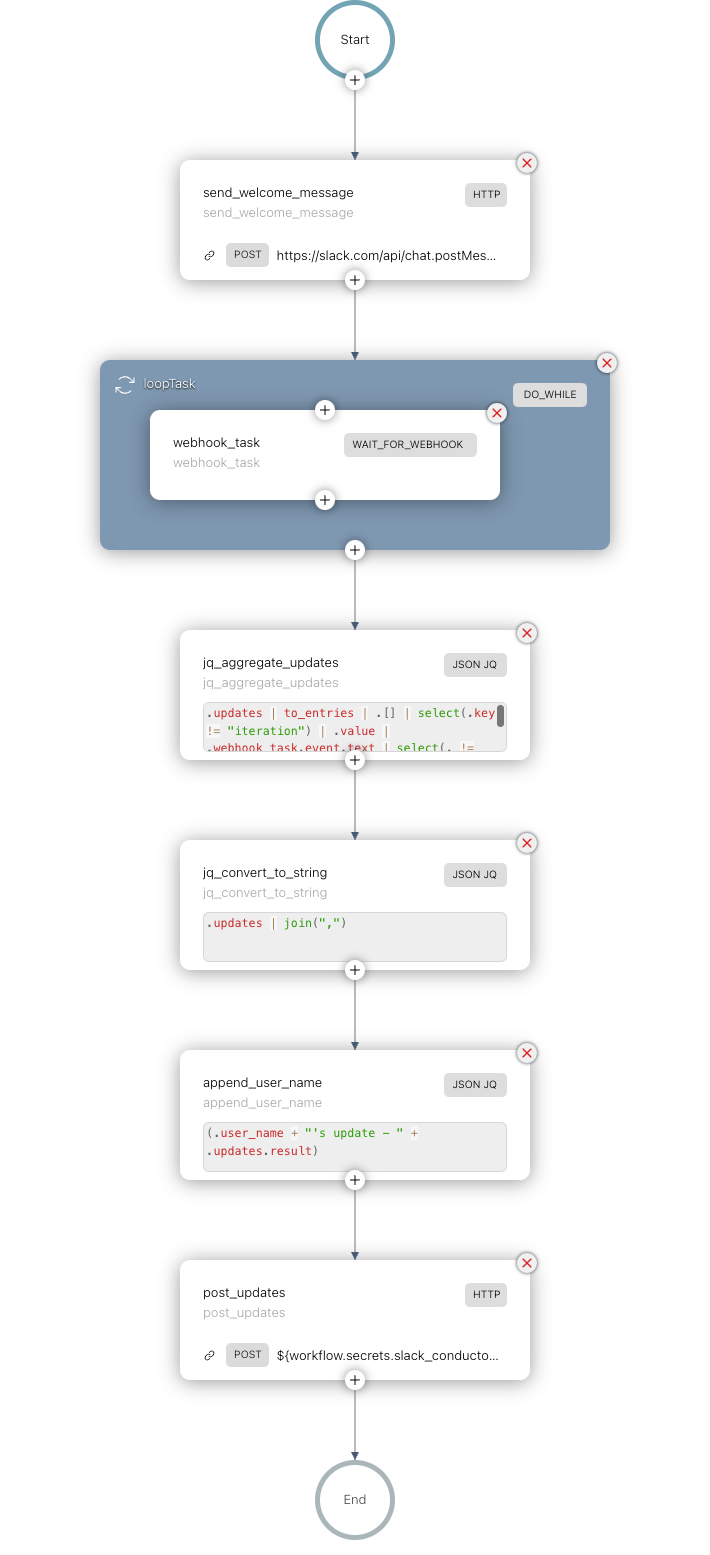
- The individual_updates workflow begins with an HTTP task that sends a welcome message to the user, asking for their scrum updates.
- Next, a Do While task captures the user inputs. The loop condition for the Do While task is checked using a Wait for Webhook task that captures incoming events from Slack.
- It is followed by a series of JSON JQ Transform tasks that aggregate updates from the user, convert them into CSV format, and append the update with the user’s name.
- The final task is an HTTP task that posts the updates to a dedicated Slack channel.
Step 1: Create the standup updates workflow
You’ll create two workflows:
- standup_updates_main: The parent workflow.
- individual_updates: The sub-workflow used to collect updates from each user.
Create the standup_updates_main
To create the workflow:
- Go to Definitions > Workflow and select + Define workflow.
- In the Code tab, enter the following JSON:
{
 "name": "standup_updates_main",
 "description": "standup_updates_main",
 "version": 1,
 "tasks": [
   {
     "name": "fork",
     "taskReferenceName": "fork",
     "inputParameters": {},
     "type": "FORK_JOIN",
     "forkTasks": [
       [
         {
           "name": "employee_2",
           "taskReferenceName": "employee_2",
           "inputParameters": {
             "user_name": "<EMPLOYEE-NAME>",
             "user_id": "<SLACK-ID>"
           },
           "type": "SUB_WORKFLOW",
           "subWorkflowParam": {
             "name": "individual_updates"
           }
         }
       ],
       [
         {
           "name": "employee_1",
           "taskReferenceName": "employee_1",
           "inputParameters": {
             "user_name": "<EMPLOYEE-NAME>",
             "user_id": "<SLACK-ID>"
           },
           "type": "SUB_WORKFLOW",
           "subWorkflowParam": {
             "name": "individual_updates"
           }
         }
       ]
     ]
   },
   {
     "name": "join",
     "taskReferenceName": "join",
     "type": "JOIN",
     "joinOn": [
       "employee_1",
       "employee_2"
     ]
   }
 ],
 "schemaVersion": 2
}
- Select Save > Confirm.
Create the individual_updates workflow
To create the workflow:
- Go to Definitions > Workflow and select + Define workflow.
- In the Code tab, enter the following JSON:
{
"name": "individual_updates",
"description": "This workflow is used to get scrum update for user",
"version": 1,
"tasks": [
{
"name": "send_welcome_message",
"taskReferenceName": "send_welcome_message",
"inputParameters": {
"user_name": "${workflow.input.user_name}",
"http_request": {
"uri": "https://slack.com/api/chat.postMessage",
"method": "POST",
"connectionTimeOut": 3000,
"readTimeOut": 3000,
"body": {
"channel": "${workflow.input.user_id}",
"text": "Hello *${workflow.input.user_name}*! Good Morning. What is your scrum update for today. Send *done* to end update",
"as_user": true
},
"headers": {
"Authorization": "Bearer ${workflow.secrets.slack_standup_token}"
}
}
},
"type": "HTTP"
},
{
"name": "loopTask",
"taskReferenceName": "loopTask",
"inputParameters": {
"value": "${workflow.input.loop}"
},
"type": "DO_WHILE",
"loopCondition": "if ($.webhook_task['event']['text'] == \"done\" ) { false;} else {true;} ",
"loopOver": [
{
"name": "webhook_task",
"taskReferenceName": "webhook_task",
"inputParameters": {
"user_id": "${workflow.input.user_id}",
"matches": {
"$['event']['type']": "message",
"$['event']['user']": "${workflow.input.user_id}"
}
},
"type": "WAIT_FOR_WEBHOOK"
}
]
},
{
"name": "jq_aggregate_updates",
"taskReferenceName": "jq_aggregate_updates",
"inputParameters": {
"updates": "${loopTask.output}",
"queryExpression": ".updates | to_entries | .[] | select(.key != \"iteration\") | .value | .webhook_task.event.text | select(. != \"done\") | select (. | startswith(\"Hello\") | not)"
},
"type": "JSON_JQ_TRANSFORM"
},
{
"name": "jq_convert_to_string",
"taskReferenceName": "jq_convert_to_string",
"inputParameters": {
"updates": "${jq_aggregate_updates.output.resultList}",
"queryExpression": ".updates | join(\",\")"
},
"type": "JSON_JQ_TRANSFORM"
},
{
"name": "append_user_name",
"taskReferenceName": "append_user_name",
"inputParameters": {
"user_name": "${workflow.input.user_name}",
"updates": "${jq_convert_to_string.output}",
"queryExpression": "(.user_name + \"'s update - \" + .updates.result)"
},
"type": "JSON_JQ_TRANSFORM"
},
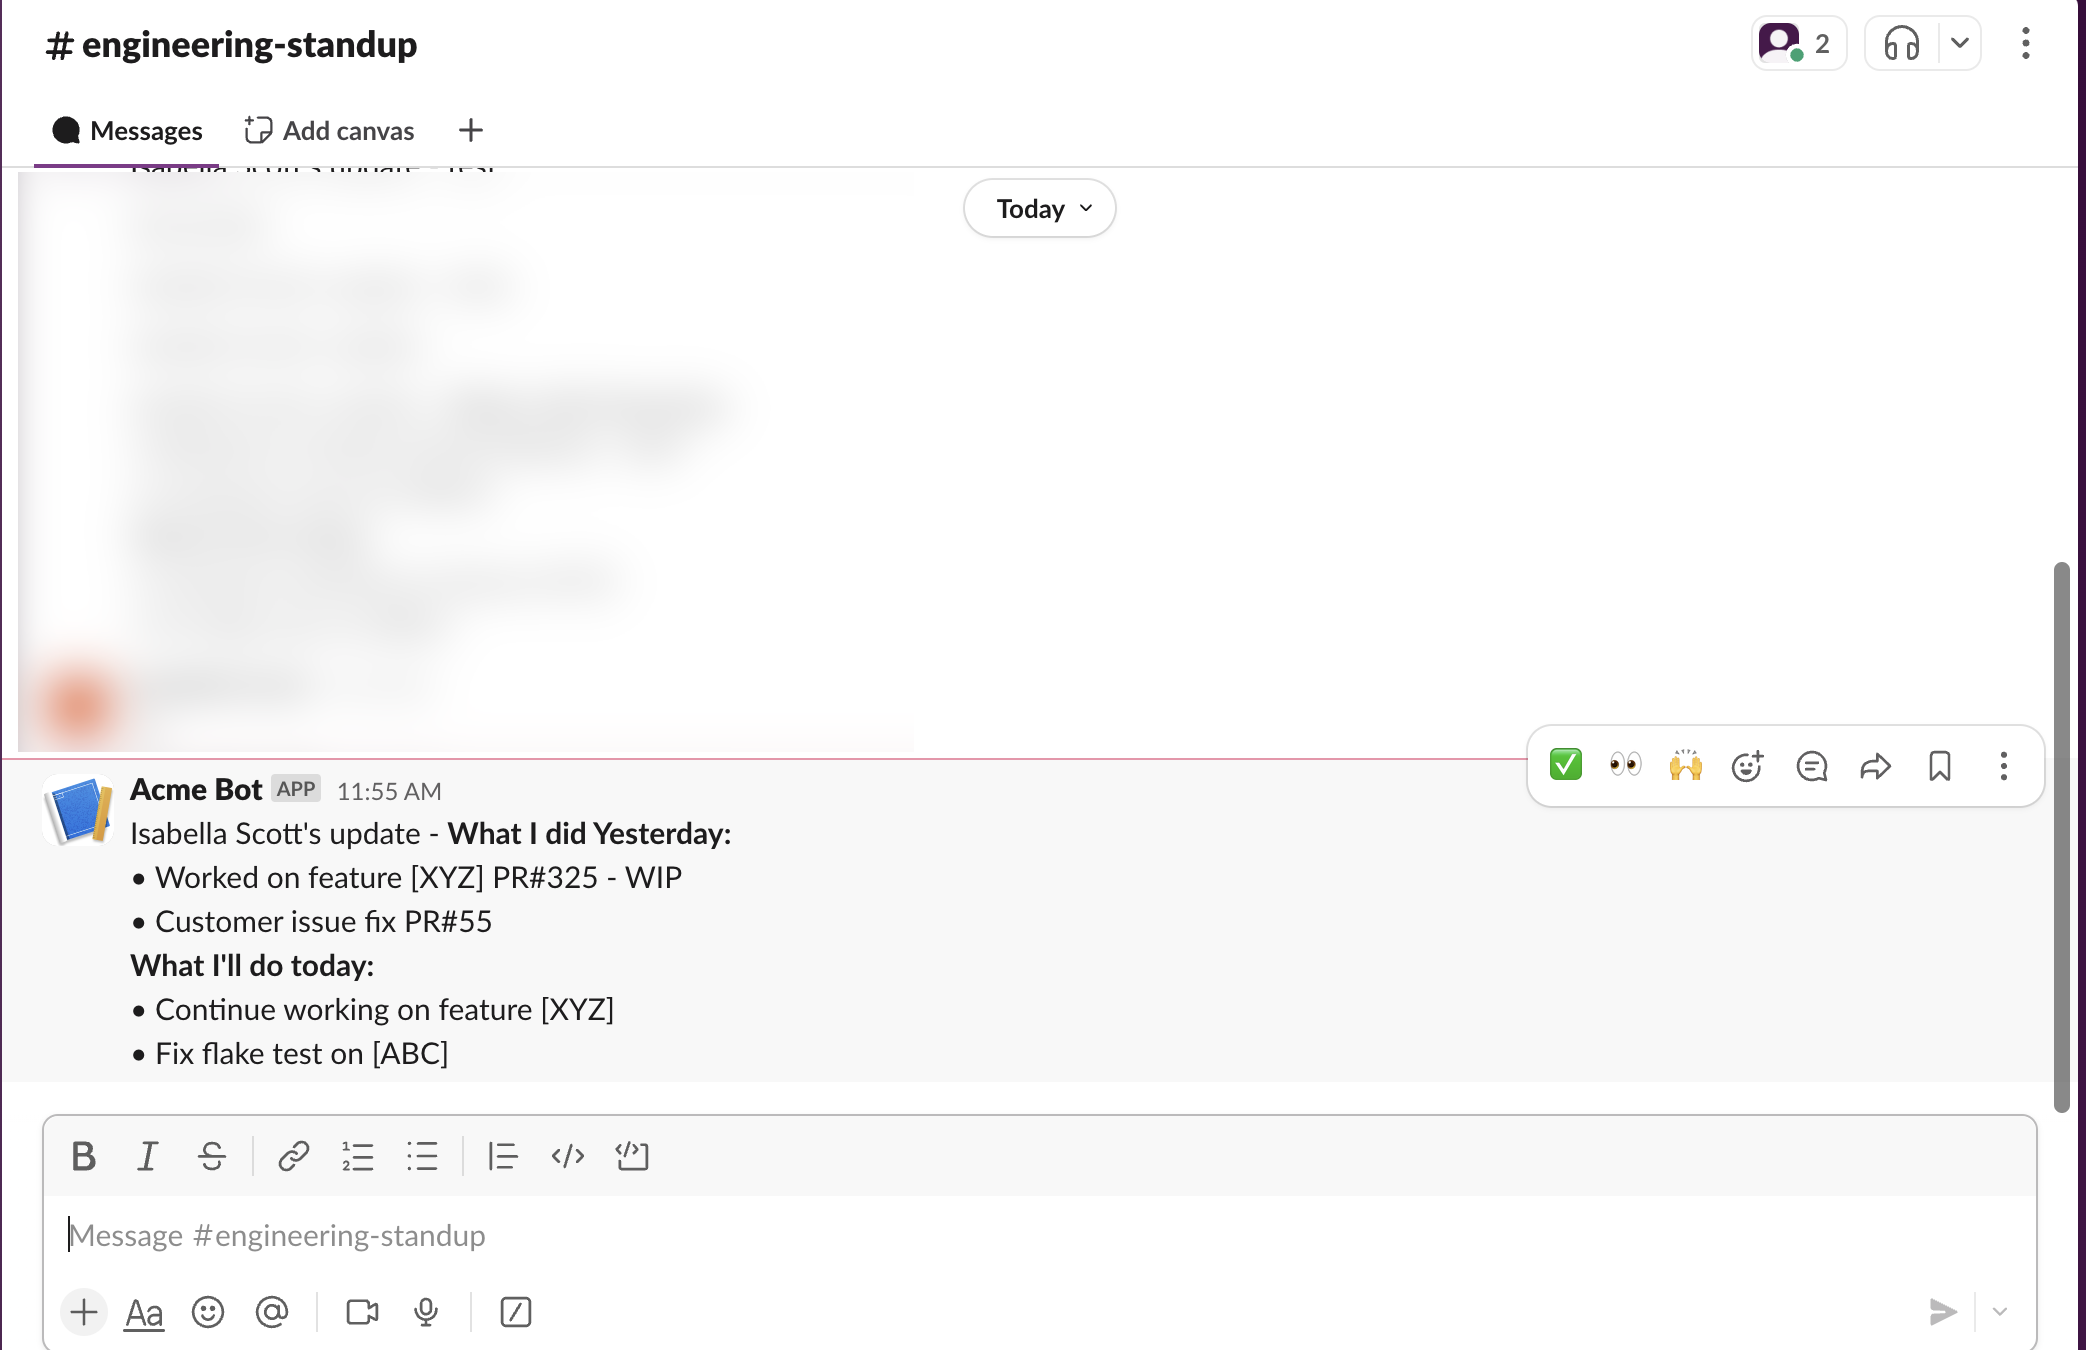
{
"name": "post_updates",
"taskReferenceName": "post_updates",
"inputParameters": {
"http_request": {
"uri": "${workflow.secrets.slack_conductor_channel_url}",
"method": "POST",
"connectionTimeOut": 3000,
"readTimeOut": 3000,
"body": {
"text": "${append_user_name.output.result}"
},
"headers": {
"Content-type": "application/json"
}
}
},
"type": "HTTP"
}
],
"inputParameters": [
"user_name",
"user_id"
],
"schemaVersion": 2
}
- Select Save > Confirm.
If you change the name of the individual_updates workflow, make sure to update the corresponding Sub Workflow task in the standup_updates_main to match the new name.
Step 2: Create a webhook
The Wait for Webhook task in the individual_updates workflow captures the users' updates as incoming events through the Slack webhook.
To create a webhook in Conductor:
- Go to Definitions > Webhook from the left navigation menu on your Conductor cluster.
- Select + New webhook.
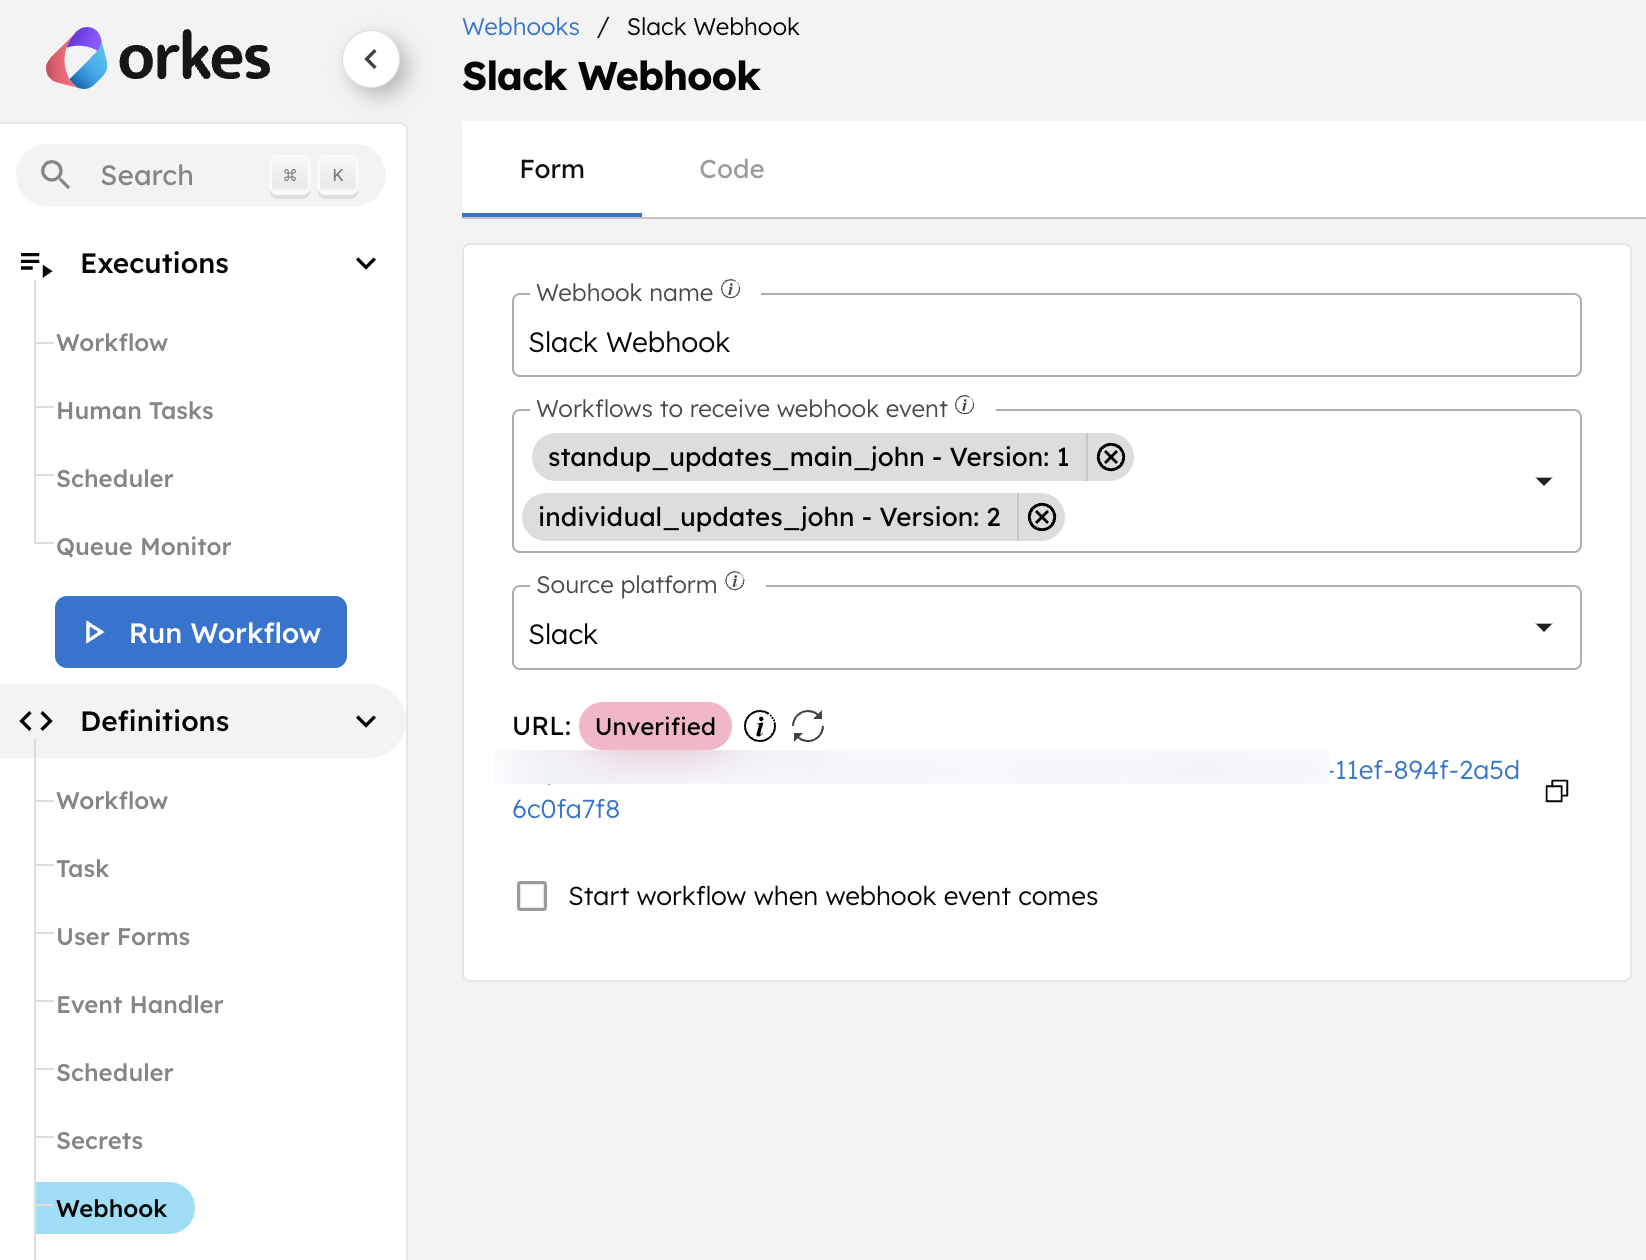
- In Webhook name, enter a unique name for the webhook.
- In Workflows to receive webhook event, select both the workflows created in the previous step.
- In Source platform, select Slack.
- Select Save.
An unverified webhook URL is generated. The next step is to create a Slack app that sends events to the workflow through this webhook.
Step 3: Create a Slack app
To create a Slack app:
- Sign in to Slack API.
- Select Create an App > From scratch.
- Enter an App name, and select a workspace to integrate the Slack app.
- Select Create App.
- From the left navigation menu, go to Features > Incoming Webhooks, and turn on Activate Incoming Webhooks.
- Go to Features > Event Subscriptions, and turn on Enable events.
- In Request URL, enter the Webhook URL created in Conductor.
- In Subscribe to bot events, select Add Bot User Event and choose message.im event.
- Select Save changes.
- Go to Features > App Home > Show Tabs.
- In Messages Tab, enable the option Allow users to send Slash commands and messages from the messages tab.
- Enable permissions for the Slack app by going to Feature > OAuth & Permissions.
- In Scopes > Bot Token Scopes, select Add an OAuth scope.
- Add chat:write permission.
The Slack app has been created.
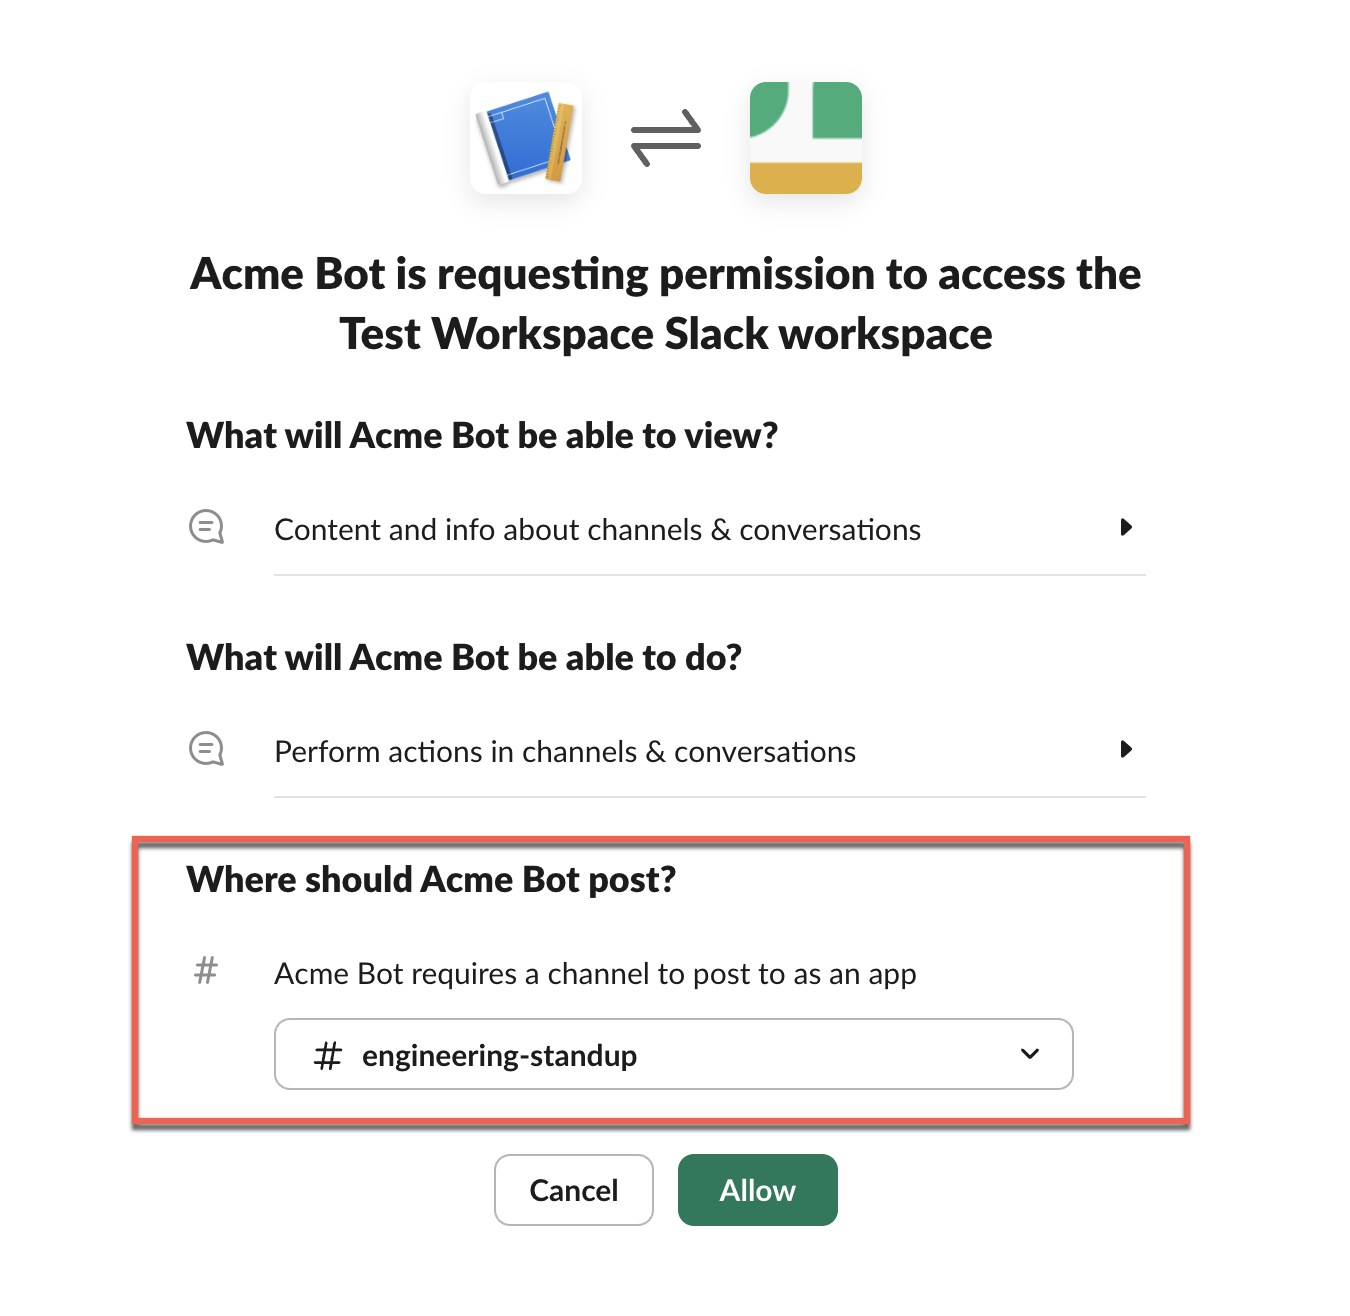
To install the app in a Slack workspace:
- Go to Settings > Install App.
- Select Install to <YOUR-WORKSPACE-NAME>.
- In Channel for webhook, select the channel to install the app and select Allow.
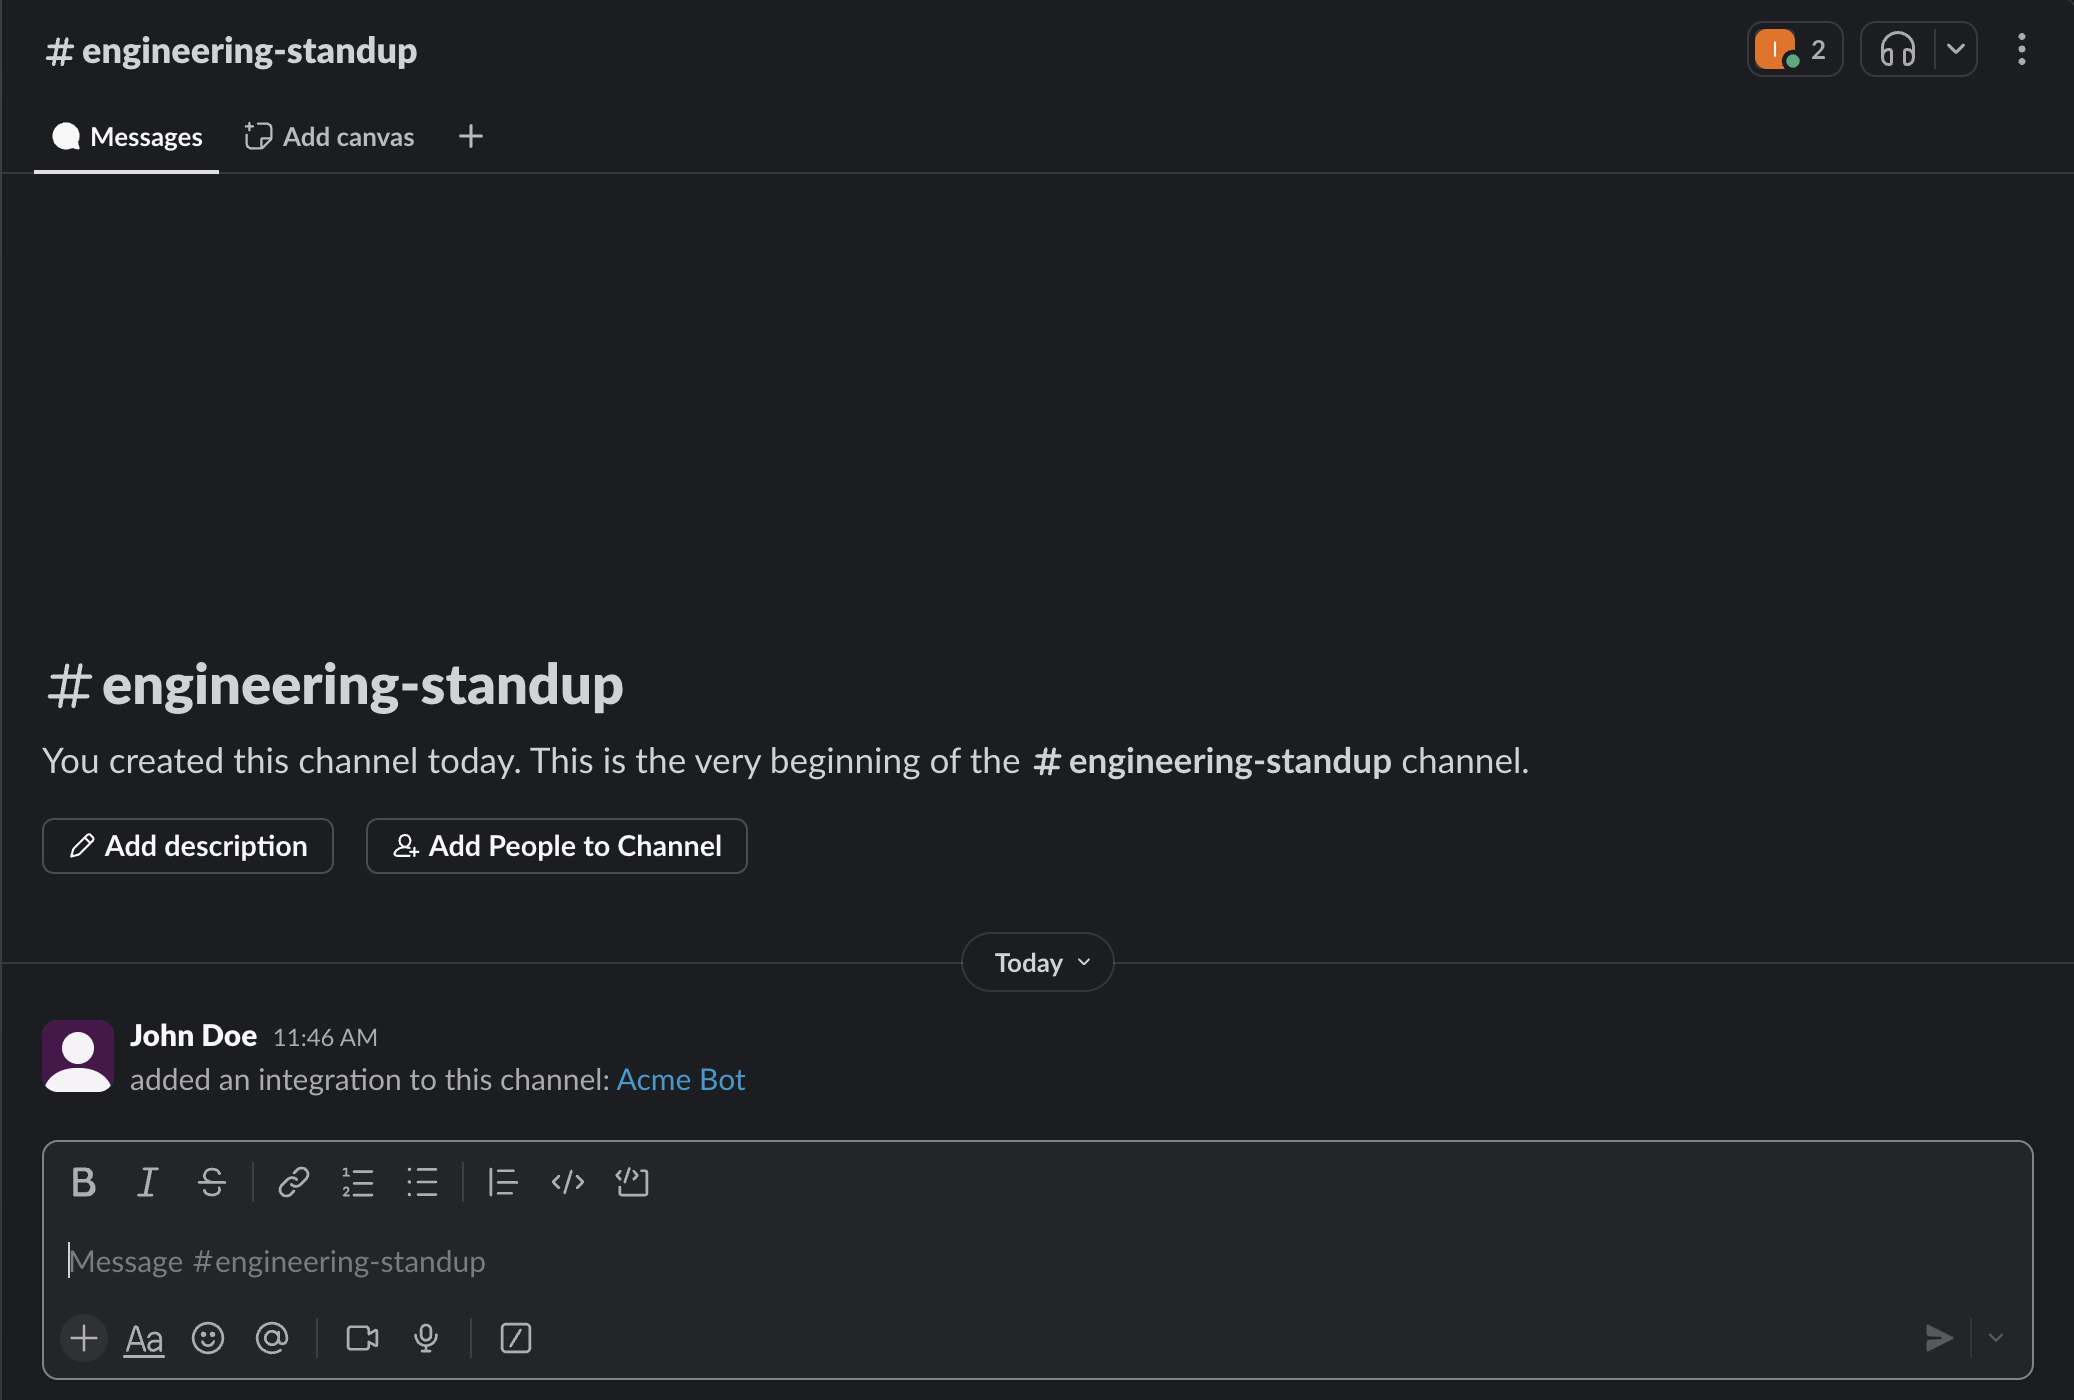
The Slack bot is integrated into the specified channel:
Once the app is installed in your workspace, a Bot User OAuth Token and a Webhook URL will be generated. These are to be added as secrets in Conductor.
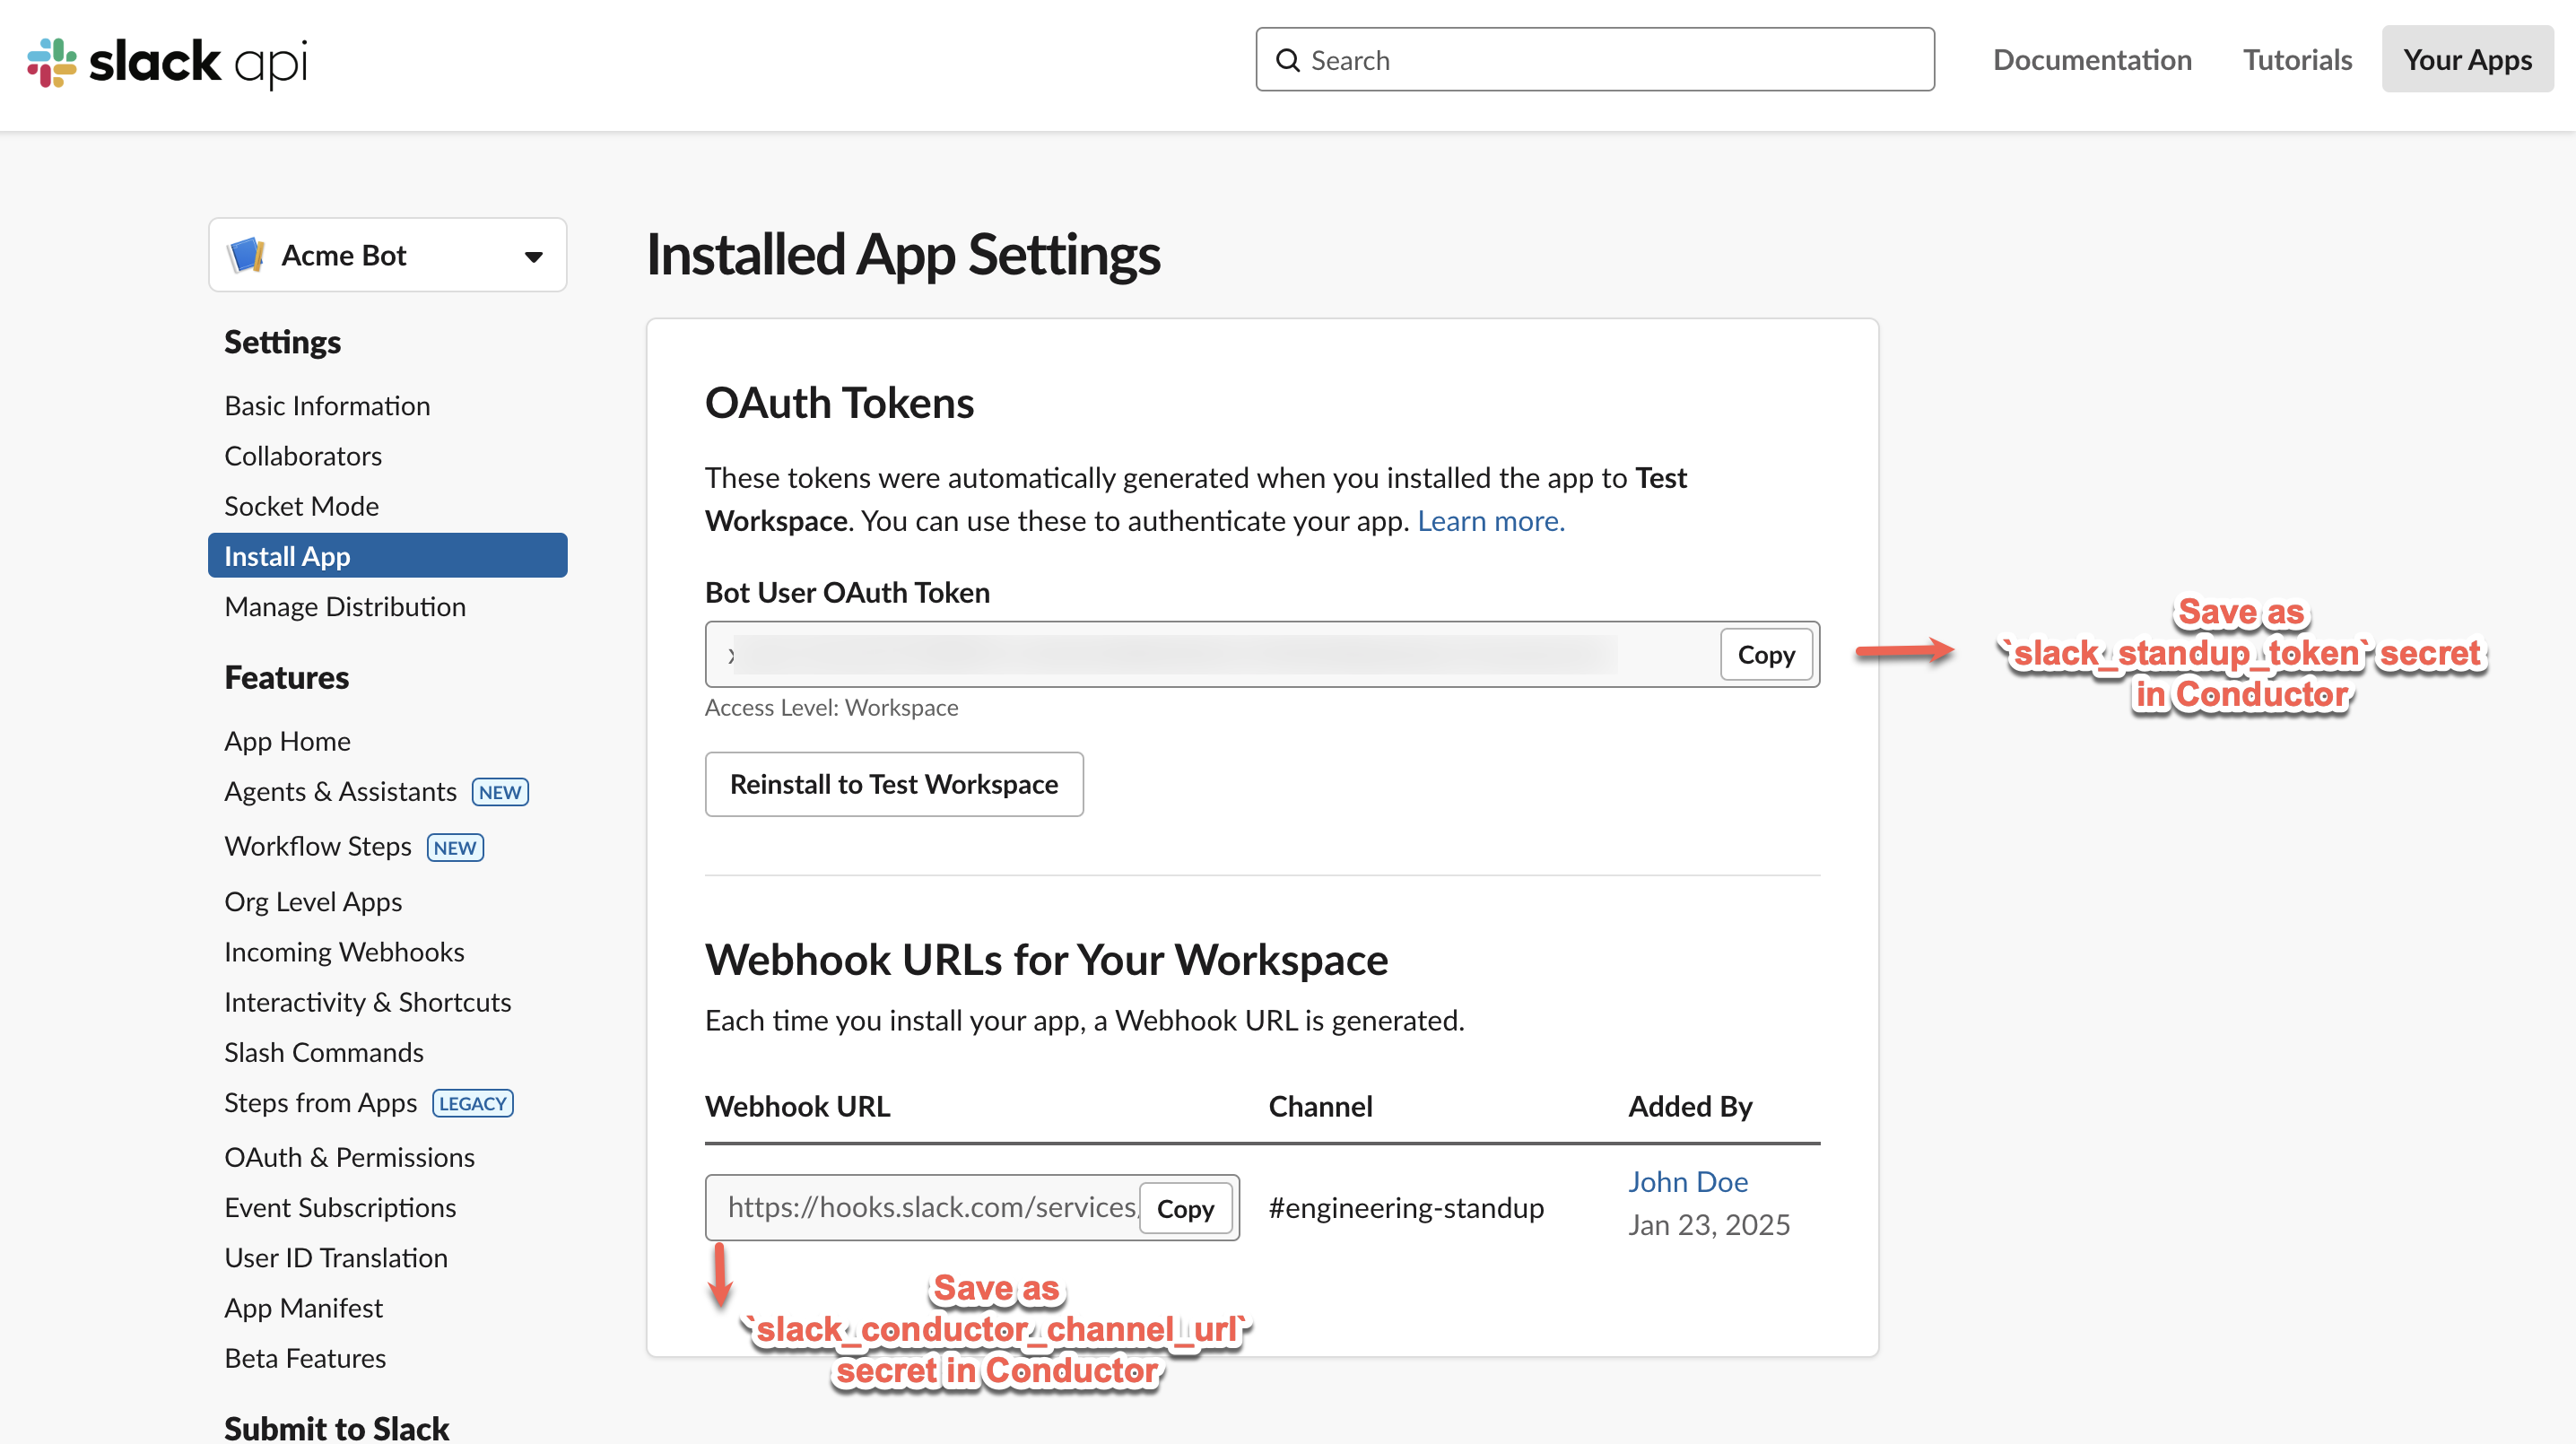
To store the OAuth Token and Webhook URL as secrets in Conductor:
- Go to Definitions > Secrets from the left menu on your Conductor cluster.
- Select + Add secret and add the following:
- Enter Secret name as slack_standup_token.
- In Secret value, enter the Bot User OAuth token generated in the previous step.
- Select Add to save the secret.
Repeat the process to create another secret, where:
- Secret name is slack_conductor_channel_url.
- Secret value is the Webhook URL generated in Slack API.
The workflow is configured to use specific secret names, so the secrets must be stored with those exact names.
Step 4: Modify workflow
Make the following changes to the workflow using your employee’s Slack details:
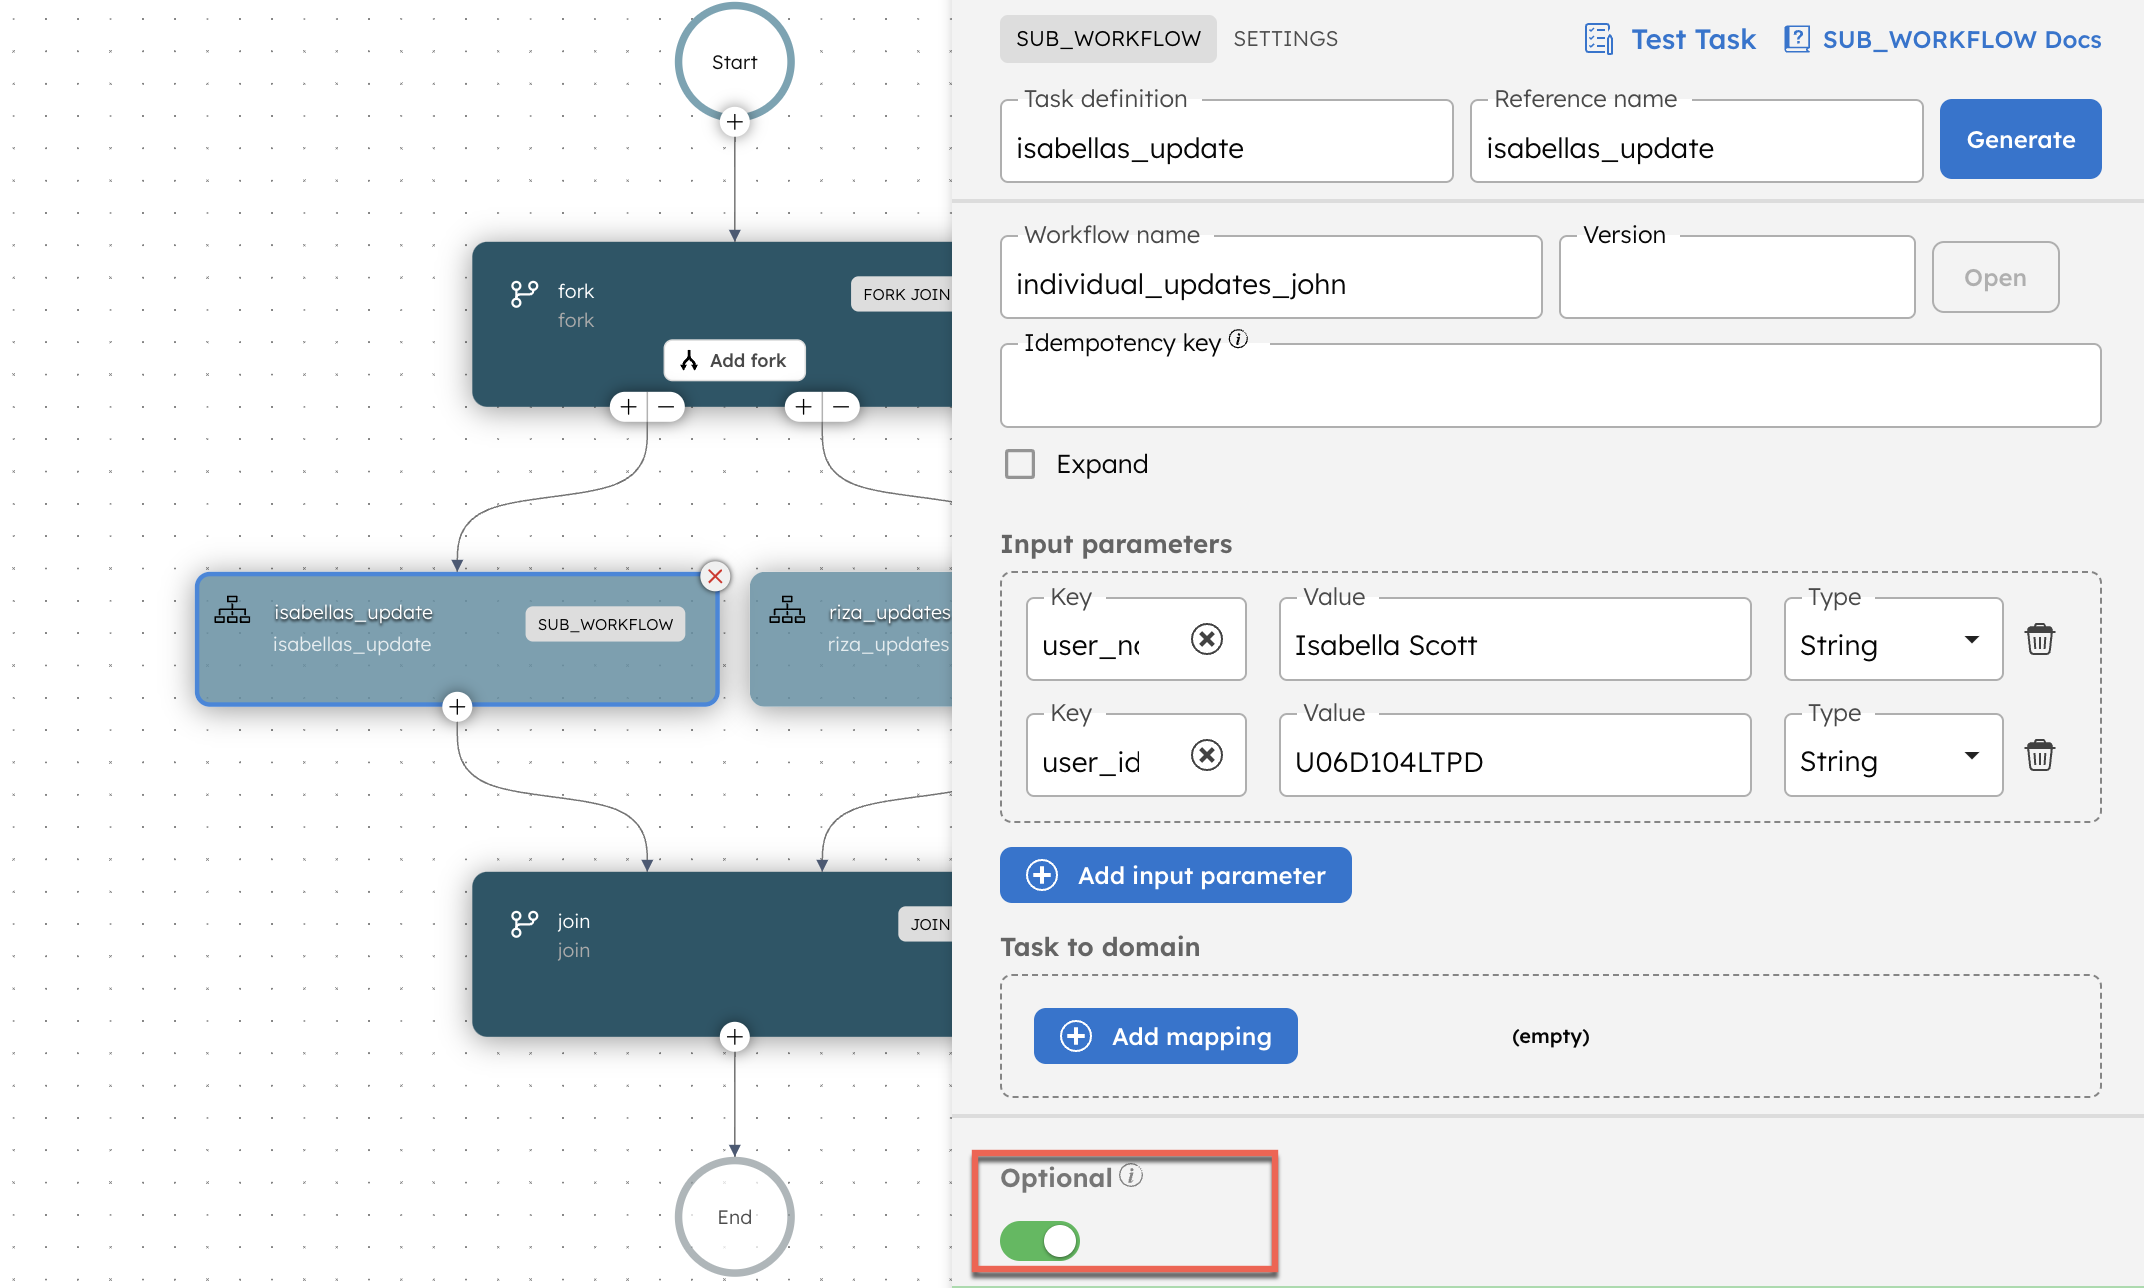
In the standup_updates_main workflow, replace user_name and user_id in the sub-workflow tasks with the respective employee details.
- user_name–The employee’s name.
- user_id–The member ID from Slack.
To get the Member ID: Go to Slack workspace > Select the user profile > View the profile > Click on three dots > Copy member ID.
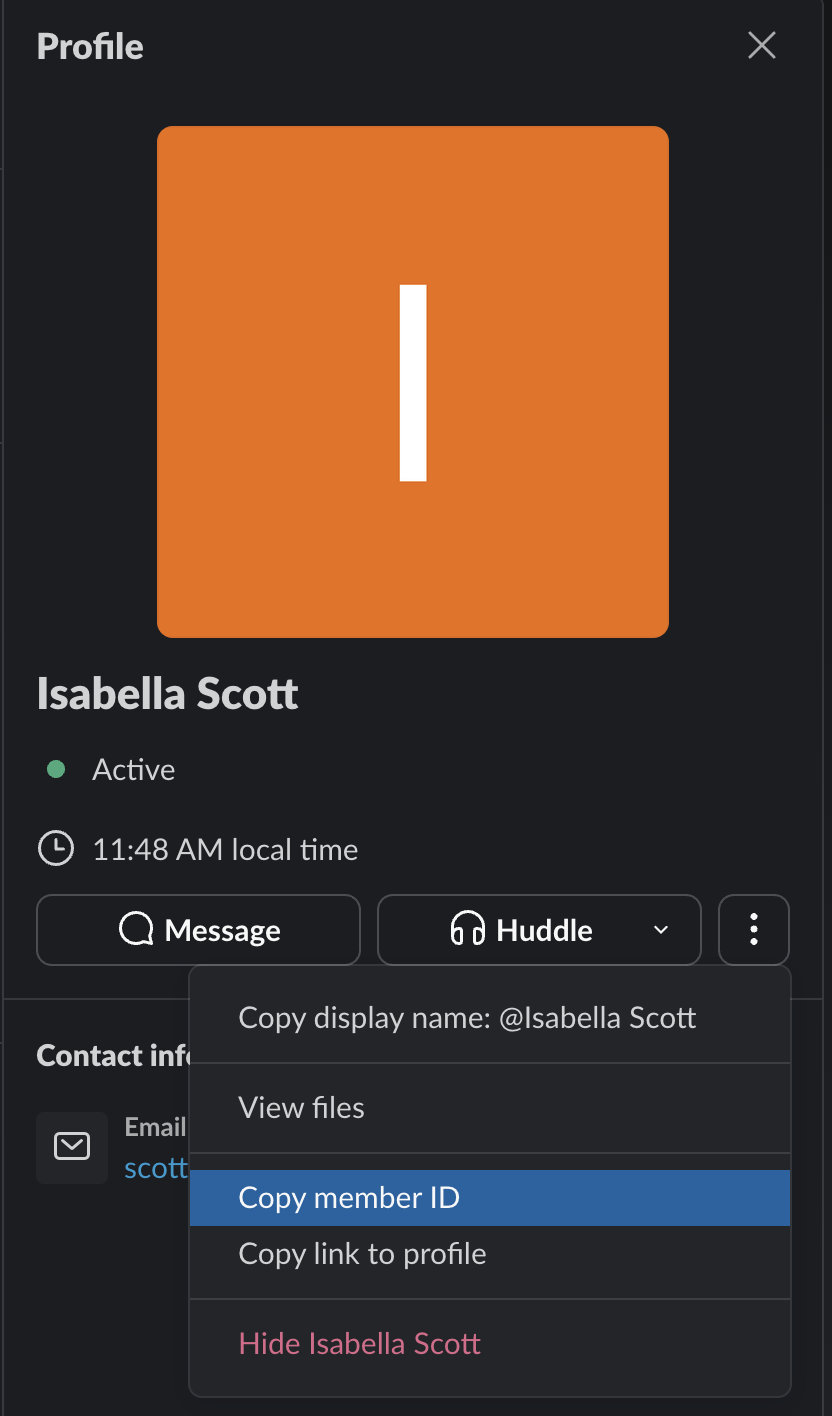
To modify the workflow with these details:
- Go to standup_updates_main workflow, and update both the Sub Workflow tasks with the user details.
- Select Save > Confirm.
Step 5: Run workflow
Run workflow using Conductor UI
To test the workflow, let’s run it from the Conductor UI. From your workflow definition, select Execute.
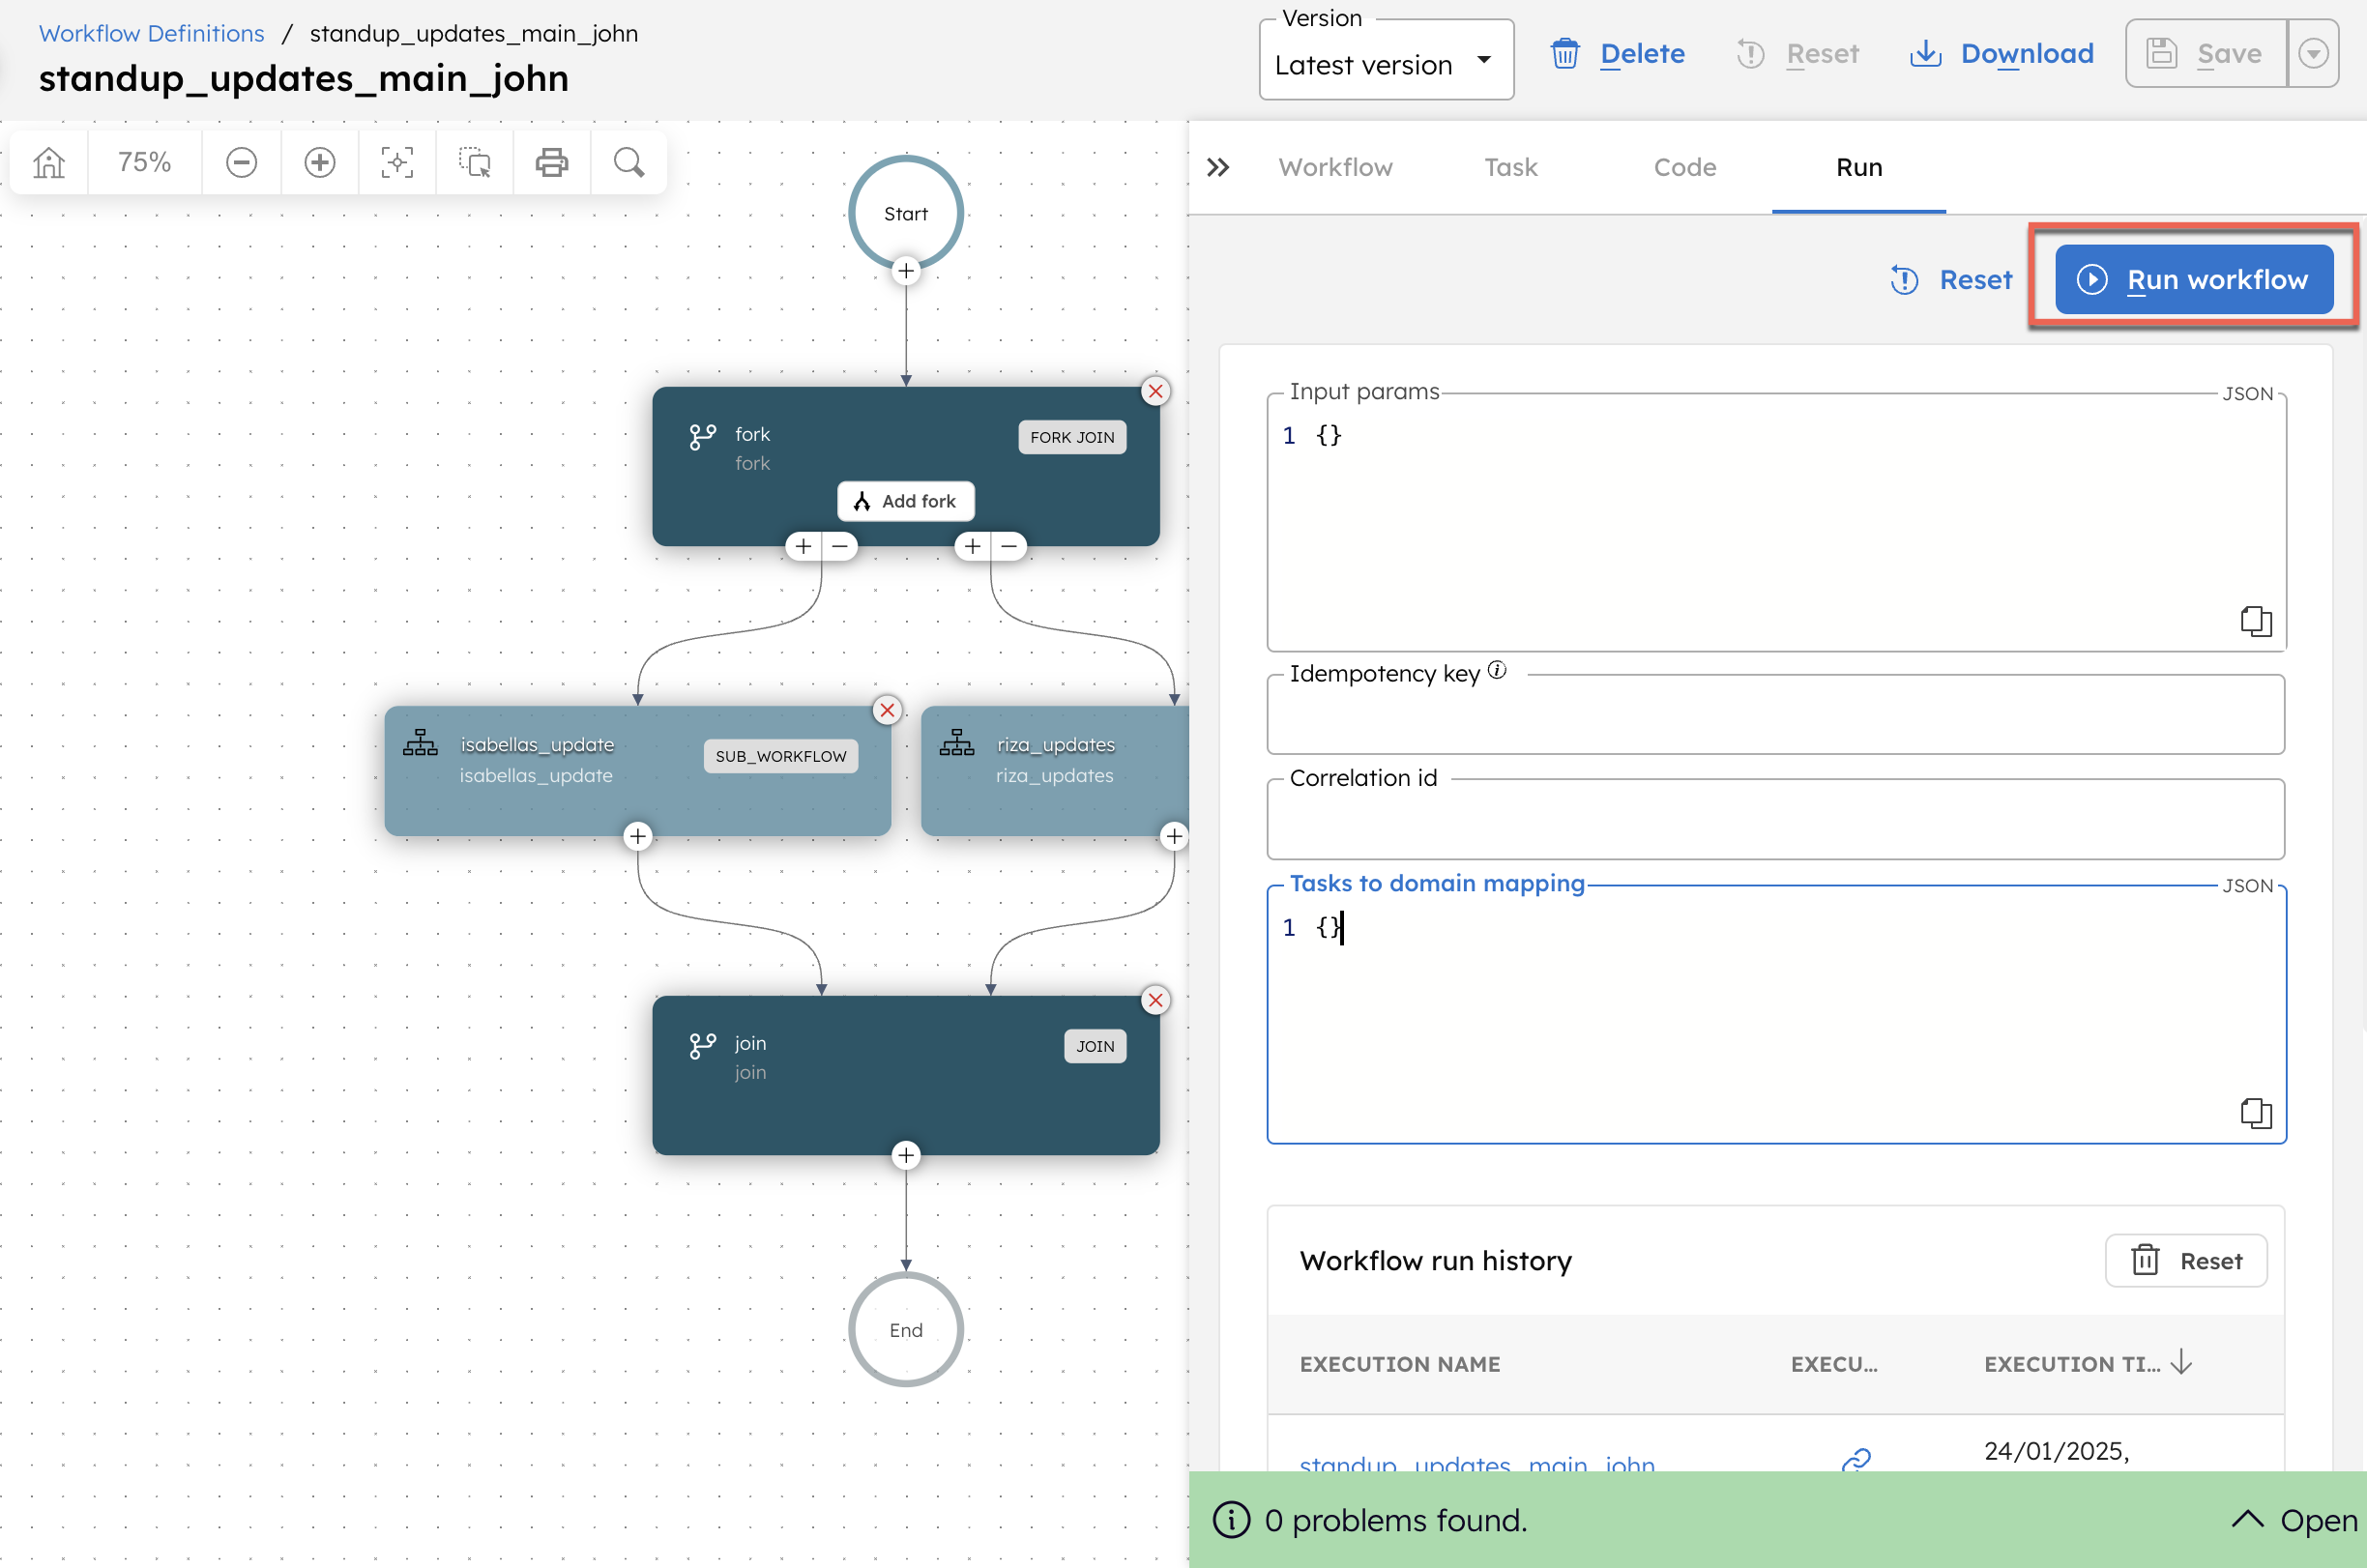
When the workflow is triggered, the bot requests updates from users.
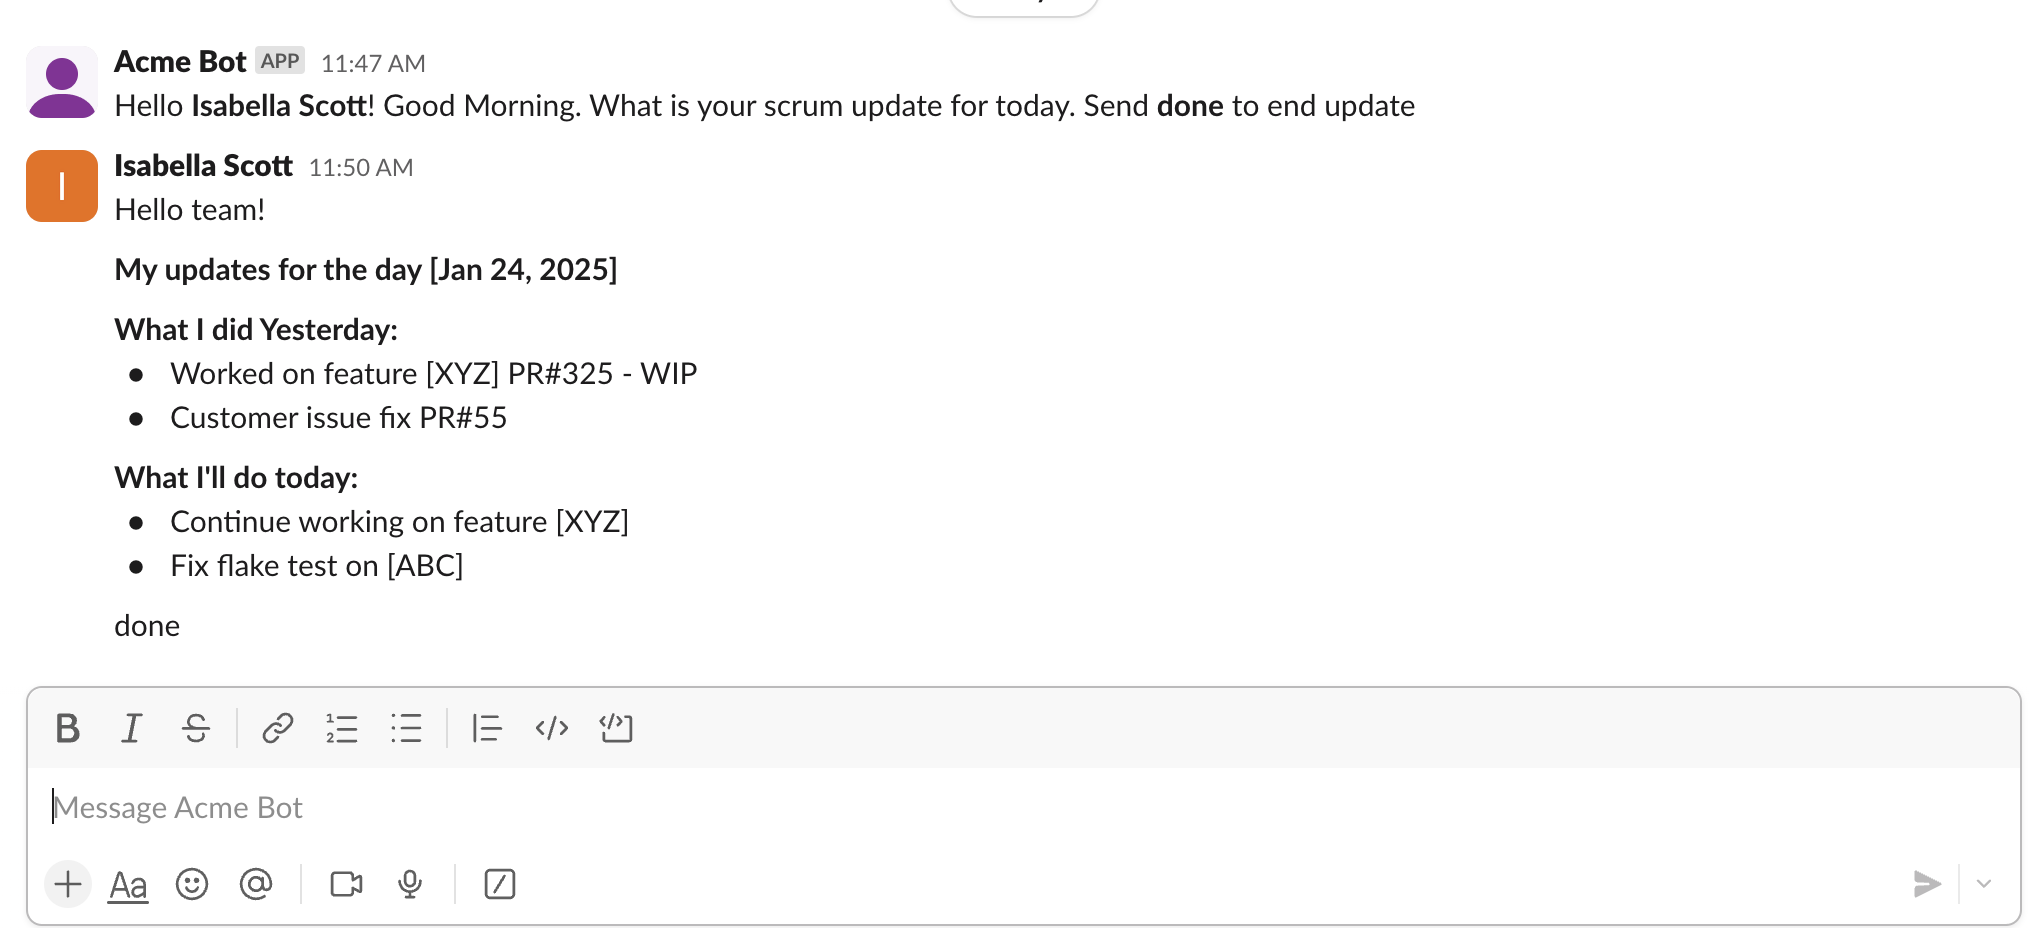
After submitting their updates, users must send a separate “done” message. The bot collects these messages and posts them to the specified channel.
Returning to the workflow execution, you can see that the particular user's branch is completed while the workflow waits for updates from the remaining users. Once all users post their updates, the workflow gets completed.

Scheduling workflow to run at standup time
For now, we have manually run the workflow. However, we must automate this in a production environment to run at the standup time.
The Scheduler allows you to set a predefined cadence for running a workflow. Once the schedule is configured, Conductor will automatically invoke the workflow at the specified intervals, such as 9 AM PT on weekdays.
To schedule workflows:
- Go to Definitions > Scheduler from the left navigation menu on your Conductor cluster.
- Select + Define Schedule.
- Provide a schedule name, select the workflow name and version, and set the schedule using the cron expression.
- Select Save > Confirm.
Refer to Scheduling Workflows documentation for more details.
Example Modifications
If an employee is out of office, the workflow will not complete unless configured otherwise. To handle such cases, in the main workflow, you can mark each fork as optional, ensuring the bot does not wait indefinitely for updates when someone is unavailable.
The bot’s waiting period for updates can be configured by setting a timeout for the individual_updates workflow. For example, to allow a 3-hour window from the scheduled time, set the workflow timeout seconds to 10800 seconds, and the timeout policy to Timeout Workflow.
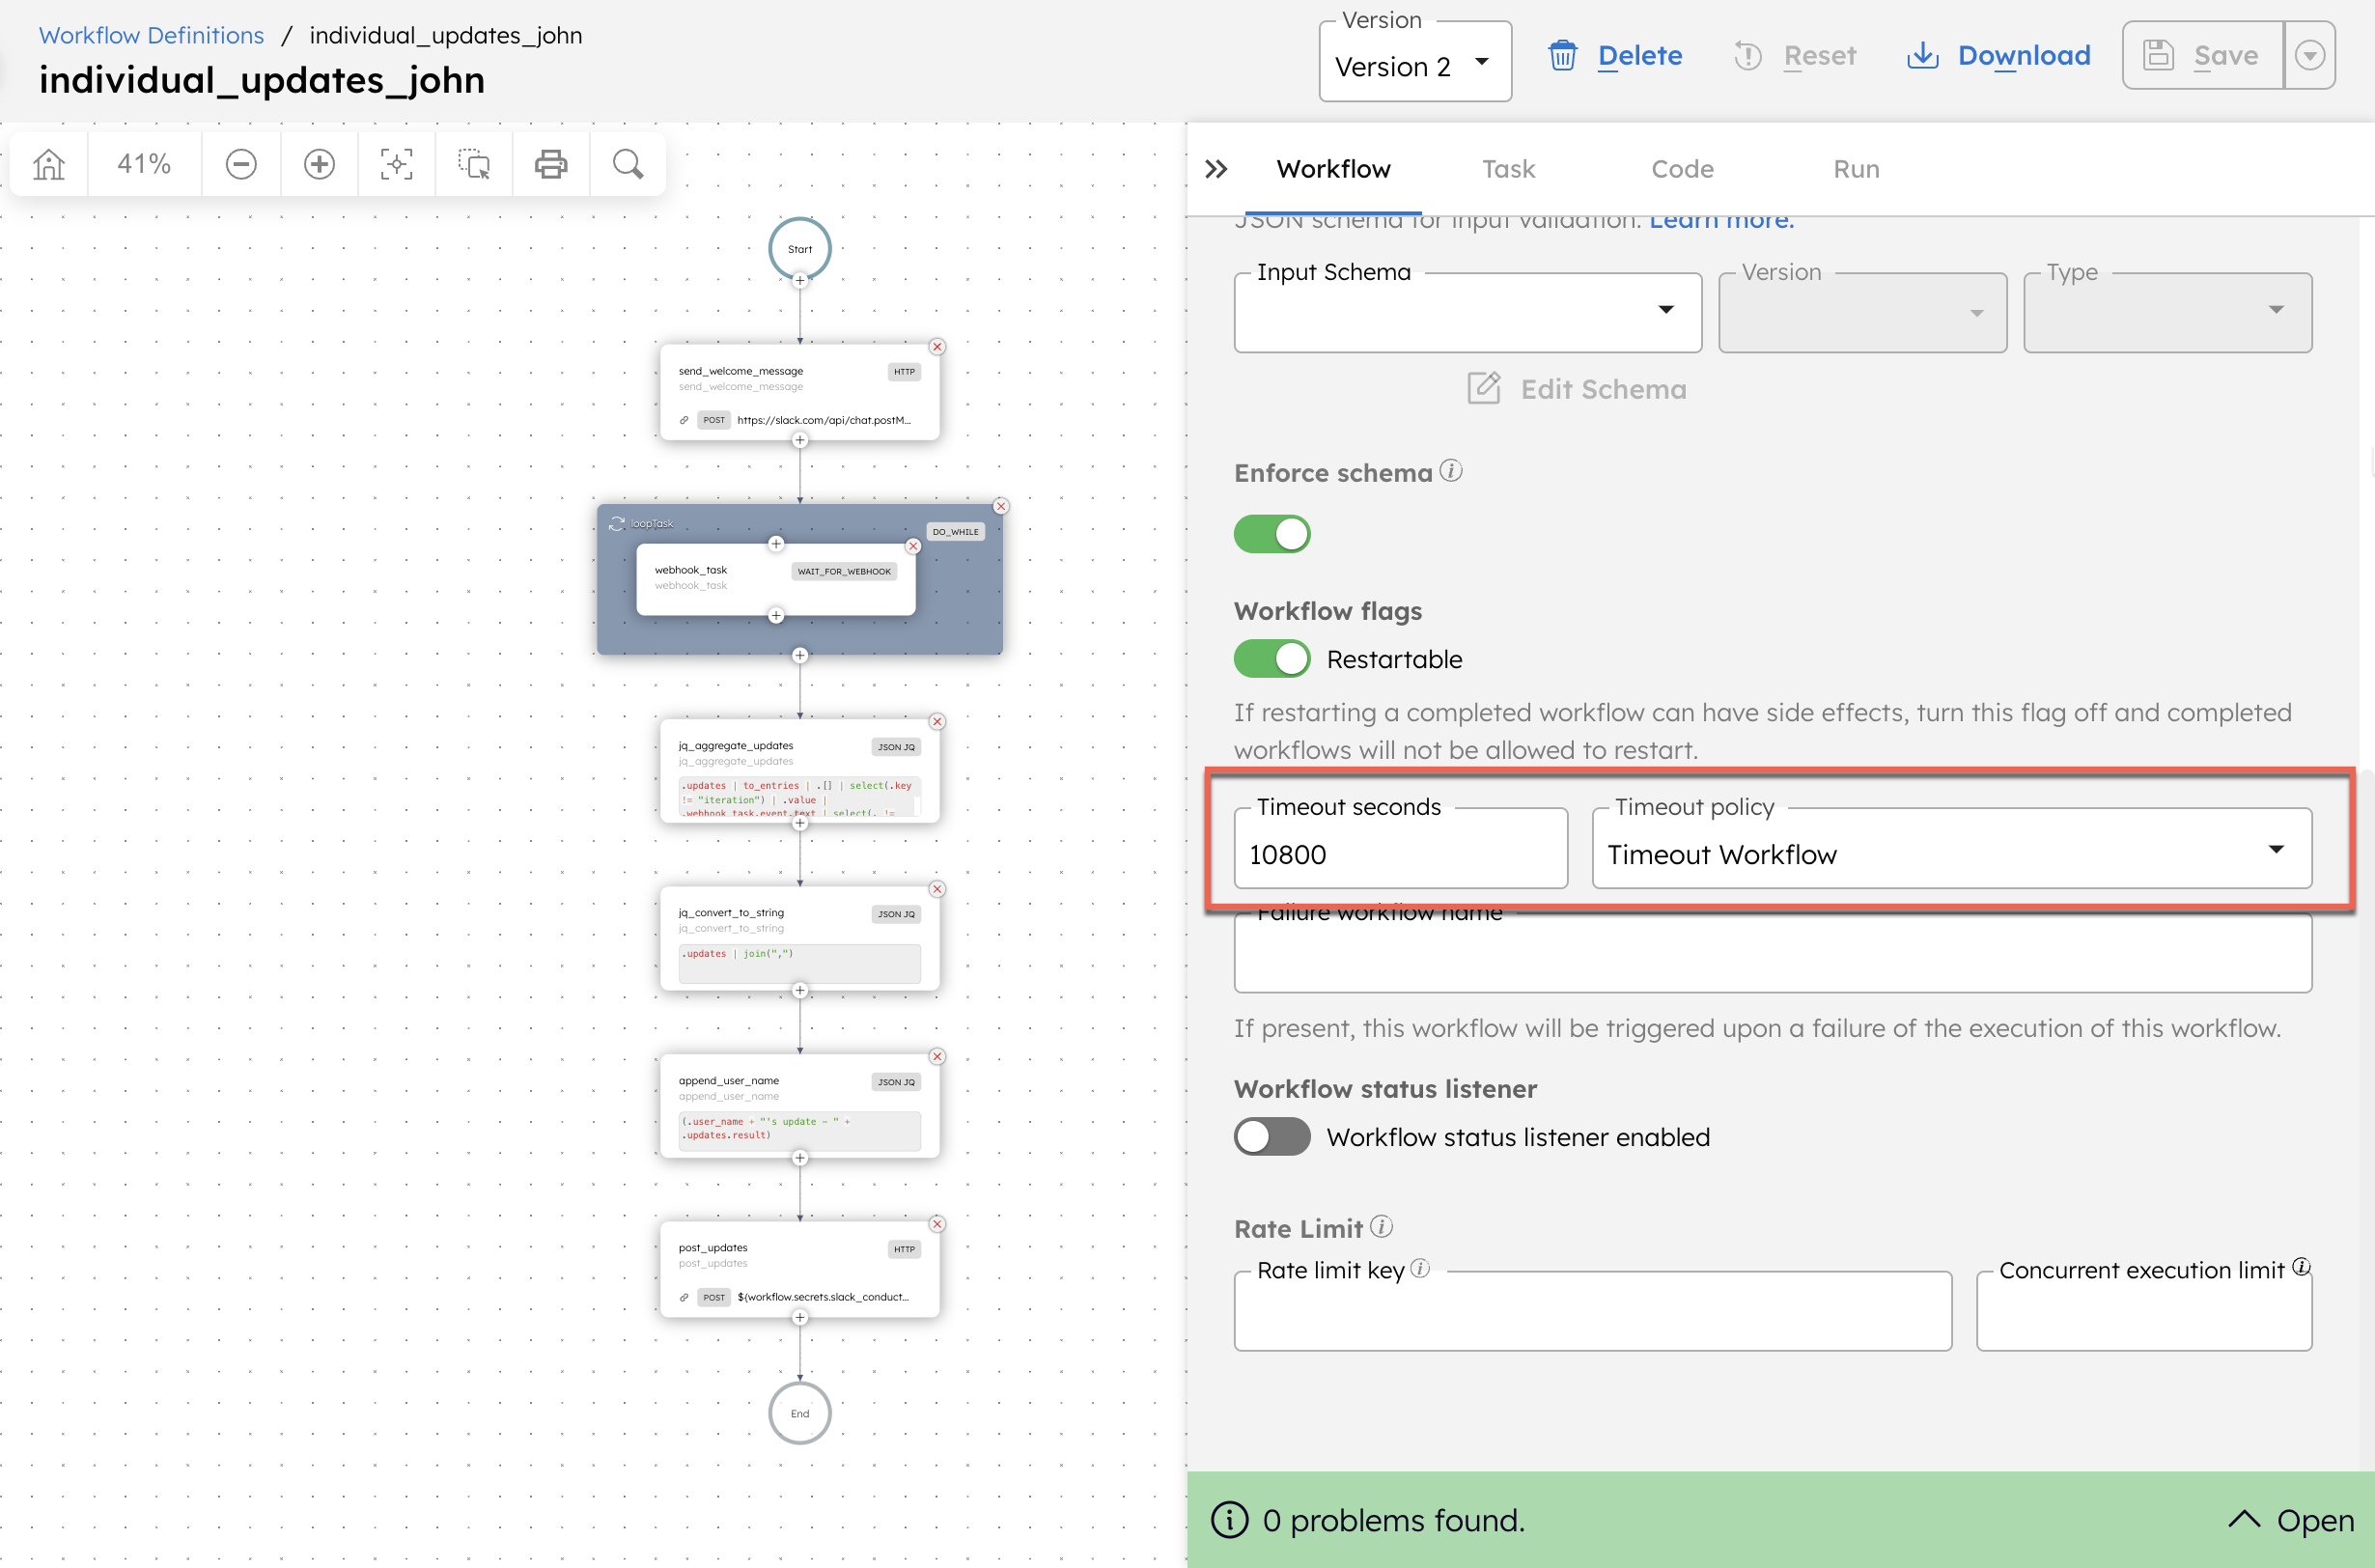
This ensures the bot operates for 3 hours from the runtime, with the forks marked as optional. Whenever a user responds within these 3 hours, the updates will be collected and posted to the specified channel.