Claims Workflow
This template is available only in the Developer Edition on Launch Pad.
This claims workflow template automates insurance claims processing by determining coverage eligibility based on the claimant’s input. The workflow includes tasks that process customer information, validate policies, estimate damage costs, and assign human review for claims assessment and investigation.
This template provides a quick start for building business process automation workflows that incorporate human inputs, reviews, or approvals.
Conductor features used
This template utilizes the following Conductor features:
How to use the template
- Import the template from Launch Pad.
- Set up workers for policy retrieval and claims creation.
- Run workflow.
Step 1: Import the template
The claims workflow template is available only in the Developer Edition on Launch Pad.
To import the template:
- Go to Developer Edition > Launch Pad on the left navigation menu.
- In Pre-built Workflow Templates, select Claims Workflow, and then choose Use Template.
- Select Import.
- Log in to view the imported workflow.
The insurance_claim workflow is now imported and ready to use.
Understand the workflow logic
This section explains the workflow logic and execution flow.
Workflow inputs:
firstName: The claimant’s first name.lastName: The claimant’s last name.
Example input payload:
{
  "firstName": "John",
  "lastName": "Doe"
}
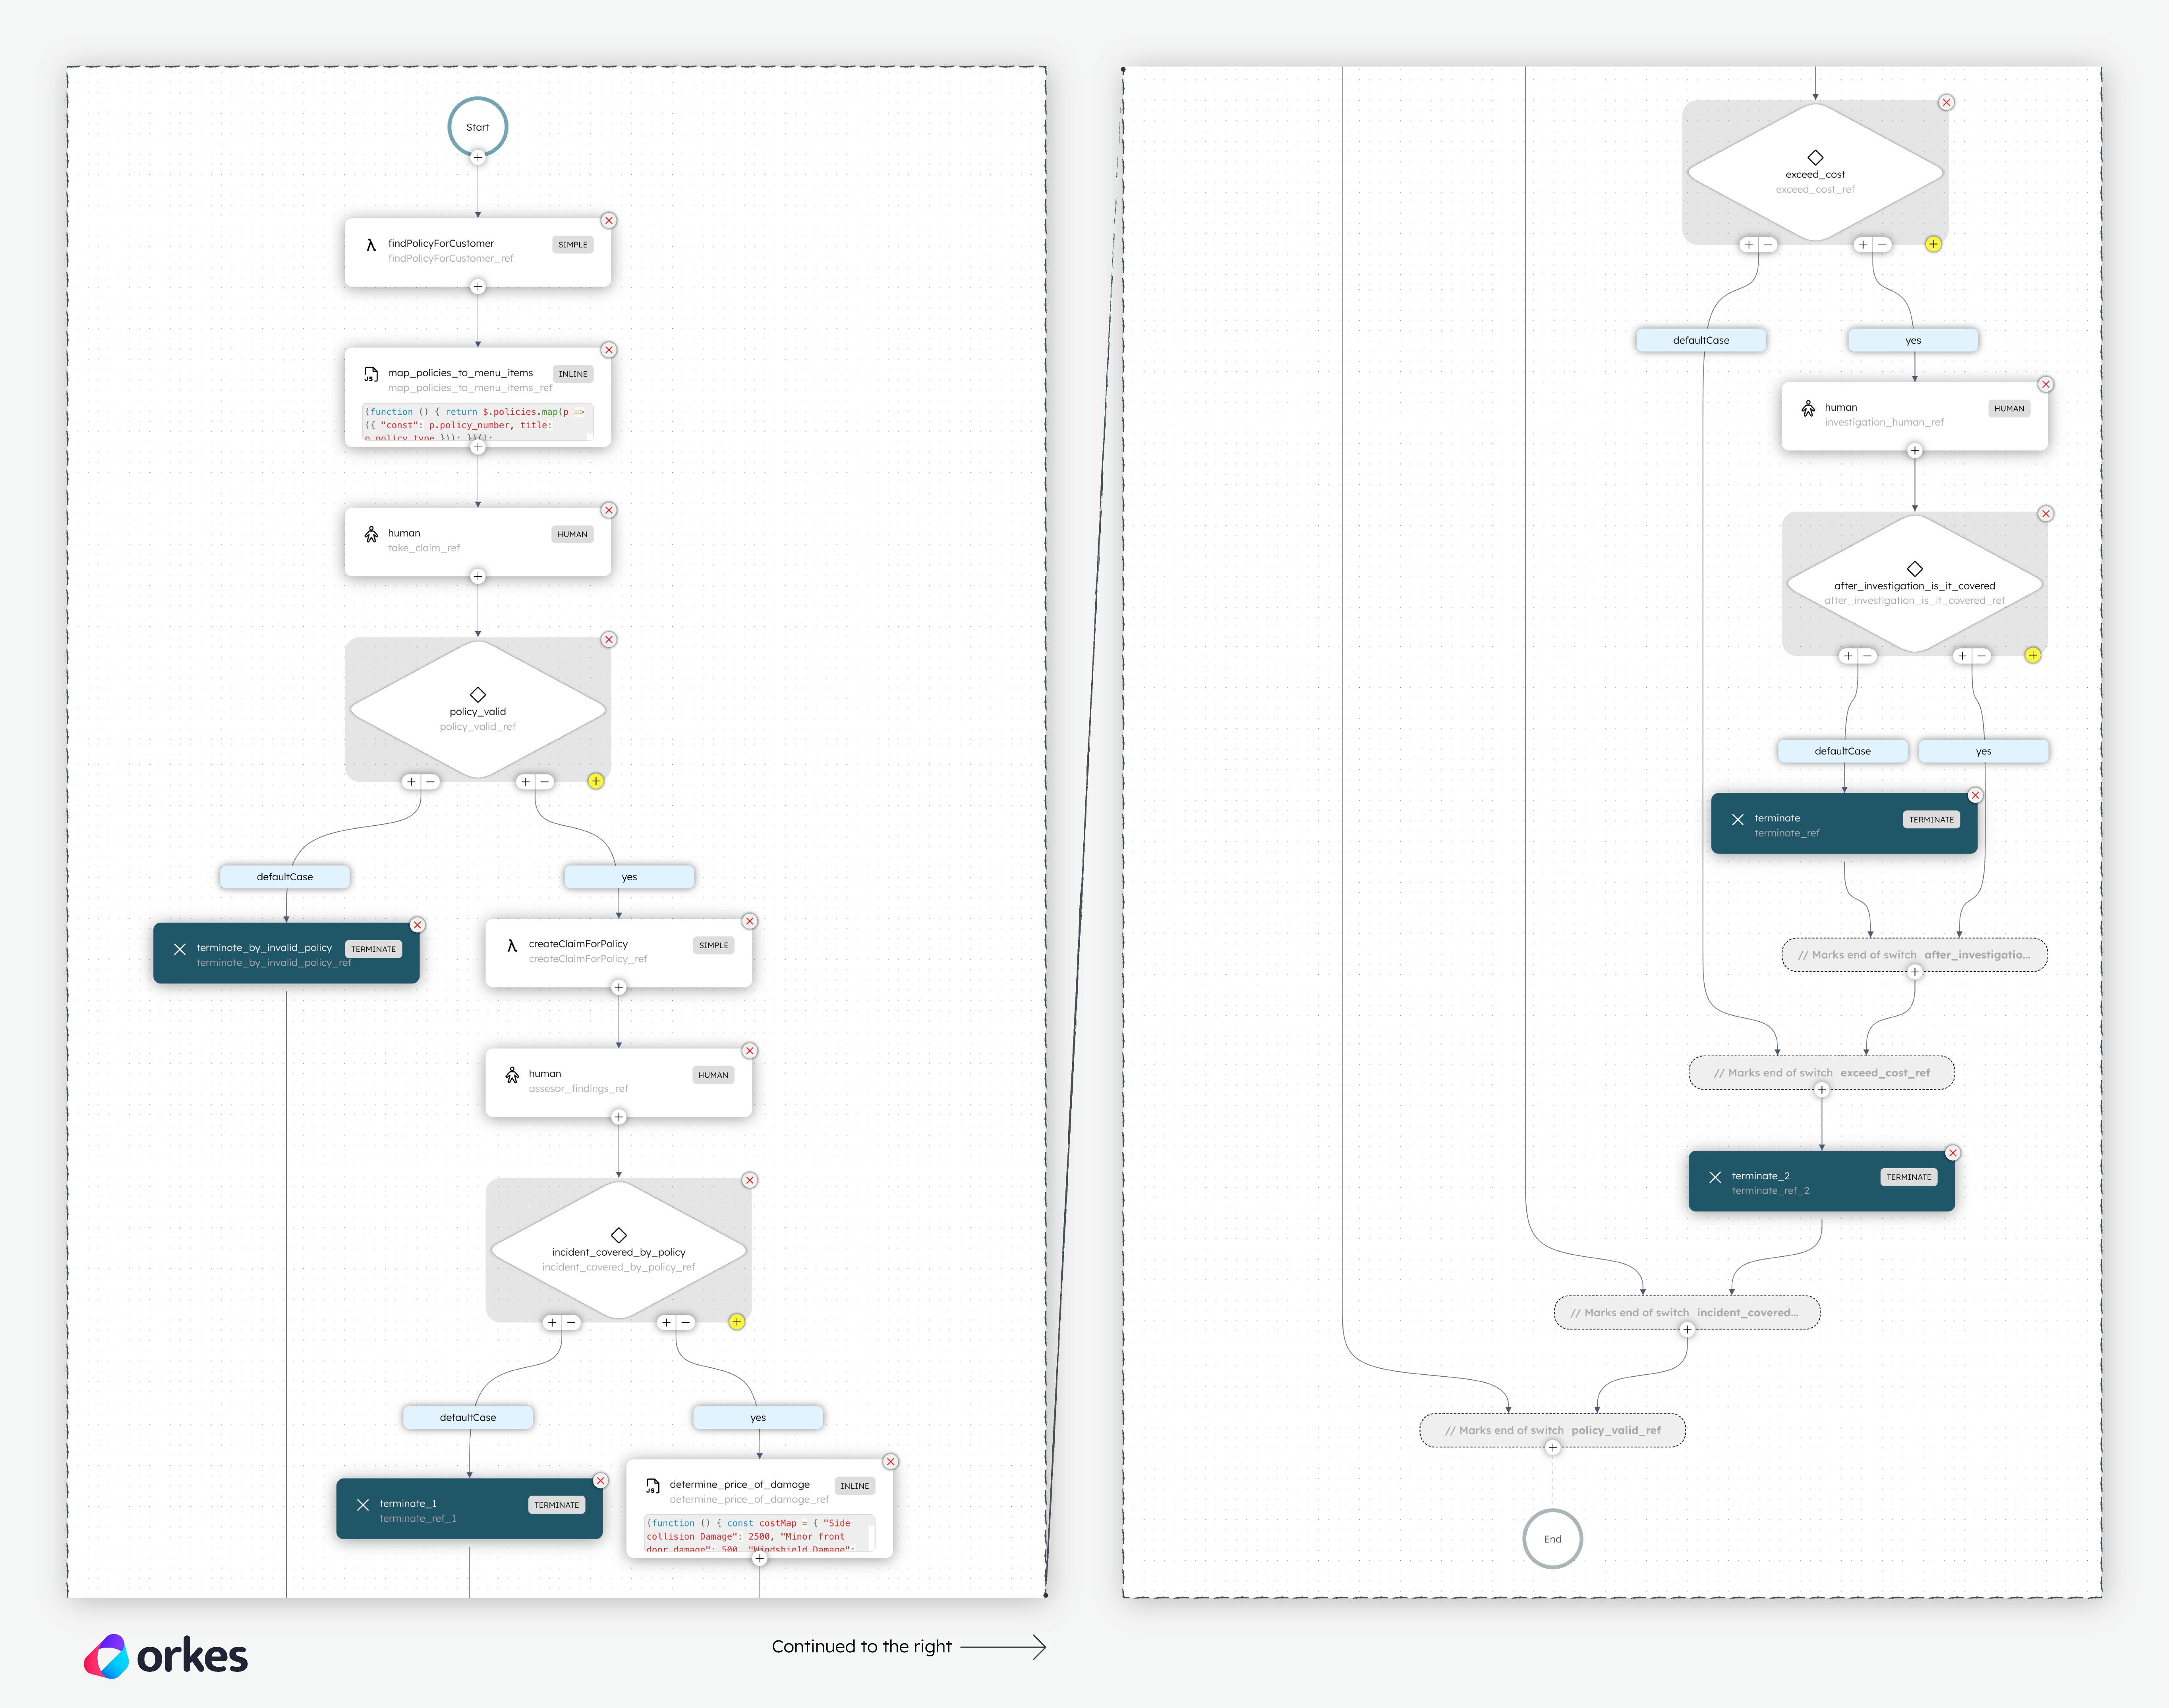
Workflow logic:
- The workflow begins with a Worker task that retrieves the claimant’s insurance policies.
- Next, the Inline task extracts the claimant’s policy types (Home, Auto, etc.) as options for the claimant to choose in the next Human task.
- The first Human task is intended for the claimant, who must fill out the claim details, including the incident location, the policy type under which the claim is being made, and a description of the incident.
- The workflow continues to a Switch task that evaluates whether the selected policy type is Auto.
- If the policy type is anything other than Auto, the Terminate task ends the workflow with the reason “Terminated because of invalid policy”.
- If the policy type is Auto, the workflow proceeds to another Worker task that creates a claim for the claimant, containing details like the claim number, description, customer ID, and so on.
- Next, the second Human task is intended for the insurance assessor, who reviews the claimant’s coverage eligibility based on the provided claim details.
- The Switch task then routes the workflow based on the coverage outcome in the previous task, such as Not Covered, Partially Covered, or Full Coverage.
- If the outcome is Not Covered, the Terminate task ends the workflow with the reason “Policy does not cover incident”.
- If there is at least partial coverage, the workflow continues to an Inline task that estimates the total damages based on predefined costs.
- The Switch task then evaluates if the damages exceed the total coverage amount.
- If the damages are within the limits, the workflow terminates with the reason “Send Payment to client”.
- If the damages exceed the coverage amount, the workflow proceeds to another Human task, which the claimant must complete with additional incident details for further investigation.
- Finally, another Switch task routes the workflow based on the investigation outcome.
- If the damages are not covered upon further investigation, the workflow terminates with the reason “Terminated after investigation. Incident not covered”.
- If the damages are covered upon further investigation, the workflow terminates with the reason “Send Payment to client”.
This template is simplified to support Auto policies only. To support additional policy types such as Home or Life, add corresponding cases to the Switch task that evaluates the policy type.
Step 2: Set up custom workers
- Node.js version 18 or higher
The workflow contains tasks for retrieving a policy based on the customer’s details and for creating a claim. The final .pdf report is created using a custom Worker task that generates a file from raw report content and a supplied file name.
To utilize these tasks, you must set up workers locally and connect them to the Conductor server using access credentials.
To retrieve the access credentials:
- Go to Definitions > Workflow and select the
insurance_claimworkflow. - In the Workflow tab on the right-hand panel, select Get Access Keys.
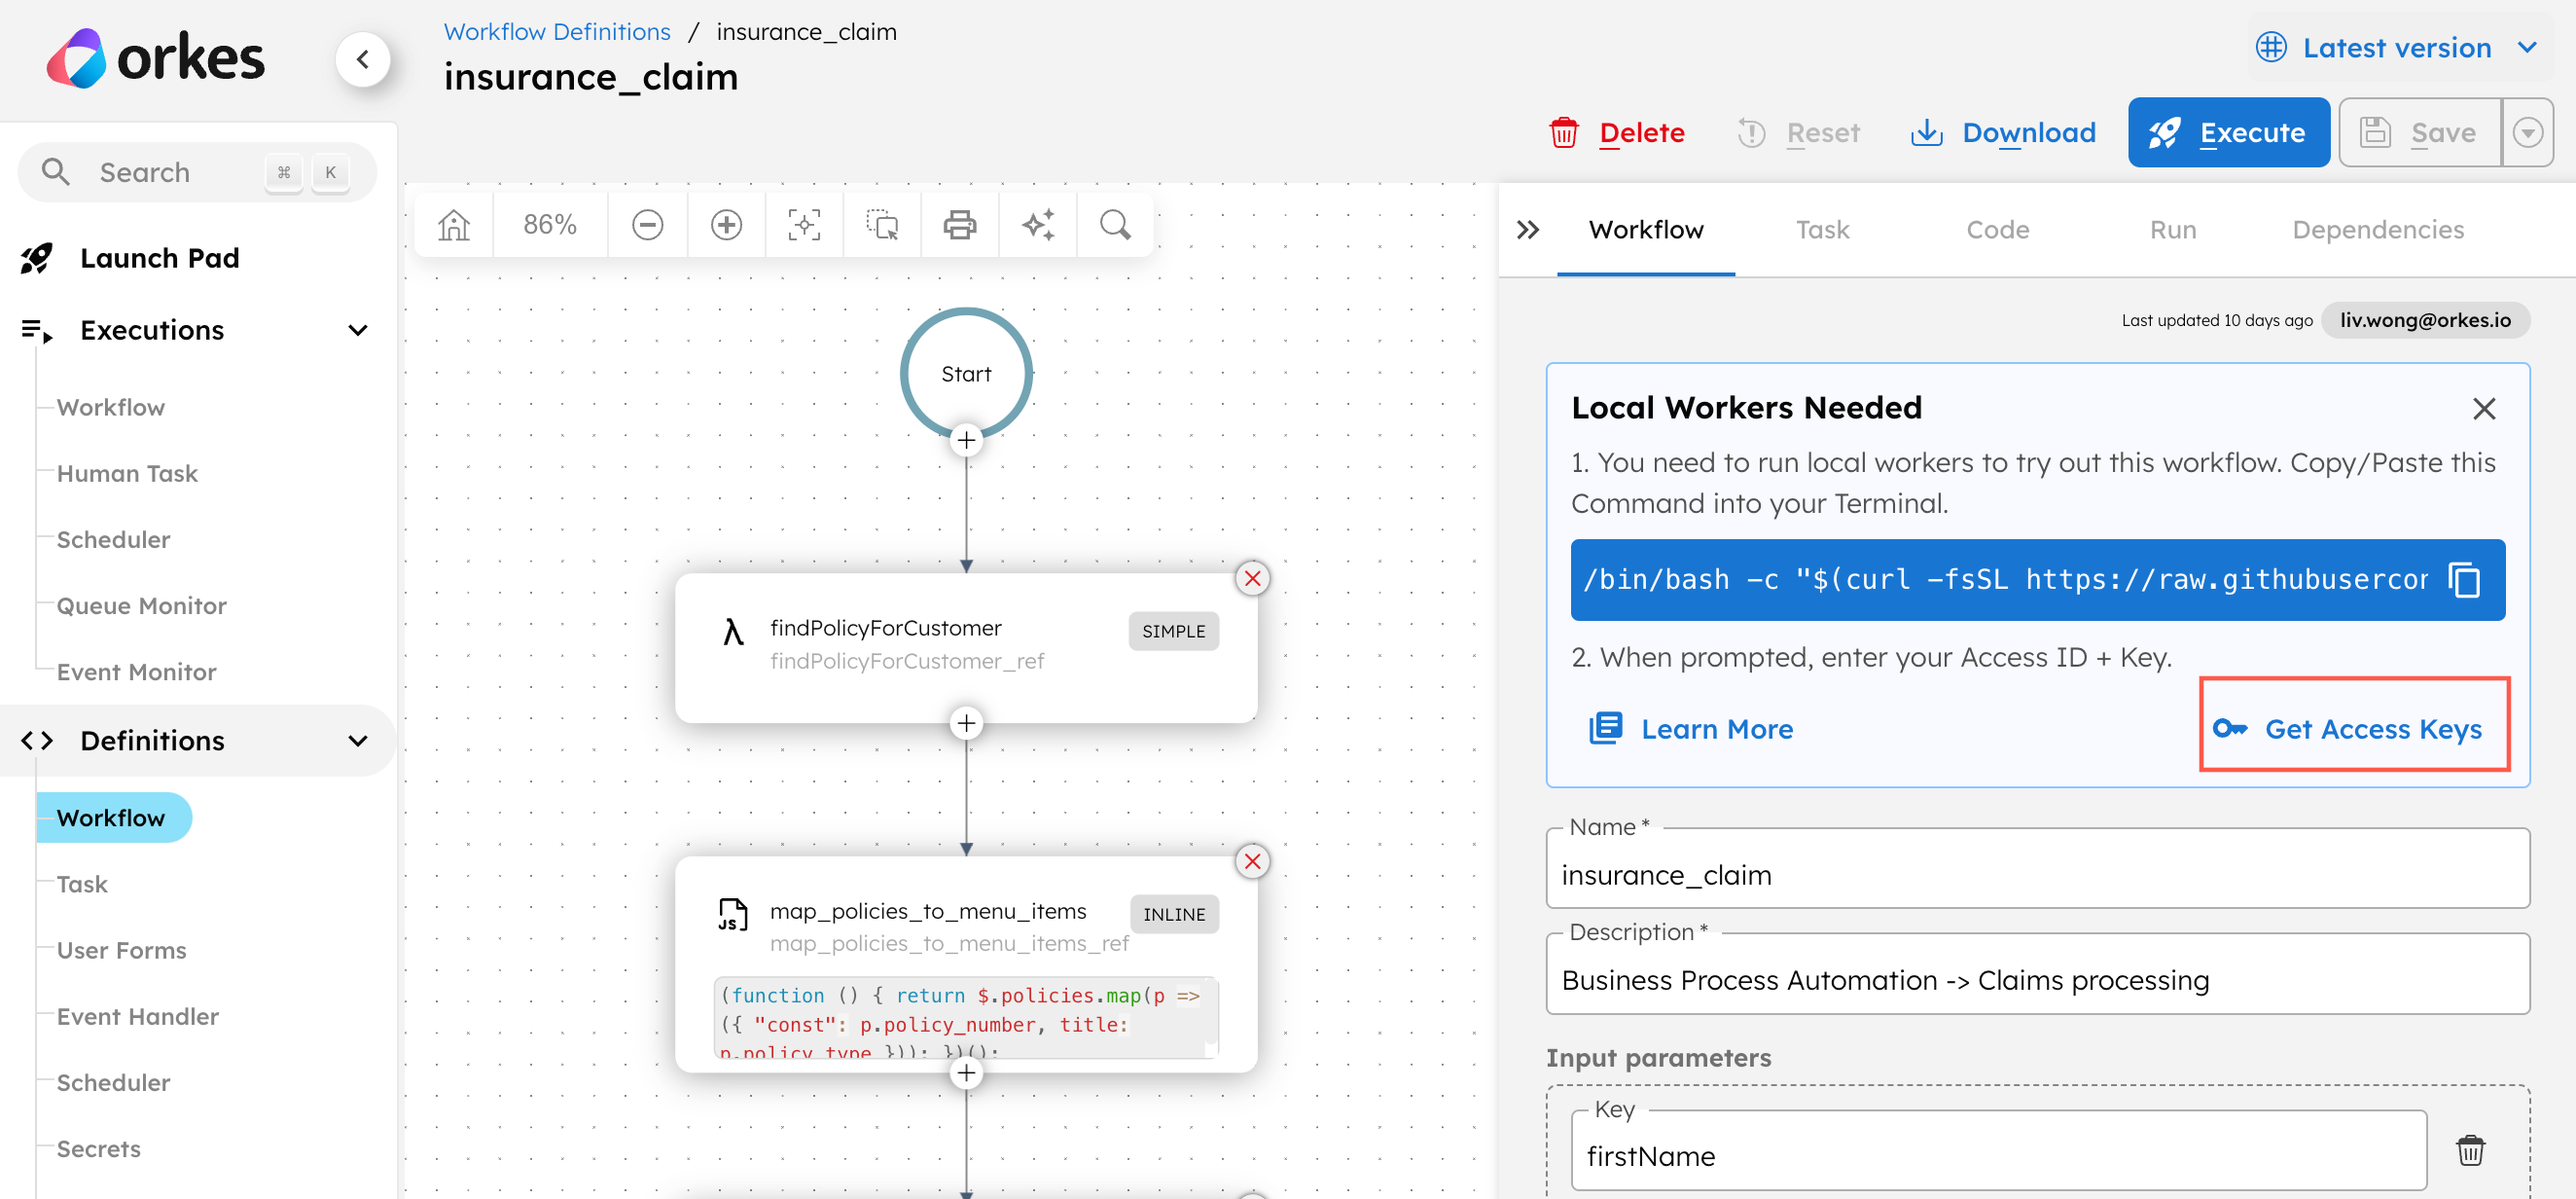
- Copy the key ID, secret, and server URL and store them securely.
To set up the workers:
- Copy the following command into your terminal:
/bin/bash -c "$(curl -fsSL https://raw.githubusercontent.com/conductor-oss/awesome-conductor-apps/refs/heads/main/typescript/claims-workflow/workers/install.sh)"
- Enter the access key ID, secret, and server URL into the terminal when prompted.
This initiates and runs the worker.
Step 3: Run the workflow
With the workflow fully set up, run it.
Refer to the test data for the workflow in the GitHub README.
To run the workflow:
- From the ``insurance_claim` workflow definition, go to the Run tab.
- Enter the Input Params.
Example:
{
  "firstName": "John",
  "lastName": "Doe"
}
- Select Execute.
Complete the Human tasks
To complete the workflow fully, try completing the Human tasks as the workflow progresses. The inputs to these Human tasks will affect the trajectory of the workflow, as shown in the workflow logic.
For development purposes, you can complete the Human tasks from the Conductor UI. In production, you can switch the Human tasks to be displayed on your own UI, such as a claims portal or an internal business site, for the relevant users to complete. Learn more.
To complete the Human tasks in the UI:
- Go to Executions > Human Task from the left menu on your Conductor cluster.
- Select the Task ID of a task to view the form.
- Select Claim and enter the necessary inputs for each form field.
- Once completed, select Complete to submit the form.
Workflow output
The claims workflow can terminate at different points based on claim eligibility:
- If the policy type is not Auto, the workflow will terminate with the reason “Terminated because of invalid policy”, without proceeding to file a claim.
- If the insurance assessor determines that the claim is not covered, the workflow will terminate with the reason “Policy does not cover incident”, without any payout.
- If the damages are within the coverage limits, the workflow will terminate with the reason “Send Payment to client”.
- If the damages exceed the limits but the claim is still covered after further investigation, the workflow will also terminate with the reason “Send Payment to client”.
Workflow modifications
This template serves as a starting point for customizing the workflow to meet your specific needs. You can modify the workflow by:
- Routing the Human tasks to specific groups or users by configuring the Human task in the workflow definition.
- Triggering a payment workflow upon successful review of the claim. This can be implemented using a Sub Workflow or Start Workflow task.