SendGrid
The SendGrid task is used to send emails through the SendGrid platform. Use this task in workflows when you need to programmatically deliver emails such as alerts, confirmations, or updates.
The task uses a pre-configured SendGrid integration for authentication and delivery. When the task runs, it connects to the SendGrid API and sends the email based on the task configuration, including the sender and recipient addresses, subject, and message body.
- Integrate SendGrid with Orkes Conductor.
Task parameters
Configure these parameters for the SendGrid task.
| Parameter | Description | Required/ Optional |
|---|---|---|
| inputParameters.from | The sender’s email address. This must be a verified email in SendGrid. Learn more. | Required. |
| inputParameters.to | The recipient’s email address. | Required. |
| inputParameters.subject | The email subject. | Required. |
| inputParameters.contentType | The type of email content. Supported values:
| Required. |
| inputParameters.content | The email body. | Required. |
| inputParameters.sendgridConfiguration | The name of the SendGrid integration that is configured in your Orkes Conductor cluster. | Required. |
The following are generic configuration parameters that can be applied to the task and are not specific to the SendGrid task.
Caching parameters
You can cache the task outputs using the following parameters. Refer to Caching Task Outputs for a full guide.
| Parameter | Description | Required/ Optional |
|---|---|---|
| cacheConfig.ttlInSecond | The time to live in seconds, which is the duration for the output to be cached. | Required if using cacheConfig. |
| cacheConfig.key | The cache key is a unique identifier for the cached output and must be constructed exclusively from the task’s input parameters. It can be a string concatenation that contains the task’s input keys, such as ${uri}-${method} or re_${uri}_${method}. | Required if using cacheConfig. |
Other generic parameters
Here are other parameters for configuring the task behavior.
| Parameter | Description | Required/ Optional |
|---|---|---|
| optional | Whether the task is optional. If set to true, any task failure is ignored, and the workflow continues with the task status updated to COMPLETED_WITH_ERRORS. However, the task must reach a terminal state. If the task remains incomplete, the workflow waits until it reaches a terminal state before proceeding. | Optional. |
Task configuration
This is the task configuration for a SendGrid task.
   {
     "name": "sendgrid",
     "taskReferenceName": "sendgrid_ref",
     "inputParameters": {
       "from": "john.doe@acme.com",
       "to": "jane.doe@acme.com",
       "subject": "Email Subject",
       "contentType": "text/plain",
       "content": "Email Body",
       "sendgridConfiguration": "<INTEGRATION-NAME>"
     },
     "type": "SENDGRID"
   }
Task output
The SendGrid task will return the following parameters.
| Parameter | Description |
|---|---|
| response | A JSON object representing the response, if present. |
| headers | An object containing the metadata about the response. |
| statusCode | The HTTP status code indicating success or failure of the request. |
| body | The response body containing the data returned by the API. |
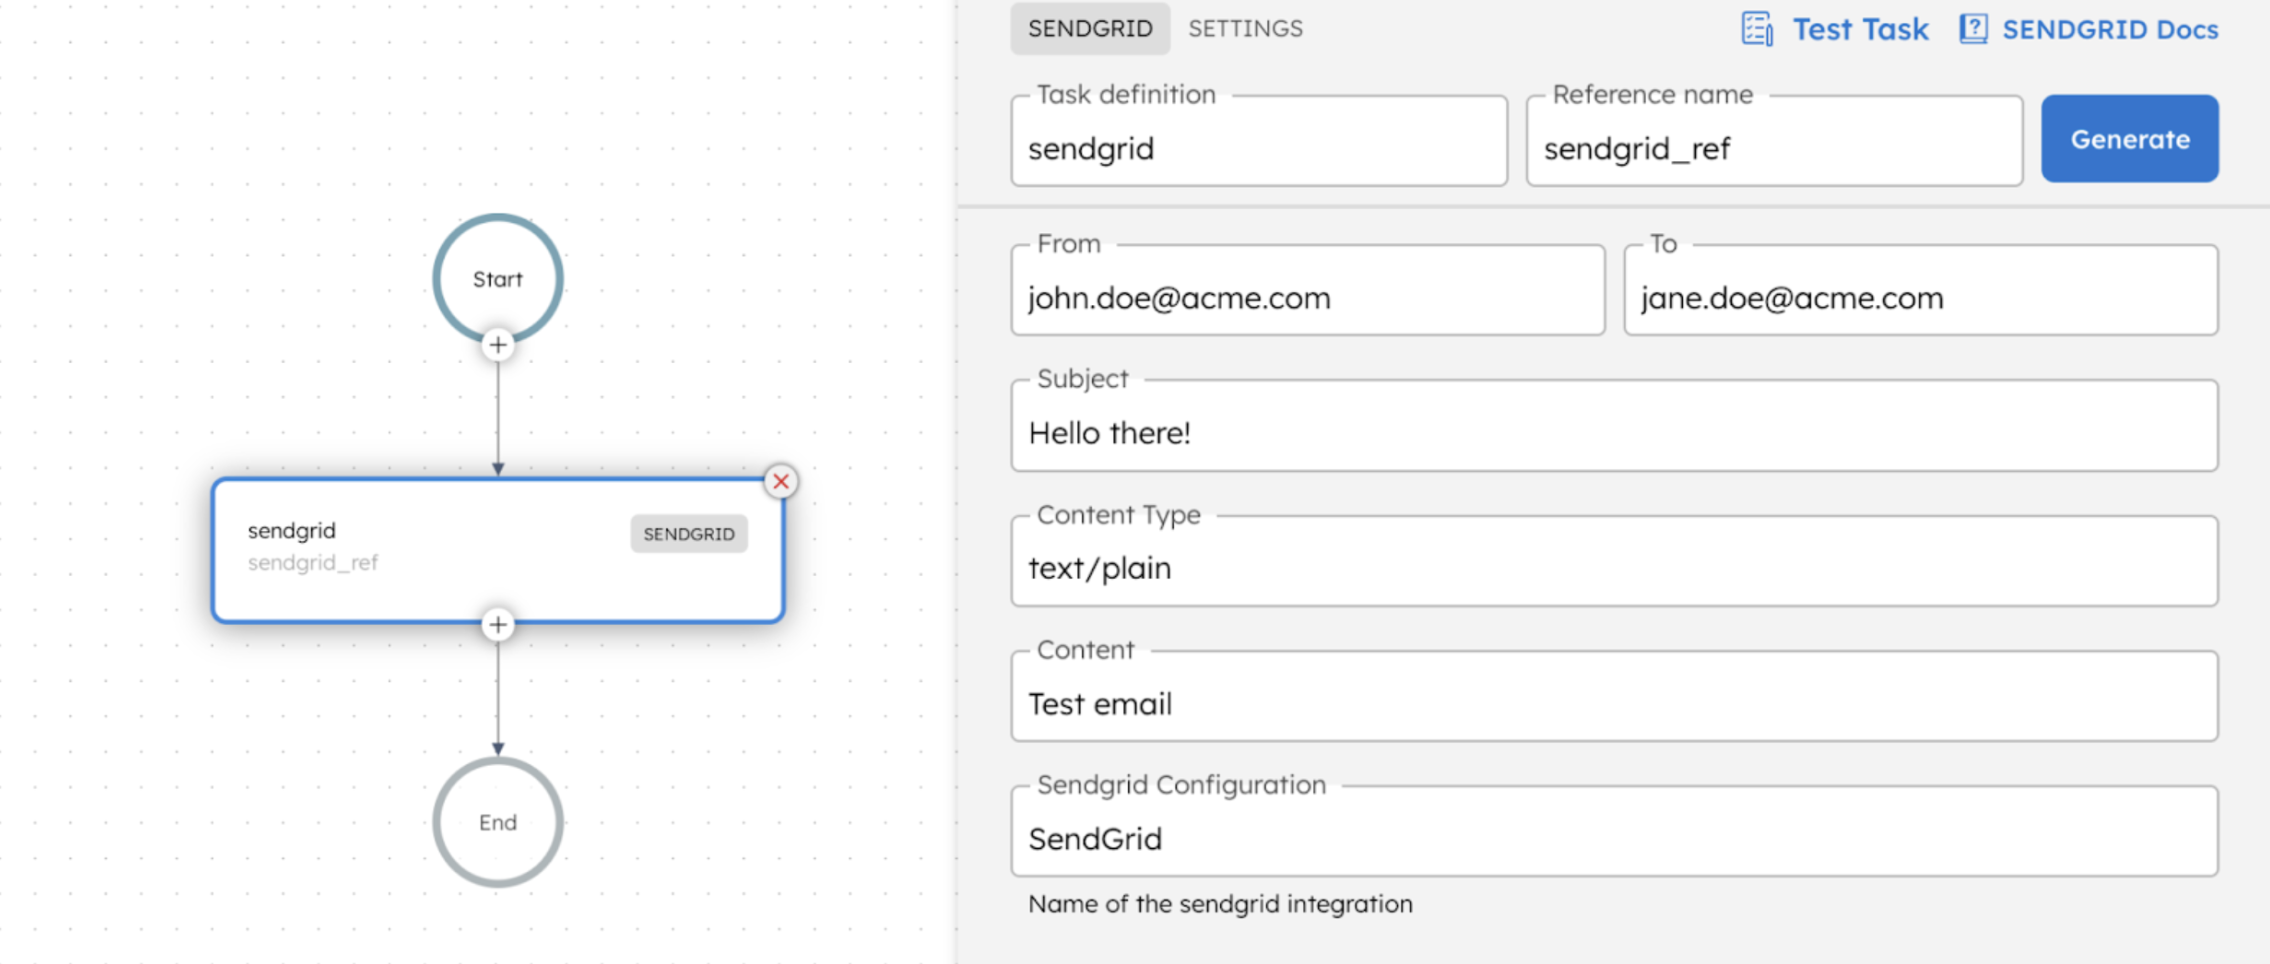
Adding a SendGrid task in UI
To add a SendGrid task:
- In your workflow, select the (+) icon and add a SendGrid task.
- In From, enter the verified SendGrid sender email.
- In To, enter the recipient’s email address.
- In Subject, enter the email subject.
- In Content Type, select the type of email content as text/plain or text/html.
- In Content, enter the email body.
- In SendGrid Configuration, select the SendGrid integration added to the cluster.
Examples
Here are some examples for using the SendGrid task.
Using the SendGrid task in a workflow
Notification workflows are common when end users must be alerted, such as for payments, alerts, or failures.
Consider a scenario where an organization uses SendGrid as its email notification platform. To create a simple email notification flow using Orkes Conductor, first create a SendGrid integration in your Conductor cluster.
Once the integration is created, note its name. For example, let’s use an integration named “SendGrid”.
The following workflow uses this integration to send an email notification.
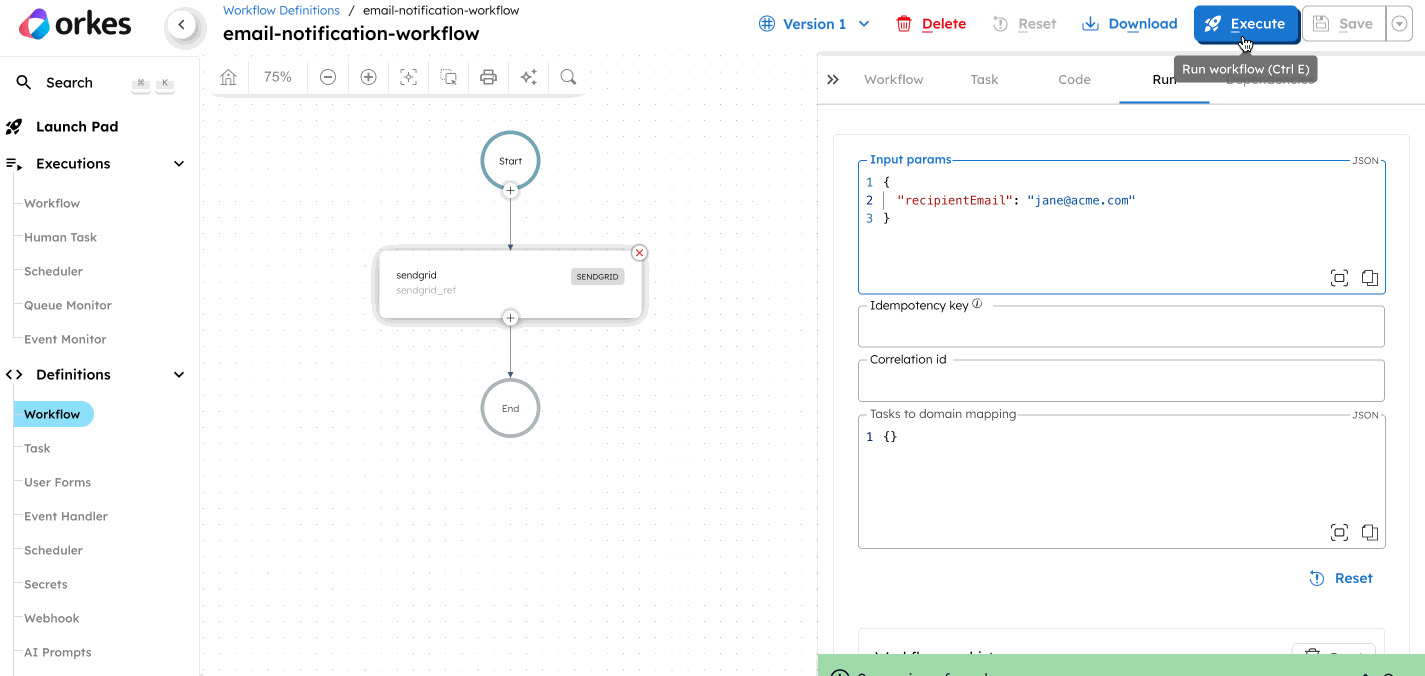
To create the workflow using Conductor UI:
- Go to Definitions > Workflow from the left navigation menu on your Conductor cluster.
- Select + Define workflow.
- In the Code tab, paste the following code, replacing your SendGrid integration name and sender email:
{
 "name": "email-notification-workflow",
 "description": "Email notification workflow using SendGrid",
 "version": 1,
 "tasks": [
   {
     "name": "sendgrid",
     "taskReferenceName": "sendgrid_ref",
     "inputParameters": {
       "from": "john.doe@acme.com", //Verified sender email in SendGrid
       "to": "${workflow.input.recipientEmail}",
       "subject": "Your renewal failed",
       "contentType": "text/plain",
       "content": "Hello, This is to notify that your subscription renewal for XYZ failed. ",
       "sendgridConfiguration": "SendGrid" // Integration name in Orkes Conductor
     },
     "type": "SENDGRID"
   }
 ],
 "inputParameters": [
   "recipientEmail"
 ],
 "schemaVersion": 2
}
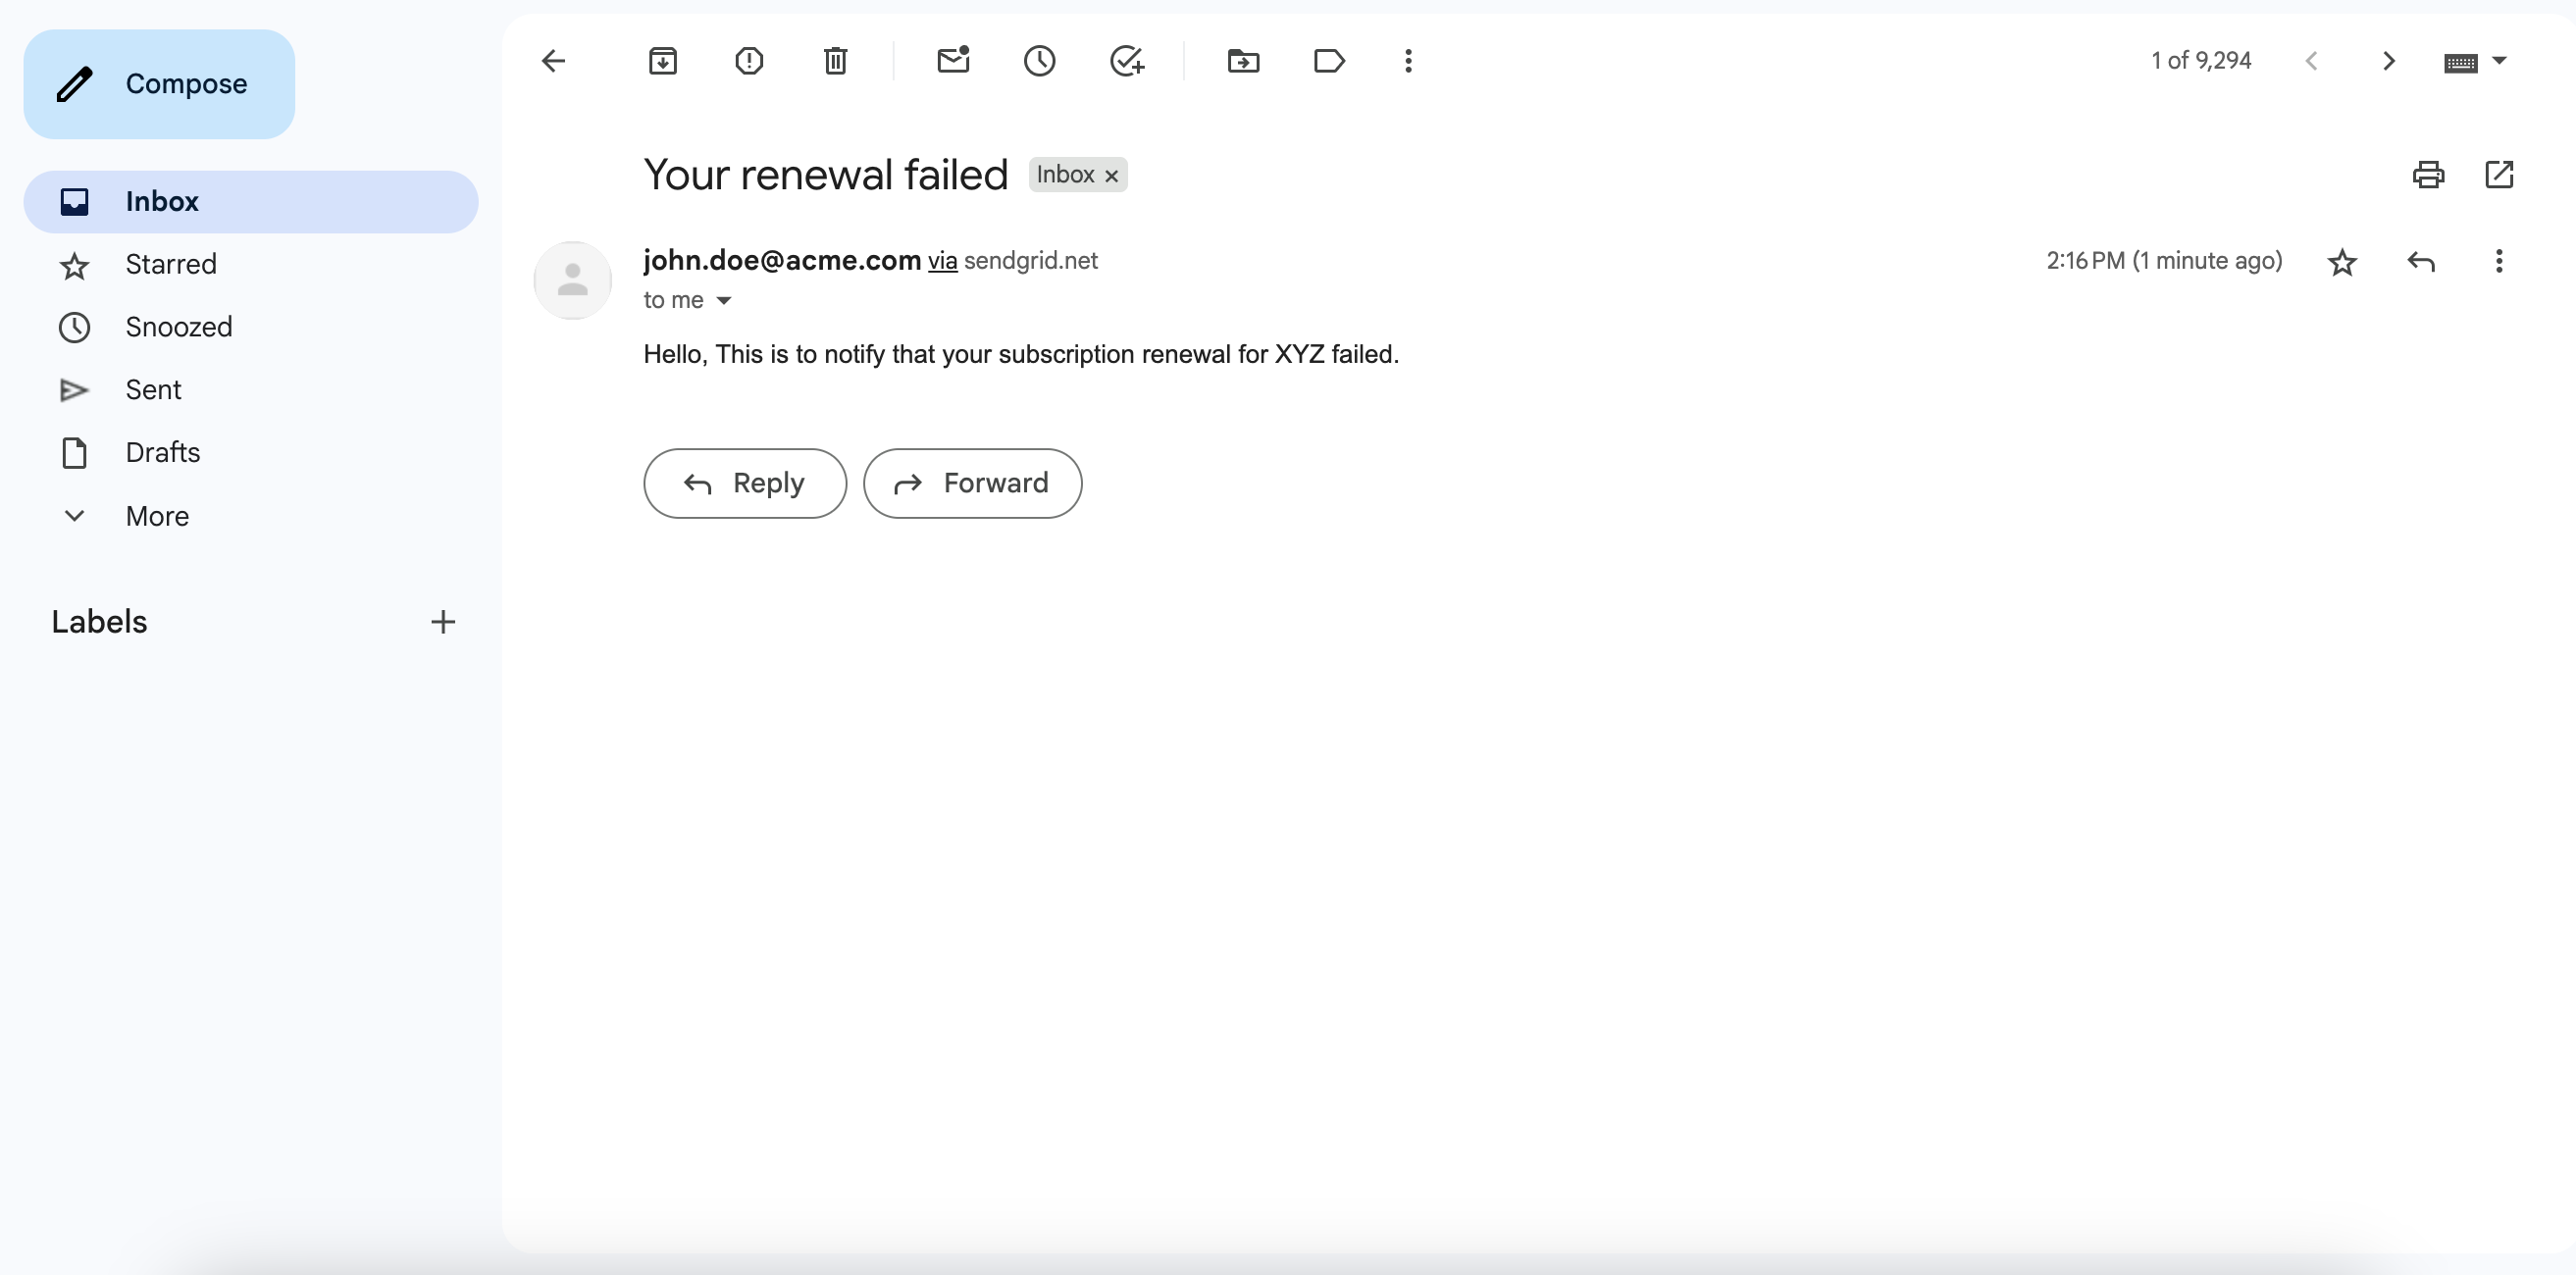
After saving the workflow, go to the Run tab, enter the recipient email address in the input parameter field, and select Execute to run the workflow.
After the workflow completes successfully, verify that the email is delivered to the recipient’s inbox.