Input/Output Schema Validation
- v4.0.11 and later
In Orkes Conductor, you can create schemas to define and enforce the payload structure of workflow or task inputs/outputs. Once created, schemas can be added to workflow or task definitions:
- A workflow-level schema specifies what workflow inputs/outputs must be supplied.
- A task-level schema specifies the inputs/outputs that must be wired to/from the task. The task-level schema can be general across workflows (specified in the task definition) or unique to a specific workflow (specified in the task configuration).
The schema is enforced at runtime. The workflow or task will fail if the inputs/outputs do not pass the validation. This behavior is the primary distinction between a task-level schema and non-validated elements, such as input keys, output keys, and input templates defined within a task.
Schema formats
Currently, schemas can be defined in the JSON Schema format. Like workflows, schemas can be versioned.
Example
{
  "createTime": 1727378396701,
  "updateTime": 1727378396701,
  "createdBy": "user@example.com",
  "updatedBy": "user@example.com",
  "name": "itemSchema",
  "version": 1,
  "type": "JSON", // set schema type as JSON Schema
  "data": { // include the JSON Schema parameters here
    "$schema": "https://json-schema.org/draft/2020-12/schema",
    "$id": "https://example.com/product.schema.json",
    "type": "object",
    "properties": {
      "productId": {
        "description": "The unique identifier for a product",
        "type": "integer"
      },
      "productName": {
        "description": "Name of the product",
        "type": "string"
      }
    },
    "required": [
      "productId"
    ]
  }
}
Using schemas
To enforce validation for input/output payloads, schemas can be added to:
- A workflow definition: Enforce workflow inputs/outputs.
- A task definition: Enforce task inputs/outputs for all instances of the task.
- A task configuration: Enforce task inputs/outputs for a specific task in a workflow.
Here is an overview of using schemas in Conductor workflows:
- Define a schema for a task’s or workflow’s inputs/outputs.
- Add the schema in a workflow definition, task definition, or task configuration.
Step 1: Define a schema
To define a schema:
- Go to Definitions > Schemas from the left navigation menu on your Conductor cluster.
- Select + New schema. A schema editor opens.
- Add your schema definition in the data object. Make sure to fill out at least the $schema, $id, type, and properties parameters as outlined in the JSON Schema.
Learn more about creating a JSON Schema.
Step 2: Add schema to workflow or task
If the version is unspecified, the latest schema version will be used.
To add a schema:
- Task definition
- Task configuration
- Workflow definition
- Go to Definitions > Task.
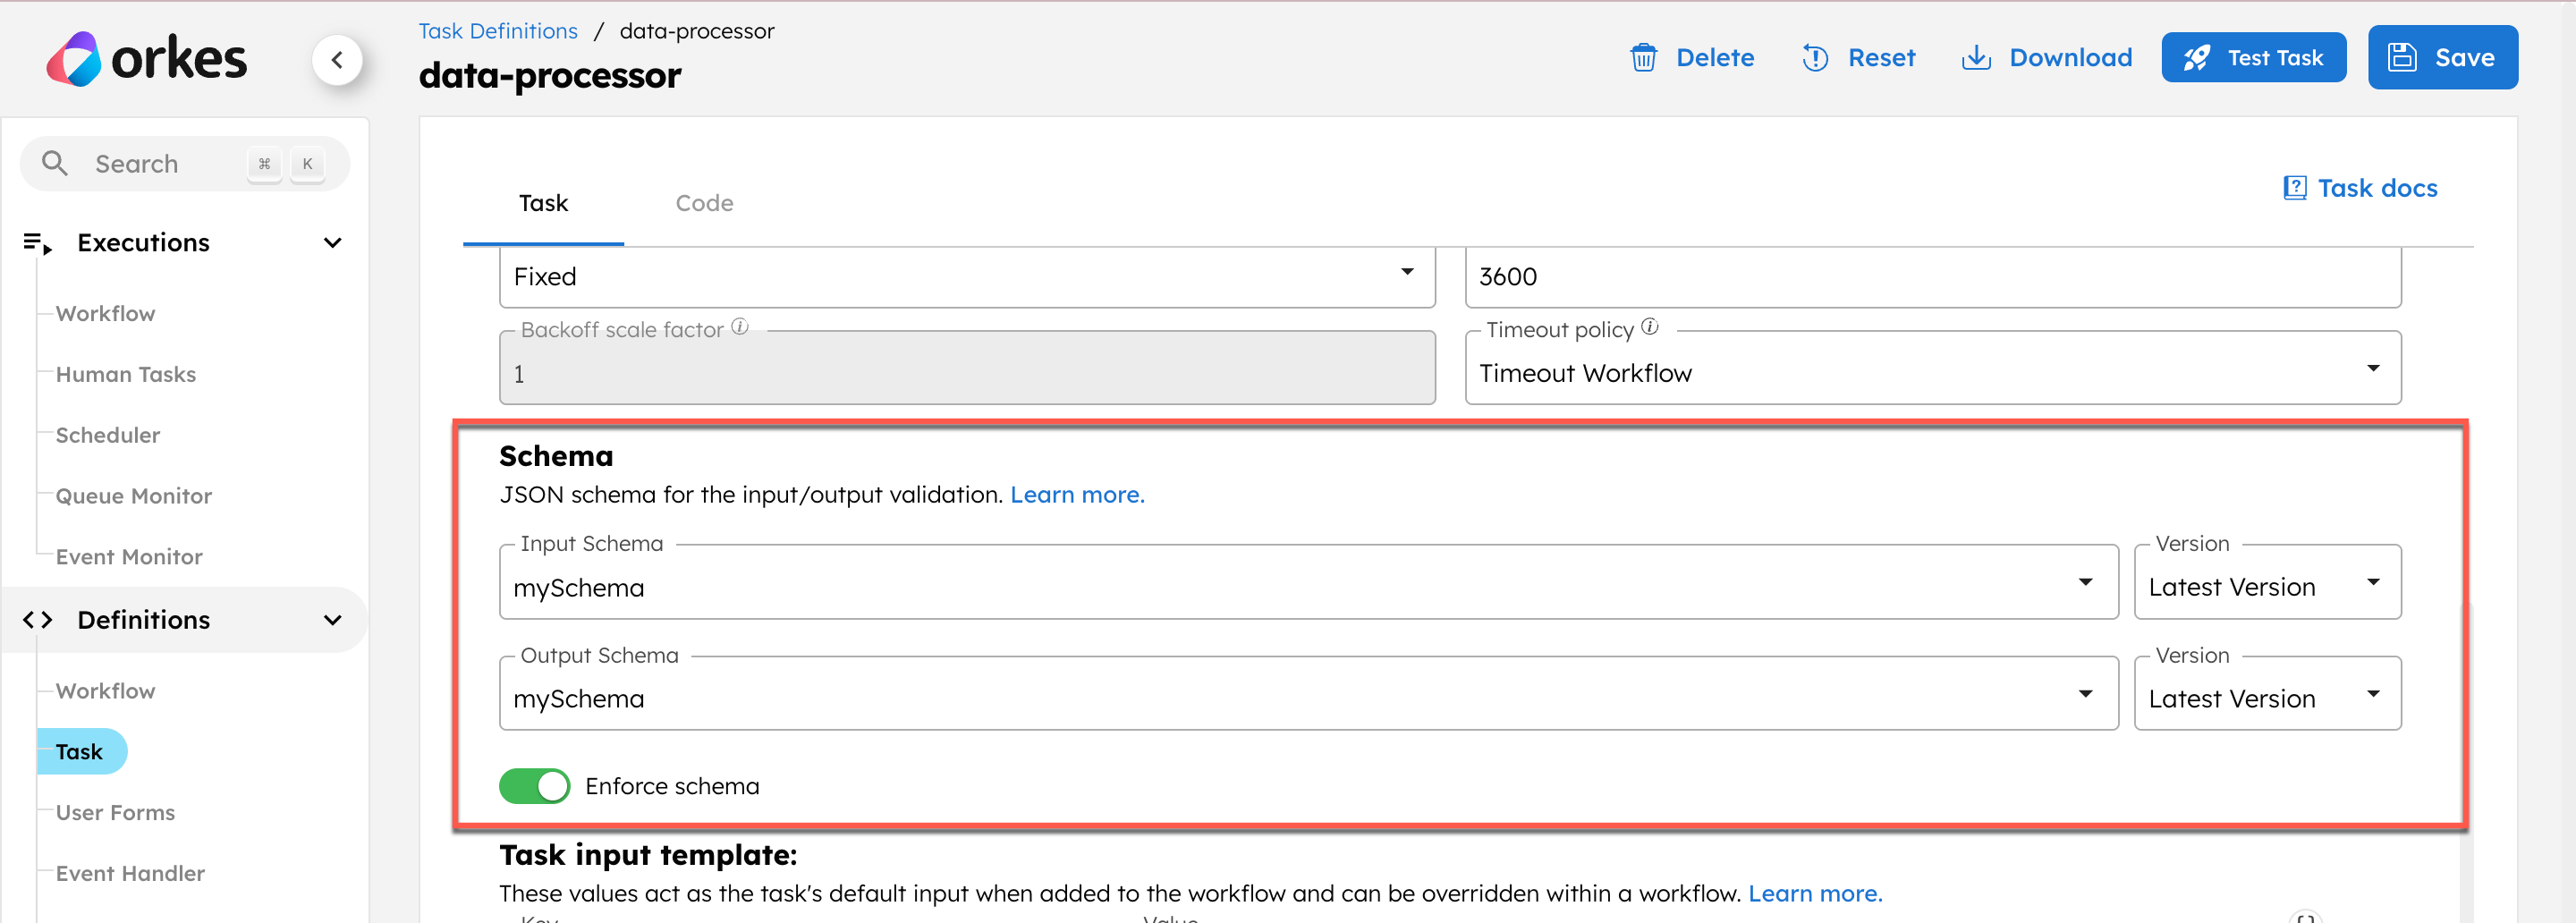
- Select a task definition that you want to add a schema to.
- In the Schema section, select a schema to use as an Input Schema or Output Schema.
- Select a Version for the schema.
- Switch on the Enforce schema toggle.
- Select Save in the top right.
// task definition

{
  "inputSchema": {
    "name": "mySchema",
    "version": 1,
    "type": "JSON"
  },
  "outputSchema": {
    "name": "mySchema",
    "type": "JSON"
  }
  "enforceSchema": true
}
- Go to Definitions > Workflow.
- Select a workflow.
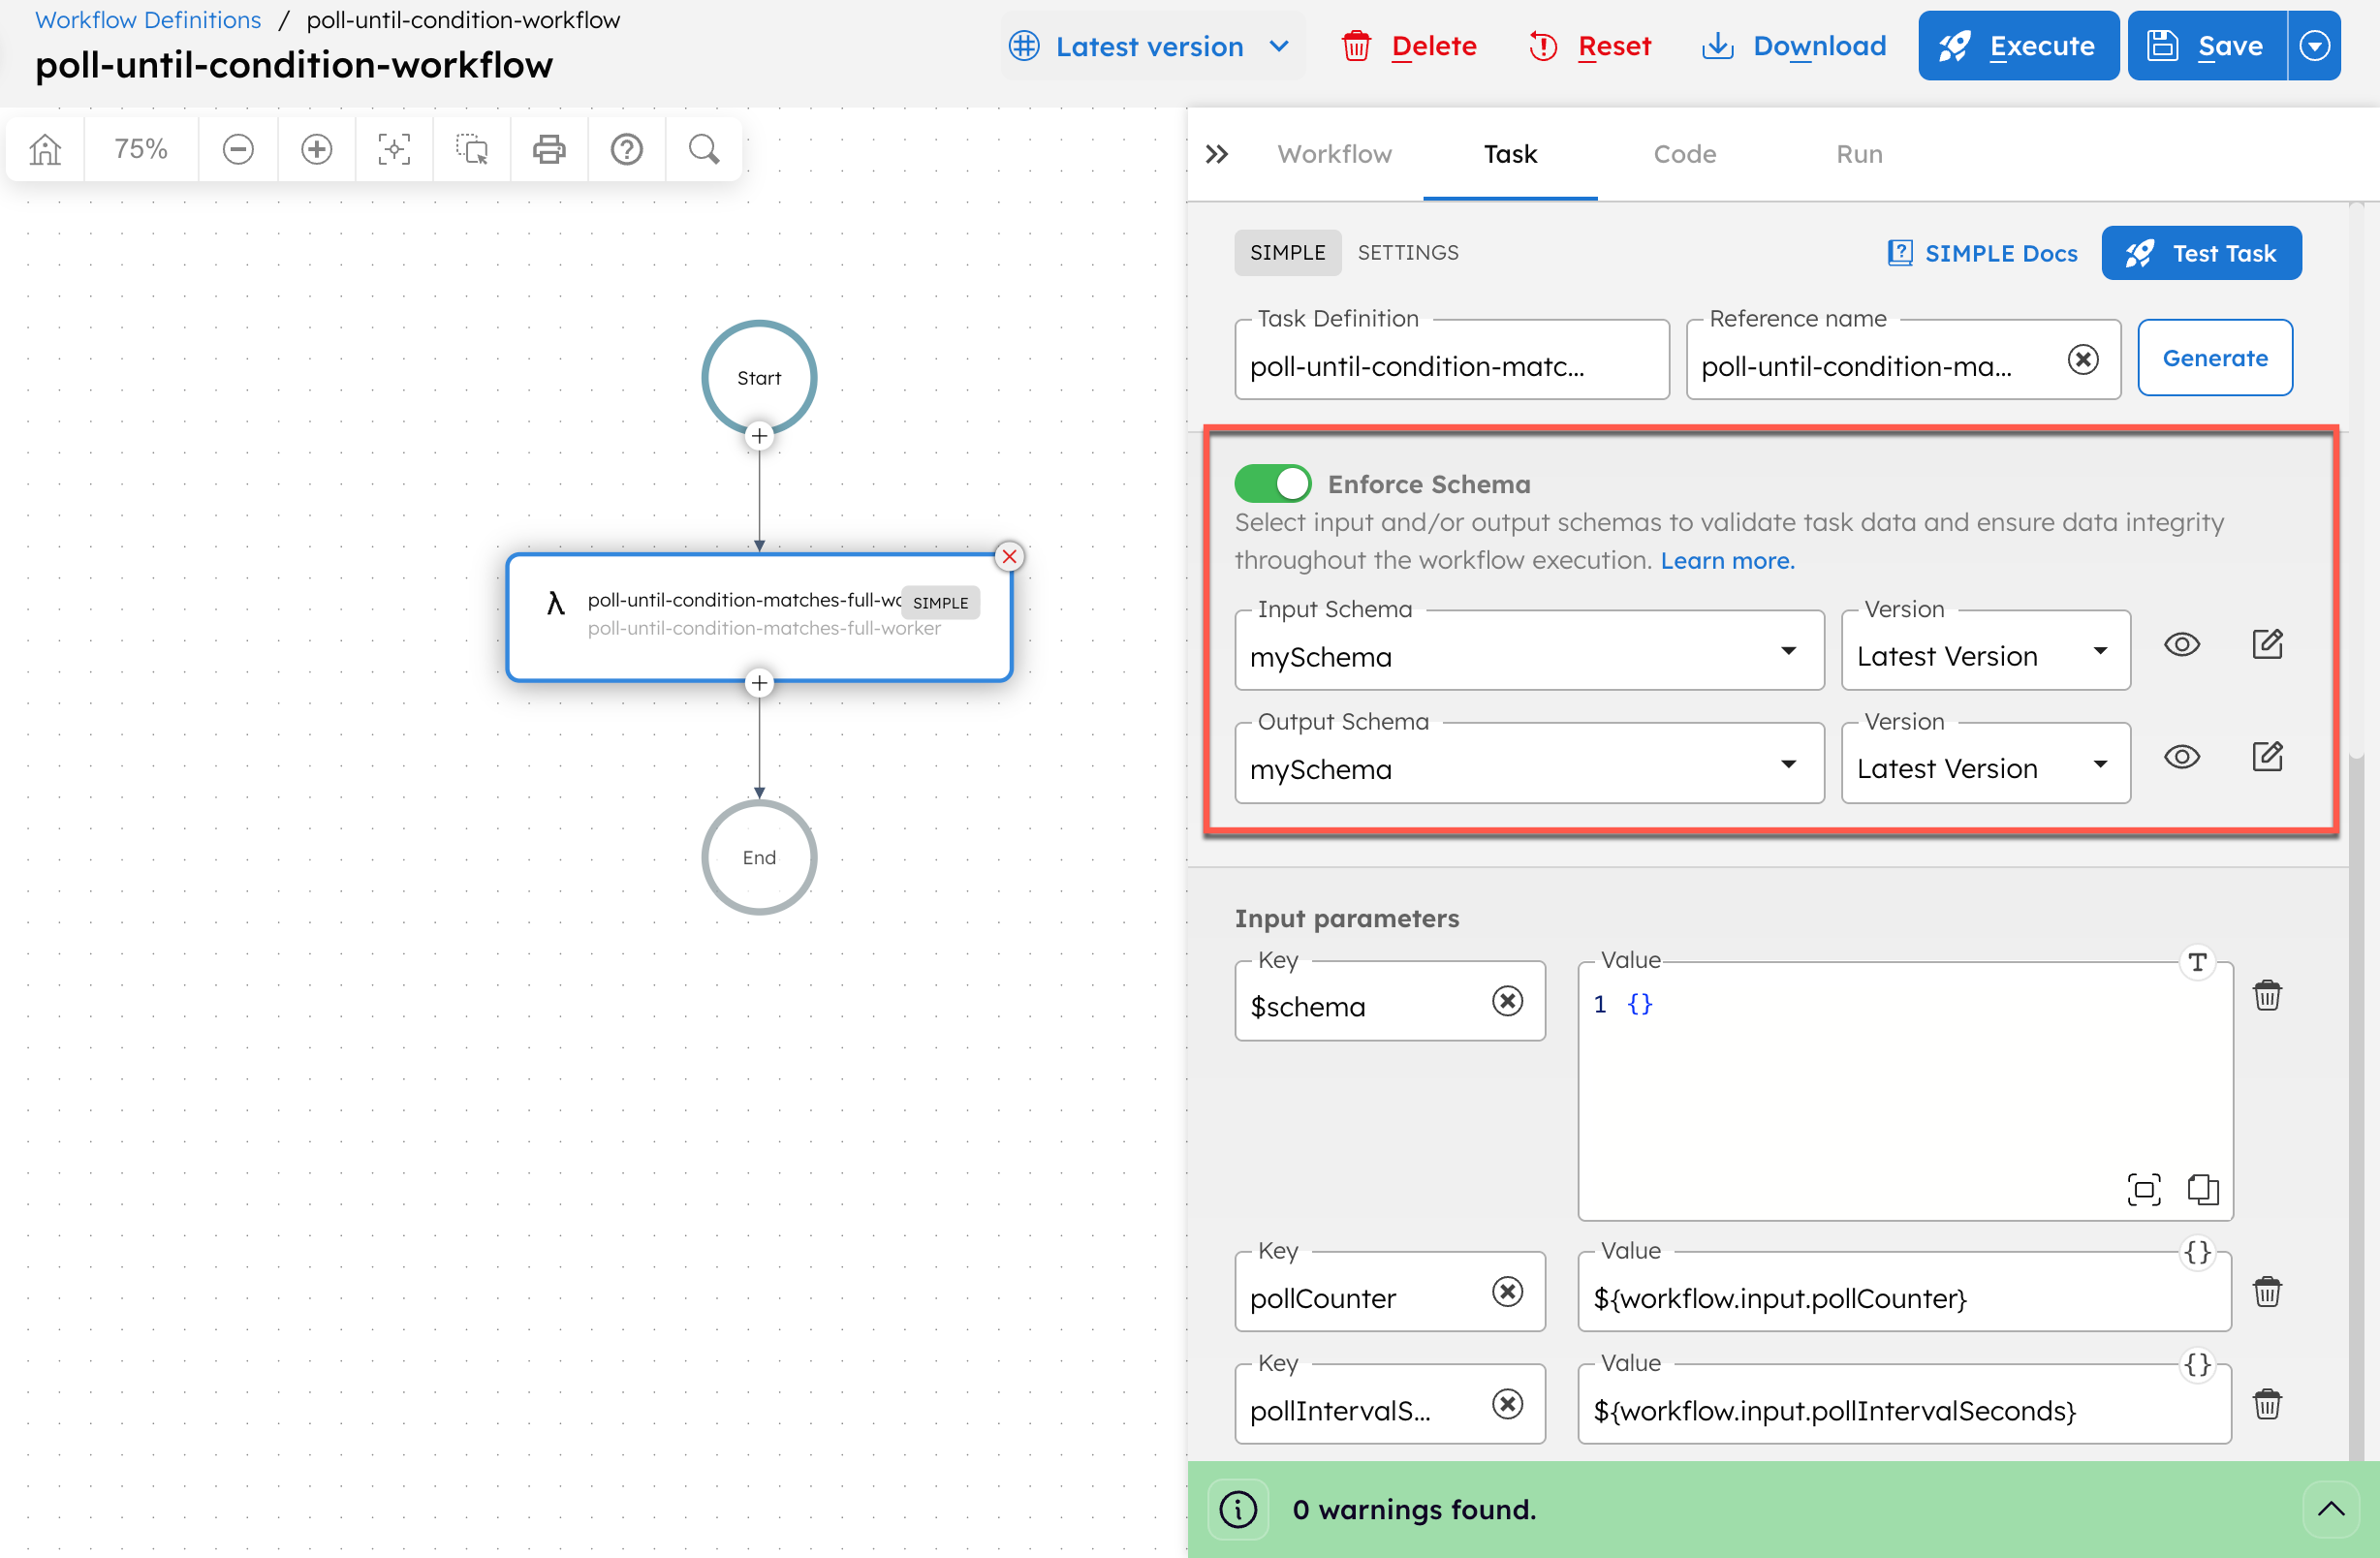
- In the visual workflow builder, select a task that you want to add a task-level schema to.
- Select a schema to use as an Input Schema or Output Schema.
- Select a Version for the schema.
- Select Save > Confirm in the top right.
// workflow definition

{
     {
     "name": "poll-until-condition-matches-full-worker",
     "taskReferenceName": "poll-until-condition-matches-full-worker",
     "inputParameters": {
       "pollCounter": "${workflow.input.pollCounter}",
       "pollIntervalSeconds": "${workflow.input.pollIntervalSeconds}"
     },
     "type": "SIMPLE",
     "taskDefinition": {
       "inputSchema": {
         "name": "mySchema",
         "type": "JSON"
       },
       "outputSchema": {
         "name": "mySchema",
         "type": "JSON"
       },
       "enforceSchema": true
     }
   }
}
Schema validation at the task-configuration level is currently supported for the following task types:
- Go to Definitions > Workflow.
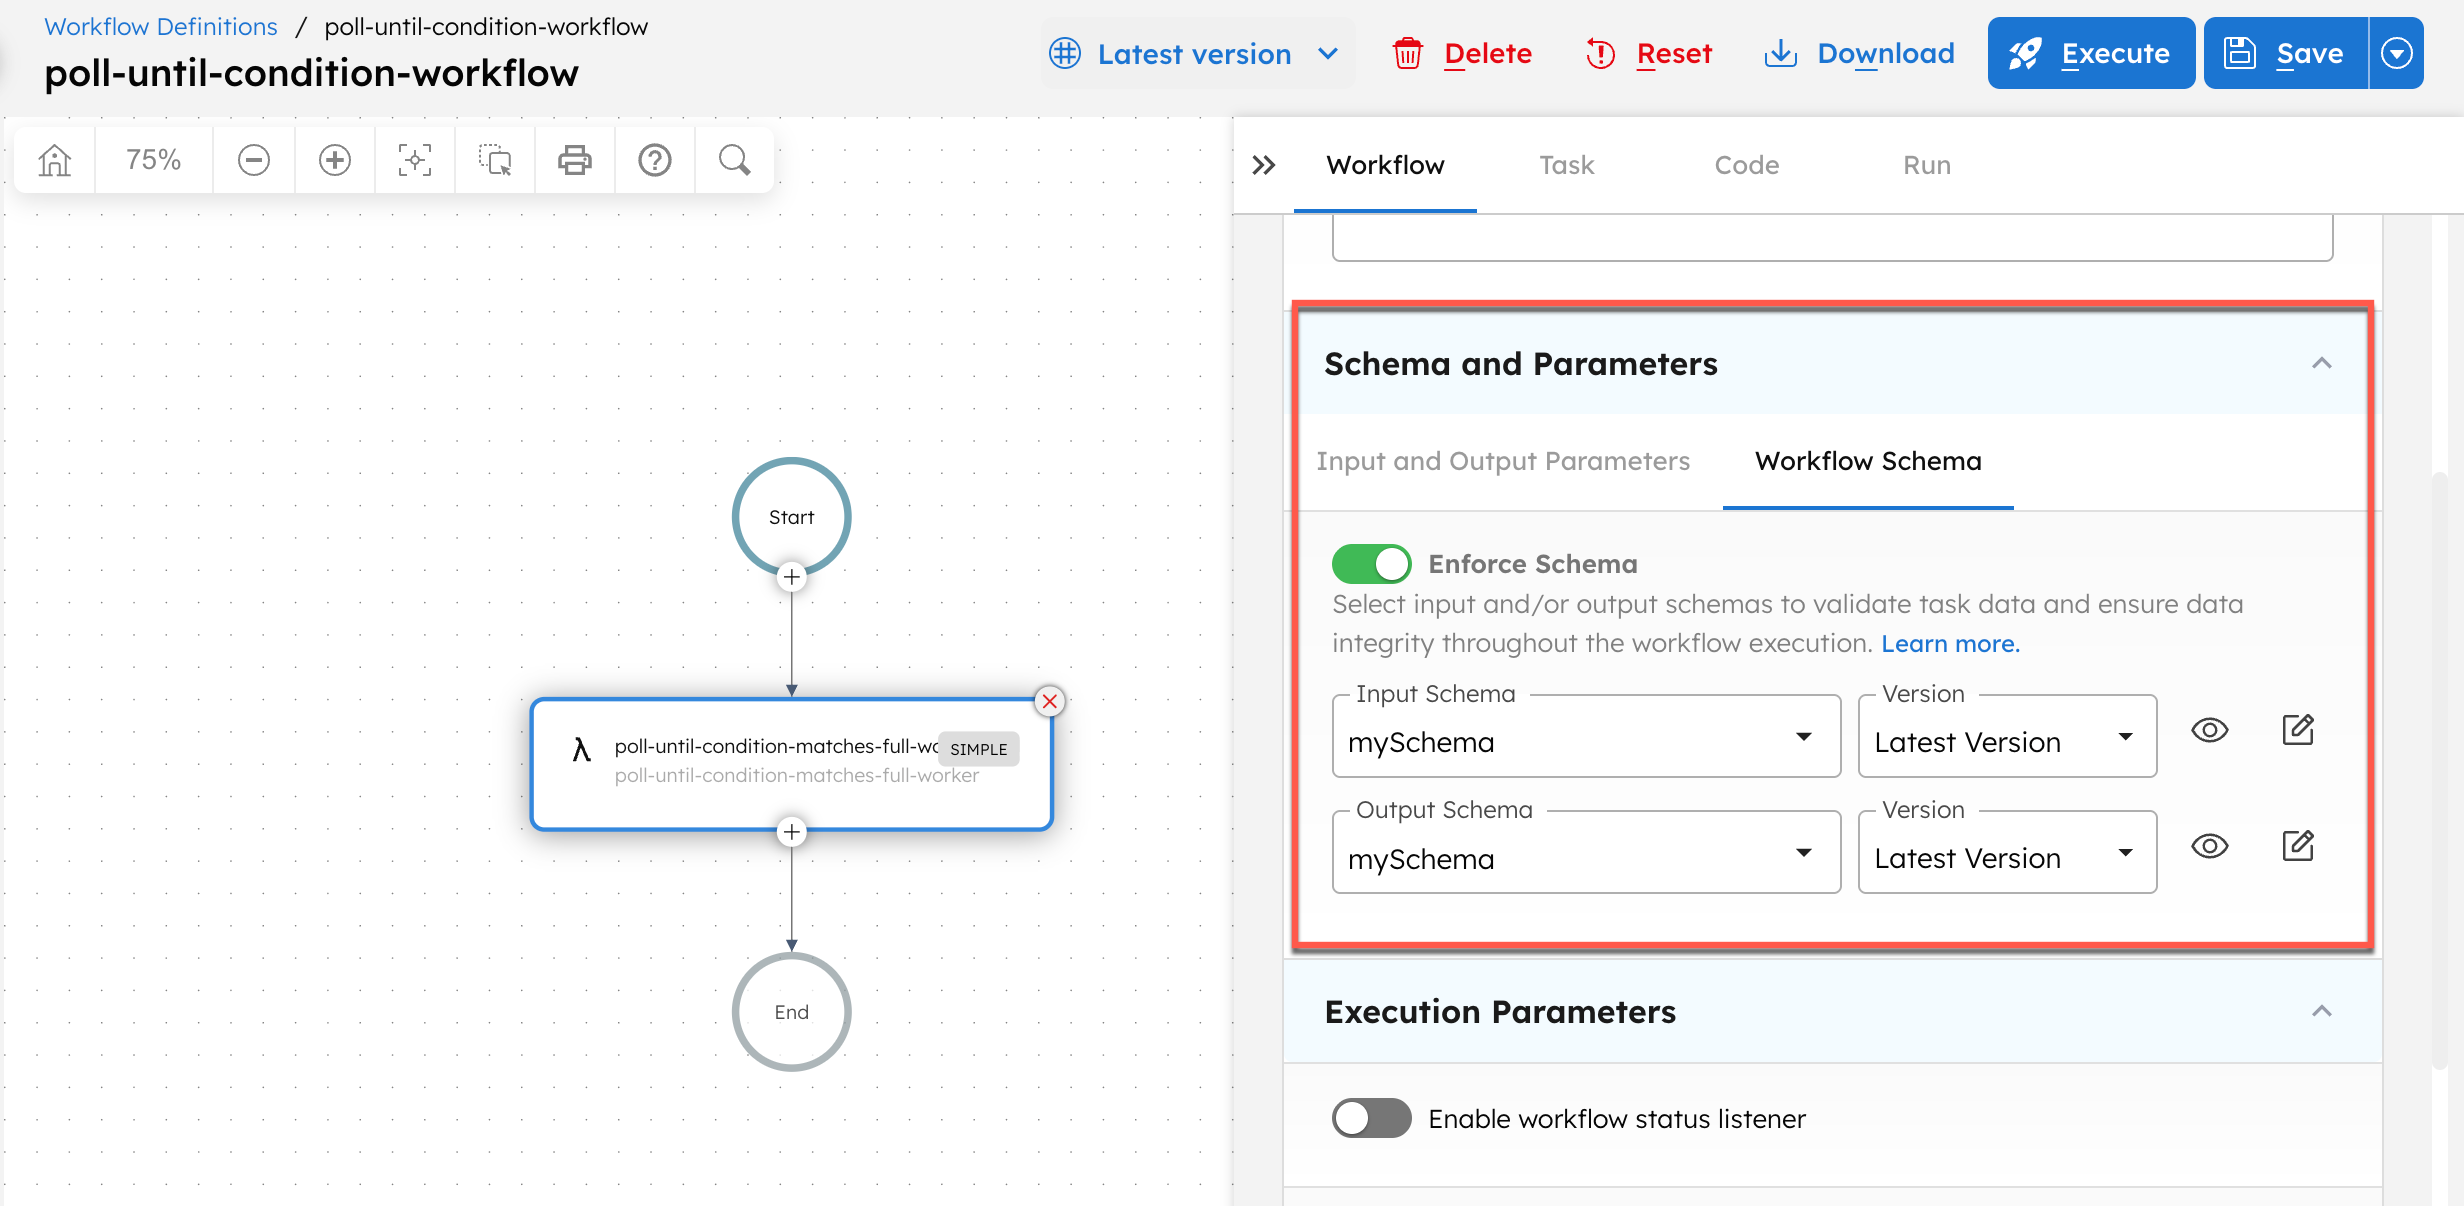
- Select a workflow that you want to add a workflow-level schema to.
- In the Workflow tab, go to Schema and Parameters > Workflow Schema.
- Select a schema to use as an Input Schema or Output Schema.
- Select a Version for the schema.
- Select Save > Confirm in the top right.
// workflow definition
{
  "inputSchema": {
    "name": "mySchema",
    "type": "JSON"
  },
  "outputSchema": {
    "name": "mySchema",
    "type": "JSON"
  },
  "enforceSchema": true
}
Once the schema is added, modify your workflow or task inputs/outputs to match the schema.
Editing schemas
Schemas can be edited in the Definitions > Schema tab or directly from where they are added to the workflow definition itself.
Since schemas can be reused for multiple workflows or tasks, you are encouraged to save changes to an existing schema as a new version or as a new schema entirely.
Workflow behavior with schemas
If a workflow does not pass its schema validation, it will not be allowed to execute.
If a task does not pass its schema validation, it will fail with a terminal error.

Examples
Here are some examples for using the Schema definition in workflows.
Applying a schema in a task definition
The following example demonstrates how to define a schema, apply it directly to a task definition, and use it in a workflow.
Step 1: Create a schema definition in Orkes Conductor
To create a schema:
- Go to Definitions > Schemas from the left navigation menu on your Conductor cluster.
- Select + New schema.
- In the Code tab, paste the following schema:
{
  "name": "productSchema",
  "version": 1,
  "type": "JSON",
  "data": {
    "$schema": "https://json-schema.org/draft/2020-12/schema",
    "type": "object",
    "properties": {
      "productId": {
        "type": "integer"
      }
    },
    "required": ["productId"]
  }
}
- Select Save.
Next, attach the schema to a task definition.
Step 2: Add schema to task definition
To add the schema to a task definition:
- Go to Definitions > Task from the left navigation menu on your Conductor cluster.
- Select an existing task, or create a new one.
- In the Schema section, select the created schema (
productSchema) to use as the Input Schema.
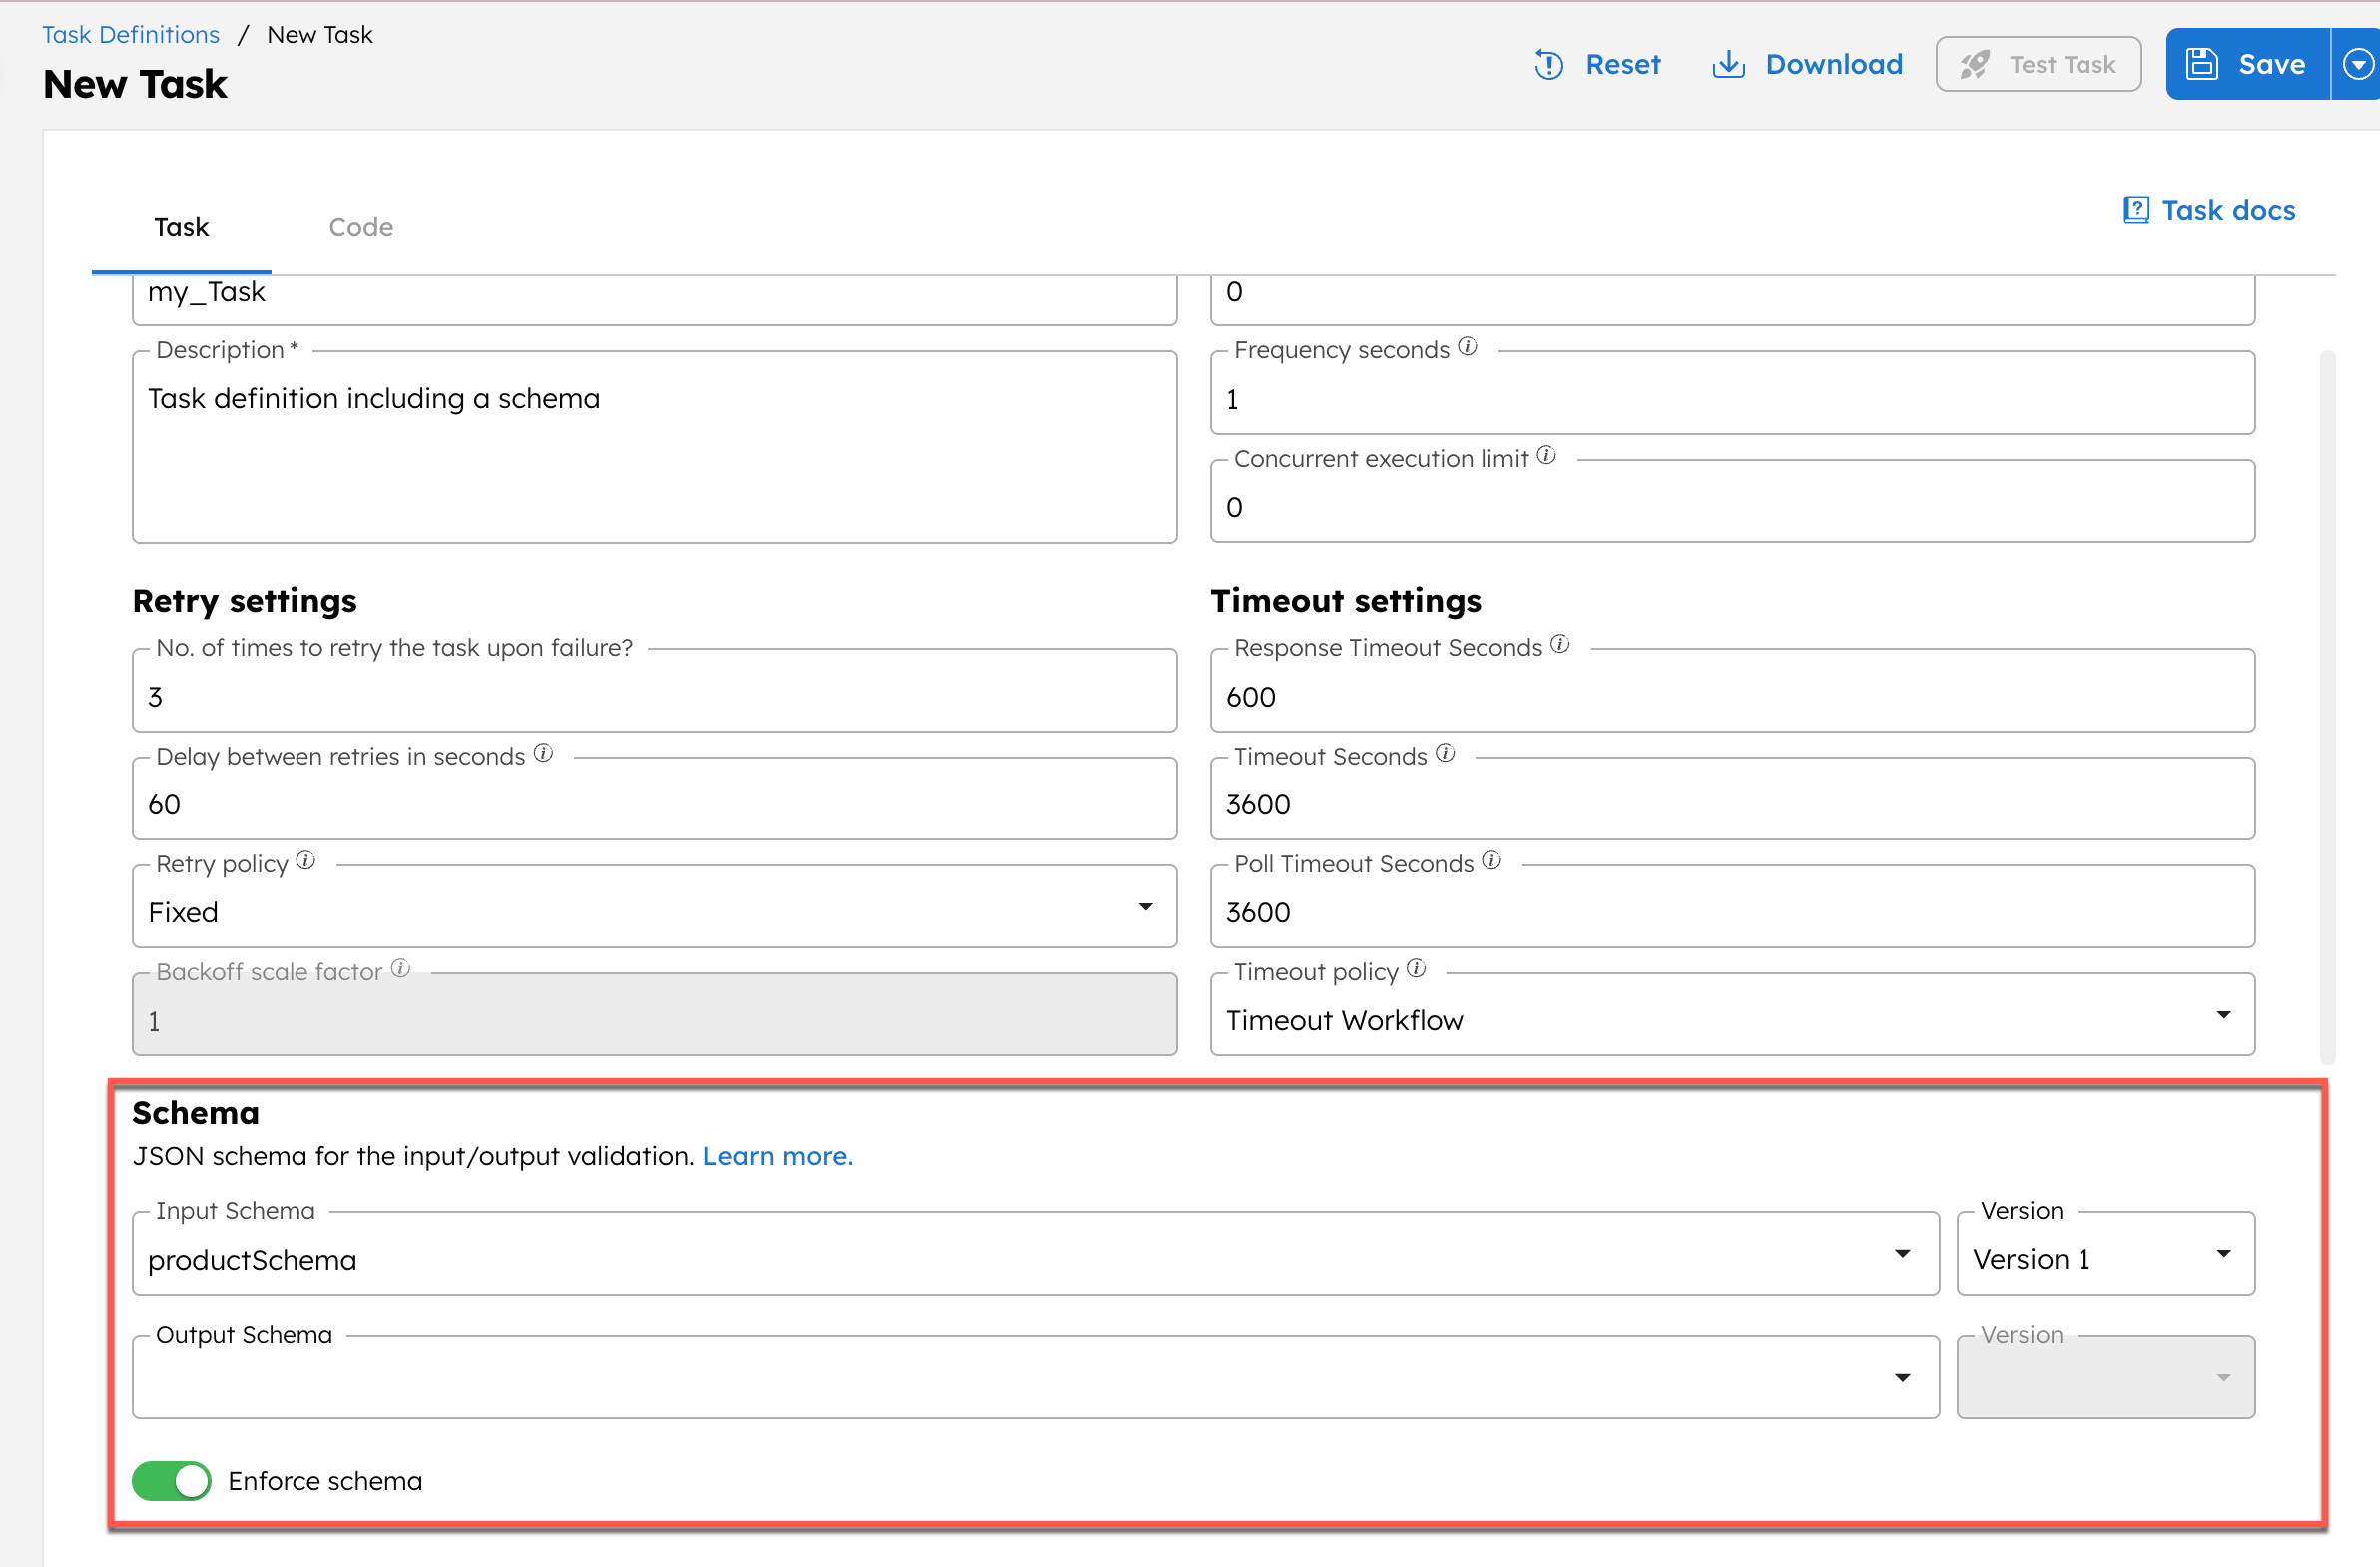
- Select a Version for the schema.
- Switch on the Enforce schema toggle.
- Select Save in the top right.
Note the task name (my_Task here), as it is to be updated in the workflow.
Next, create a workflow definition to use this task definition.
Step 3: Add the task to a workflow definition
To add the task to a workflow definition:
- Go to Definitions > Workflow from the left navigation menu on your Conductor cluster.
- Select + Define workflow and paste the following code in the Code tab:
{
 "name": "schema_task_definition_example",
 "description": "Example",
 "version": 1,
 "tasks": [
   {
     "name": "my_Task",
     "taskReferenceName": "my_Task_ref",
     "inputParameters": {
       "productId": "${workflow.input.productId}"
     },
     "type": "SIMPLE"
   }
 ],
 "inputParameters": [
   "productId"
 ],
 "schemaVersion": 2
}
- Select Save > Confirm.
- Select the task and update its Task Definition to the one created in Step 2. This step ensures that the schema is actually applied.
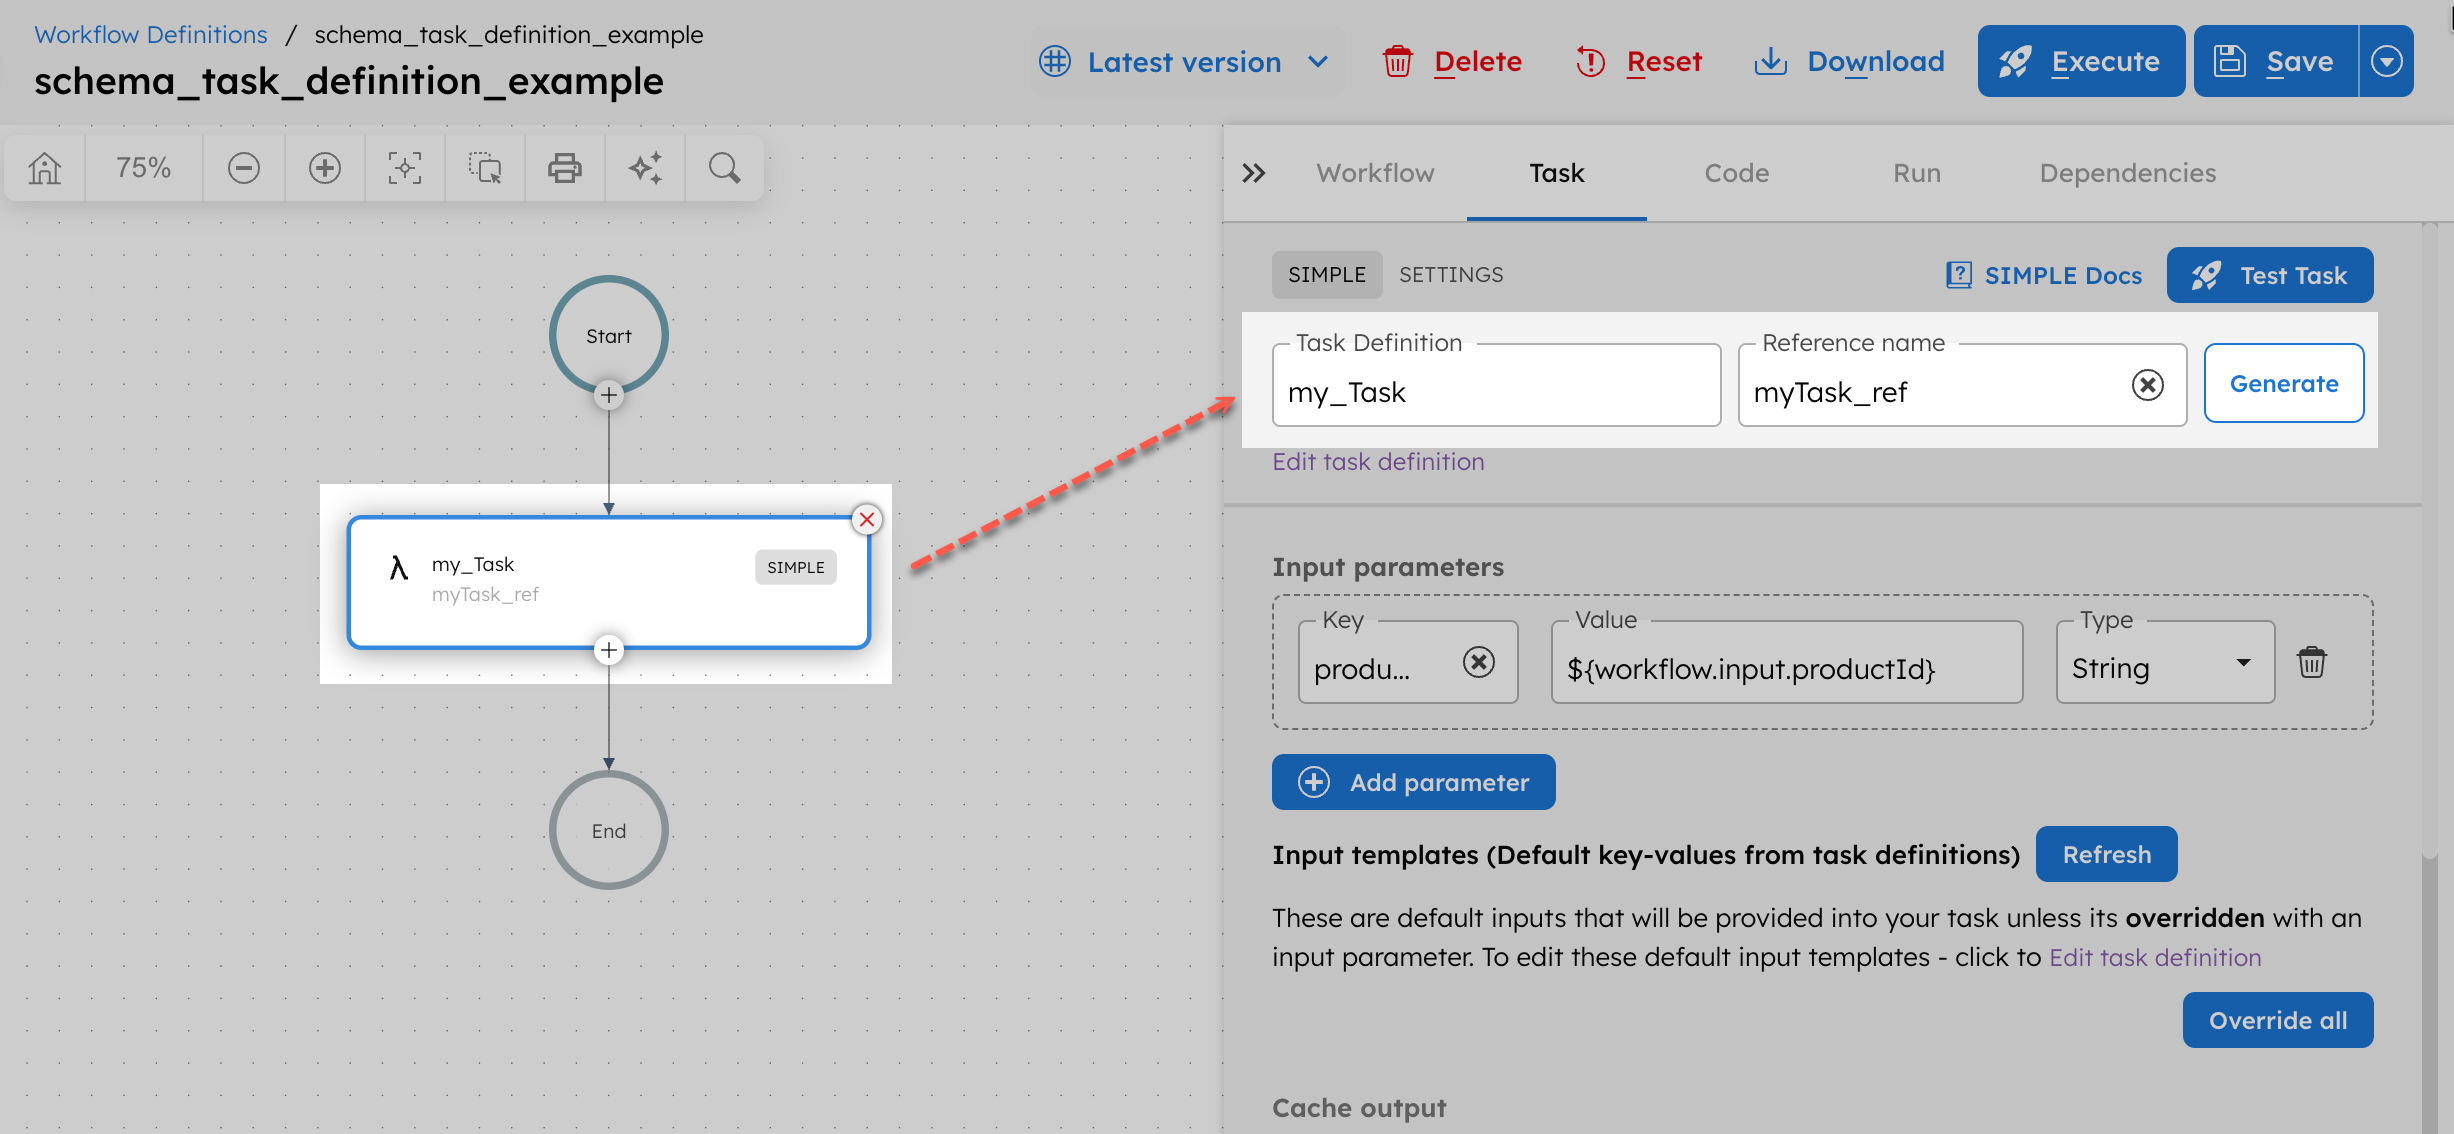
- Save the workflow.
Next, run the workflow.
Step 4: Run the workflow
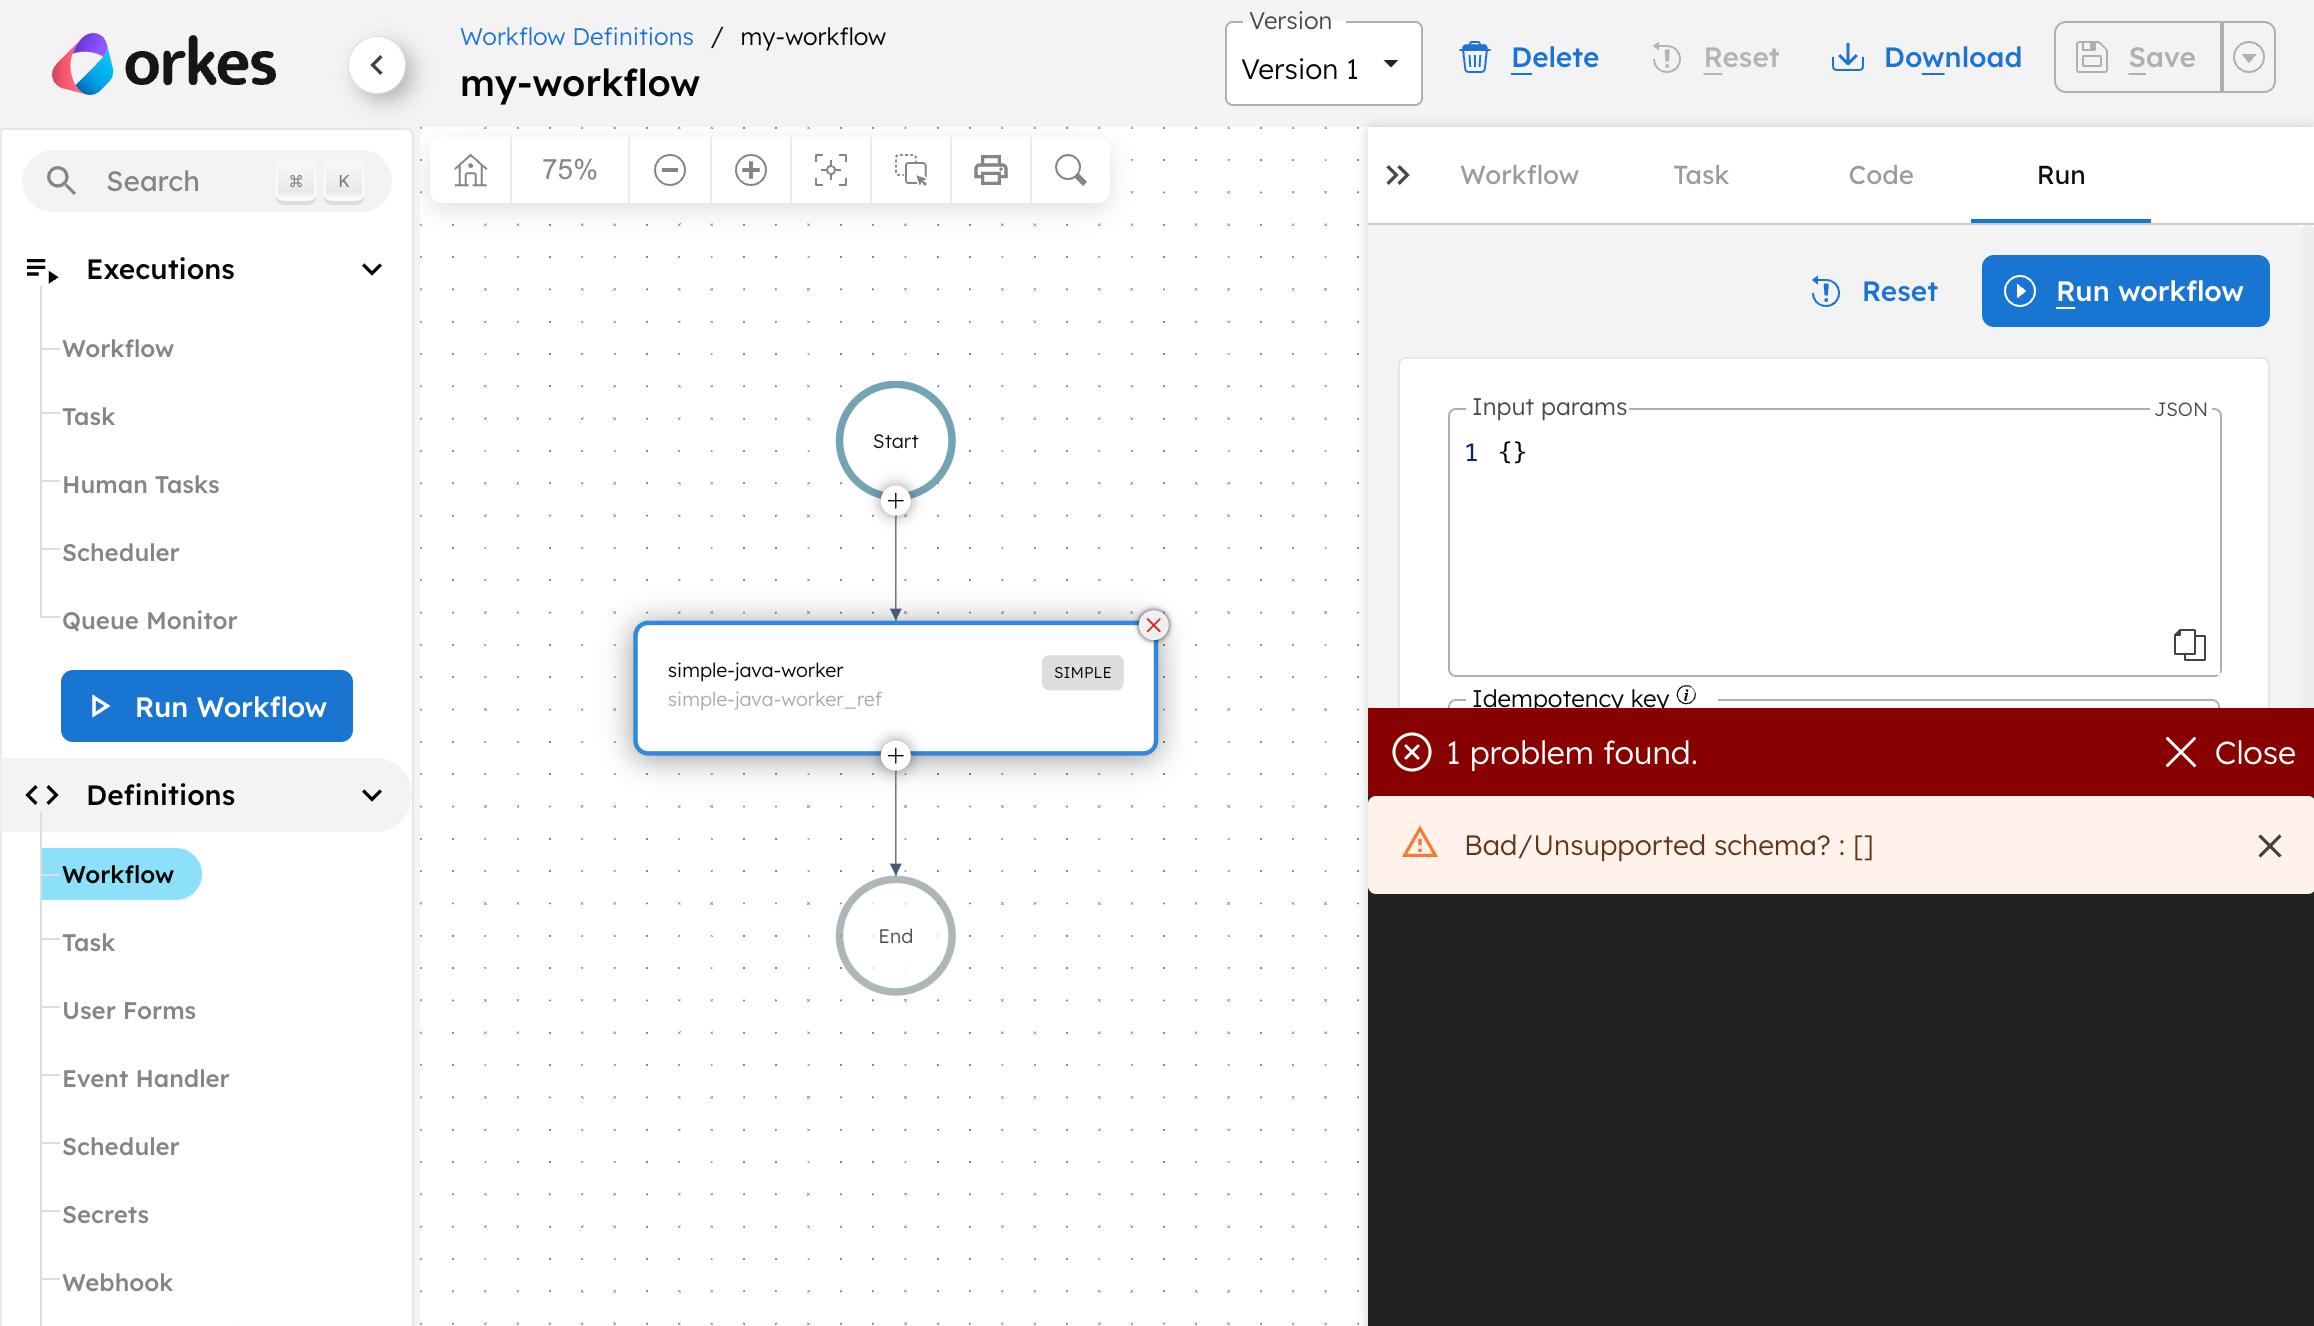
- Go to the Run tab and enter a valid integer for Input params. For example:
{
  "productId": 25
}
- Select Execute.
The workflow begins execution. Since the task is a SIMPLE worker task and no worker is registered for this example, the task remains SCHEDULED. For demonstration purposes, manually mark the task as completed from the Conductor UI.
See the documentation on using Workers for more details on running Worker tasks.
The workflow completes successfully. This indicates that the input matched the schema and validation passed.
Let’s see what happens if the schema validation is not correct. For example, if the input does not match the required type, the workflow fails immediately at the task execution stage.
Rerun the same workflow with an invalid productId, for example:
{
  "productId": "abc"
}
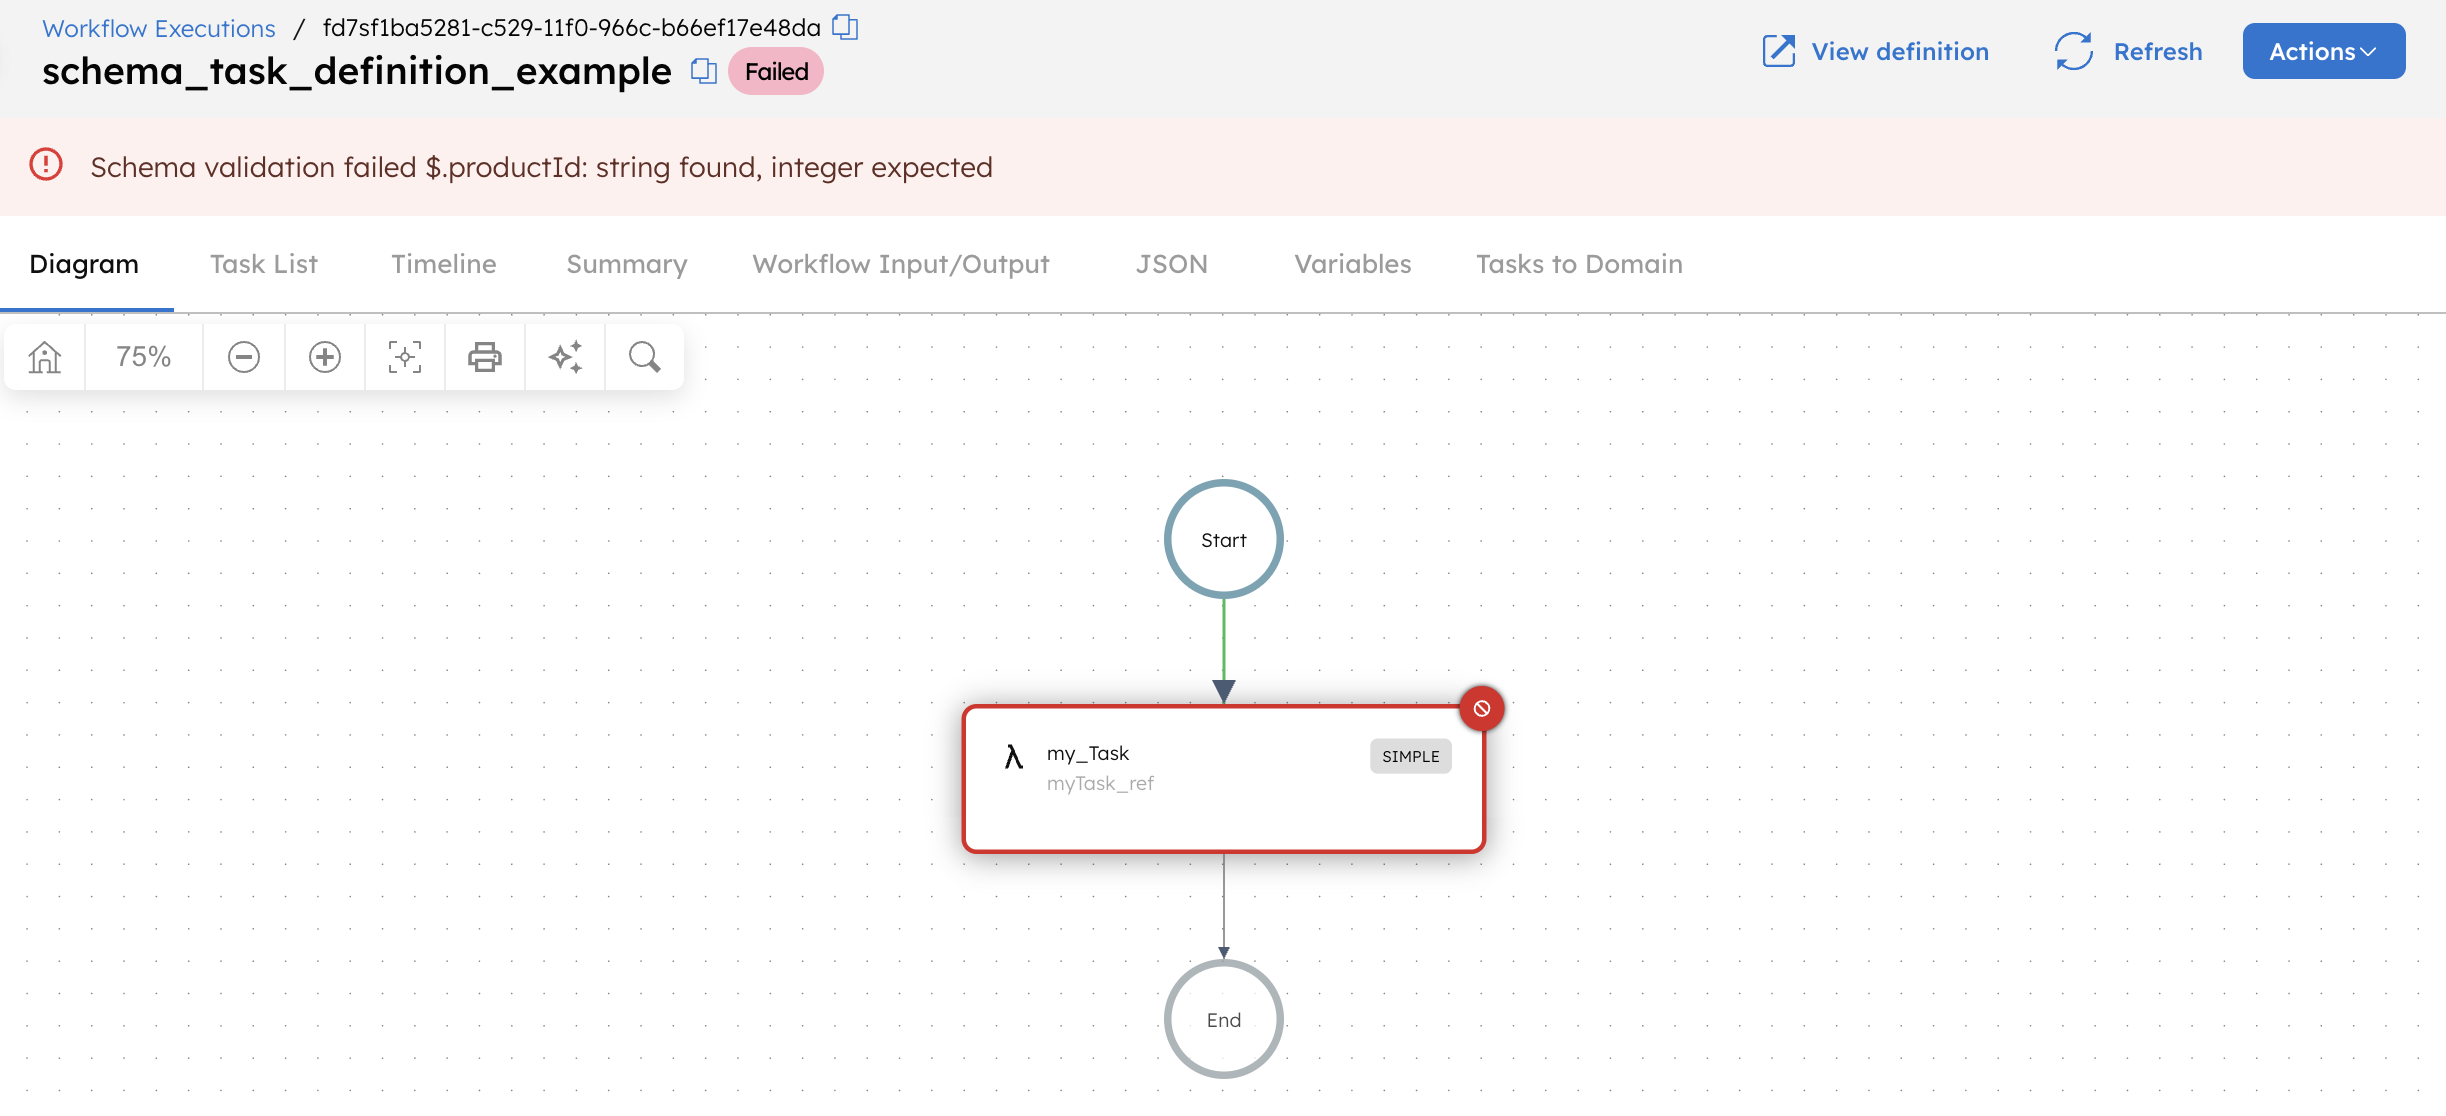
The workflow execution now fails. Because the input does not match the schema (expected integer), the task fails schema validation.
Applying a schema in a task configuration
The following example demonstrates how to define a schema and apply it at the task configuration level within a workflow.
Unlike task-definition level schemas, a task-configuration schema applies only to that specific task instance within the workflow.
Step 1: Create a schema definition in Orkes Conductor
To create a schema:
- Go to Definitions > Schemas from the left navigation menu on your Conductor cluster.
- Select + New schema.
- In the Code tab, paste the following schema:
{
  "name": "productSchema",
  "version": 1,
  "type": "JSON",
  "data": {
    "$schema": "https://json-schema.org/draft/2020-12/schema",
    "type": "object",
    "properties": {
      "productId": {
        "type": "integer"
      }
    },
    "required": ["productId"]
  }
}
- Select Save.
Next, attach the schema to a task inside a workflow.
Step 2: Add the schema to a task configuration
To add the schema to a task configuration:
- Go to Definitions > Workflow from the left navigation menu on your Conductor cluster.
- Select + Define workflow and paste the following code in the Code tab:
{
 "name": "SampleDemo",
 "description": "Example workflow",
 "version": 1,
 "tasks": [
   {
     "name": "simple_1",
     "taskReferenceName": "simple_ref_1",
     "inputParameters": {
       "productId": "${workflow.input.productId}"
     },
     "type": "SIMPLE"
   }
 ],
 "inputParameters": [
   "productId"
 ],
 "schemaVersion": 2
}
- Select Save > Confirm.
- Open the workflow in the visual editor and select the Worker task.
- Select the created schema (
productSchema) to use as the Input Schema.
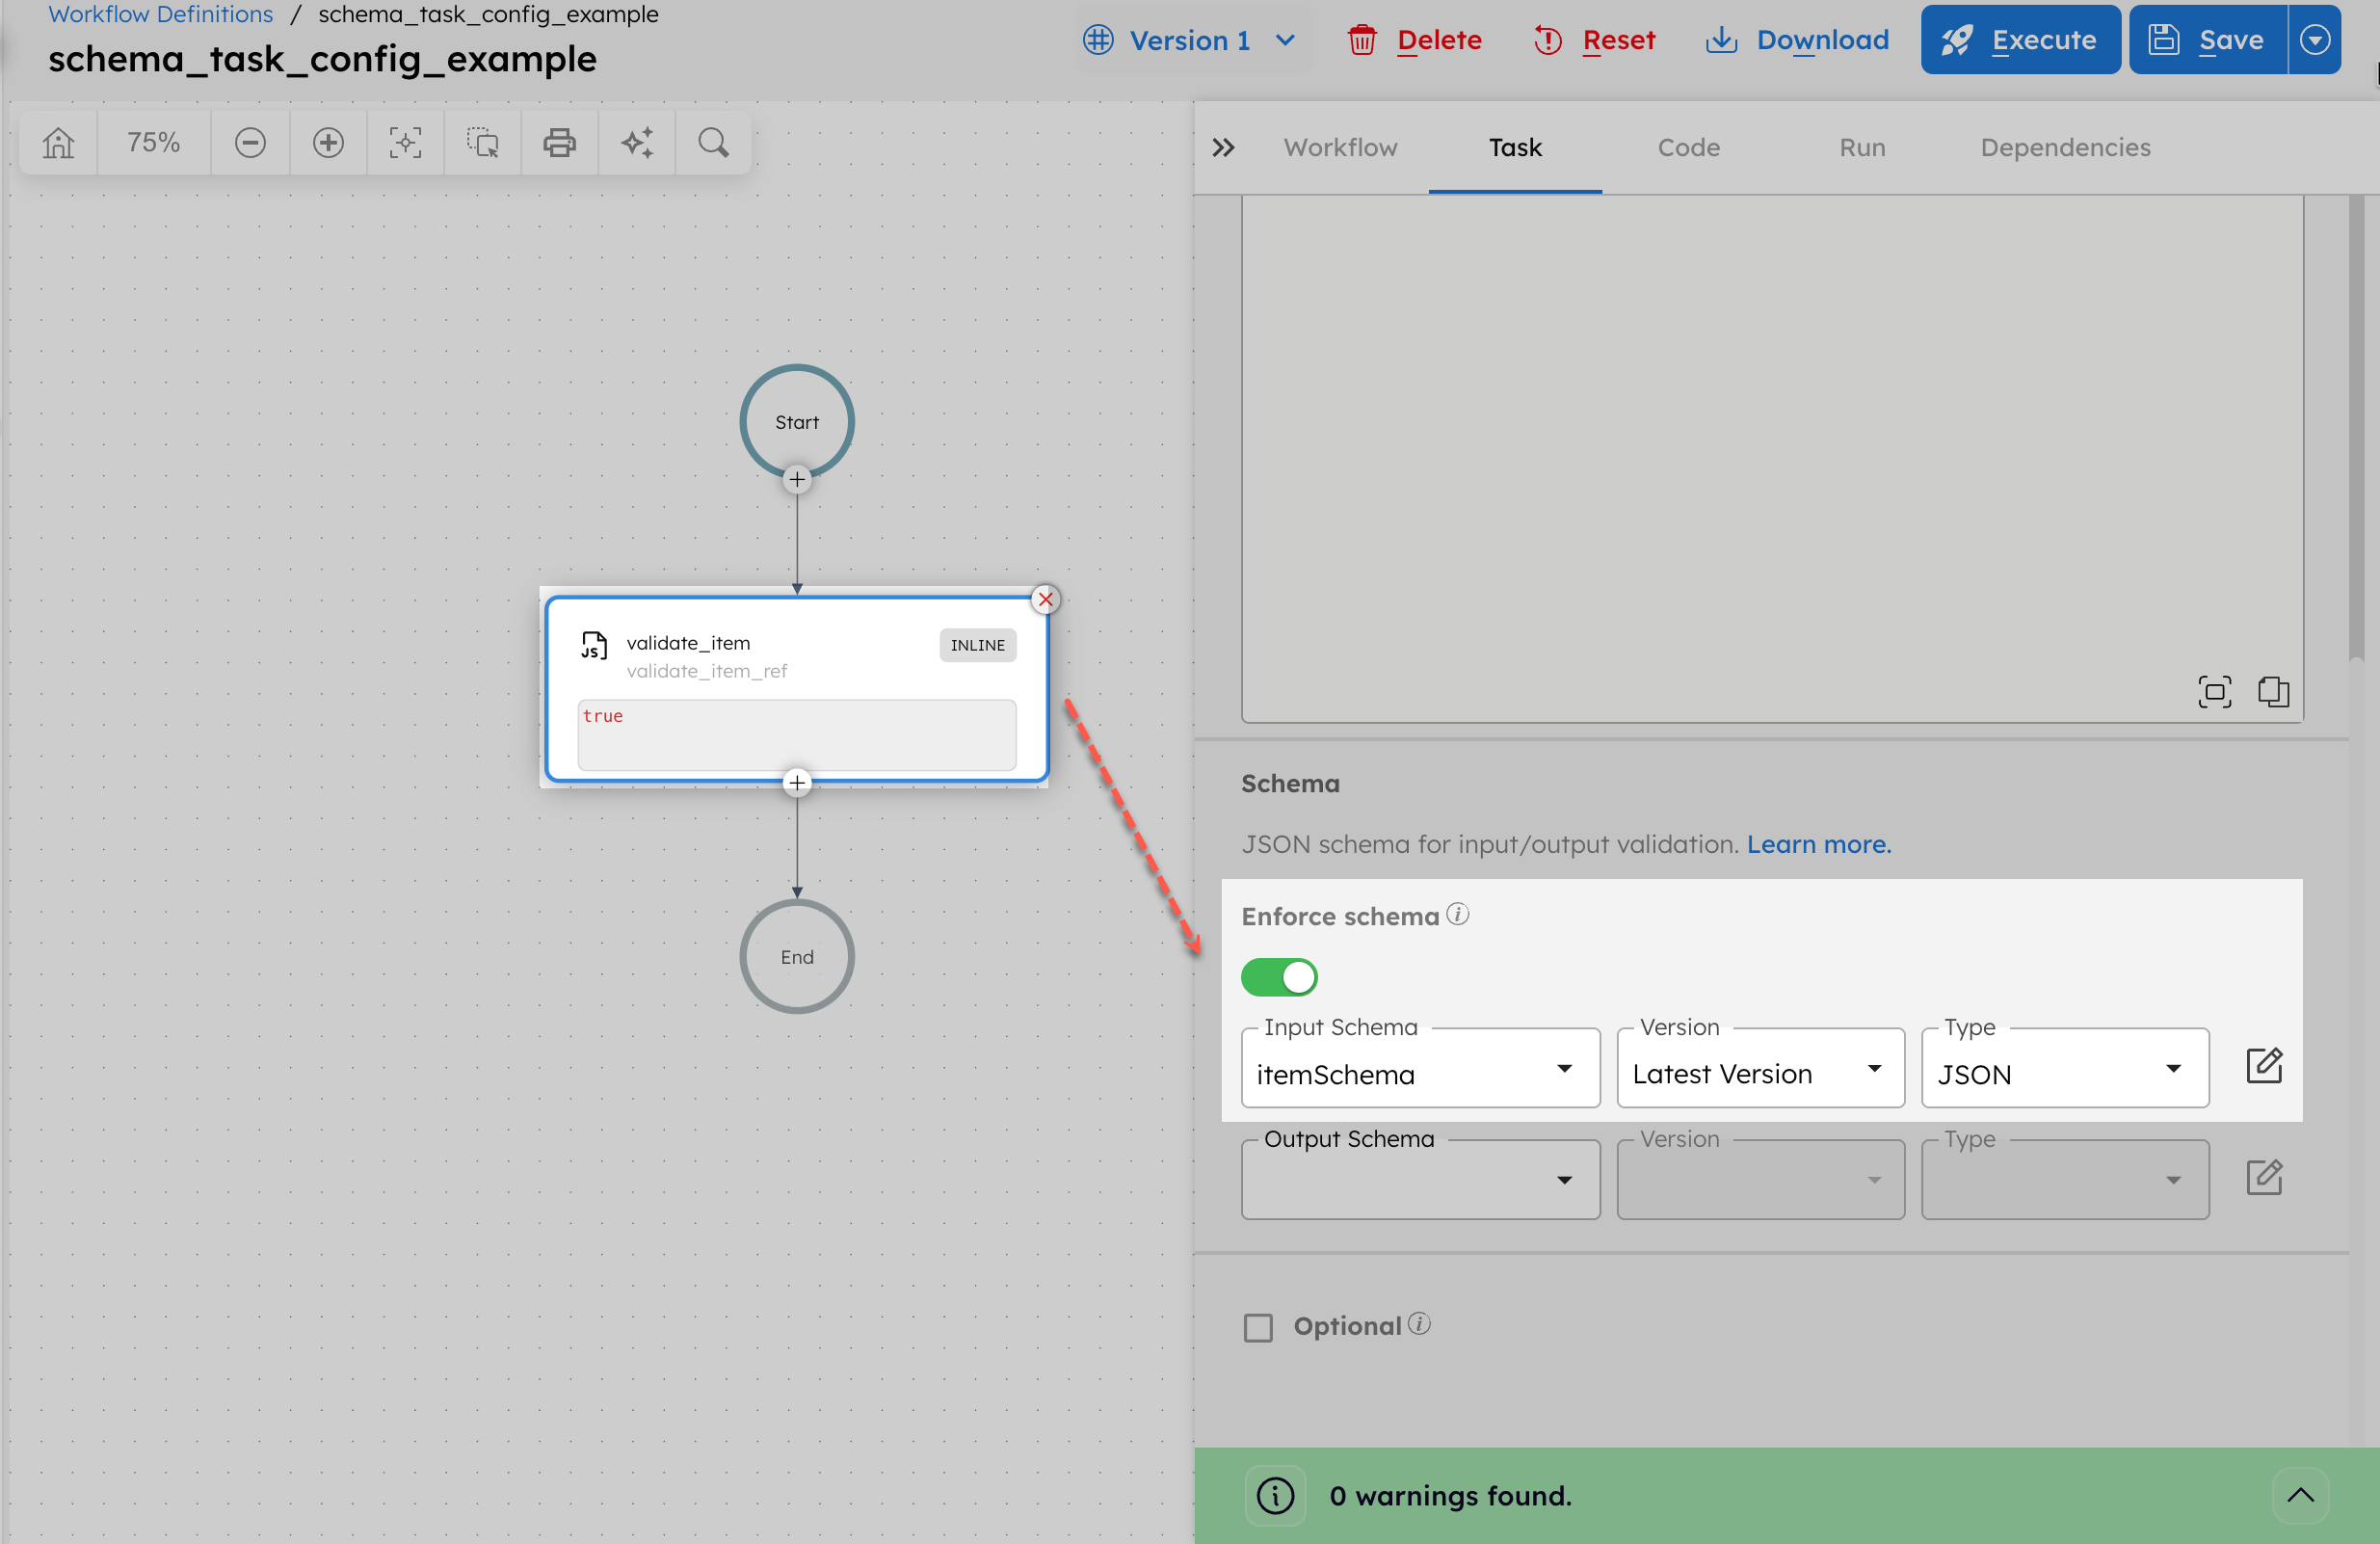
- Select a Version for the schema.
- Ensure to update the Input parameter to
${workflow.input.productId}. - Select Save > Confirm in the top right.
Next, run the workflow.
Step 3: Run the workflow
- Go to the Run tab and enter a valid value for Input params. For example:
{
 "productId": 100
}
- Select Execute.
The workflow begins execution. Since the task is a SIMPLE worker task and no worker is registered for this example, the task remains SCHEDULED. For demonstration purposes, manually mark the task as completed from the Conductor UI.
See the documentation on using Workers for more details on running Worker tasks.
The workflow completes successfully. This indicates that the input matched the schema and validation passed.
Let’s see what happens if the schema validation is not correct. For example, if the input does not match the required type, the workflow fails immediately at the task execution stage.
Rerun the same workflow with an invalid productId, for example:
{
  "productId": "abc"
}
The workflow execution now fails. Because the input does not match the schema (expected integer), the task fails schema validation.
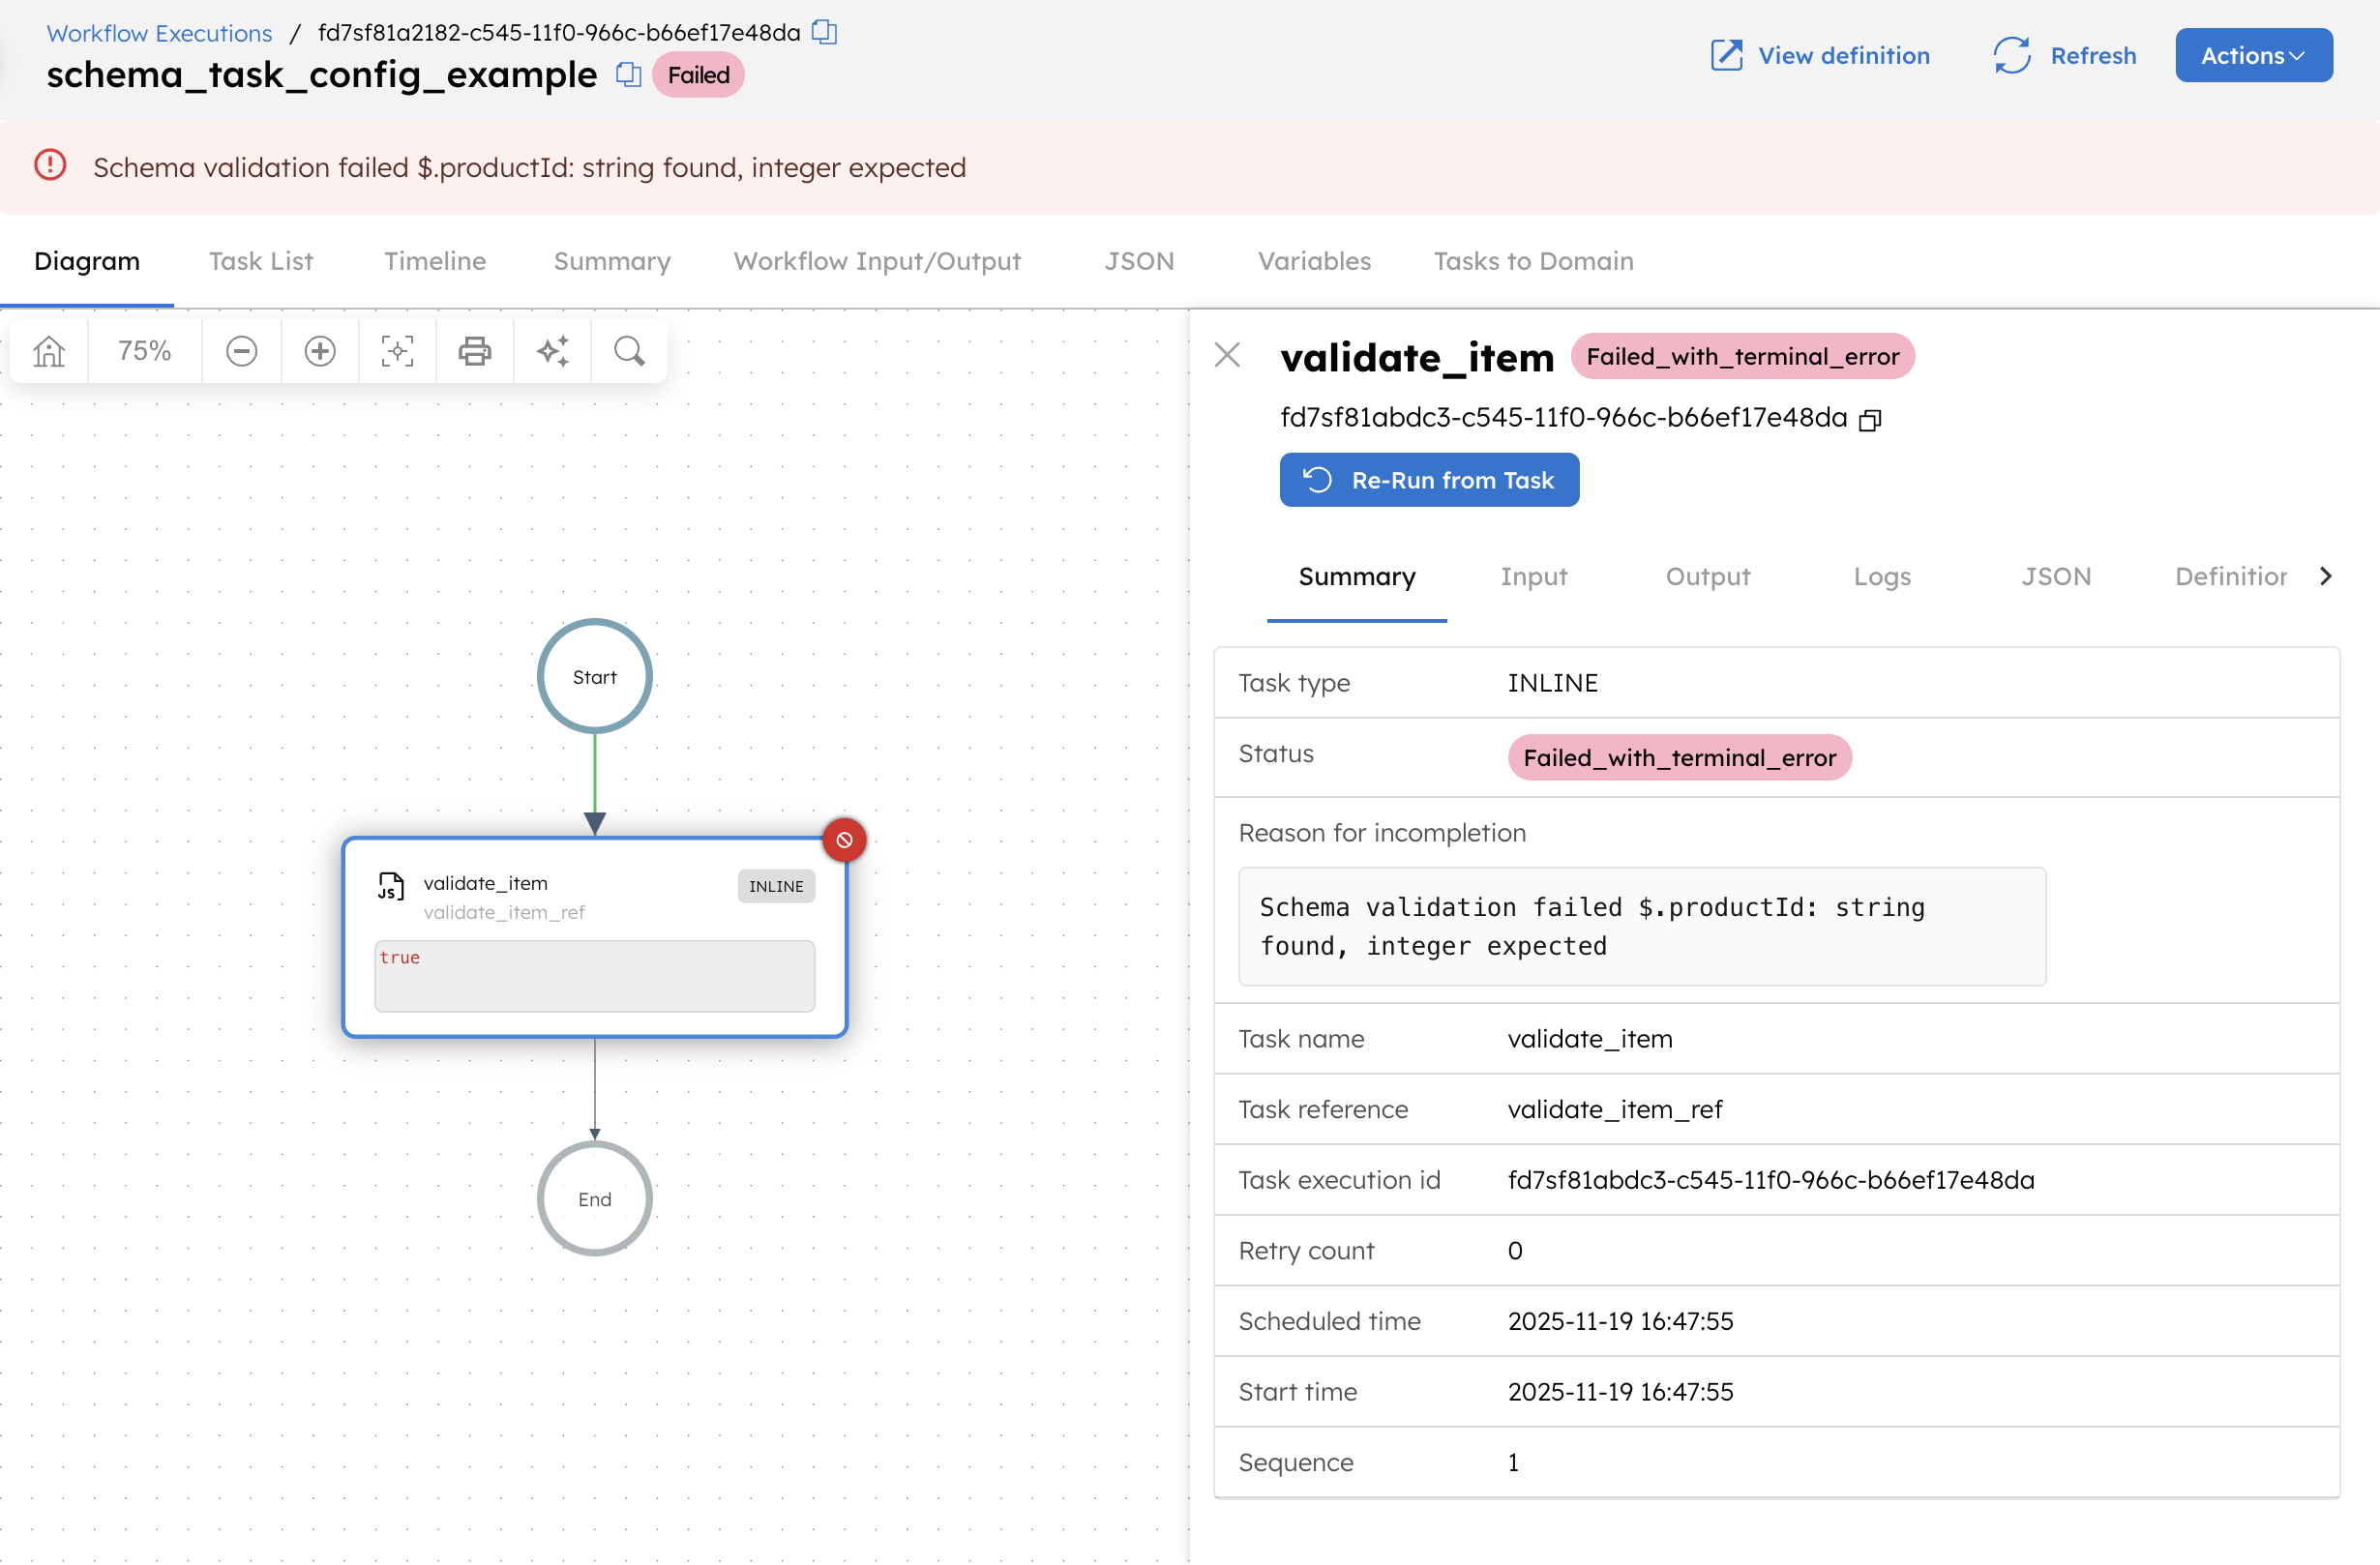
Because productId is defined in the schema as an integer, providing a string value causes the input to violate the schema. During execution, Conductor validates the task inputs against the schema attached to the task configuration. When the validator checks $.productId, it detects that a string was provided where an integer is required.
As a result, schema validation fails before the task can run. Conductor immediately marks the task with the status FAILED_WITH_TERMINAL_ERROR, which indicates that the task cannot proceed or be retried automatically. Since this task is part of a workflow and its failure is terminal, the workflow also transitions to the Failed state.
Applying a schema in a workflow definition
The following example demonstrates how to define a schema and apply it at the workflow definition level.
A workflow-level schema validates the workflow input payload itself, before any tasks begin execution.
Step 1: Create a schema definition in Orkes Conductor
To create a schema:
- Go to Definitions > Schemas from the left navigation menu on your Conductor cluster.
- Select + New schema.
- In the Code tab, paste the following schema:
{
  "name": "customerSchema",
  "version": 1,
  "type": "JSON",
  "data": {
    "$schema": "https://json-schema.org/draft/2020-12/schema",
    "type": "object",
    "properties": {
      "customerId": {
        "type": "string"
      }
    },
    "required": ["customerId"]
  }
}
- Select Save.
This schema enforces that all workflow runs must provide a customerId of type string.
Step 2: Add the schema to a workflow definition
To add the schema to a workflow definition:
- Go to Definitions > Workflow from the left navigation menu on your Conductor cluster.
- Select + Define workflow and paste the following code in the Code tab:
{
 "name": "schema_workflow_definition_example",
 "description": "Workflow-level schema validation example",
 "version": 1,
 "tasks": [
   {
     "name": "log_customer",
     "taskReferenceName": "log_customer_ref",
     "type": "INLINE",
     "inputParameters": {
       "customerId": "${workflow.input.customerId}",
       "expression": "true",
       "evaluatorType": "graaljs"
     }
   }
 ],
 "inputParameters": [
   "customerId"
 ],
 "schemaVersion": 2
}
- Select Save > Confirm.
- In the Workflow tab, go to Schema and Parameters > Workflow Schema.
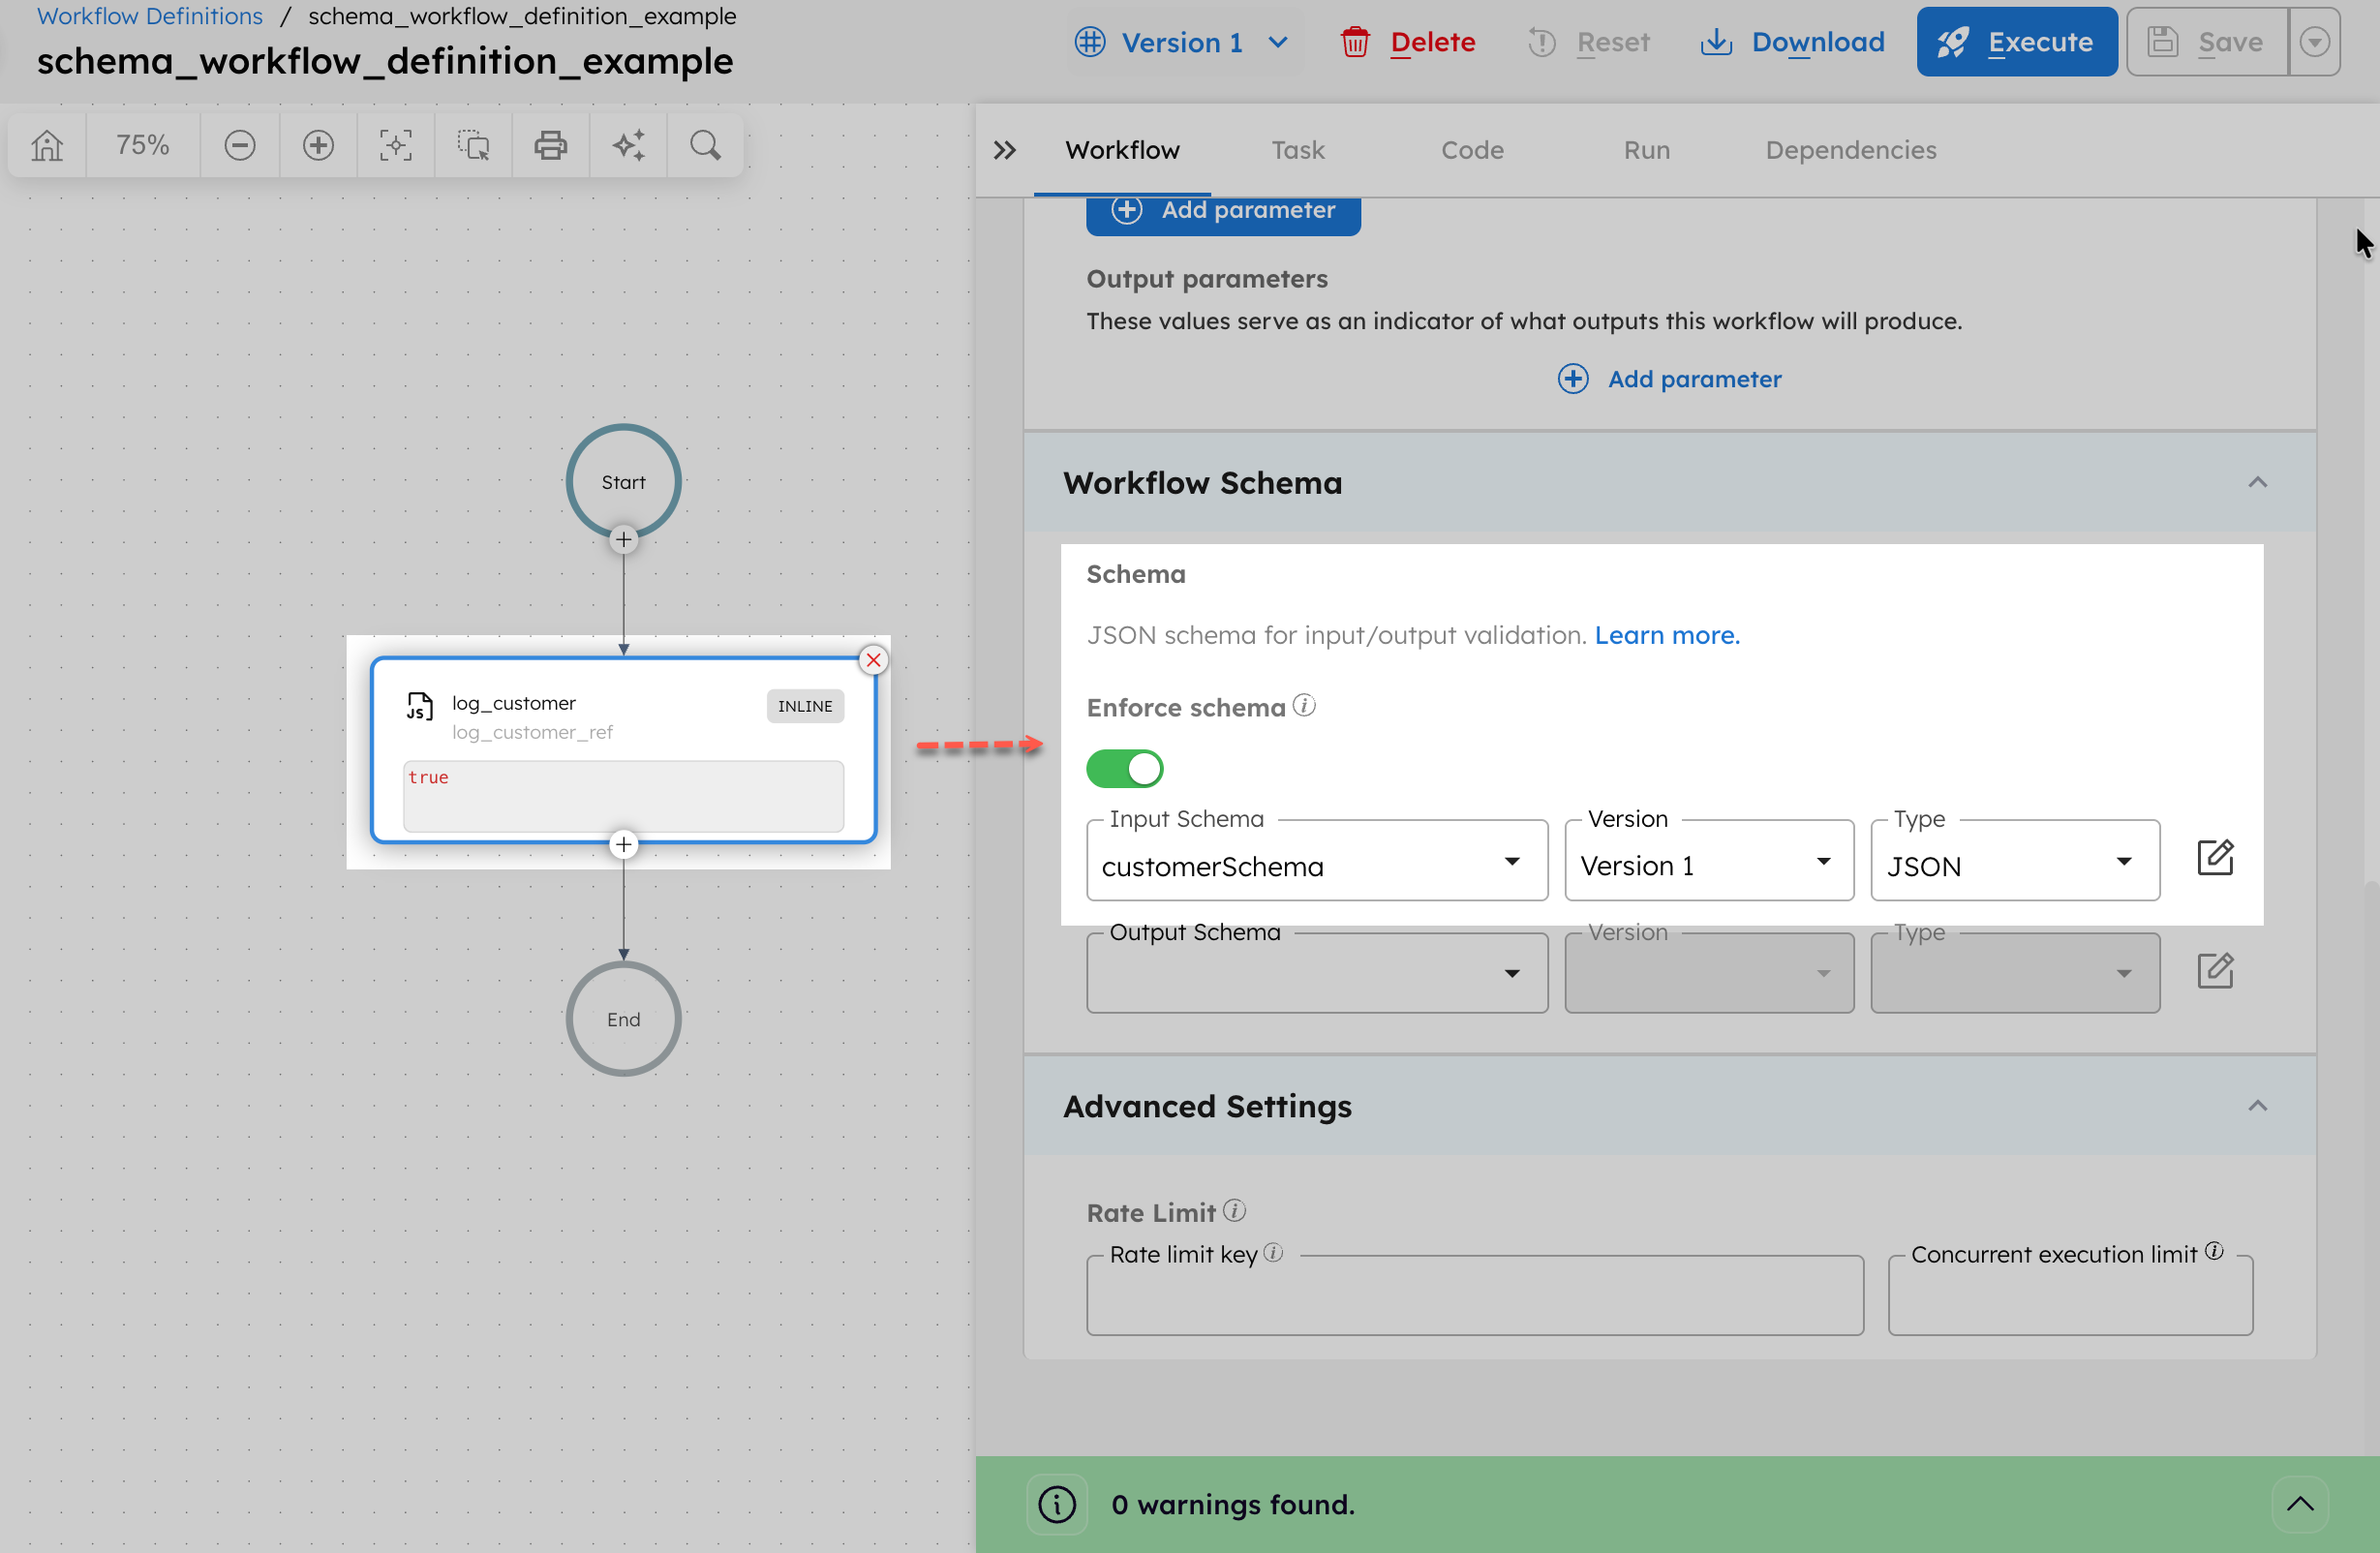
- In Input Schema, select the schema (
customerSchema) created in the previous step. - Select a Version for the schema.
- Select Save > Confirm in the top right.
Next, run the workflow.
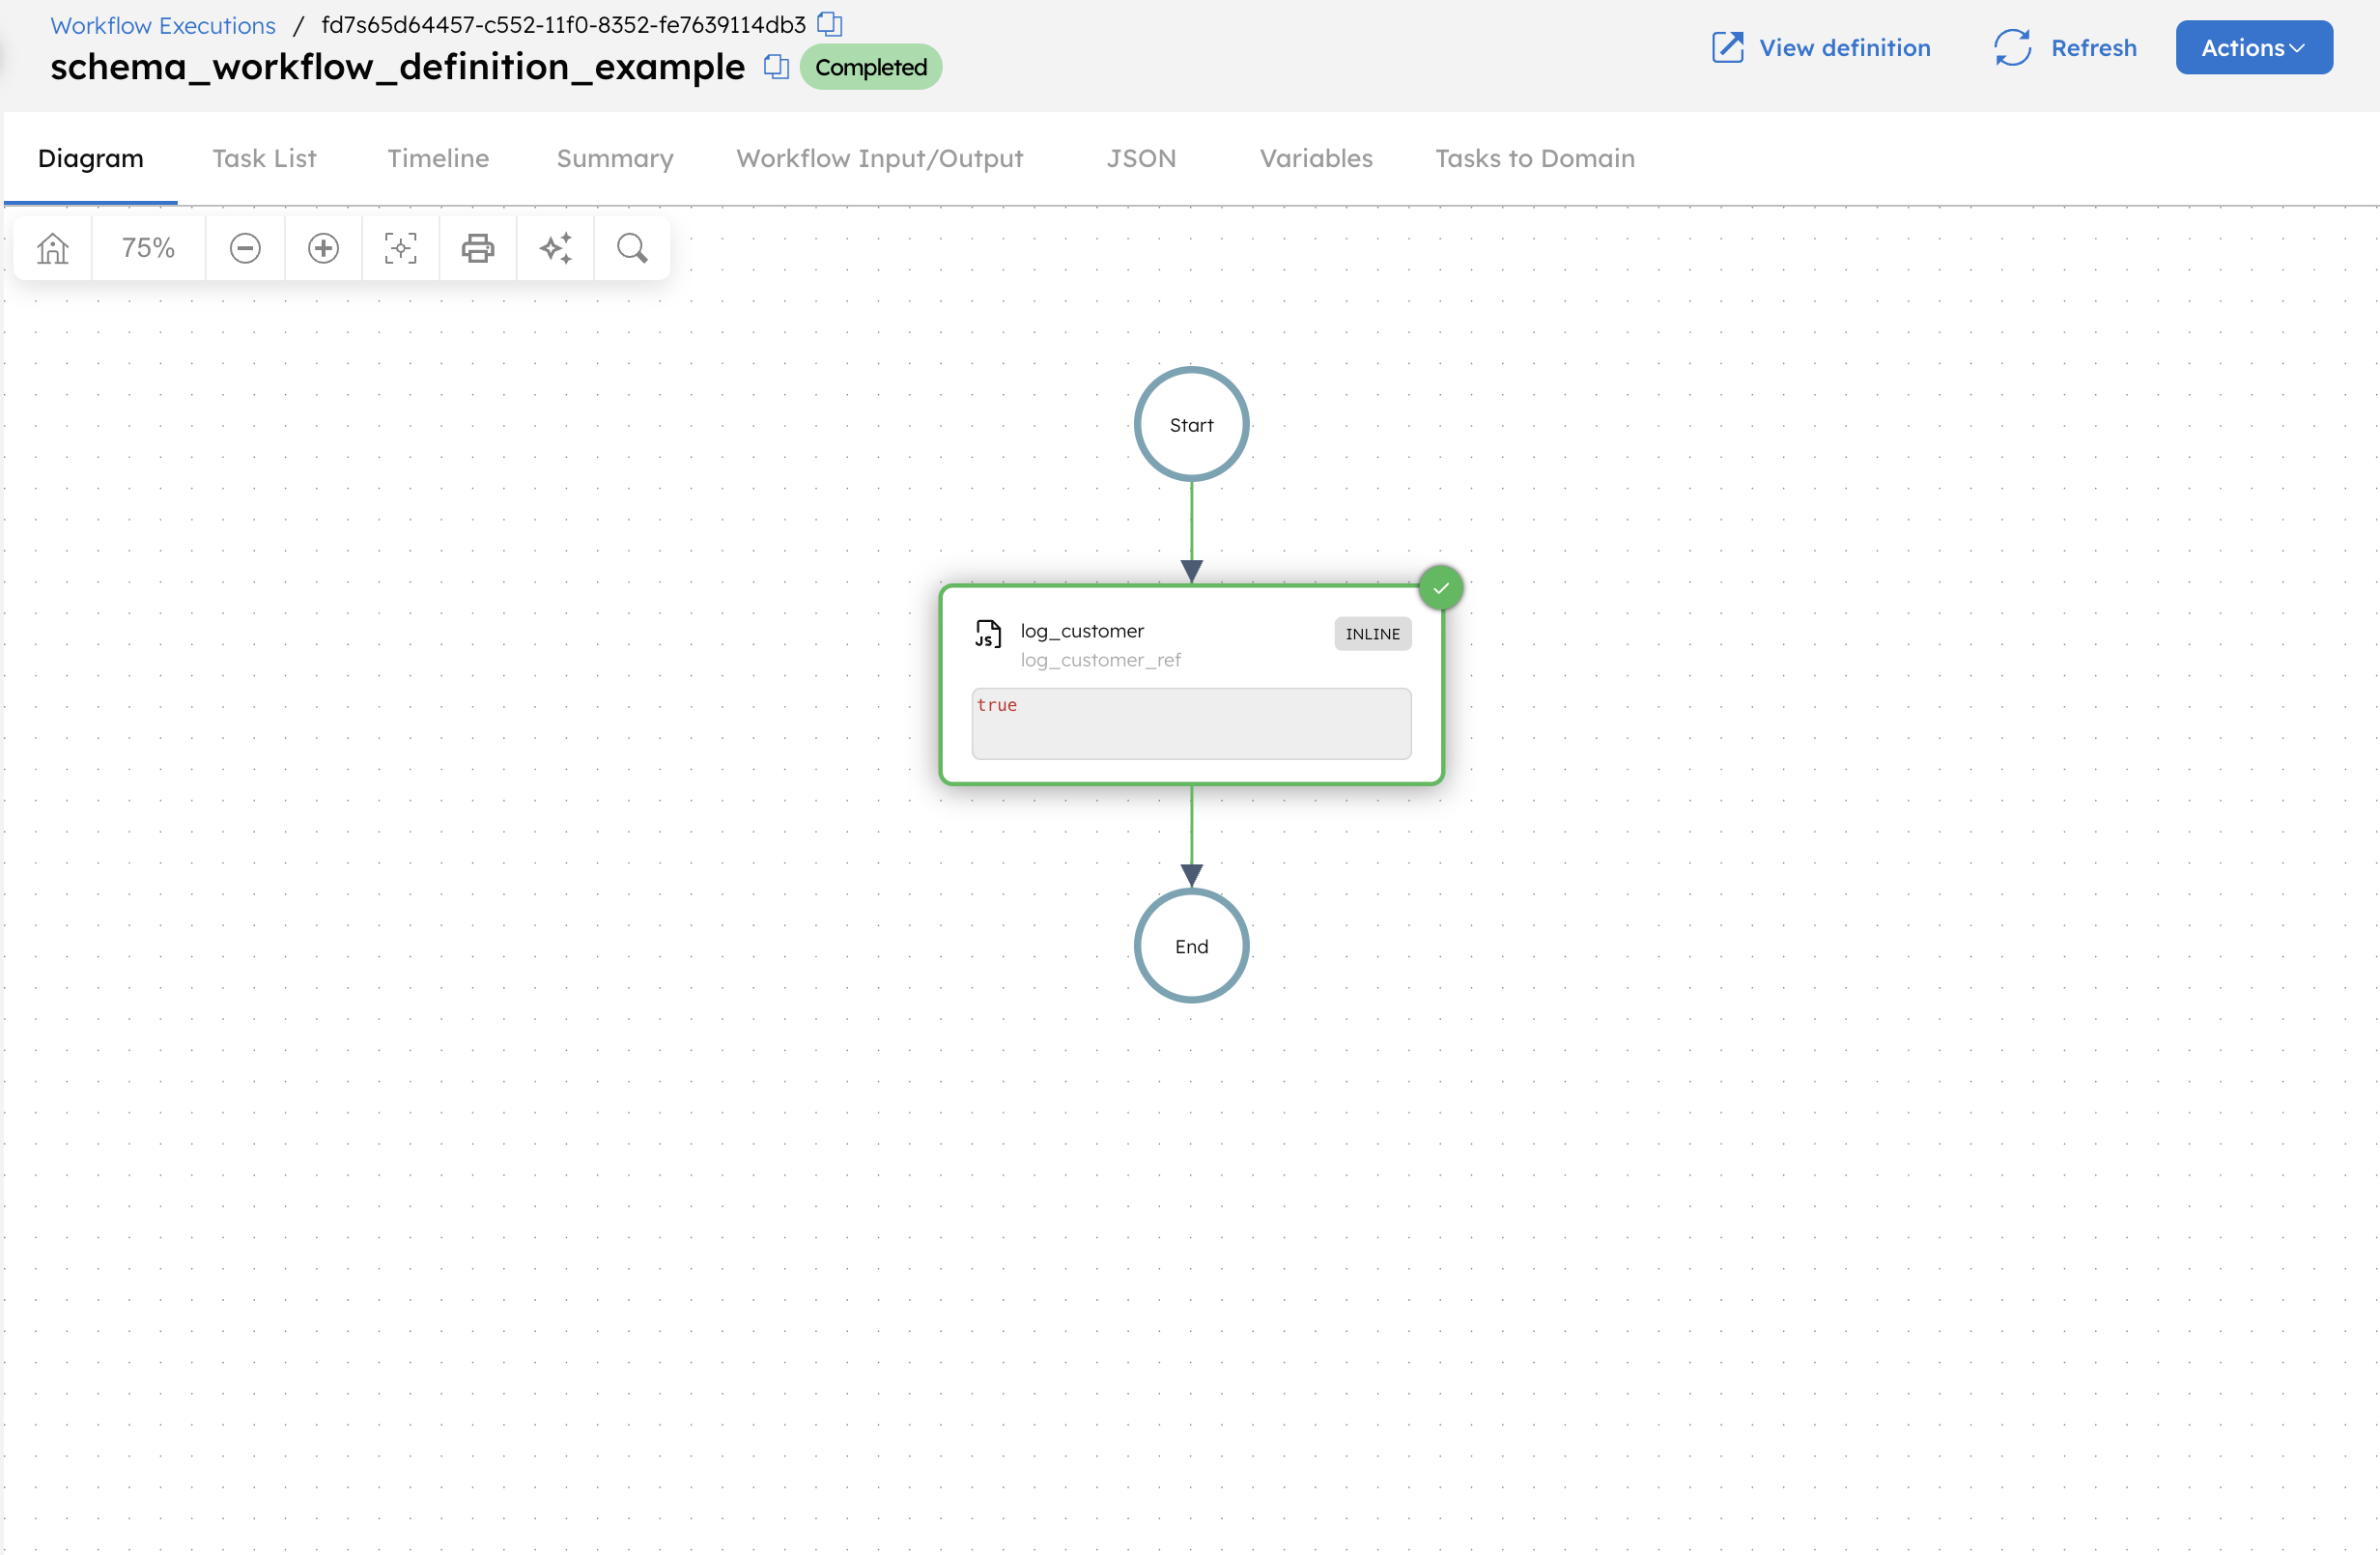
Step 3: Run the workflow
- Go to the Run tab, and enter a valid
customerIdas the Input params. For example:
{
  "customerId": "CUST-001"
}
- Select Execute.
Since the workflow input matches the required schema (string type), validation is successful. The Inline task executes immediately, and the workflow completes successfully.
Let’s see what happens if the schema definition is not correct.
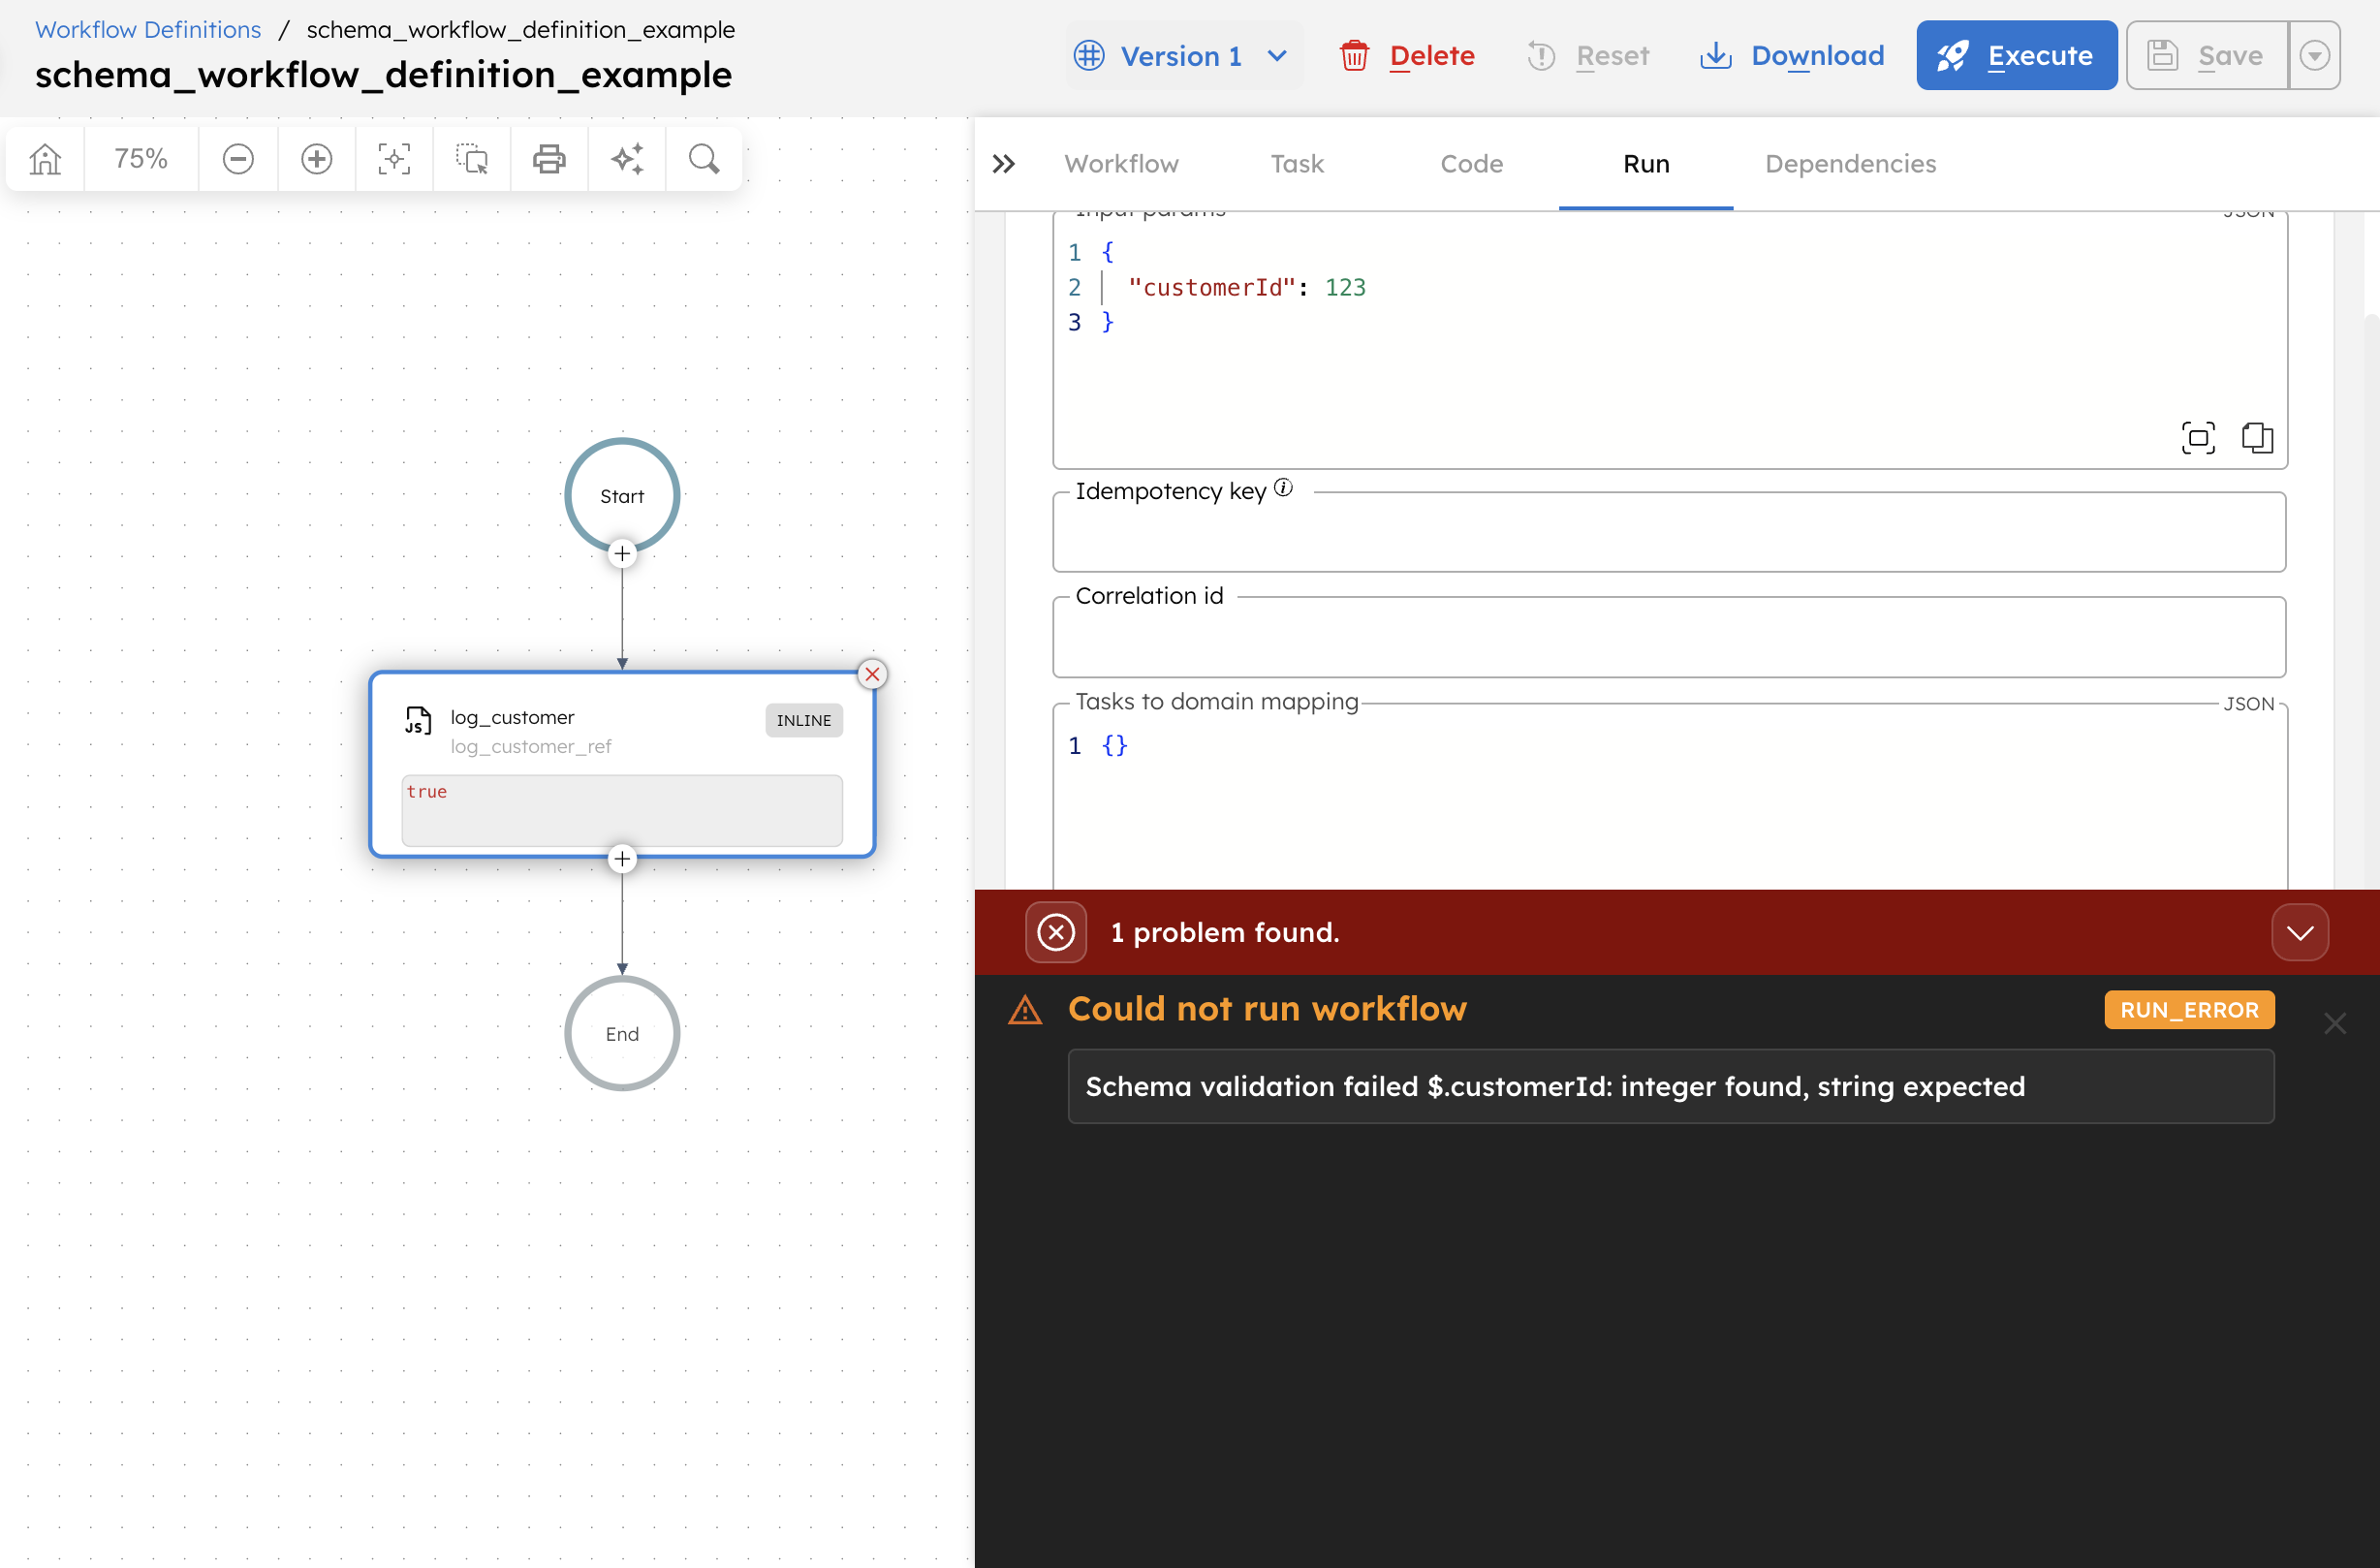
Rerun the same workflow with an invalid input, for example:
{
  "customerId": 123
}
Execution does not begin because workflow-level validation runs first. When Conductor detects that the customerId is expected to be a string but an integer was passed, it blocks the workflow from starting and surfaces the following error immediately: