Event
The Event task is used to publish events into message brokers. It supports various message brokers, including AMQP, Amazon MSK, AWS SQS, Azure Service Bus, Confluent Kafka, Apache Kafka, NATS Messaging, GCP Pub/Sub, and IBM MQ.
An Event task publishes a message to an event queue or topic. The specific message broker used depends on the configured sink. The sink parameter defines the message broker type, integration name, and queue/topic name. The task execution payload is sent to this sink, and Conductor automatically appends additional system input parameters to the payload.
- Integrate the required message broker with Orkes Conductor.
- Ensure the required topic/queue is created within your message broker.
Task parameters
Configure these parameters for the Event task.
| Parameter | Description | Required/ Optional |
|---|---|---|
| sink | The event queue sink in the format: message-broker-type:integration-name:topic/queue-name Where,
| Required. |
| inputParameters | The input parameters for the Event task, which can be passed as a dynamic variable or a fixed value. These parameters determine the payload sent to the event sink during task execution. | Optional. |
System-appended input payloads
During workflow execution, Conductor automatically adds the following parameters to the payload sent to the message broker. Ensure that these fields are not present in the input payload, as they will be overwritten at runtime.
- workflowInstanceId–Workflow (execution) ID from where this event was sent.
- workflowType–Name of the workflow definition.
- workflowVersion–Version of the workflow definition.
- correlationId–Correlation ID of the workflow execution.
Example
Given the following task configuration:
{
  "name": "event_task",
  "taskReferenceName": "event_task_ref",
  "type": "EVENT",
  "sink": "kafka:integration-name:topic-name",
  "inputParameters": {
    "myKey": "myValue",
    "myNumber": 100
  }
}
The execution will produce the following input parameters:
{
  "myKey": "myValue",
  "myNumber": 100,
  "workflowInstanceId": "967b19ae-10d1-4b23-b0e7-ae324524dac0",
  "workflowType": "my-workflow-name",
  "workflowVersion": "1",
  "correlationId": "fbdcafd2-69c7-4b75-8dd1-653e33d48746"
}
The following are generic configuration parameters that can be applied to the task and are not specific to the Event task.
Other generic parameters
Here are other parameters for configuring the task behavior.
| Parameter | Description | Required/ Optional |
|---|---|---|
| optional | Whether the task is optional. If set to true, any task failure is ignored, and the workflow continues with the task status updated to COMPLETED_WITH_ERRORS. However, the task must reach a terminal state. If the task remains incomplete, the workflow waits until it reaches a terminal state before proceeding. | Optional. |
| asyncComplete | Whether the task is completed asynchronously. The default value is false.
Available since v4.1.40 and later | Optional. |
Task configuration
This is the task configuration for an Event task.
{
     "name": "event",
     "taskReferenceName": "event_ref",
     "type": "EVENT",
     "sink": "message-broker-type:integration-name:topic/queue-name",
     "inputParameters": {
       "someKey": "someValue"
     }
}
Task output
The task output mirrors the payload sent during execution, including system-appended parameters, and additional metadata. For example:
{
 "eventId": "13a6bdfa-e375-4e87-af46-8ba66572ad9c",
 "sink": "messaging-type:integration-name:queue-or-topic-name",
 "workflowType": "eventTest",
 "correlationId": null,
 "workflowVersion": 1,
 "_createdBy": "john.doe@acme.com",
 "workflowInstanceId": "2610b755-c147-11f0-92e1-ae47cf6bc1ce"
}
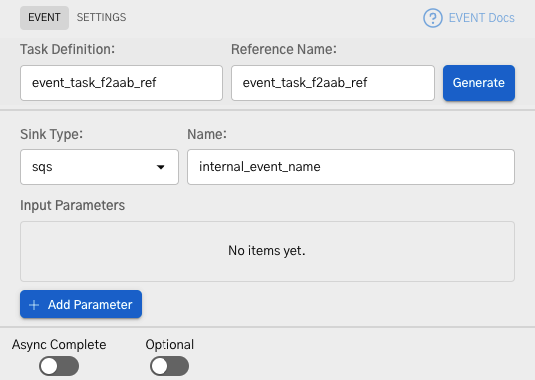
Adding an Event task in UI
To add an Event task:
- In your workflow, select the (+) icon and add an Event task.
- In Destination > Sink, select the required integration from the drop-down list, then manually append the topic or queue name. The drop-down lists only the integration name. If you do not append a valid topic or queue, the task fails because the payload has no destination.
- (Optional) Add any additional input parameters.
Examples
Here are some examples for using the Event task.
Using an Event task to publish events to AWS SQS
In this example, we will integrate AWS SQS with Orkes Conductor to publish messages to an SQS queue.
- Integrate AWS SQS with Orkes Conductor.
- Create a Workflow with an Event task.
- Run Workflow.
- Verify message delivery in AWS SQS.
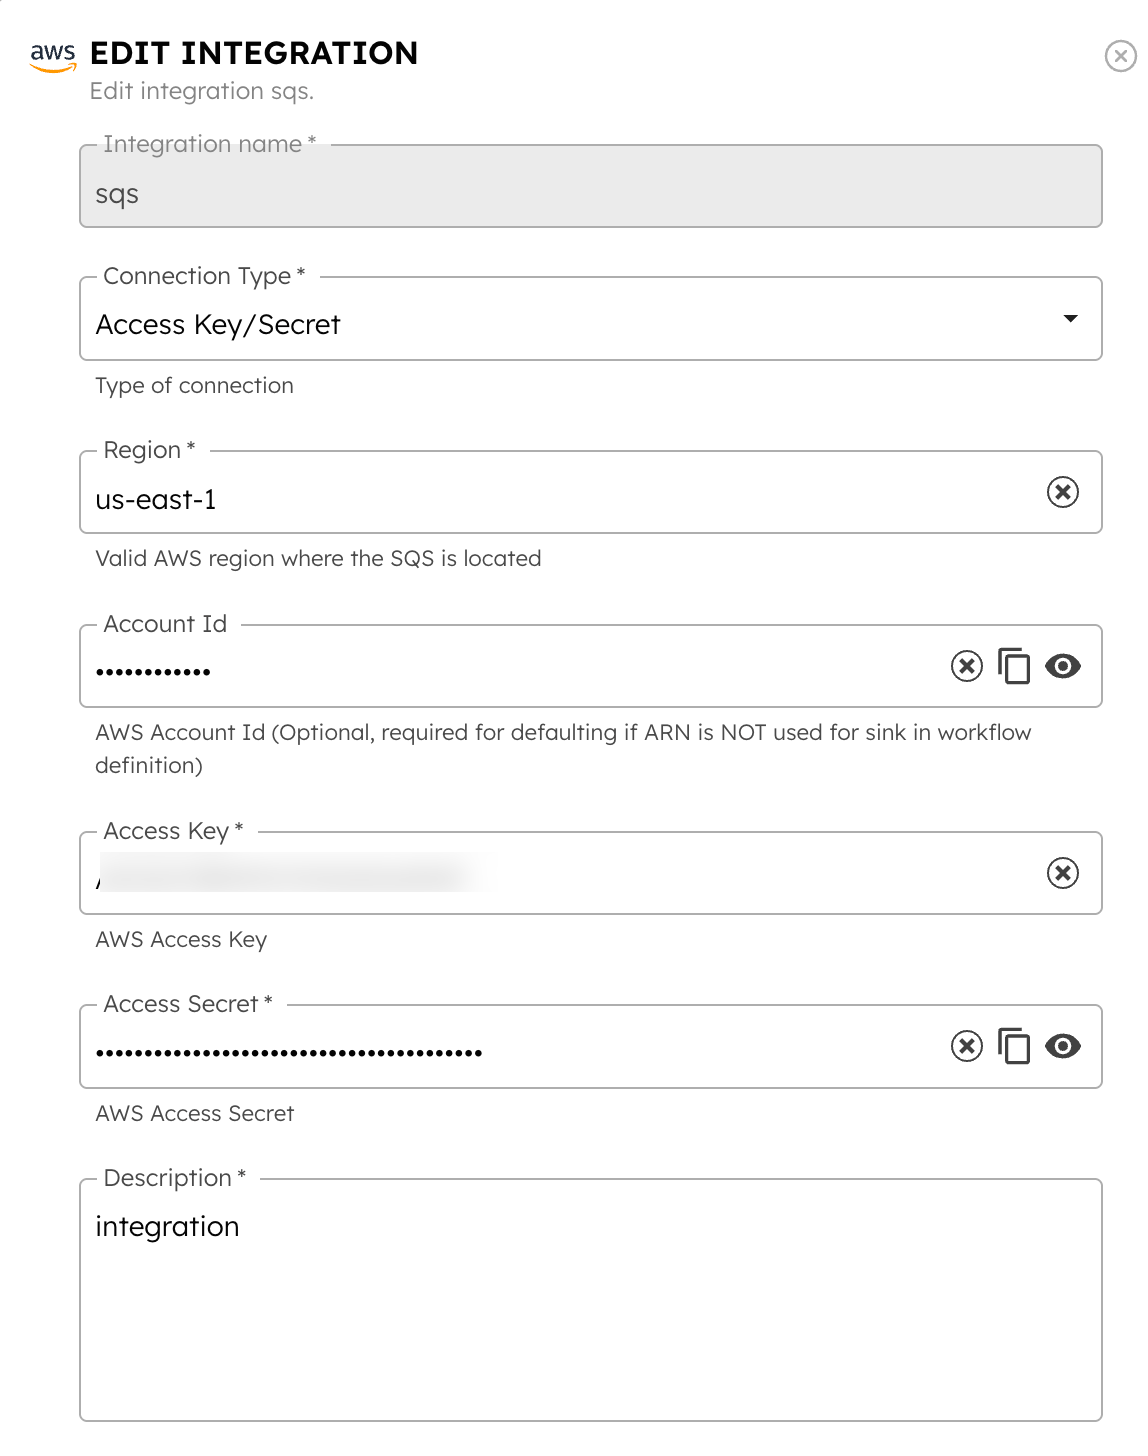
Step 1: Integrate AWS SQS with Orkes Conductor
In this example, you integrate AWS SQS using the connection type “Access Key/Secret.” For this, you need the following credentials from your AWS account:
- Region: The region of your AWS account. For example, us-east-1.
- Account ID: The account ID available in your AWS account details.
- Access Key and Access Secret: Create an IAM user with the AmazonSQSFullAccess permission, and then generate the access credentials.
- SQS queue: A queue to receive events from Conductor.
Once you have these credentials, add the integration to your Conductor cluster.
- Go to Integrations > Connections and Resources from the left navigation menu on your Conductor cluster.
- Create a new integration for Amazon SQS using the credentials you retrieved.
Step 2: Create a Workflow with an Event task
This step involves creating a workflow with an Event task. Here, you use the AWS SQS queue as the sink for the event.
For testing purposes, you can quickly build a workflow using the Conductor UI.
To create a workflow:
- Go to Definitions > Workflow, and select + Define Workflow.
- Add an Event task with the Sink
sqs:<your-integration-name>:<your-queue-name>.
Here’s the complete workflow definition JSON:
{
 "name": "eventTest",
 "description": "A workflow that sends workflow details to AWS SQS queue",
 "version": 1,
 "tasks": [
   {
     "name": "event",
     "taskReferenceName": "event_ref",
     "type": "EVENT",
     "sink": "sqs:<your-integration-name>:<your-queue-name>" //Replace with your integration and queue name
   }
 ],
 "schemaVersion": 2
}
- Save the workflow.
Step 3: Run Workflow
To run the workflow, select the Execute button from the workflow definition page.

This takes you to the workflow execution page, where you can view the workflow status. Once the workflow is complete, you can view the workflow output payload sent to the SQS queue.

Step 4: Verify message delivery in AWS SQS
Next, verify the message delivery in the SQS console.
- In your Amazon SQS console, go to Amazon SQS > Queues > Select your queue.
- Select Send and receive messages.
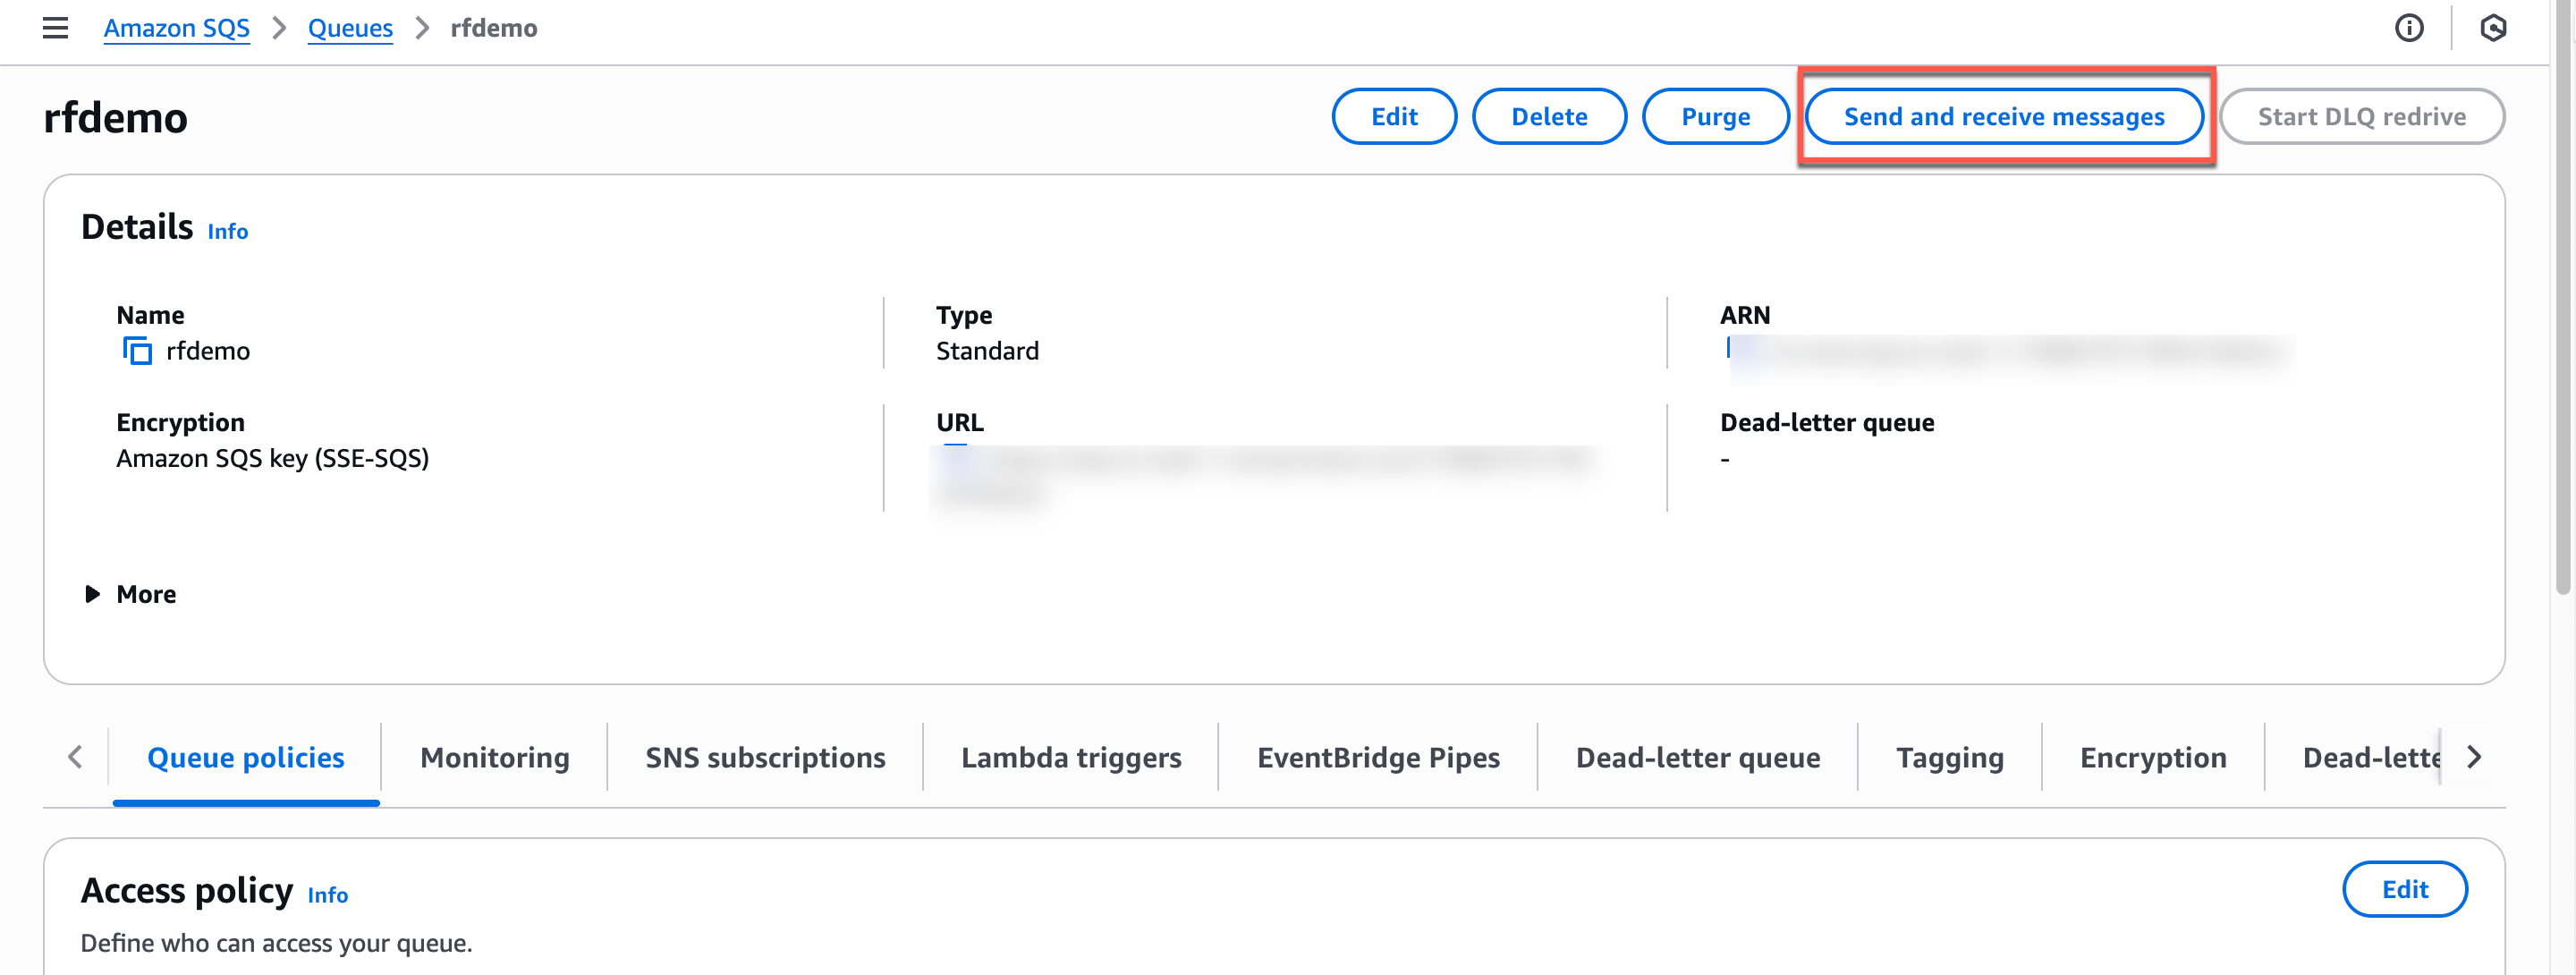
- Scroll down to Receive messages and select Poll for messages.
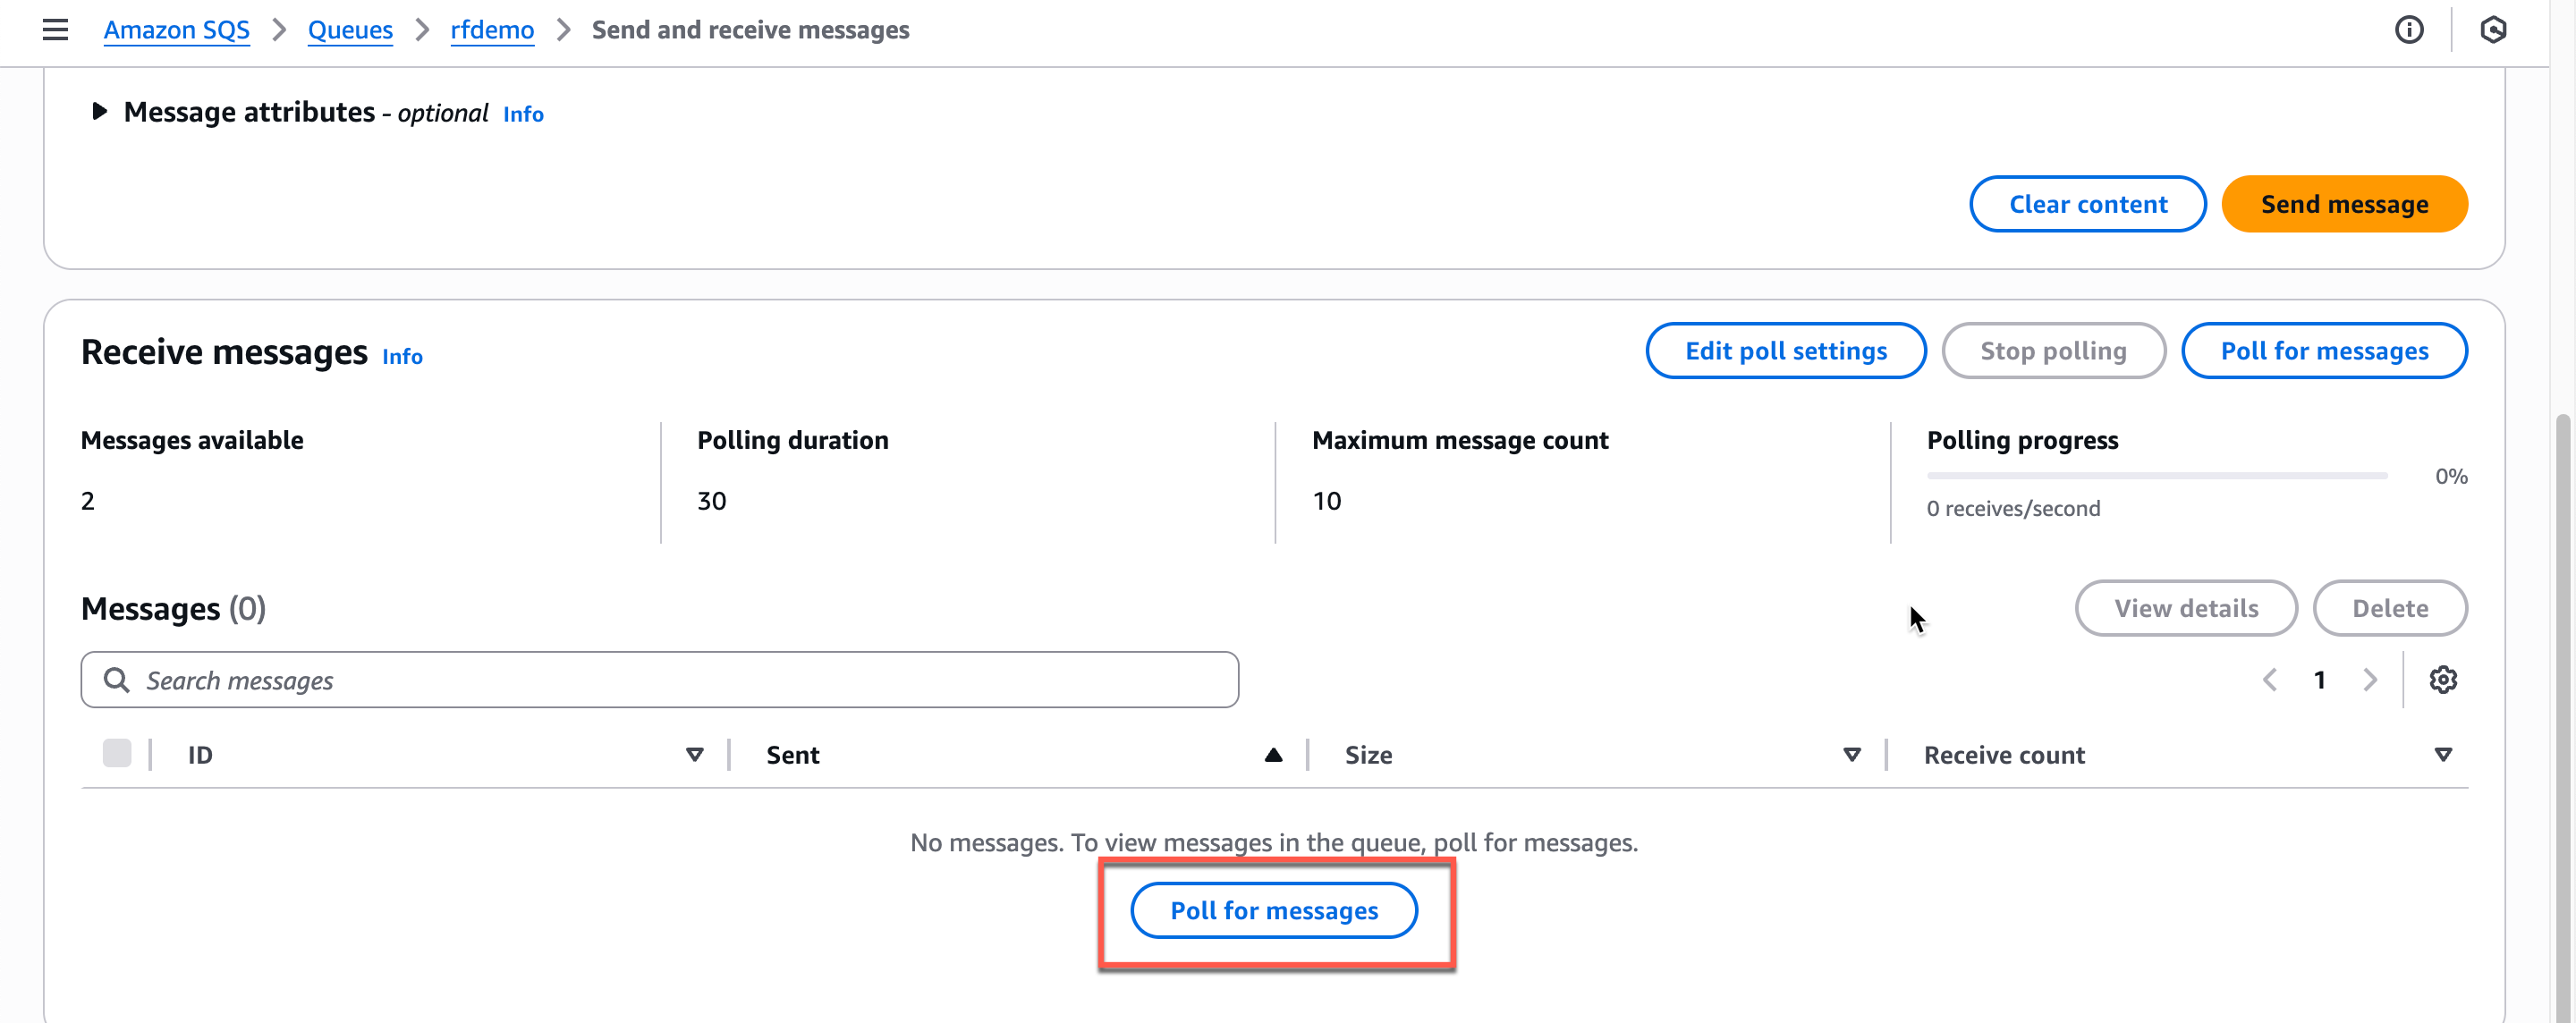
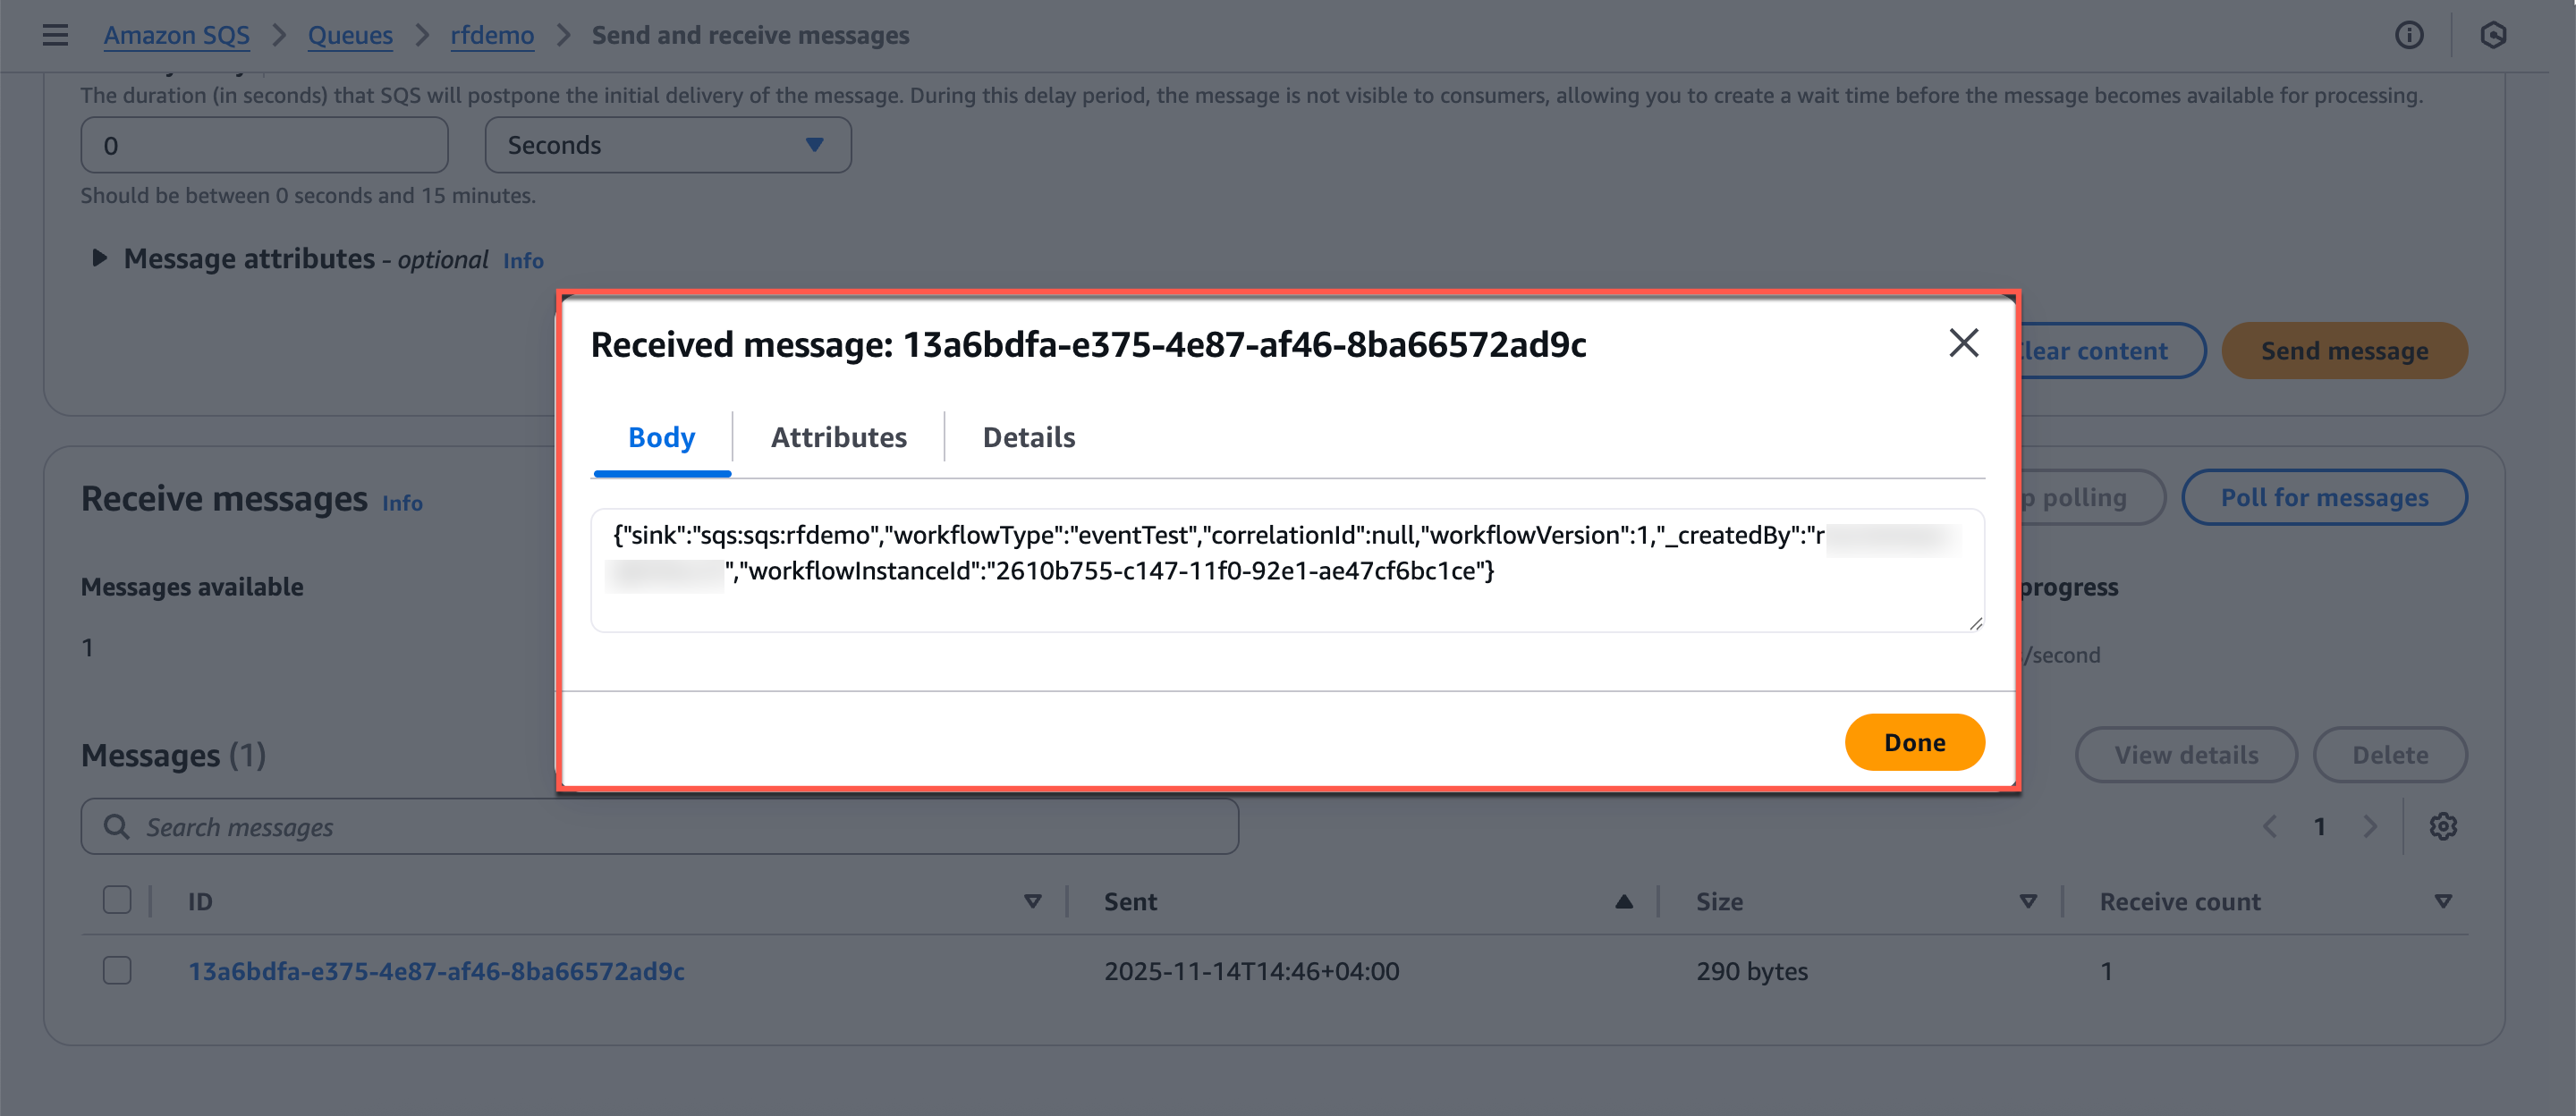
- The message ID appears, which is the
eventIdpassed from Conductor. Select it to view the message body, which is the output of the Conductor workflow.
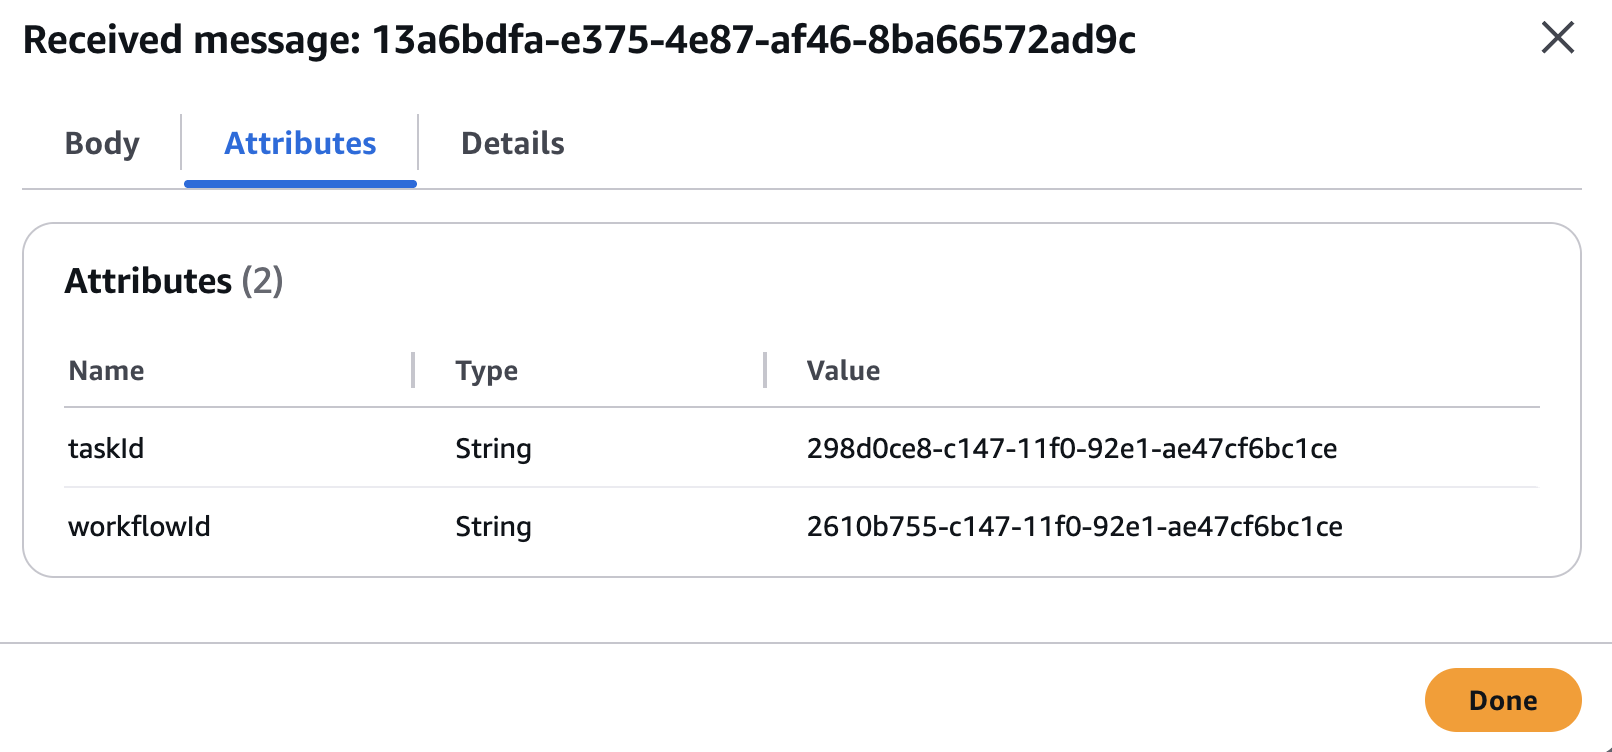
- In the Attributes tab, you can view the task ID and the workflow execution ID.
That’s it, you have sent the message to the SQS queue. You can extend this workflow based on your requirements by customizing the Event task’s input to suit your use case.
Using an Event task to publish events to Confluent Kafka
In this example, we’ll integrate Confluent Kafka with Orkes Conductor to publish messages to a Kafka topic.
- Integrate Confluent Kafka with Orkes Conductor.
- Create a Workflow with an Event task.
- Run Workflow.
- Verify message delivery in the Confluent portal.
Step 1: Integrate Confluent Kafka with Orkes Conductor
Get the configuration credentials and integrate Kafka as a message broker in Conductor cluster.
Step 2: Create a Workflow with an Event task
This step involves creating a workflow with an Event task. Here, we utilize the Kafka topic as a sink for the event.
For testing purposes, we can quickly build a workflow using Conductor UI.
To create a workflow:
-
Go to Definitions > Workflow, and select + Define Workflow.
-
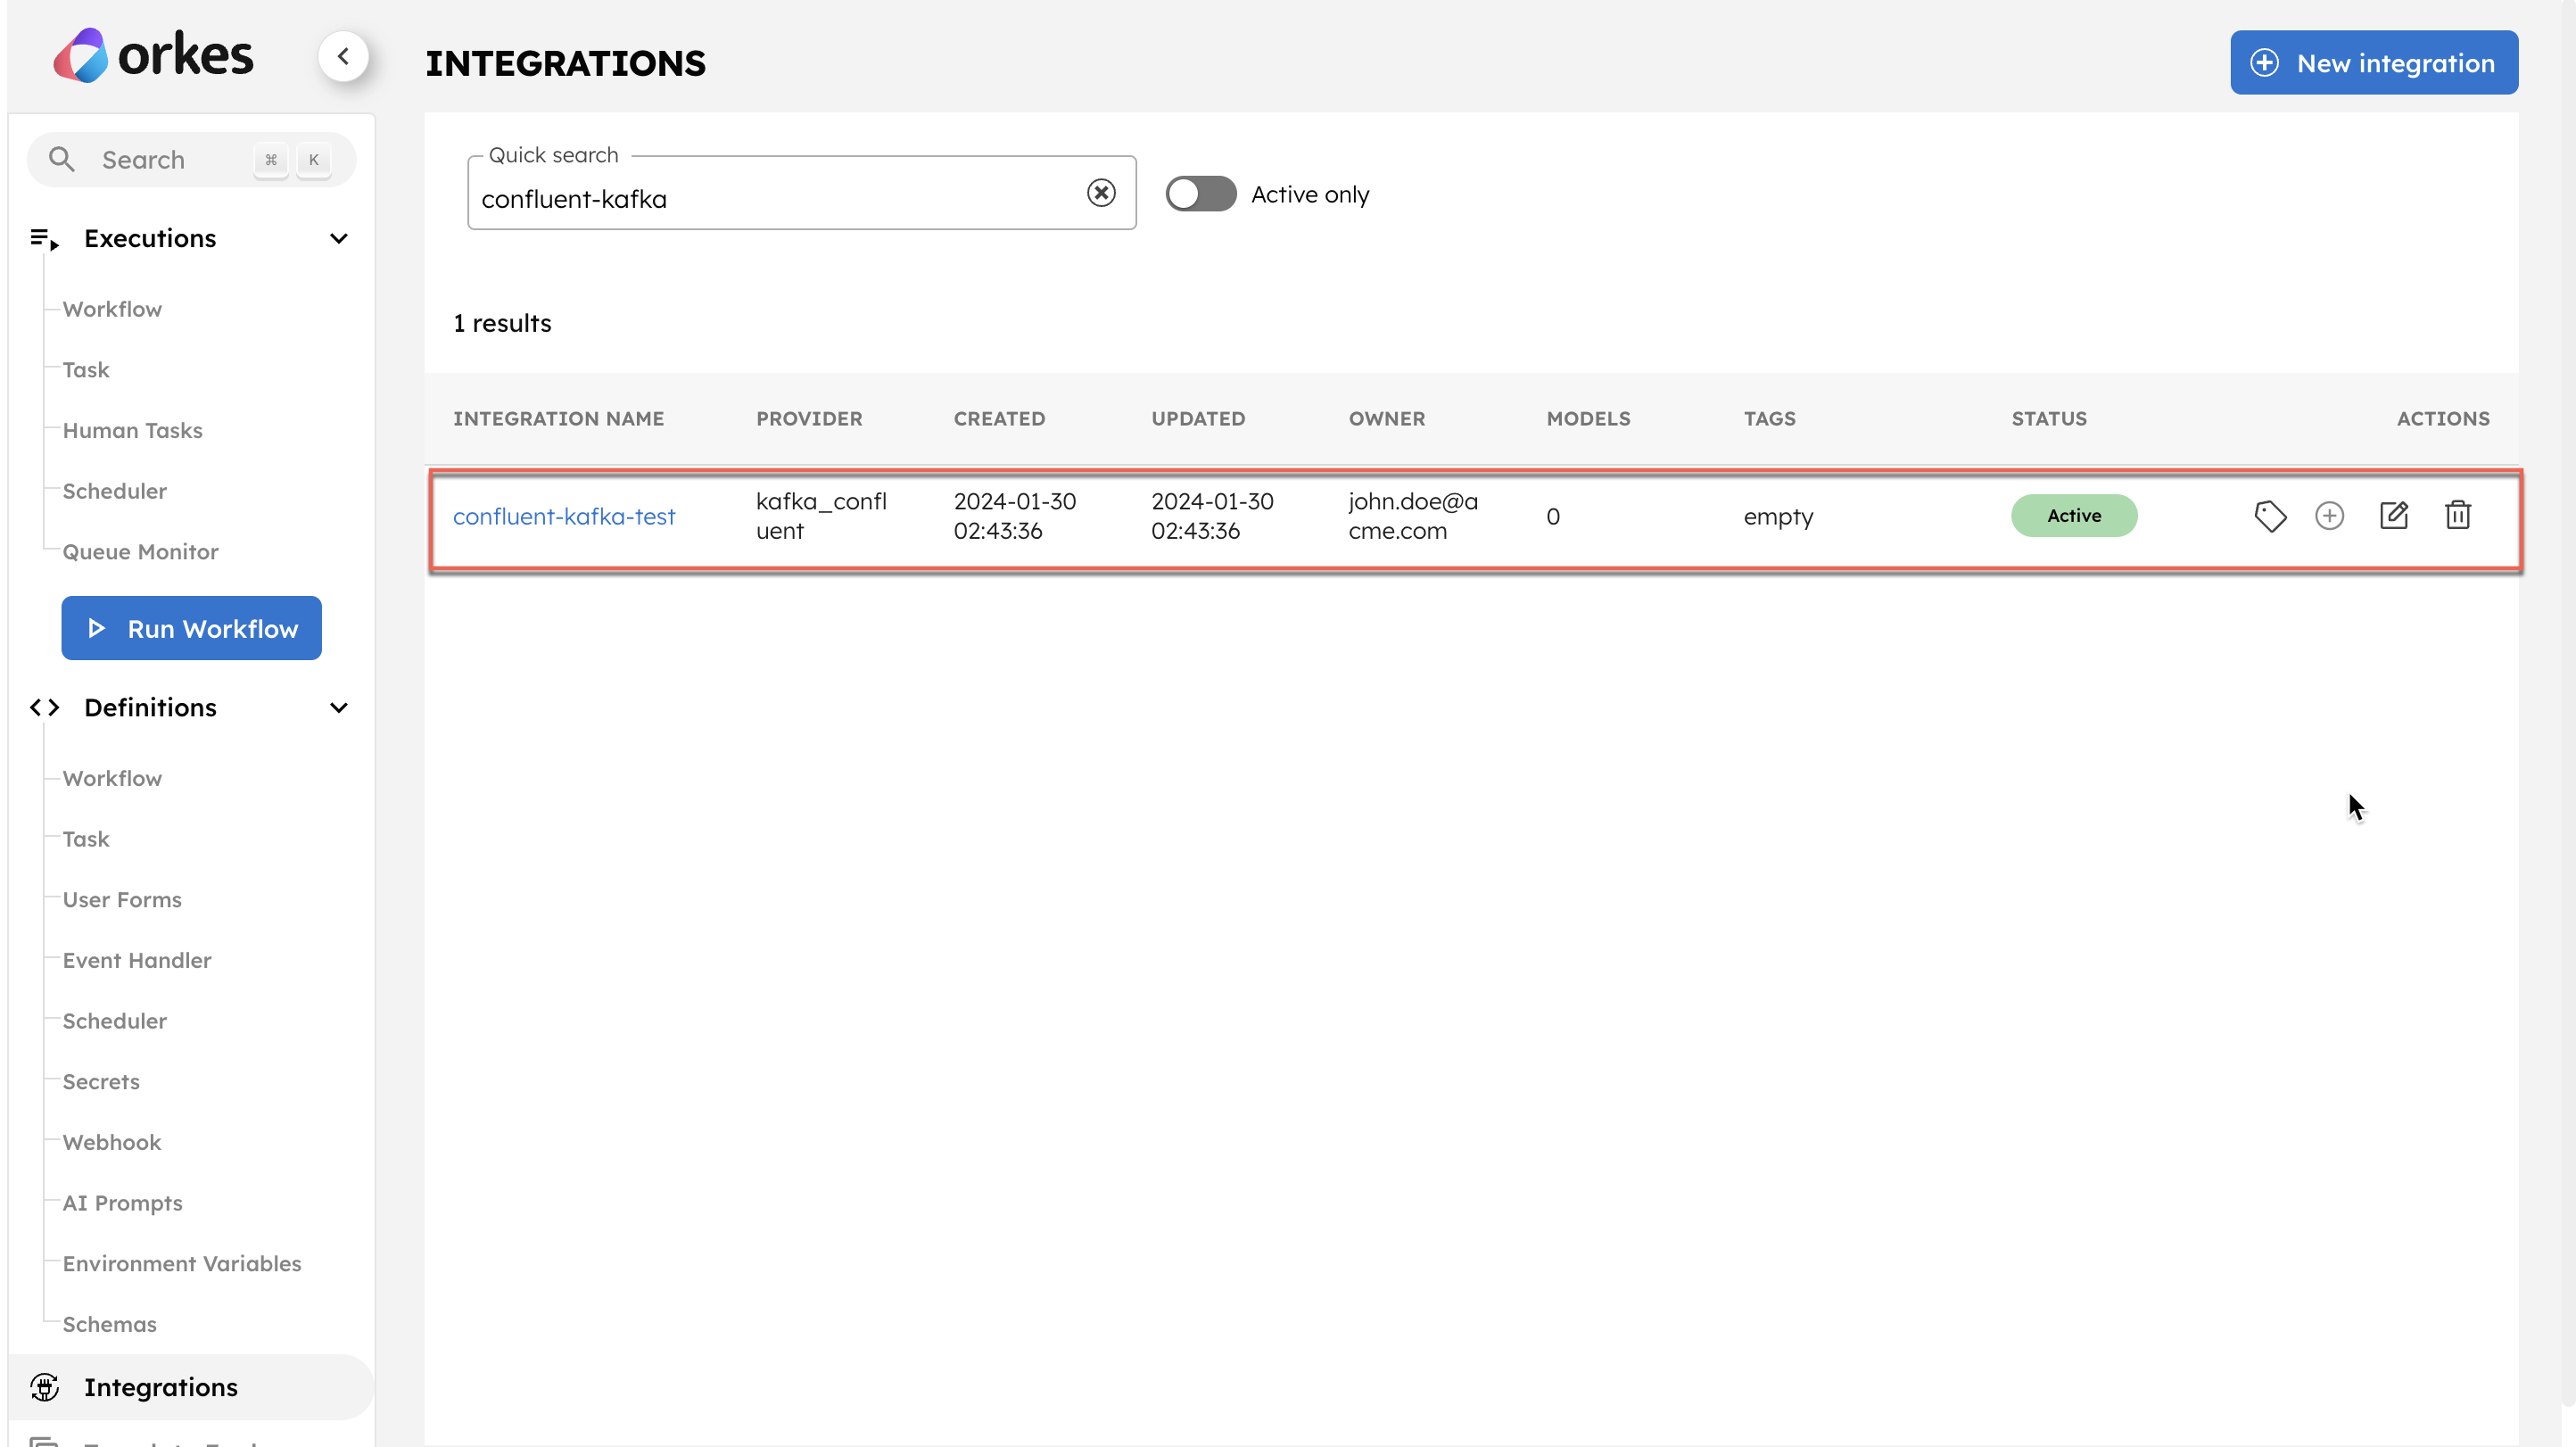
Add an Event task with the Sink
kafka_confluent:confluent-kafka-test:topic_0. -
In Input parameters, add the following parameters:
-
_schema—Set it to the topic name, including the schema subject.
To locate the schema subject name from Confluent console:- Go to Home > Environment > [Choose your environment].
- Under Schema Registry, find the subject name.
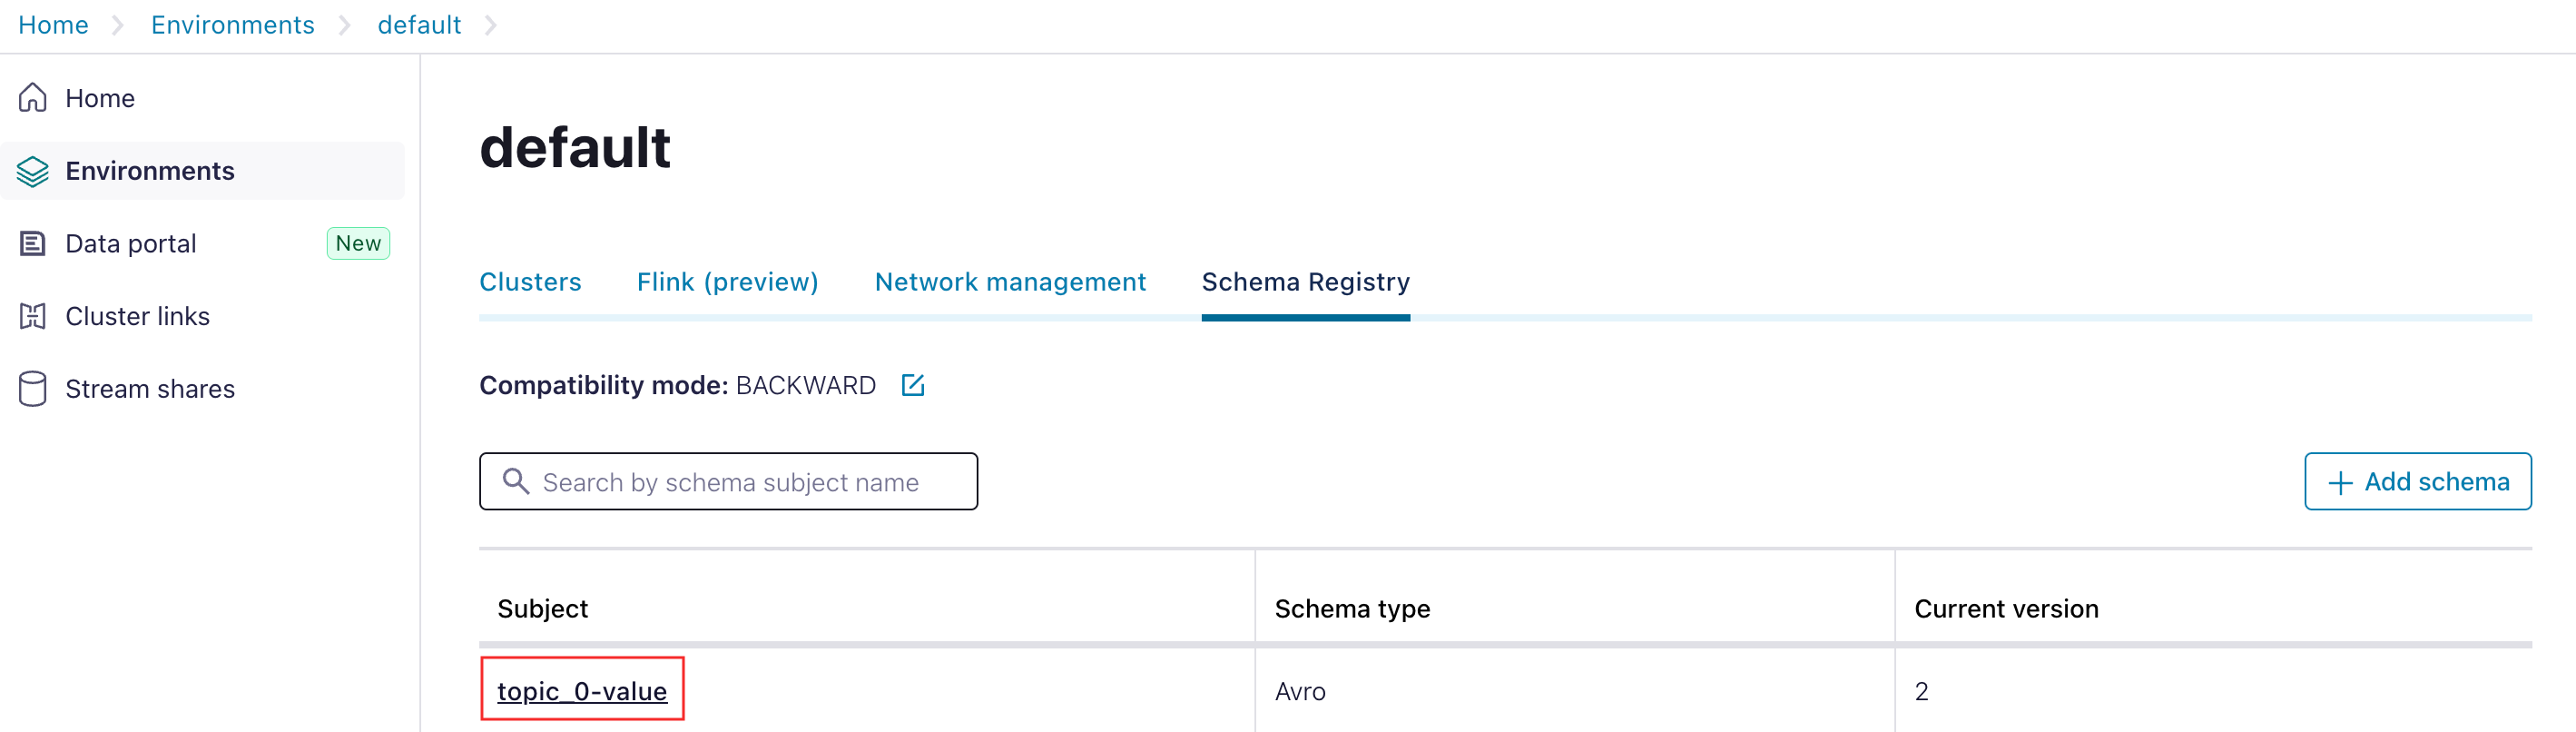
- Add this subject name as the input parameter:
"_schema": "topic_0-value"
-
Add all fields in the topic’s schema as the input parameters as well.
- Locate the schema for your topic by navigating to the Schema sub-tab from your topic and selecting Evolve schema.
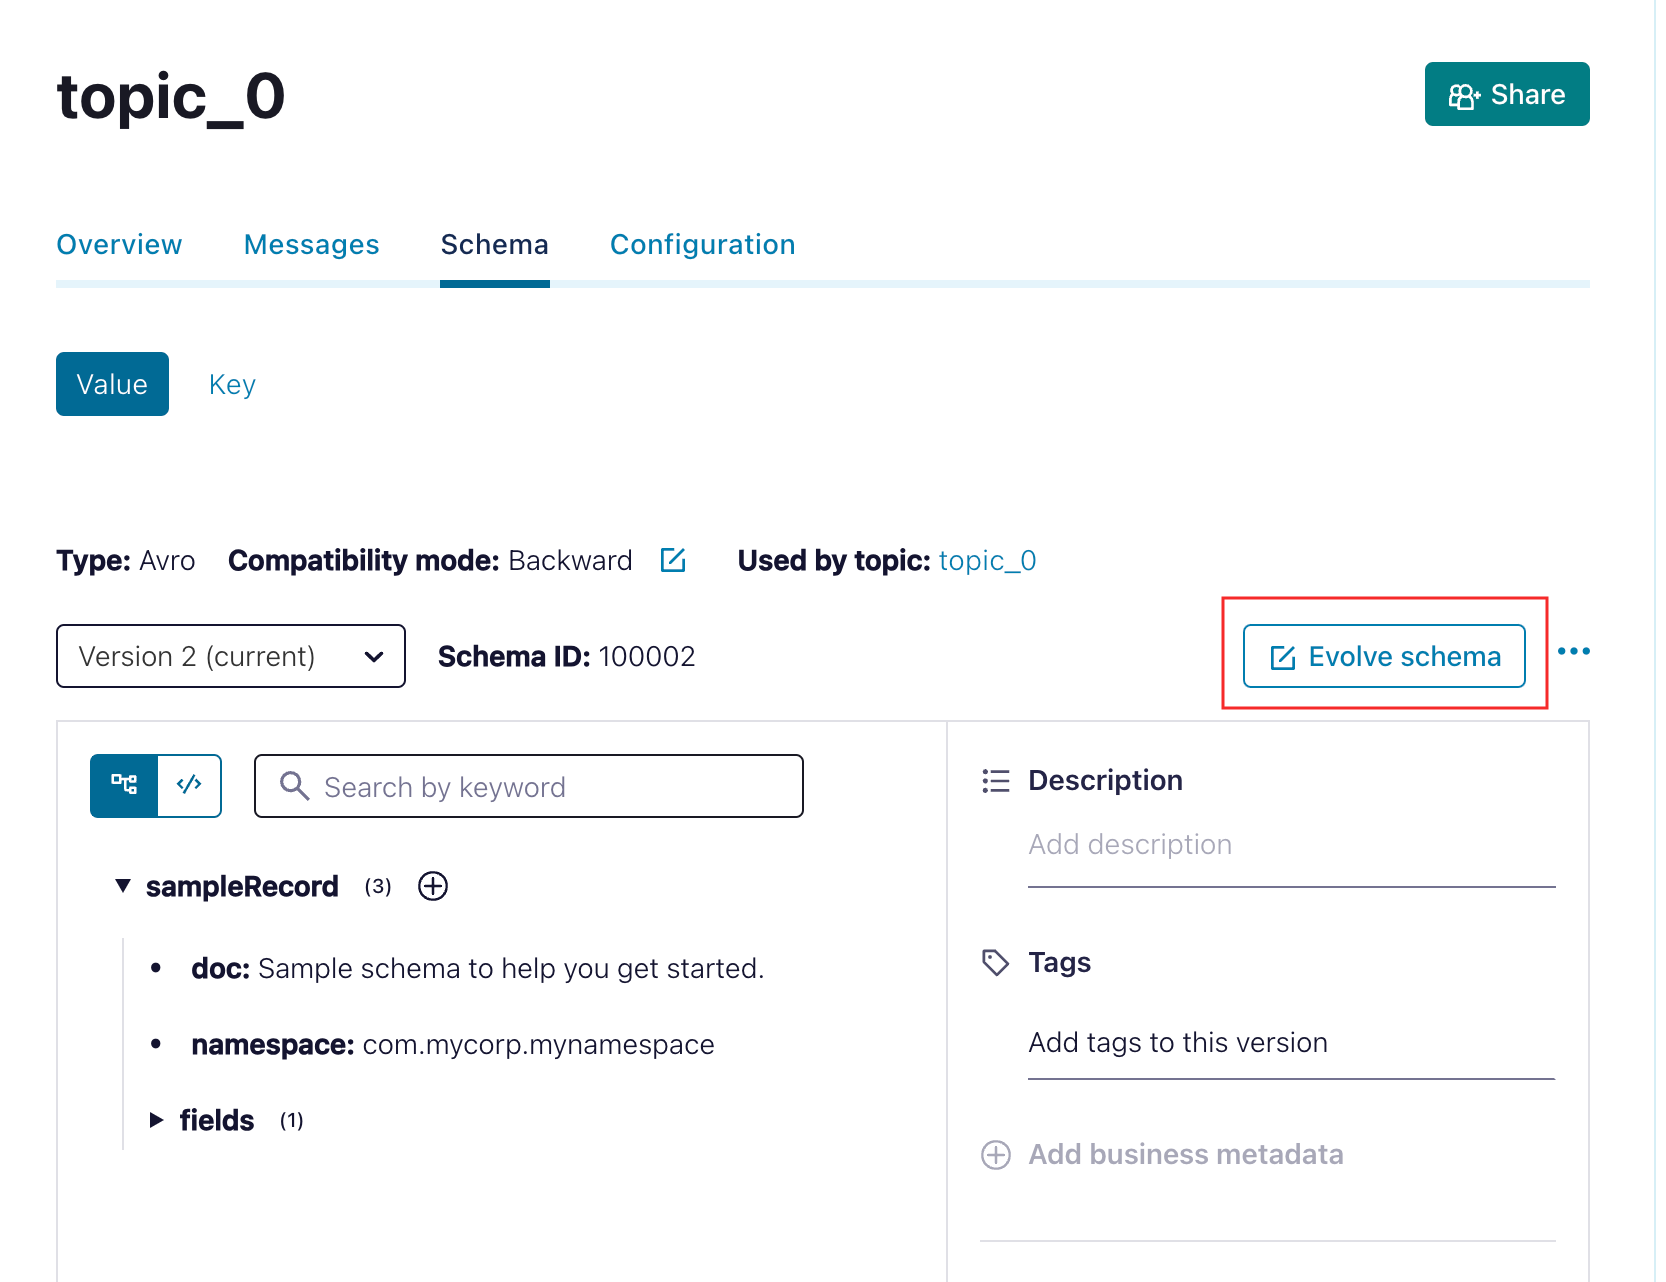
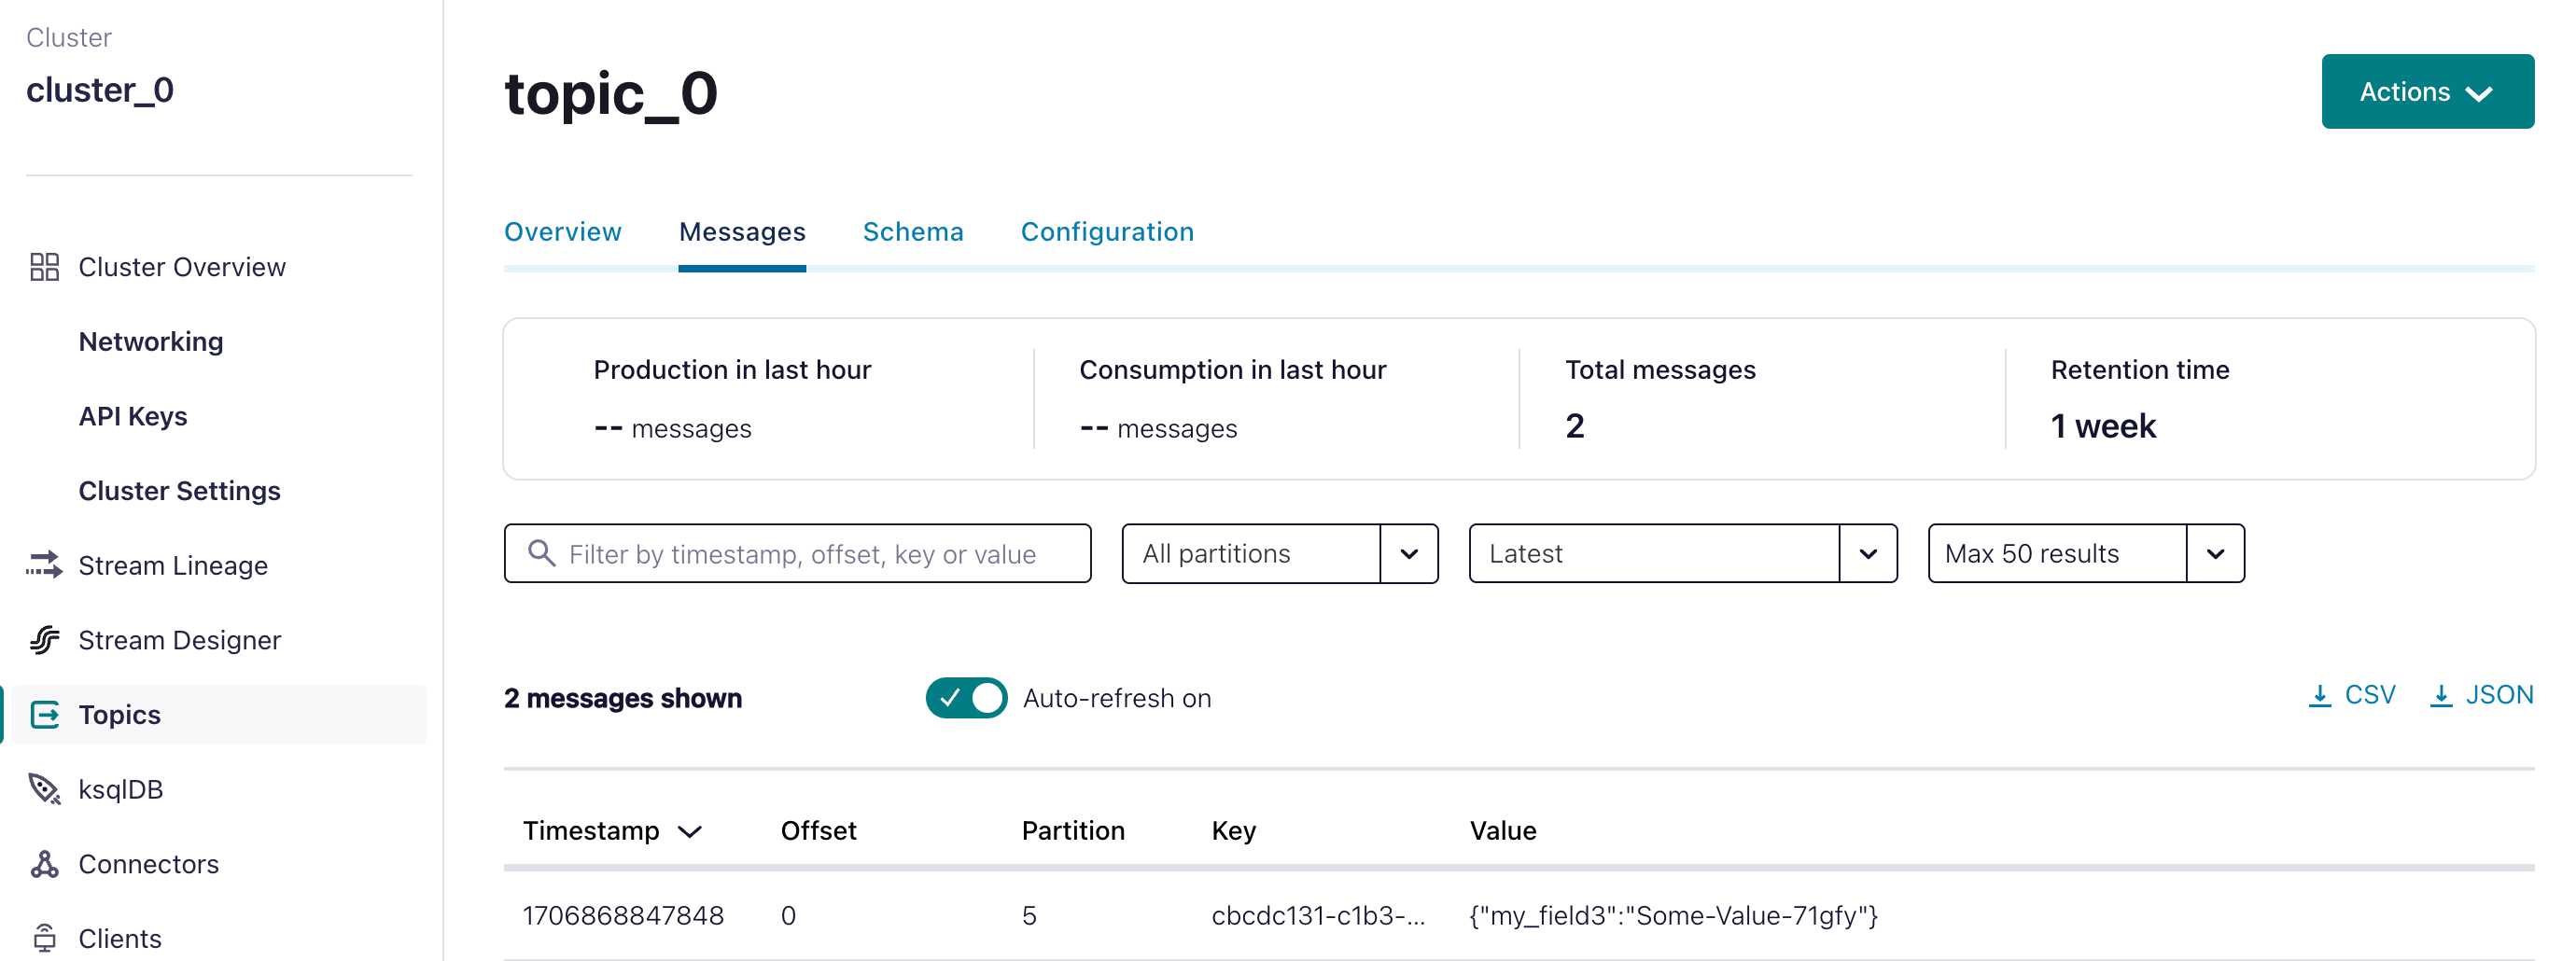
For example, The topic here is
topic_0, which has the following schema:{
"doc": "Sample schema to help you get started.",
"fields": [
{
"doc": "The string is a unicode character sequence.",
"name": "my_field3",
"type": "string"
}
],
"name": "sampleRecord",
"namespace": "com.mycorp.mynamespace", //Use a unique `name` and `namespace` to avoid any conflicts.
"type": "record"
}Ensure that each field in the schema is mapped as input parameters in the Event task.
So, in this example, the input parameters (including the schema fields and schema subject name) are as follows :
 "inputParameters": {
 "_schema": "topic_0-value",
 "my_field3": "Some-Value-71gfy"
 },
-
Here’s the complete workflow definition JSON:
{
  "name": "Confluent-Kafka-workflow",
  "description": "Sample Workflow for Confluent Kafka Integration",
  "version": 1,
  "tasks": [
    {
      "name": "event",
      "taskReferenceName": "event_ref",
      "inputParameters": {
        "_schema": "topic_0-value",
        "my_field3": "Some-Value-71gfy"
      },
      "type": "EVENT",
      "sink": "kafka_confluent:confluent-kafka-test:topic_name"
    }
  ],
  "schemaVersion": 2,
  "ownerEmail": "john.doe@acme.com"
}
- Save the workflow.
Step 3: Run Workflow
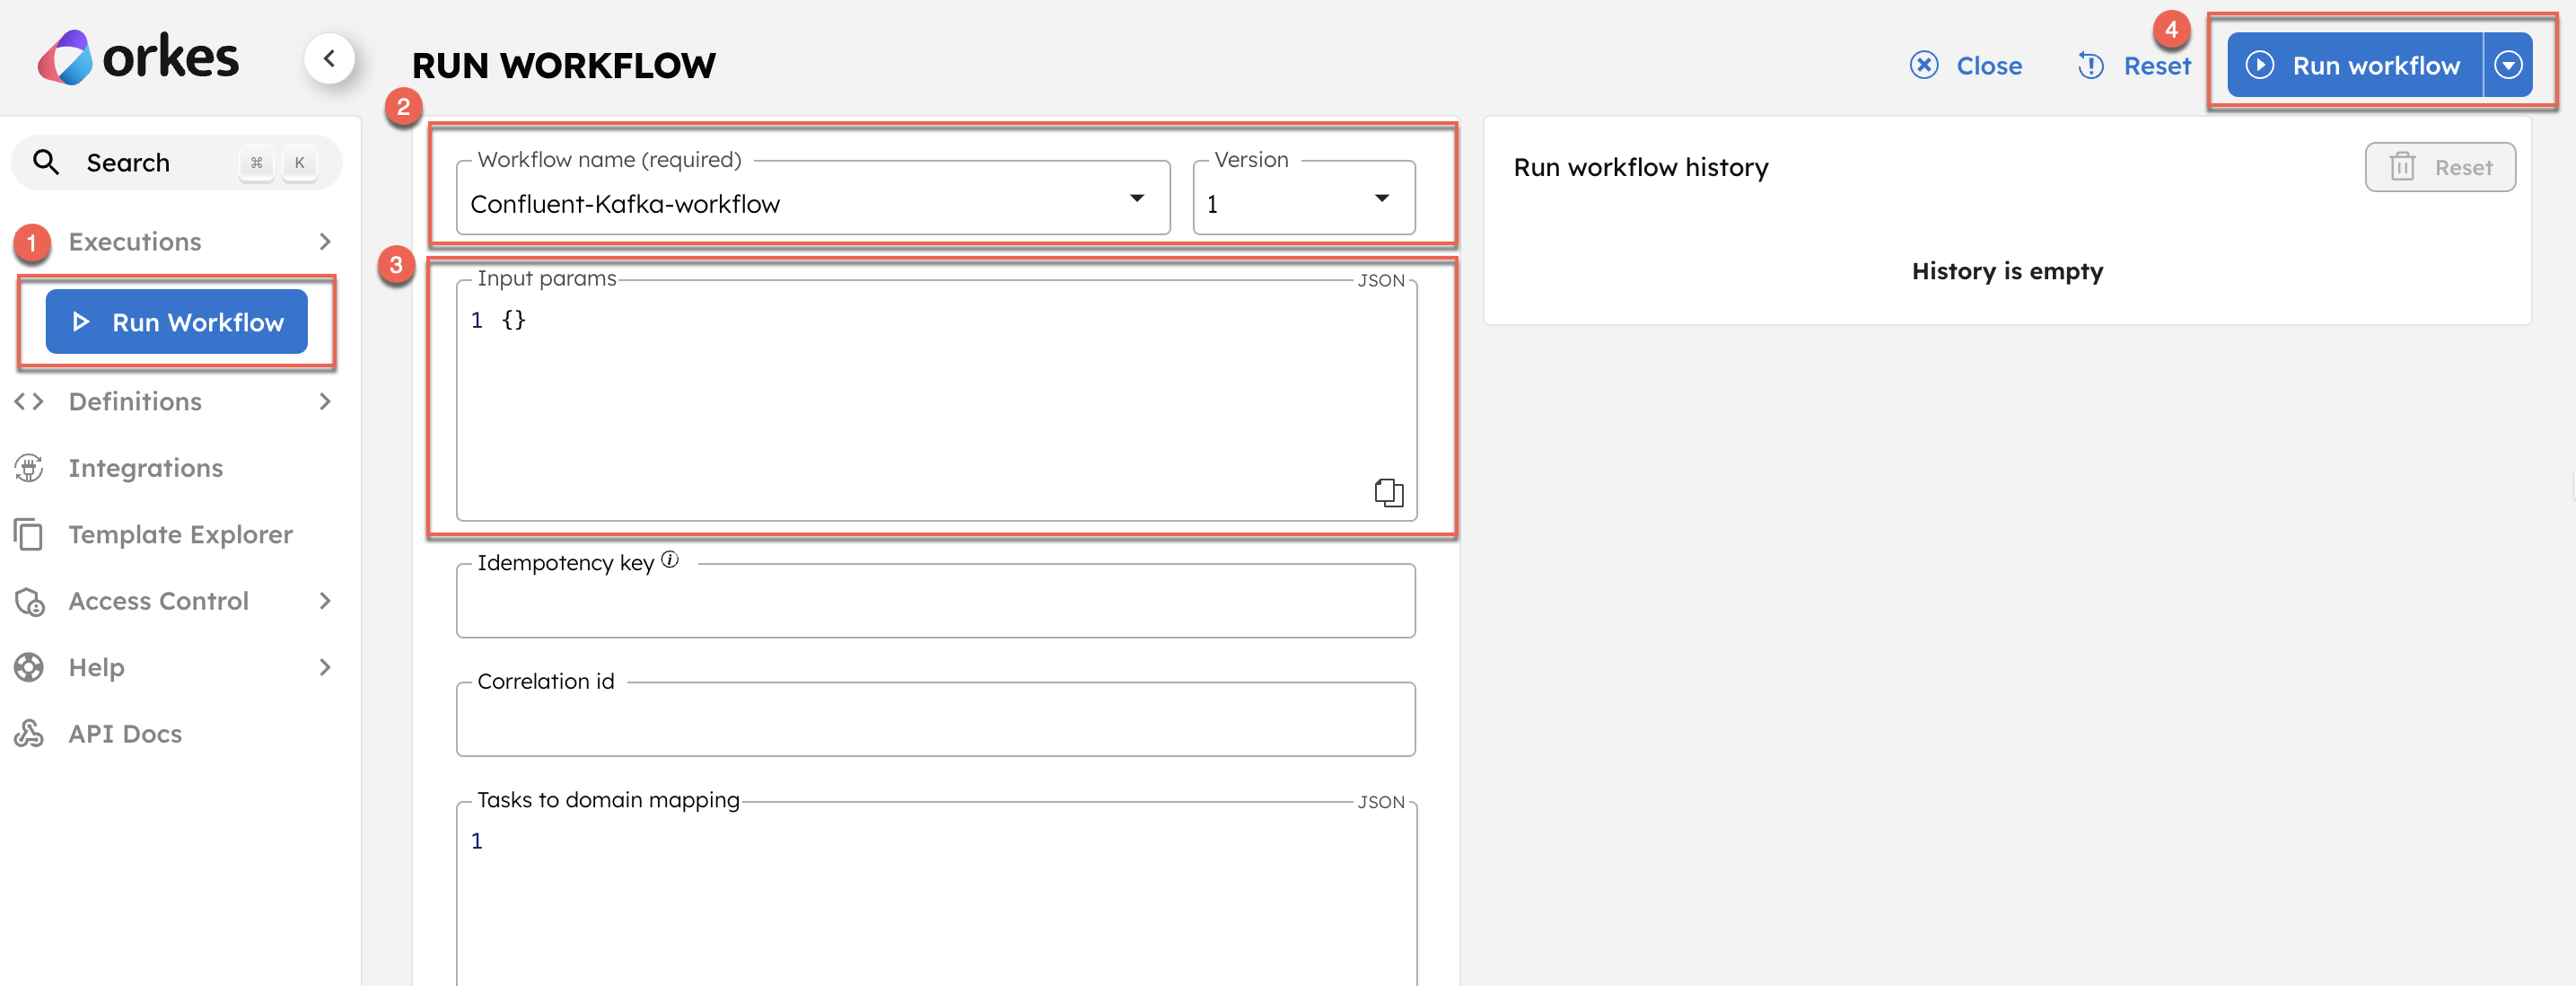
- Go to Run Workflow from the left menu on the Conductor cluster.
- Select the Workflow name and Version.
- Enter the input parameters.
- Click Run Workflow.
Once started, you can track execution progress in Executions > Workflow in the Conductor UI.
Step 4: Verify message delivery in the Confluent portal
After successful execution, verify the message's delivery in the Confluent portal.
- From your cluster details page, navigate to Topics in the left menu.
- In the Messages tab, verify that the message is consumed successfully.