Wait For Webhook
A webhook is an HTTP-based callback function that facilitates communication between the Conductor and other third-party systems. It can be used to receive data from other applications to the Conductor. Conductor supports webhook integration with the following platforms:
- GitHub
- Microsoft Teams
- SendGrid
- Slack
- Stripe
Additionally, the Custom option can be used to integrate other systems.
For a full guide on how to use webhook tasks, refer to Webhook Integrations.
Task parameters
Configure these parameters for the Wait for Webhook task.
| Parameter | Description | Required/ Optional |
|---|---|---|
| inputParameters.matches | The conditions that incoming event payloads must meet to trigger the webhook. Can be string, number, boolean, null, or object/array. Note When you update the matches, a default caching period of 60 seconds is applied, causing the updates to take effect with a delay of up to 60 seconds. | Required. |
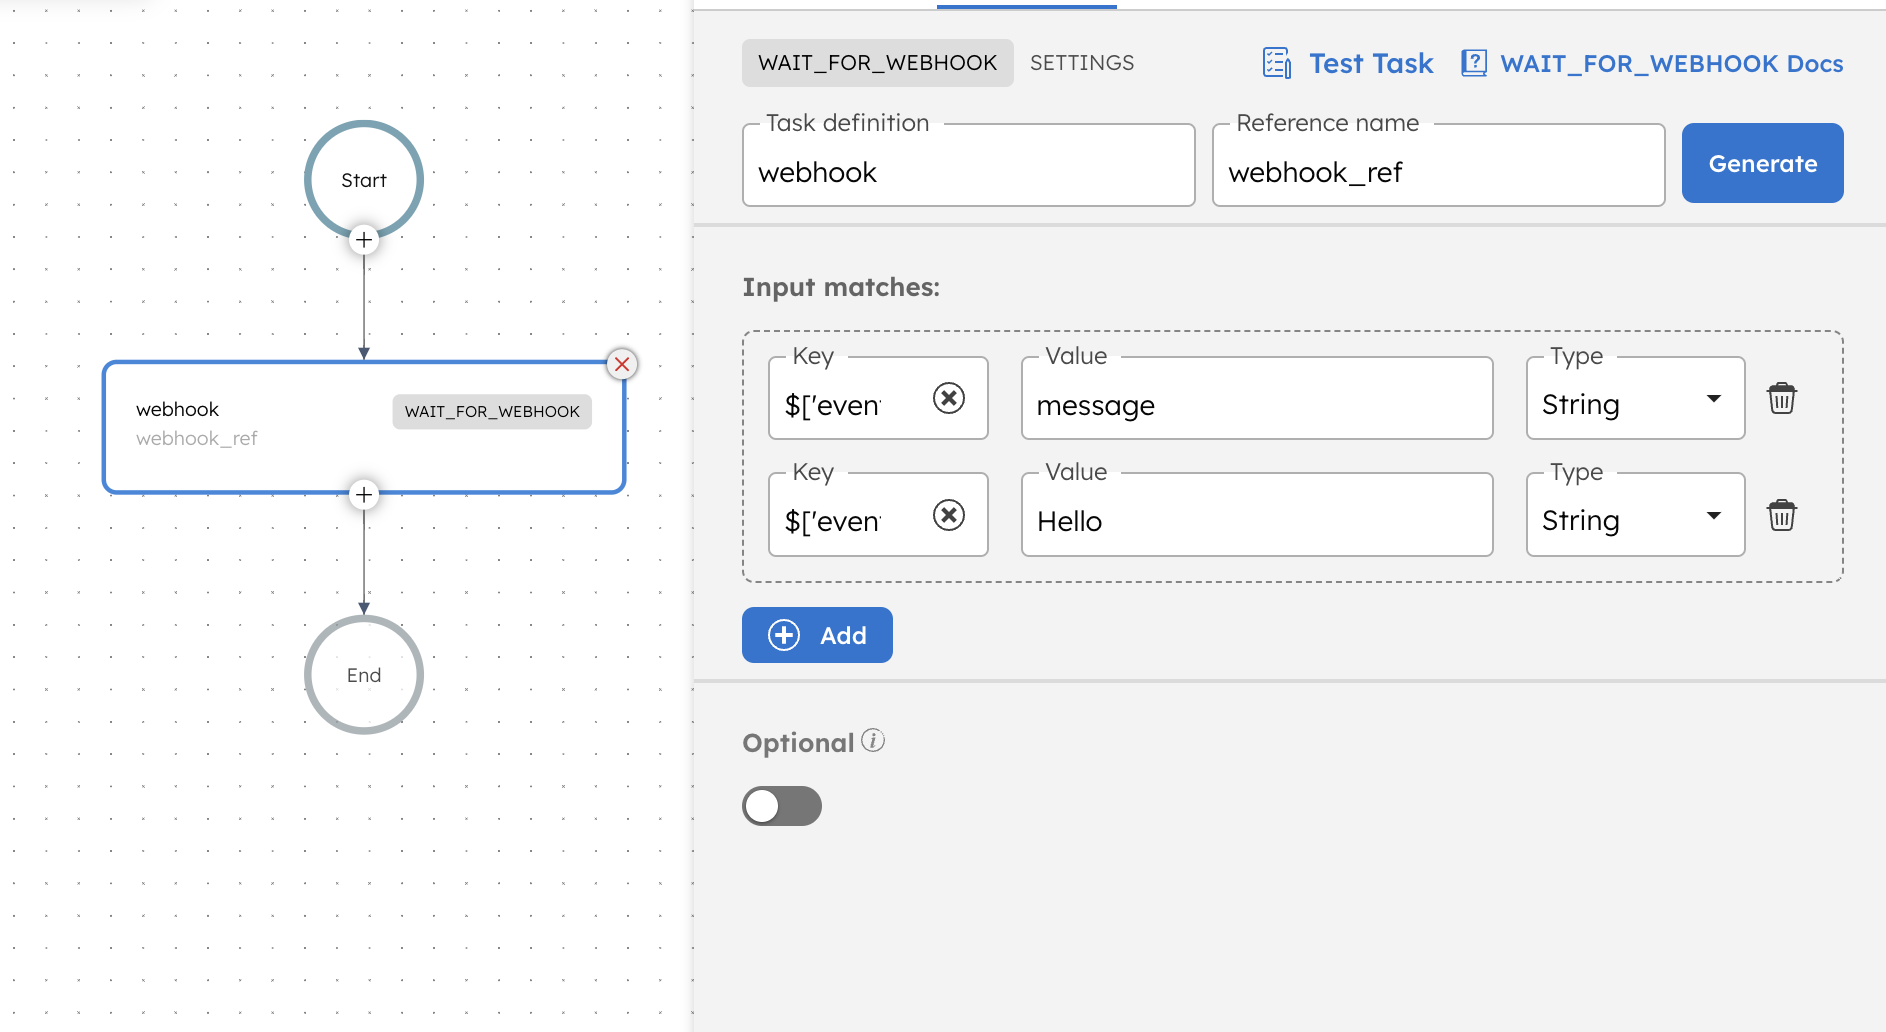
Writing input matches
In the example below, the input matches for a Wait for Webhook task are defined as follows:
"matches":
{
   "$['event']['type']": "message"
}
This configuration requires the incoming event payload to have a JSON path event.type, and it must be a message.
To satisfy this condition, the webhook request body sent to Conductor must include:
"inputParameters": {
  "event": {
    "type": "message"
  }
}
You can define multiple match conditions within the matches object. All conditions are evaluated using the logical AND operator.
   "matches" : {
       "$['event']['type']": "message",
       "$['event']['text']": "hello"
   }
For example, the configuration above will match the webhook event payload where event.type is message AND event.text is hello.
To satisfy this condition, the webhook request body sent to Conductor must include:
"inputParameters": {
    "event": {
        "type": "message",
        "text": "hello"
    }
}
You can use any webhook testing tool (for example, Webhook.site) to temporarily capture and view the incoming payload. Use the captured JSON paths to configure inputMatches. Most providers document their webhook payloads, but a capture tool can help you validate the payload.
The following are generic configuration parameters that can be applied to the task and are not specific to the Wait for Webhook task.
Other generic parameters
Here are other parameters for configuring the task behavior.
| Parameter | Description | Required/ Optional |
|---|---|---|
| optional | Whether the task is optional. If set to true, any task failure is ignored, and the workflow continues with the task status updated to COMPLETED_WITH_ERRORS. However, the task must reach a terminal state. If the task remains incomplete, the workflow waits until it reaches a terminal state before proceeding. | Optional. |
Task configuration
This is the task configuration for a Wait for Webhook task.
{
  "name": "webhook",
  "taskReferenceName": "webhook_ref",
  "inputParameters": {
    "matches": {
      "$['event']['type']": "message",
      "$['event']['text']": "Hello"
    }
  },
  "type": "WAIT_FOR_WEBHOOK"
}
Task output
The Wait for Webhook task returns the incoming webhook event payload as its output. The exact fields depend on the payload sent by the webhook source.
For example, if the incoming webhook payload is:
{
  "data": {
    "recipientId": "2",
    "message": "Hello"
  },
  "event": {
    "type": "message"
  }
}
The task output will be:
{
  "data": {
    "recipientId": "2",
    "message": "Hello"
  },
  "event": {
    "type": "message"
  }
}
To reference these fields in downstream tasks, use the task reference name with standard dot-notation:
{
  "recipientId": "${webhook_ref.output.data.recipientId}",
  "messageType": "${webhook_ref.output.event.type}"
}
Replace webhook_ref with your task's reference name and adjust the field path to match your payload structure.
Adding a Wait for Webhook task in UI
To add a Wait for Webhook task:
- In your workflow, select the (+) icon and add a Wait for Webhook task.
- Add the Input matches.
Examples
Here are some examples for using the Wait for Webhook task.
Incoming webhook using cURL
See an example of passing an incoming request to Webhook using cURL commands.
Incoming webhook using Postman
See an example of passing an incoming request to Webhook using Postman.
Sample Workflow for Slack webhook - Creating standup bot
See an example of creating a standup bot using Slack Webhook.
Sample workflow for Slack webhook - Automating Slack greetings
See an example of automating Slack Greetings using Slack Webhook.
Sample workflow for SendGrid webhook
See an example of using SendGrid Event Webhooks in Orkes Conductor.
Sample workflow for GitHub webhook
Sample workflow for Stripe webhook
See an example of building a Stripe payment confirmation workflow in Orkes Conductor.
Sample workflow for Microsoft Teams webhook
See an example of building a Microsoft Teams webhook processing workflow in Orkes Conductor.
Using dynamic idempotency keys in webhook-triggered workflows
See an example of using dynamic idempotency keys in webhook-triggered workflows.
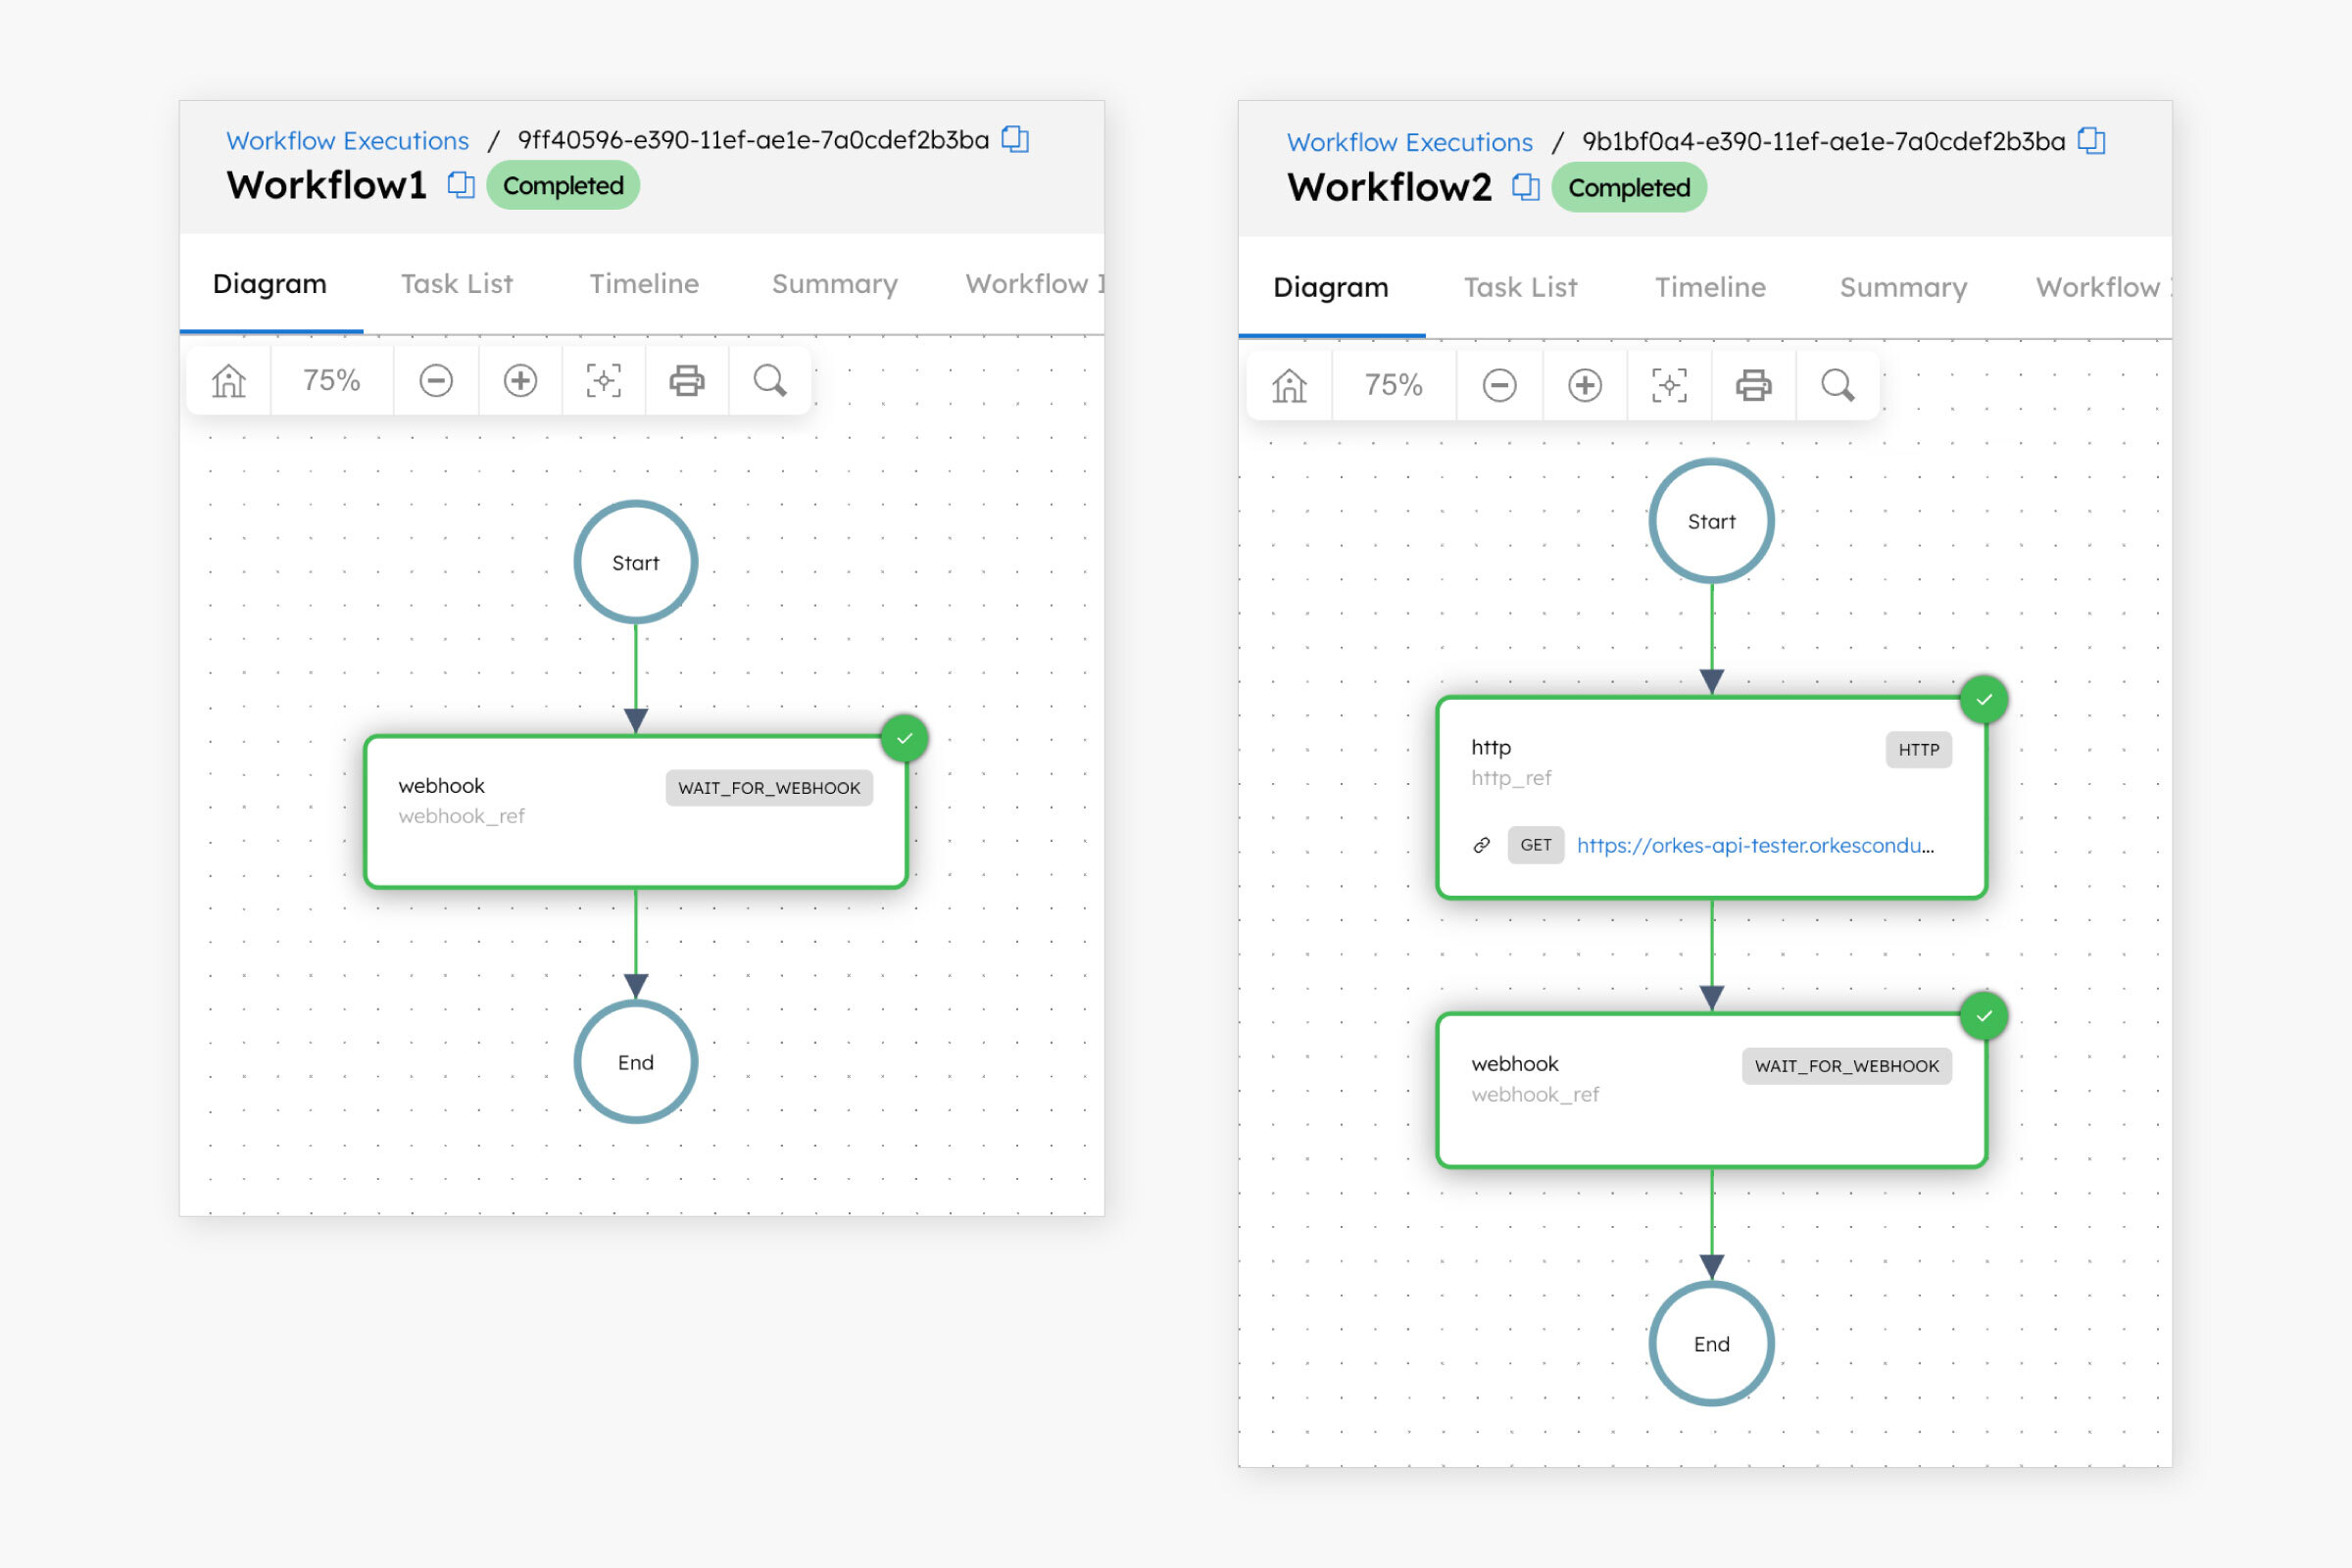
Single webhook triggering multiple workflows
Multiple workflows can wait for and respond to the same webhook event. This example demonstrates how two workflows, each containing a Wait for Webhook task, are triggered by a single webhook event.
The following workflows include a Wait for Webhook task configured with the same matches:
Workflow 1
{
 "name": "Workflow1",
 "description": "Sample workflow",
 "version": 1,
 "tasks": [
   {
     "name": "webhook",
     "taskReferenceName": "webhook_ref",
     "inputParameters": {
       "matches": {
         "$['data']['recipientId']": "${workflow.input.recipientId}"
       }
     },
     "type": "WAIT_FOR_WEBHOOK"
   }
 ],
 "inputParameters": [
   "recipientId"
 ],
 "schemaVersion": 2,
 "ownerEmail": "john.doe@acme.com"
}
Workflow 2
{
 "name": "Workflow2",
 "description": "Sample workflow",
 "version": 1,
 "tasks": [
   {
     "name": "http",
     "taskReferenceName": "http_ref",
     "inputParameters": {
       "uri": "https://orkes-api-tester.orkesconductor.com/api",
       "method": "GET",
       "accept": "application/json",
       "contentType": "application/json",
       "encode": true
     },
     "type": "HTTP"
   },
   {
     "name": "webhook",
     "taskReferenceName": "webhook_ref",
     "inputParameters": {
       "matches": {
         "$['data']['recipientId']": "${workflow.input.recipientId}"
       }
     },
     "type": "WAIT_FOR_WEBHOOK"
   }
 ],
 "inputParameters": [
   "recipientId"
 ],
 "schemaVersion": 2,
 "ownerEmail": "john.doe@acme.com"
}
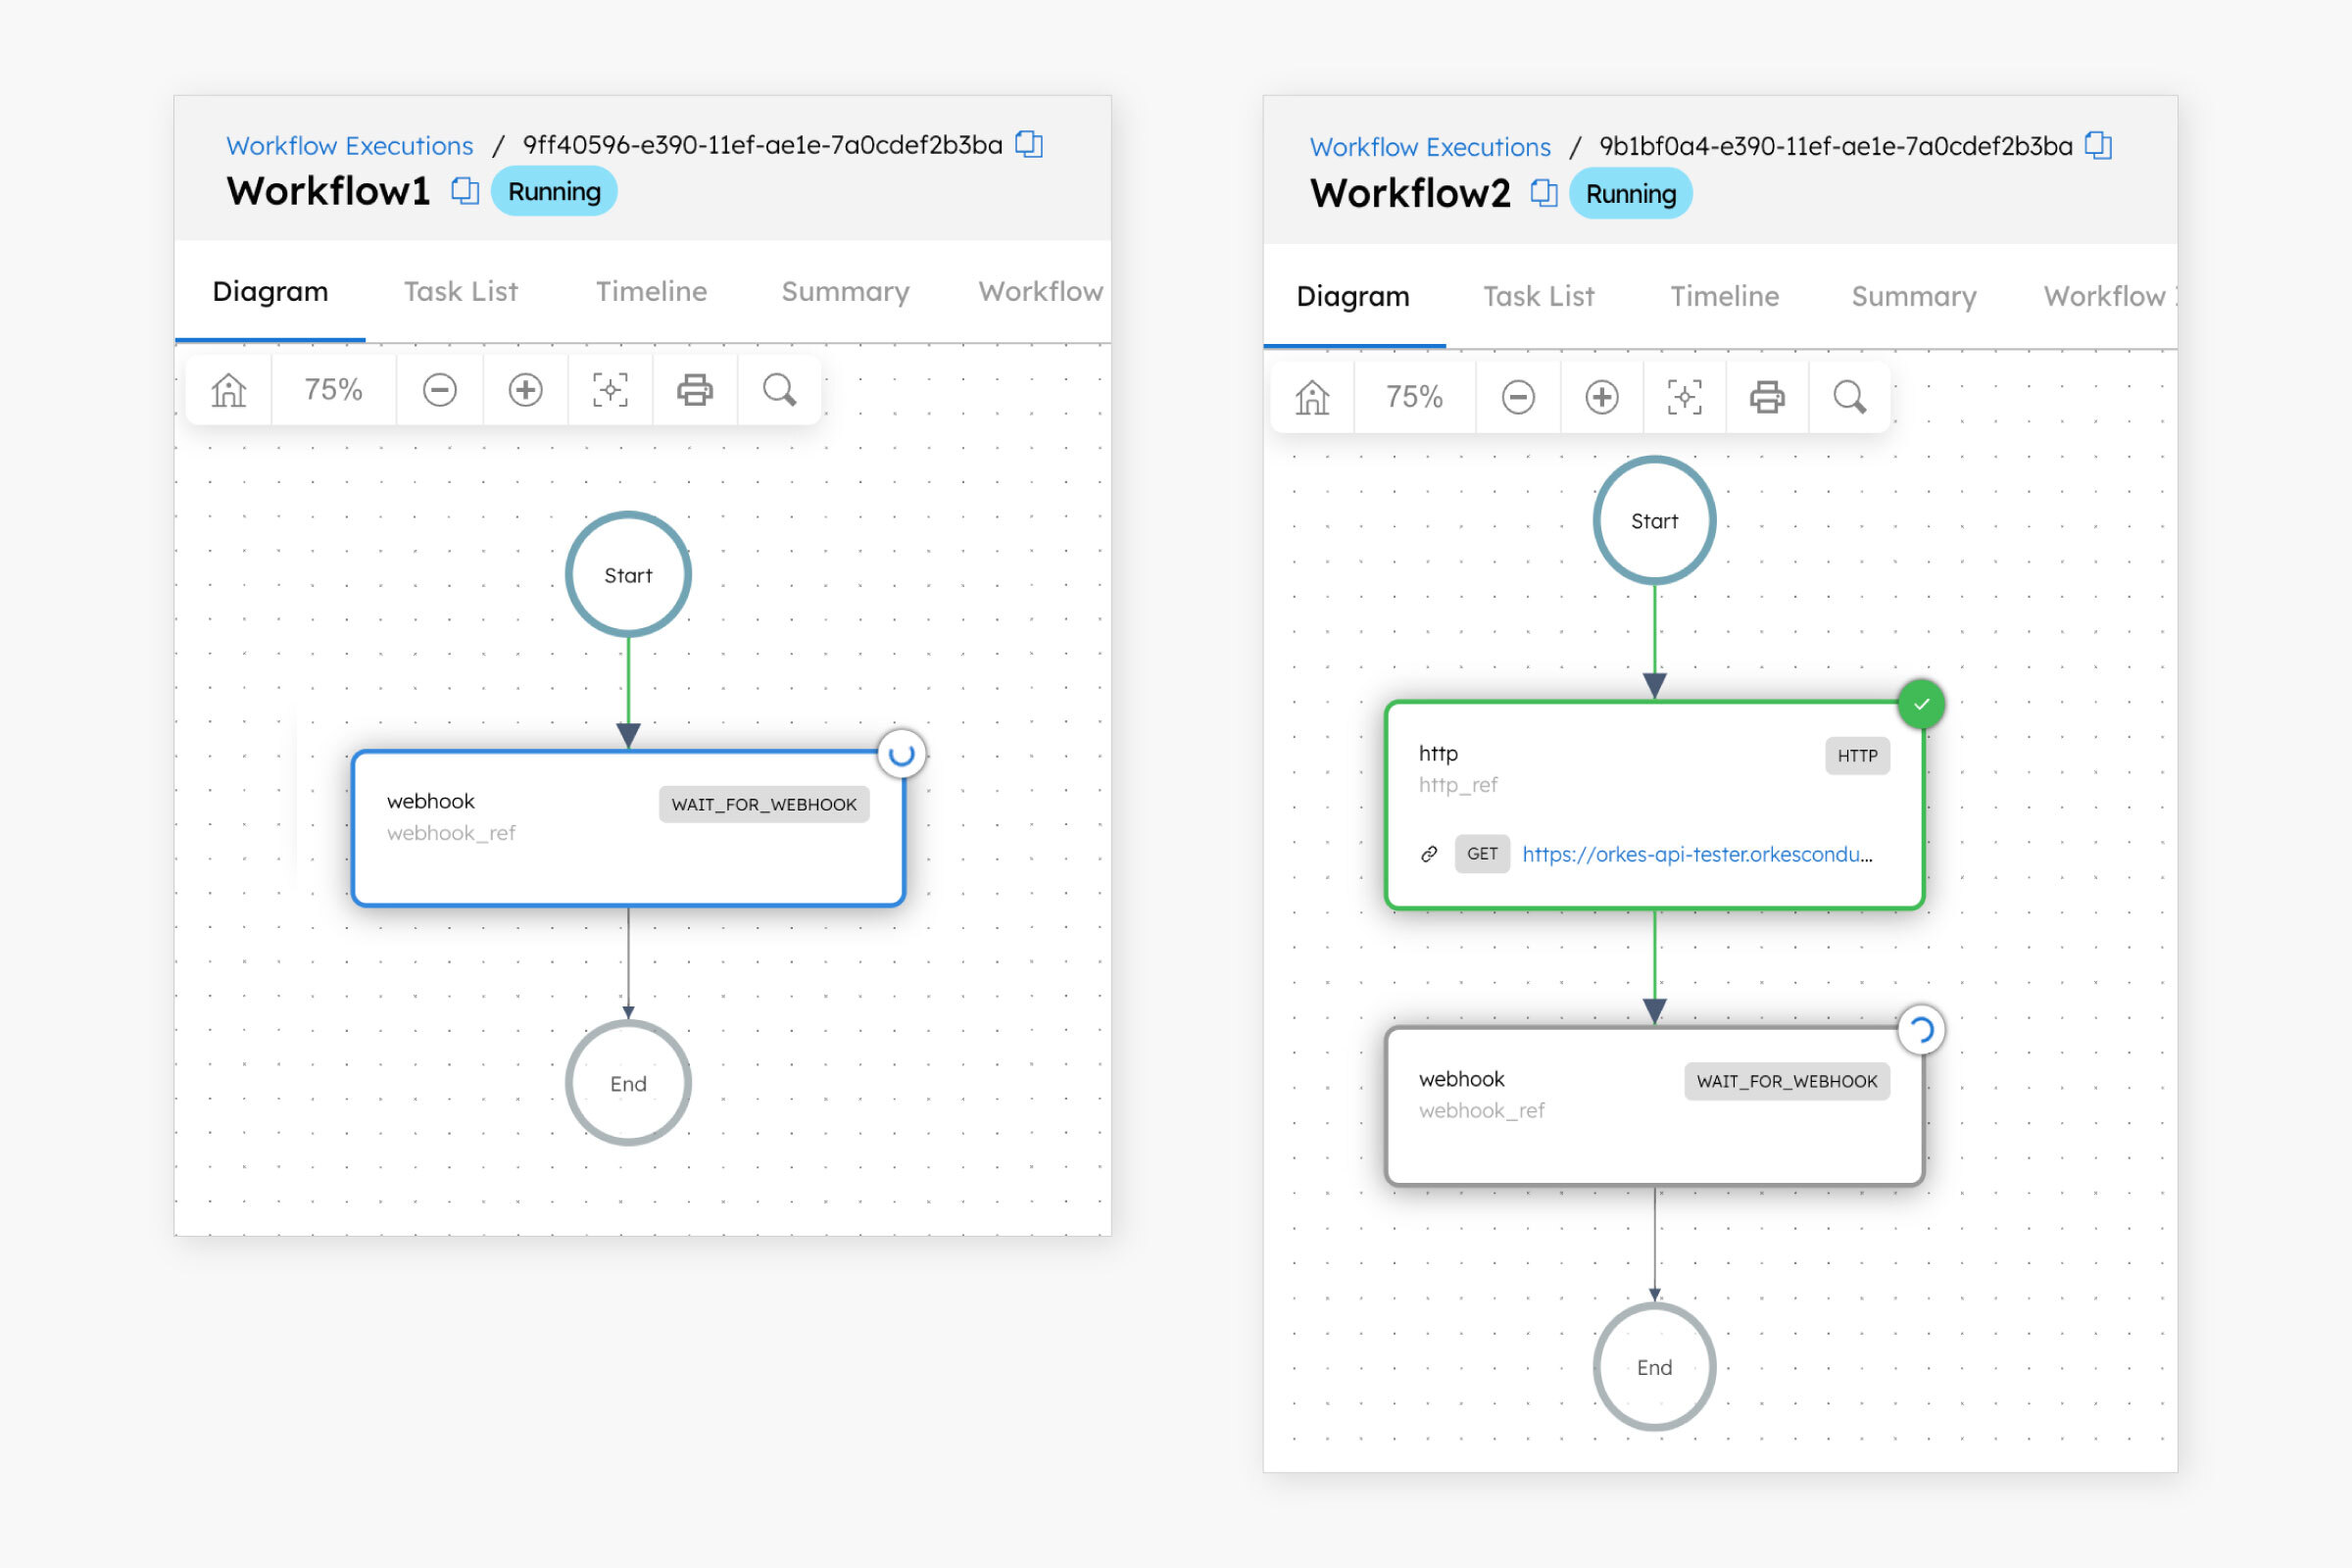
Run the workflows with the same input values.
The workflows are now in a running state, waiting for the webhook event.
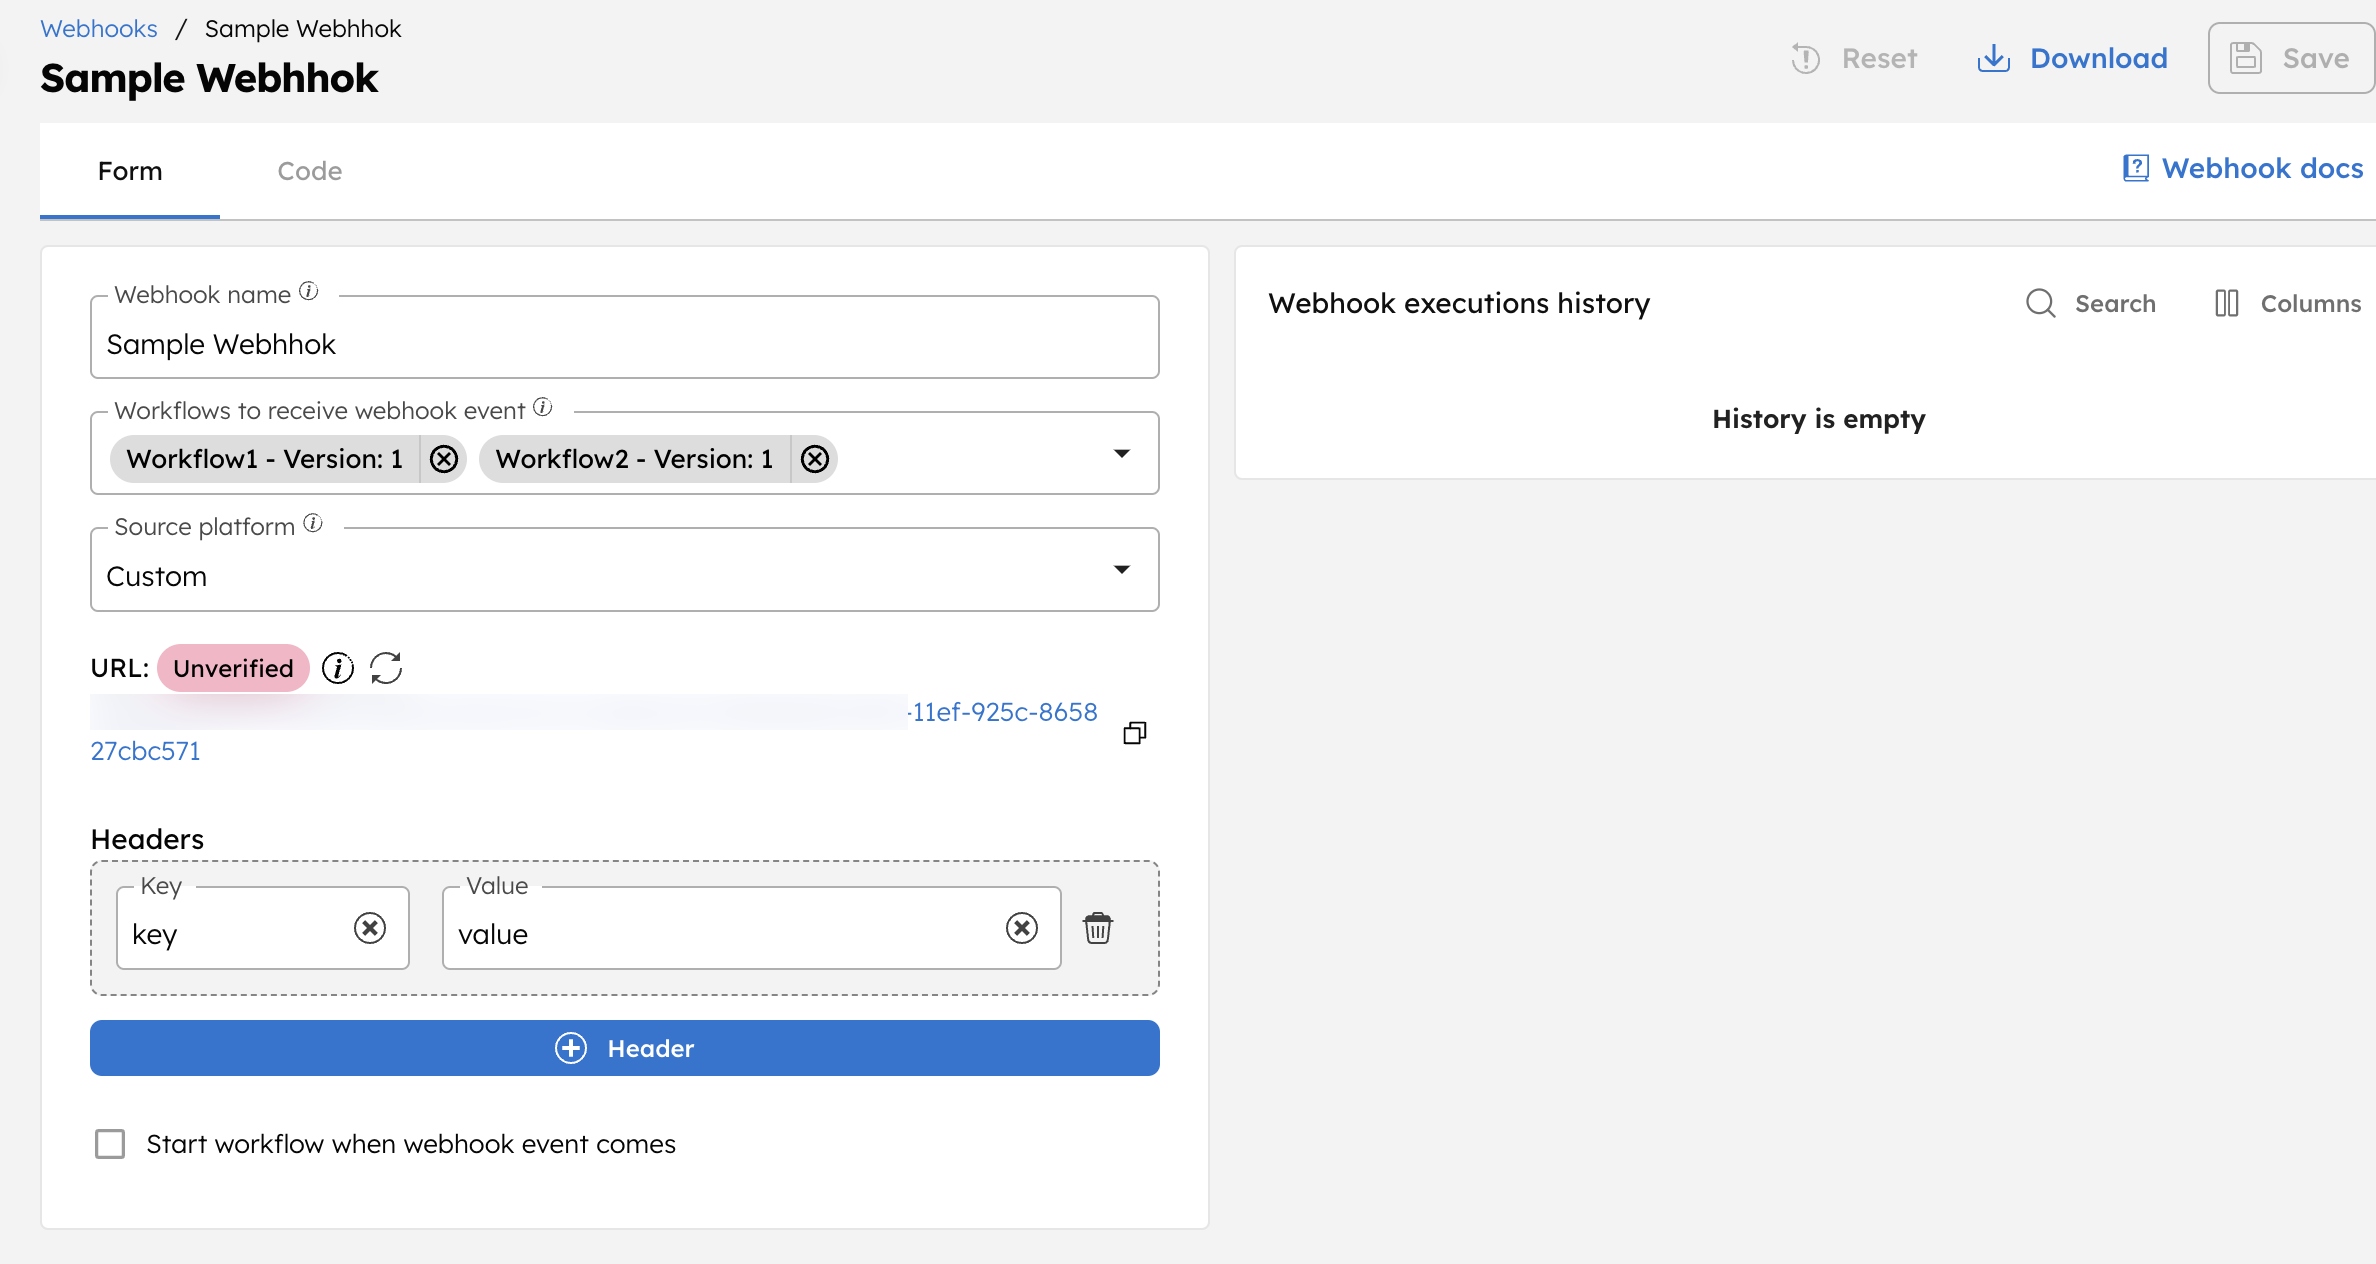
Next, create a custom webhook in Conductor to receive events, ensuring that both workflows are included and the headers are set.
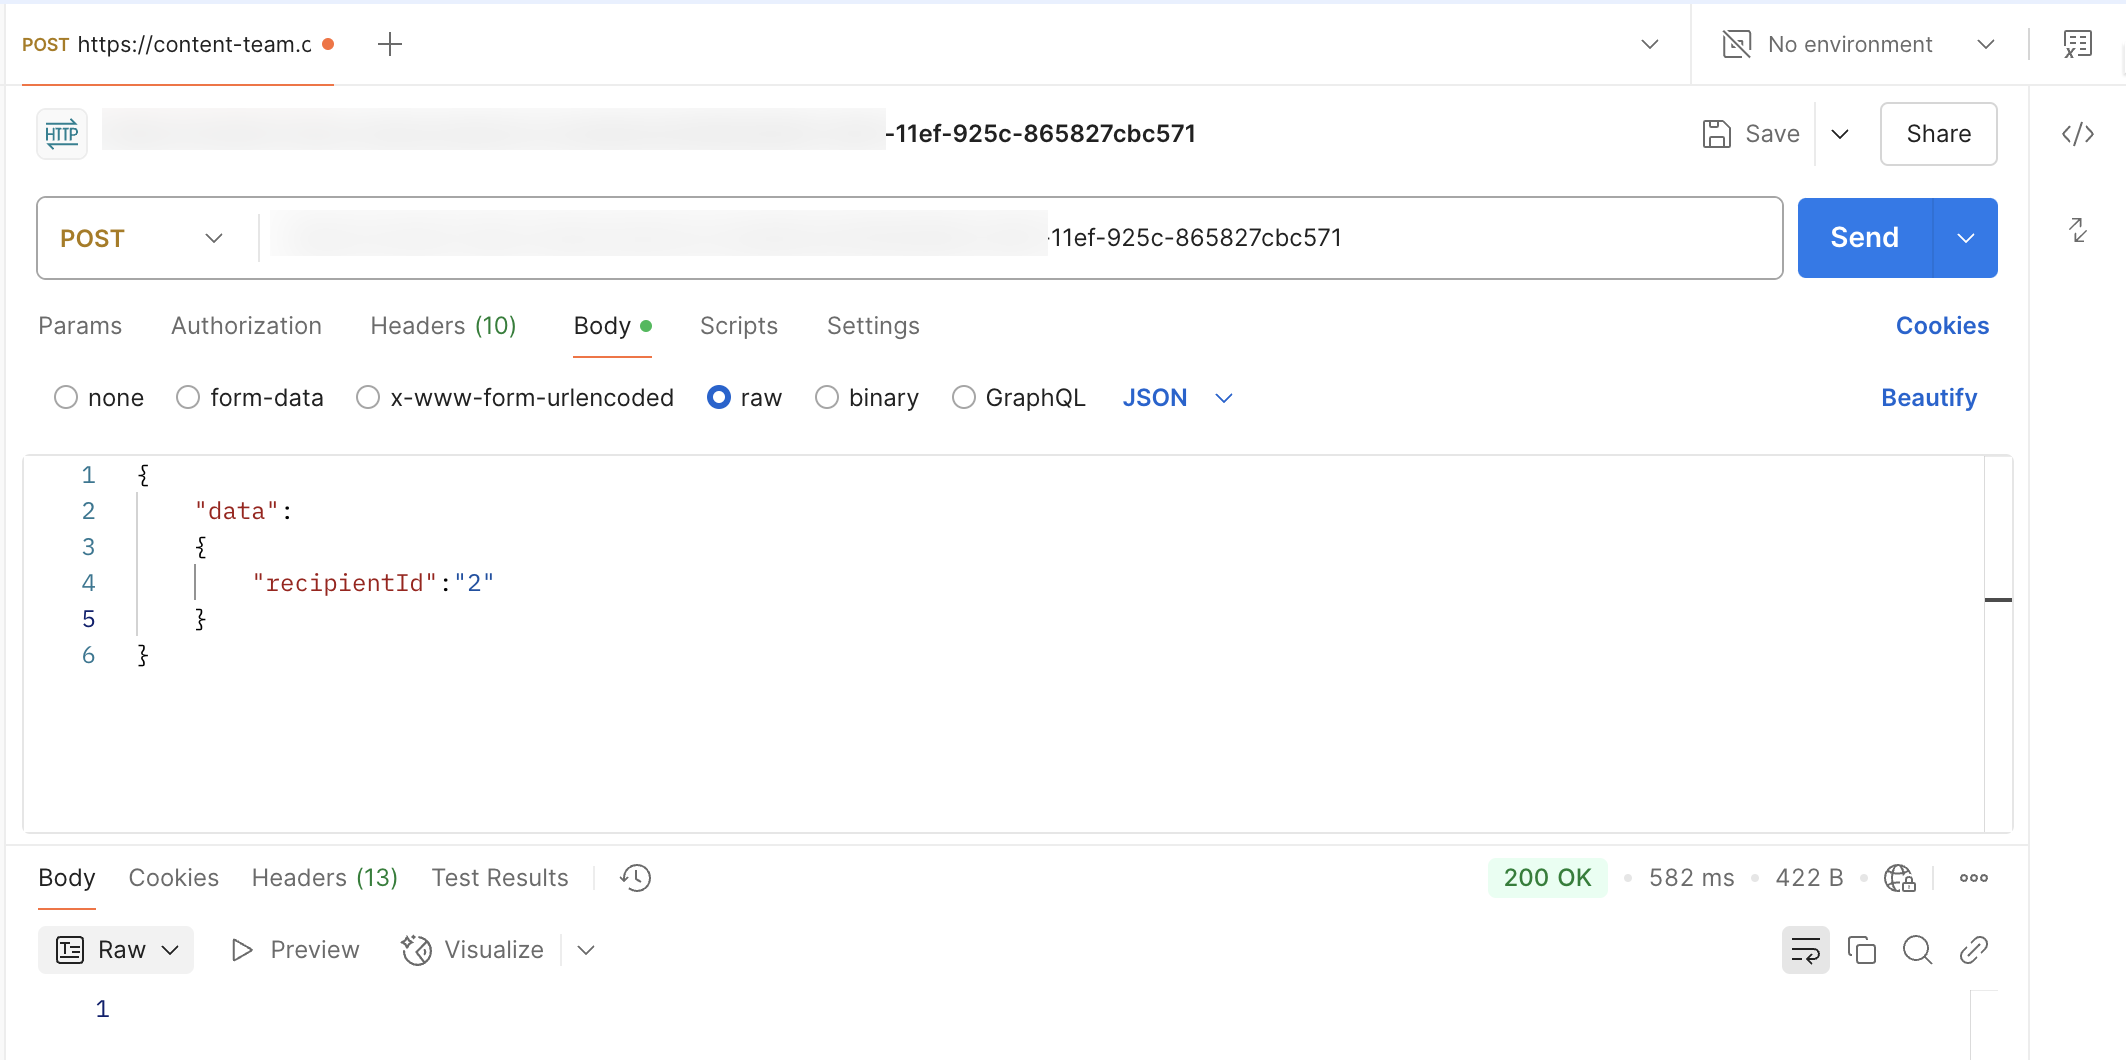
Next, send a Postman request using the same input payload defined in the Wait for Webhook tasks.
The matches in the Wait for Webhook tasks are defined as:
     "inputParameters": {
       "matches": {
         "$['data']['recipientId']": "${workflow.input.recipientId}"
       }
     },
Both workflows are triggered with the following input:
{
 "recipientId": "2"
}
To ensure the request is matched, send the Postman request with a payload that aligns with these matches.
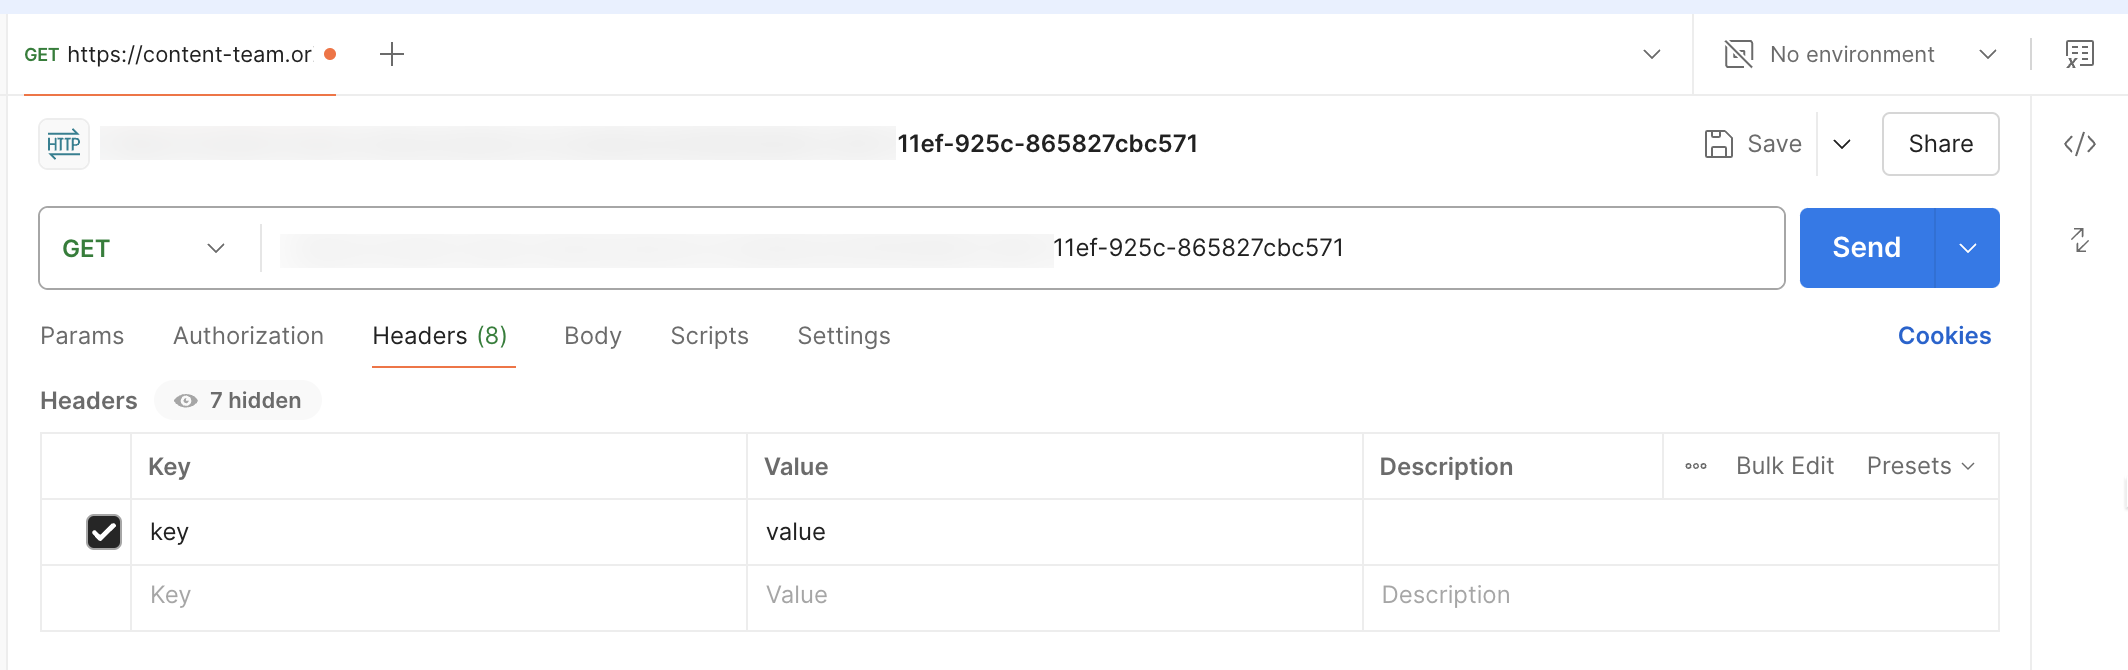
Ensure the request includes the same headers as set in the Conductor webhook.
Once the webhook receives the event, both workflows are triggered.
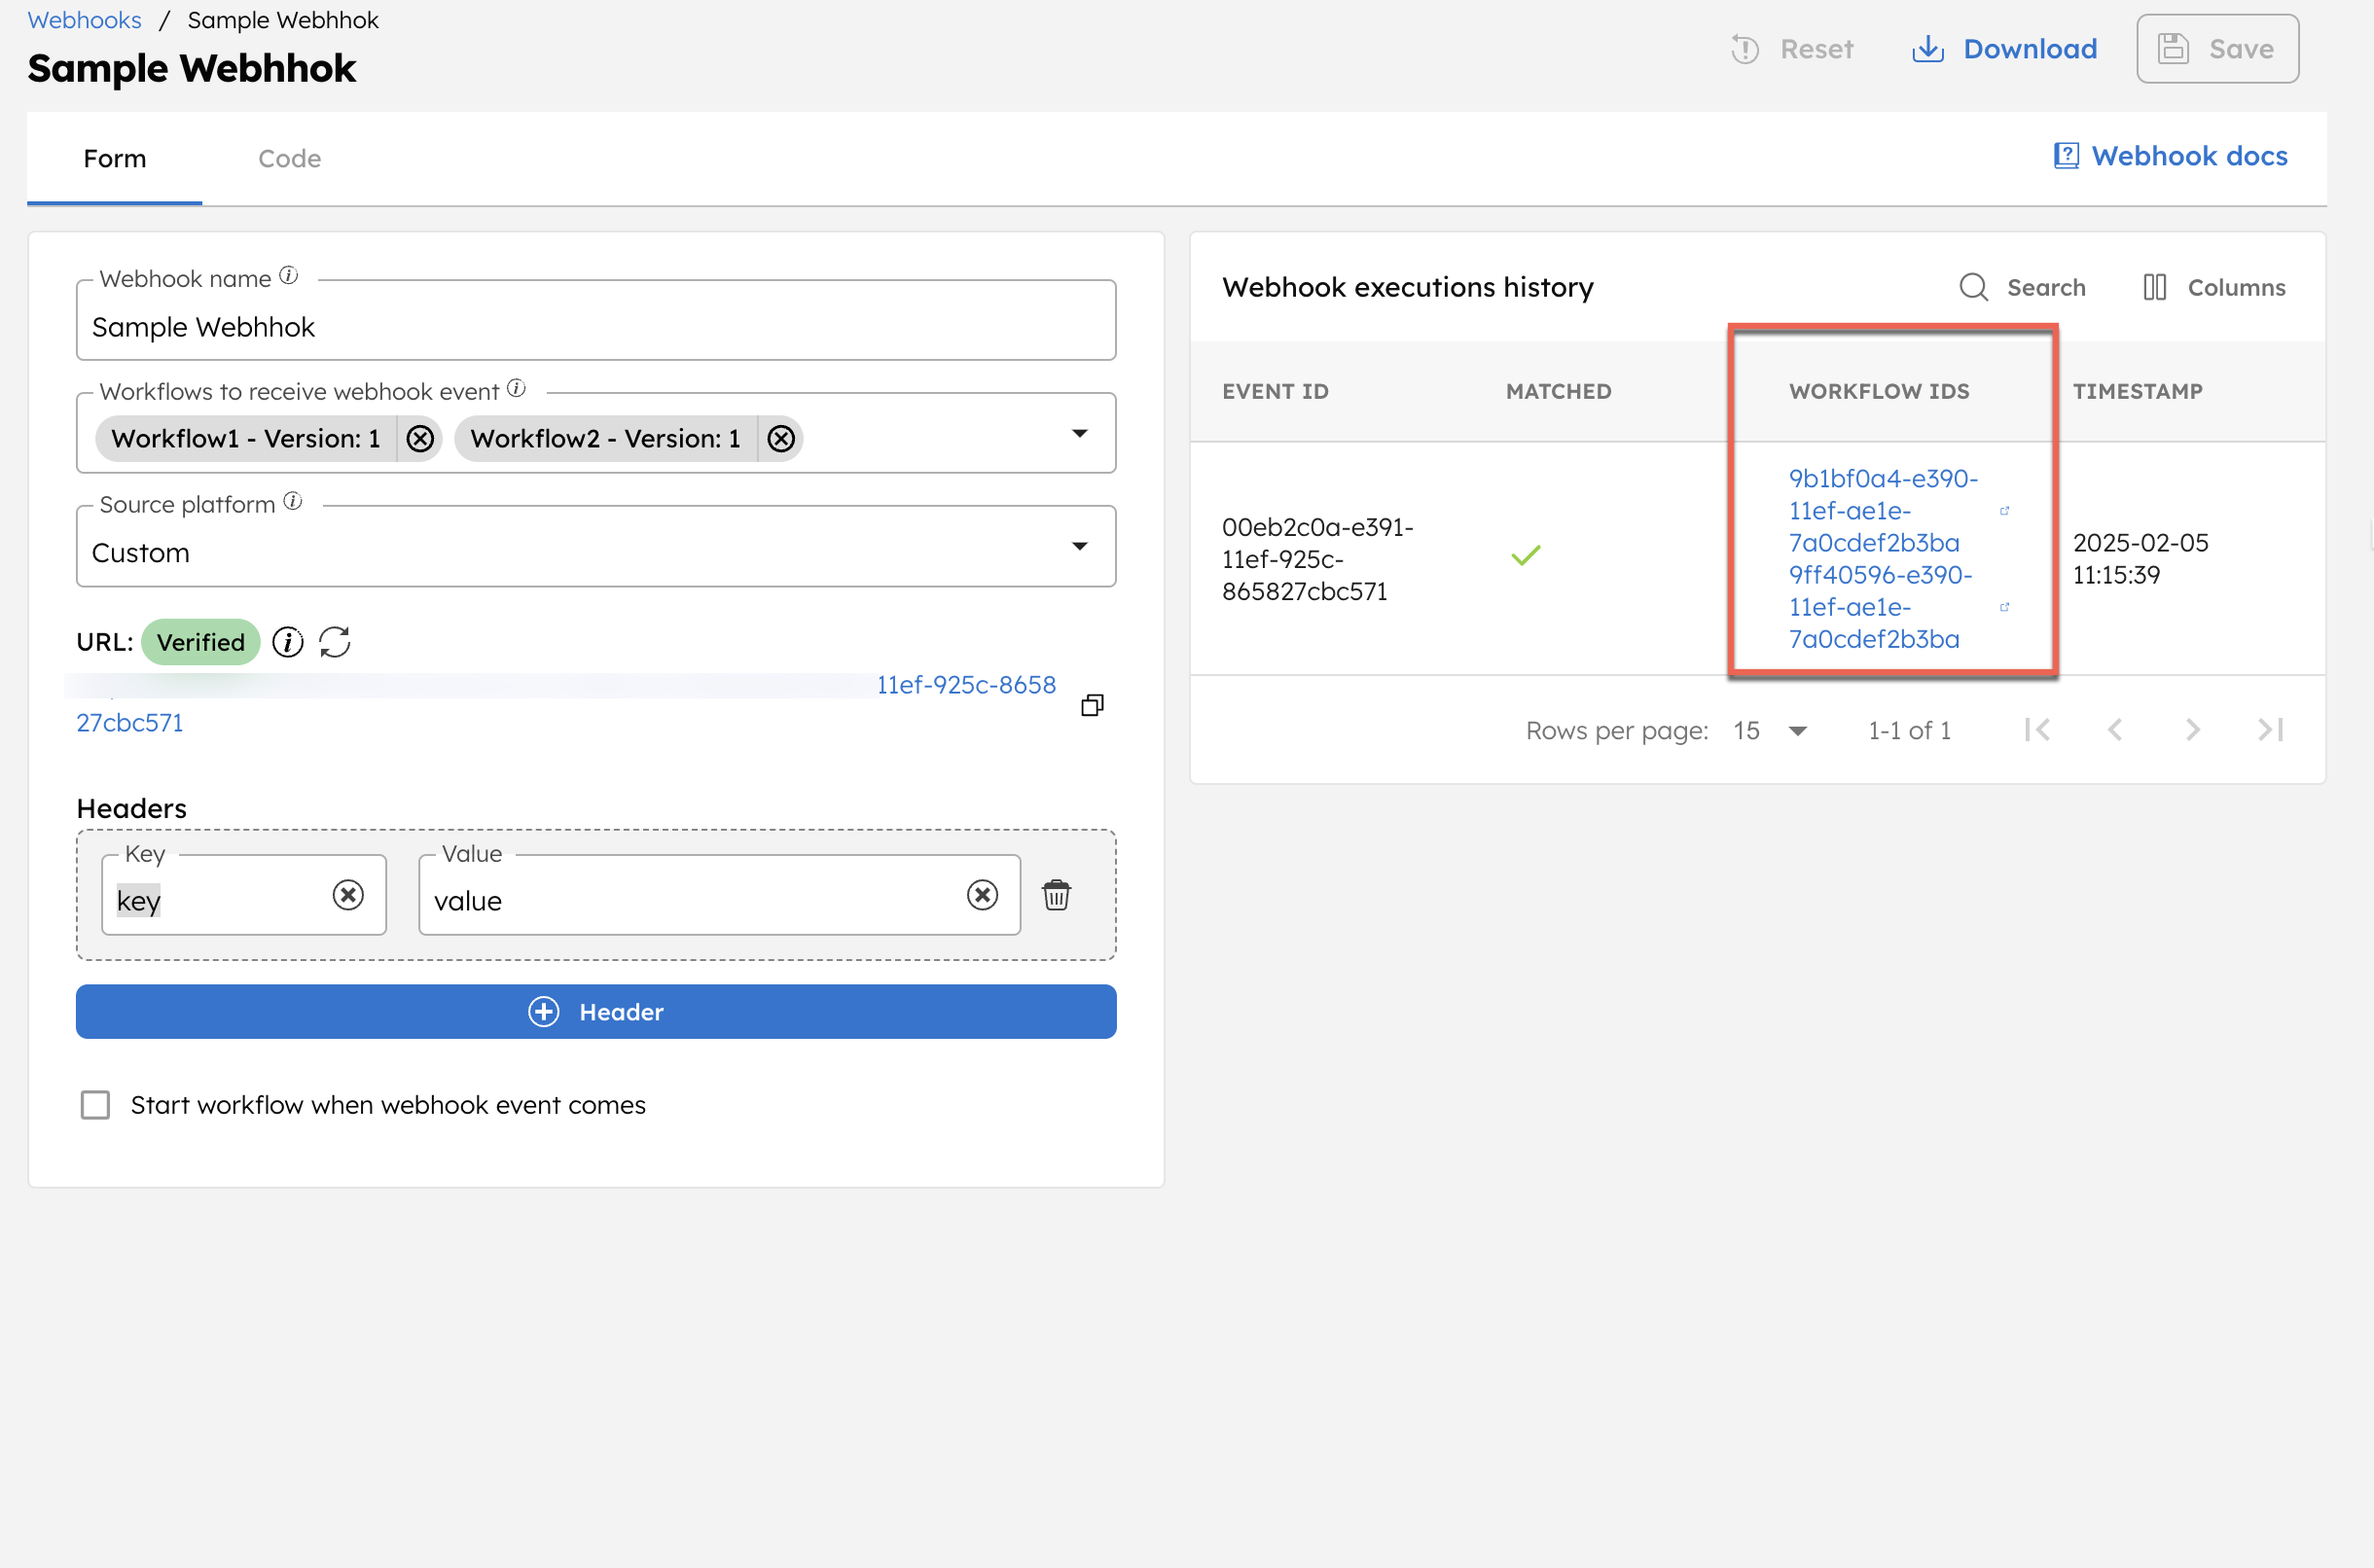
Click on the workflow (execution) IDs to confirm that the Wait for Webhook tasks have been completed.