Build a Stripe Payment Confirmation Workflow
This tutorial explains how to automate email confirmations for Stripe checkout events using Orkes Conductor. When a payment is completed, Stripe sends a webhook event to Conductor, which then generates and sends a receipt email using SendGrid.
While Stripe provides native notifications, extending them for custom branding, routing logic, analytics, and added business workflows often requires custom engineering. Using Orkes Conductor gives you full ownership and visibility of every step, with the ability to integrate with any system you rely on.
The payment confirmation workflow
Here’s an overview of the system we are going to build:
- Create a payment confirmation workflow in Conductor.
- Configure SendGrid.
- Create a webhook in Conductor.
- Configure a webhook endpoint in Stripe.
- Modify and run the workflow.
- Trigger test events from Stripe.
Follow the tutorial using the free Orkes Developer Edition. Sign up for an account to get started.
Step 1: Create payment confirmation workflow
Orkes Conductor lets you define workflows as JSON, through SDKs, APIs, or the UI.
In this tutorial, we will create the workflow using Conductor UI.
To create the workflow:
- Go to Definitions > Workflow from the left navigation menu on your Conductor cluster.
- Select + Define workflow.
- Select the Code tab on the right and paste the following code:
{
 "name": "stripe_webhook",
 "description": "Handle Stripe webhook events and send a receipt email via SendGrid",
 "version": 1,
 "tasks": [
   {
     "name": "wait_for_stripe_event",
     "taskReferenceName": "webhook_ref",
     "inputParameters": {
       "matches": {
         "$['type']": "${workflow.input.eventType}"
       }
     },
     "type": "WAIT_FOR_WEBHOOK"
   },
   {
     "name": "prepare_email_payload",
     "taskReferenceName": "prepare_email_ref",
     "inputParameters": {
       "expression": "(function () { var ev = $.event; var obj = (ev.data && ev.data.object) || {}; var amount = (obj.amount_total || obj.amount || 0) / 100; var currency = (obj.currency || '').toUpperCase(); var email = obj.customer_email || (obj.customer_details && obj.customer_details.email) || ''; var subject = 'Payment received: ' + amount + ' ' + currency; var content = 'Hi, we received your payment of ' + amount + ' ' + currency + '.'; return { to: email, subject: subject, content: content }; })();",
       "evaluatorType": "graaljs",
       "event": "${webhook_ref.output}"
     },
     "type": "INLINE"
   },
   {
     "name": "send_receipt_email",
     "taskReferenceName": "sendgrid_ref",
     "inputParameters": {
       "from": "<YOUR-SENDGRID-VERIFIED-SENDER-EMAIL>",
       "to": "${prepare_email_ref.output.result.to}",
       "subject": "${prepare_email_ref.output.result.subject}",
       "contentType": "text/plain",
       "content": "${prepare_email_ref.output.result.content}",
       "sendgridConfiguration": "<YOUR-SENDGRID-INTEGRATION>"
     },
     "type": "SENDGRID"
   }
 ],
 "inputParameters": [
   "eventType"
 ],
 "schemaVersion": 2
}
- Select Save > Confirm.
Your workflow will look like this:
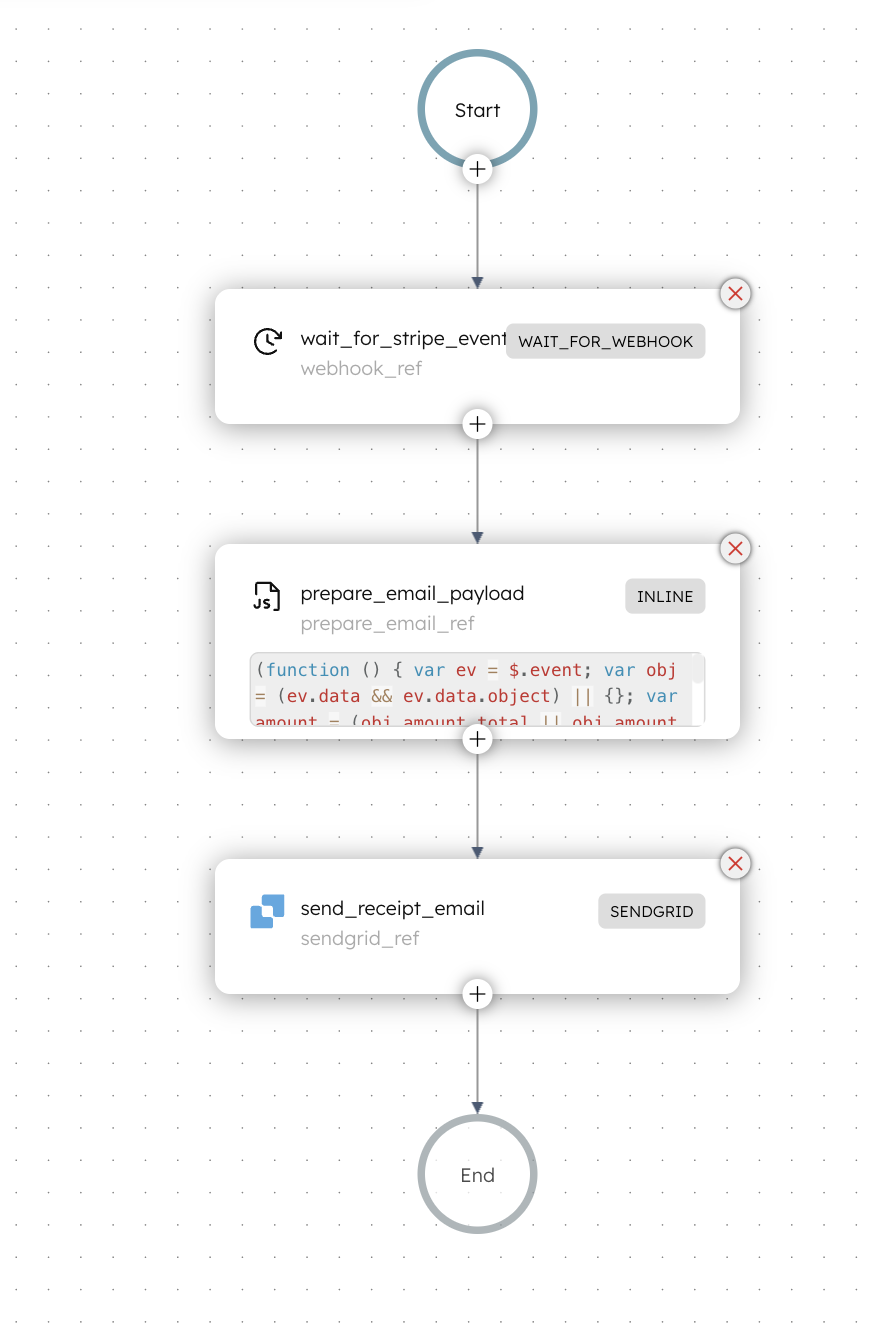
- The workflow begins with a Wait for Webhook task that pauses execution until a matching Stripe event is received. When the event arrives, Conductor captures it and sends the payload to the next task.
- The Inline task extracts the payment amount, currency, and customer email and prepares a formatted email body.
- Finally, the SendGrid task sends the confirmation email to the customer.
Using the Wait for Webhook task
The Wait For Webhook task requires input matches to determine which events should trigger the task completion.
Stripe’s event payloads have the following pattern:
{
  "type": "checkout.session.completed",
  "data": {
    "object": { ... }
  }
}
To match this structure, the input matches must be:
"matches": {
  "$['type']": "checkout.session.completed"
}
This ensures that the workflow only triggers when Stripe fires a completed checkout event.
Now that the workflow is set up, the next step is to configure SendGrid.
Step 2: Configure SendGrid in Orkes Conductor
After the webhook delivers the payment details to the workflow, the SendGrid task sends the acknowledgment email to the customer. To enable this step, add a SendGrid integration to your Orkes Conductor cluster.
To create an integration:
- Go to Integrations from the left navigation menu on your Conductor cluster.
- Select + New integration.
- In Integrations, select SendGrid Email.
- Select + Add and enter a Name for the integration, API key from SendGrid, and an optional Description.
- Select Save.
Step 3: Create a webhook in Conductor
The next step is to create a webhook in Conductor that will listen for events coming from Stripe.
To create a webhook:
- Go to Definitions > Webhook from the left navigation menu on your Conductor cluster.
- Select + New webhook.
- Configure the following parameters:
- In Webhook name, enter a unique name for the webhook.
- In Workflows to receive Webhook event, select the workflow created in Step 1.
- Select the Source platform as Stripe.
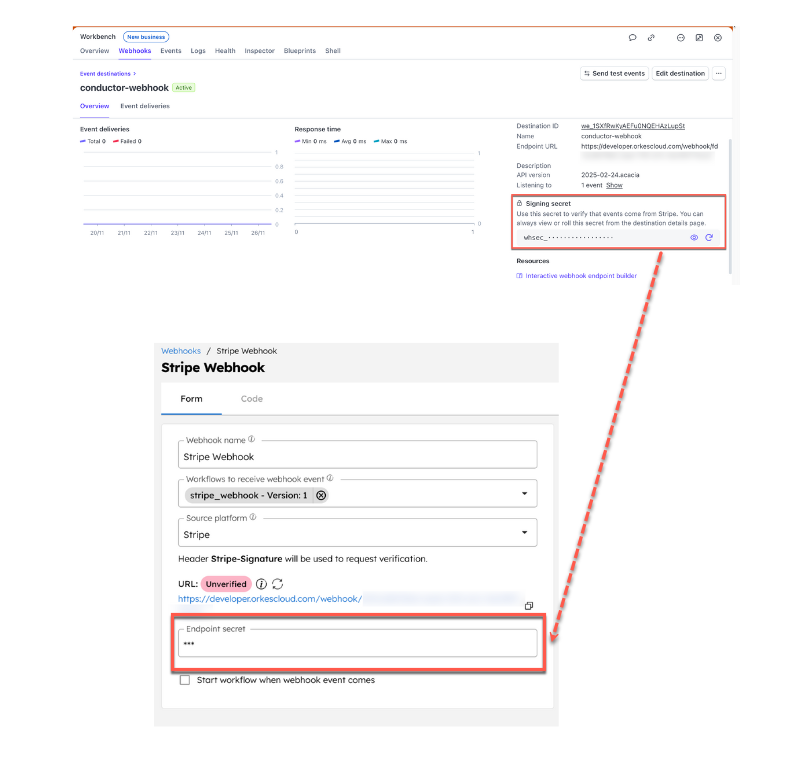
- Leave the Endpoint secret field for now. We will add that later.
- Select Save.
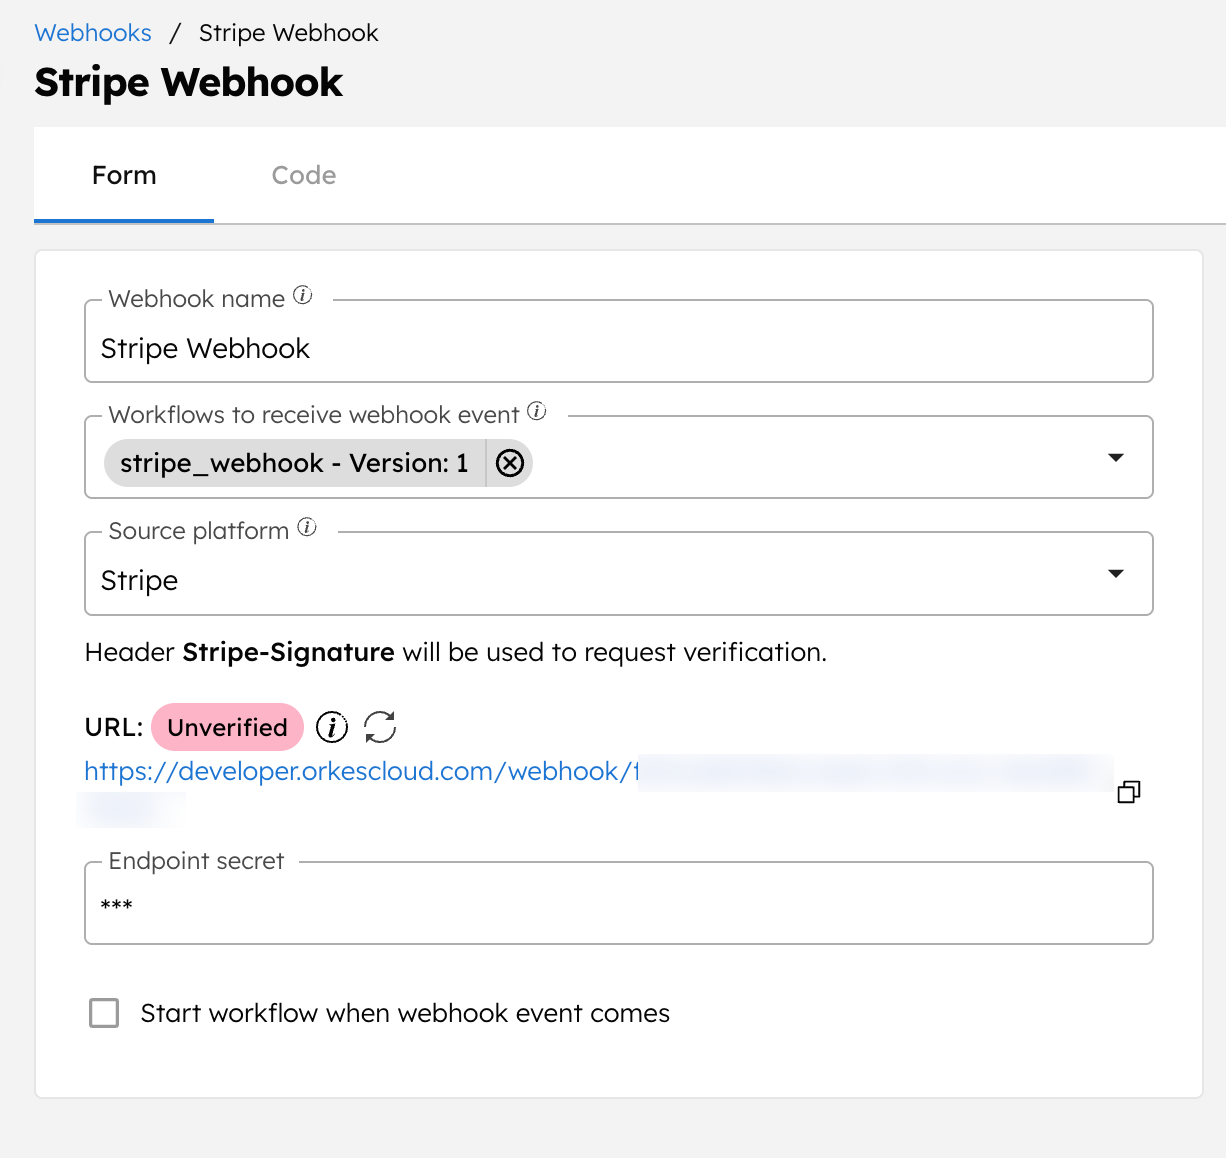
An unverified webhook URL will be generated, which you will copy to the Stripe webhook later.
Step 4: Configure a webhook in Stripe
You now need to configure a Stripe webhook.
To create a webhook in Stripe:
- Log in to your Stripe account.
- Go to Developers > Webhooks from the left menu.
- Select + Add destination.
- In Events from, select Your account.
- In Events, search and select checkout.session.completed.
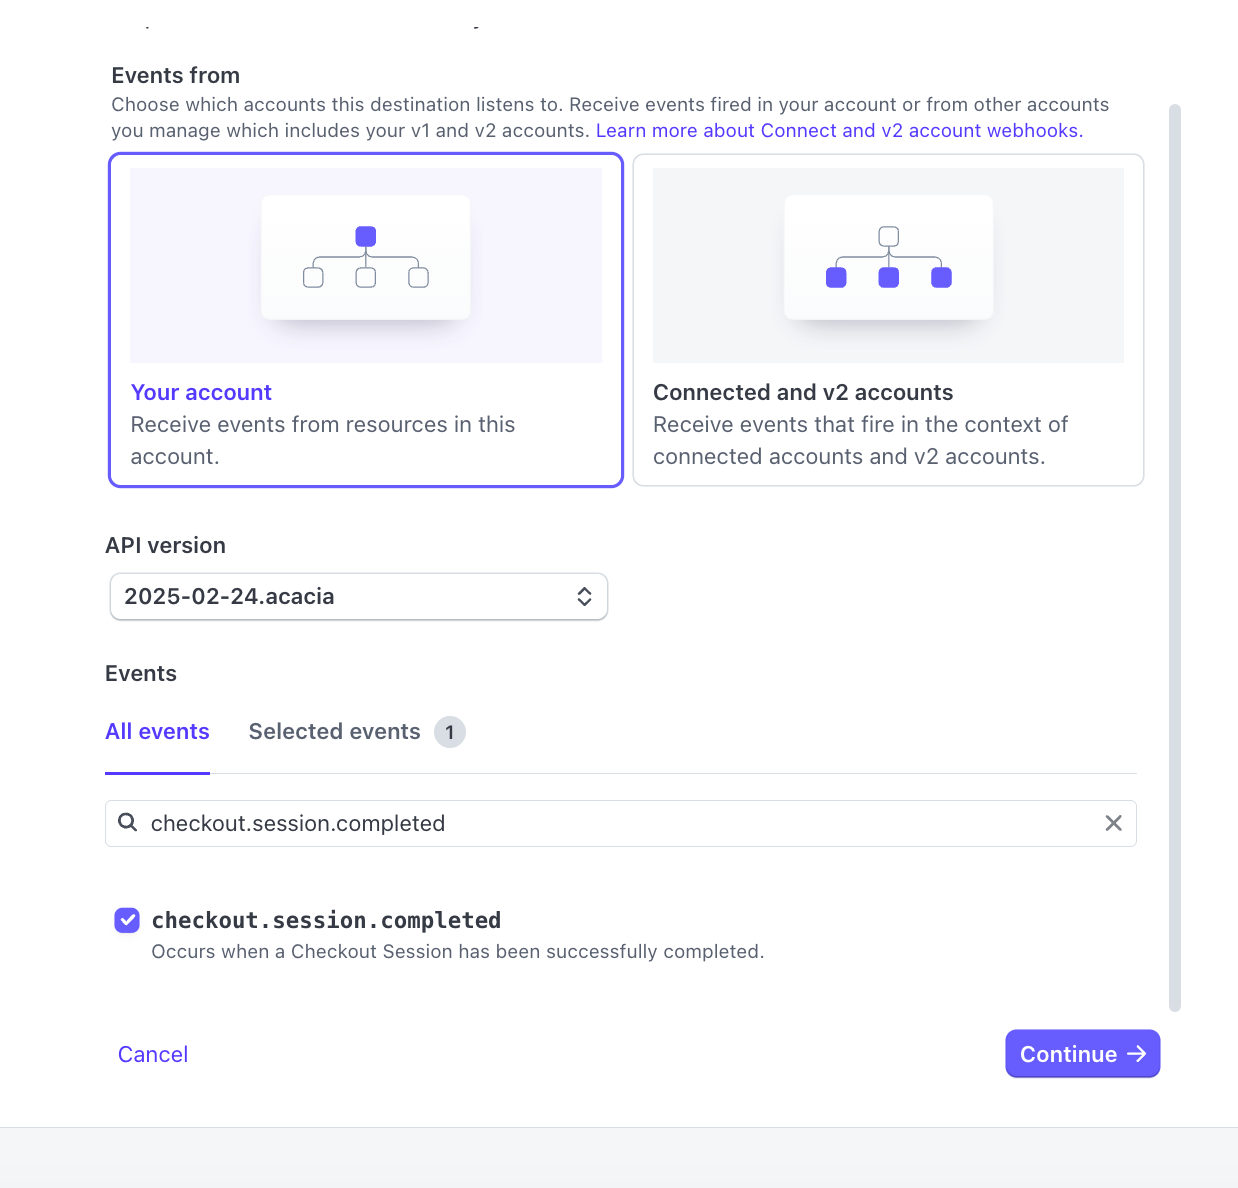
- In Destination type, select Webhook endpoint, and select Continue.
- In Destination name, enter a name to identify the webhook.
- In Endpoint URL, paste the webhook URL generated in Conductor.
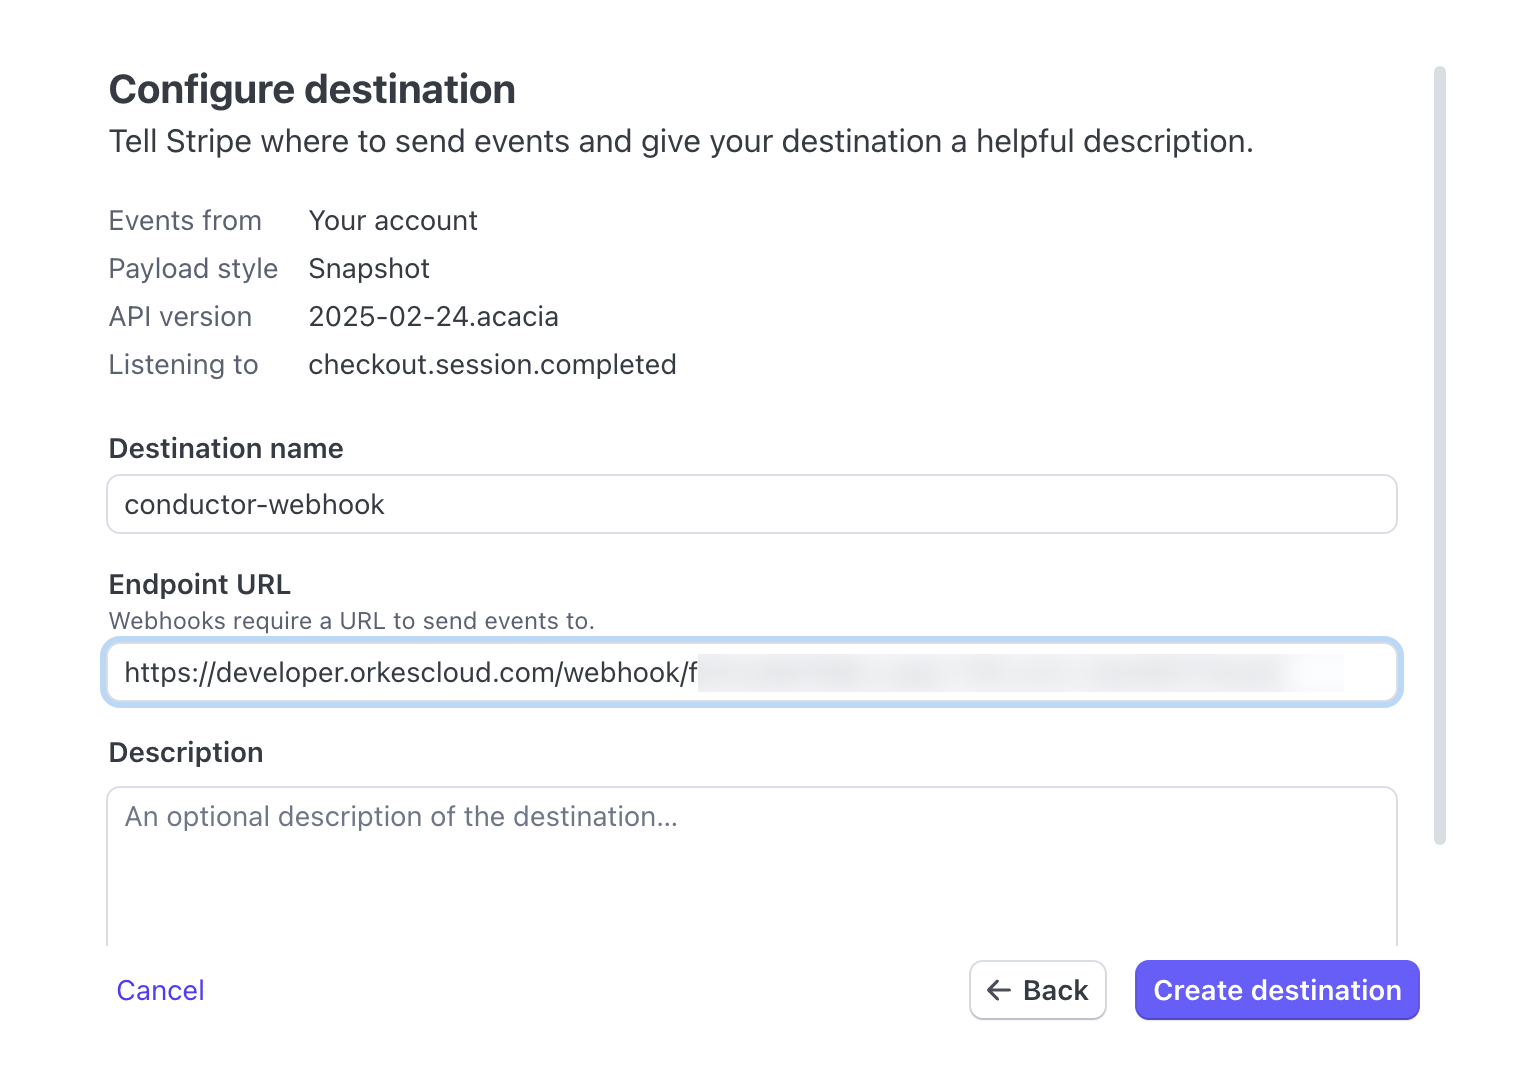
- Select Create destination to save the webhook.
This saves the webhook. Stripe generates a signing secret for the endpoint. Copy this secret and add it to the Conductor webhook configuration, as Endpoint secret.
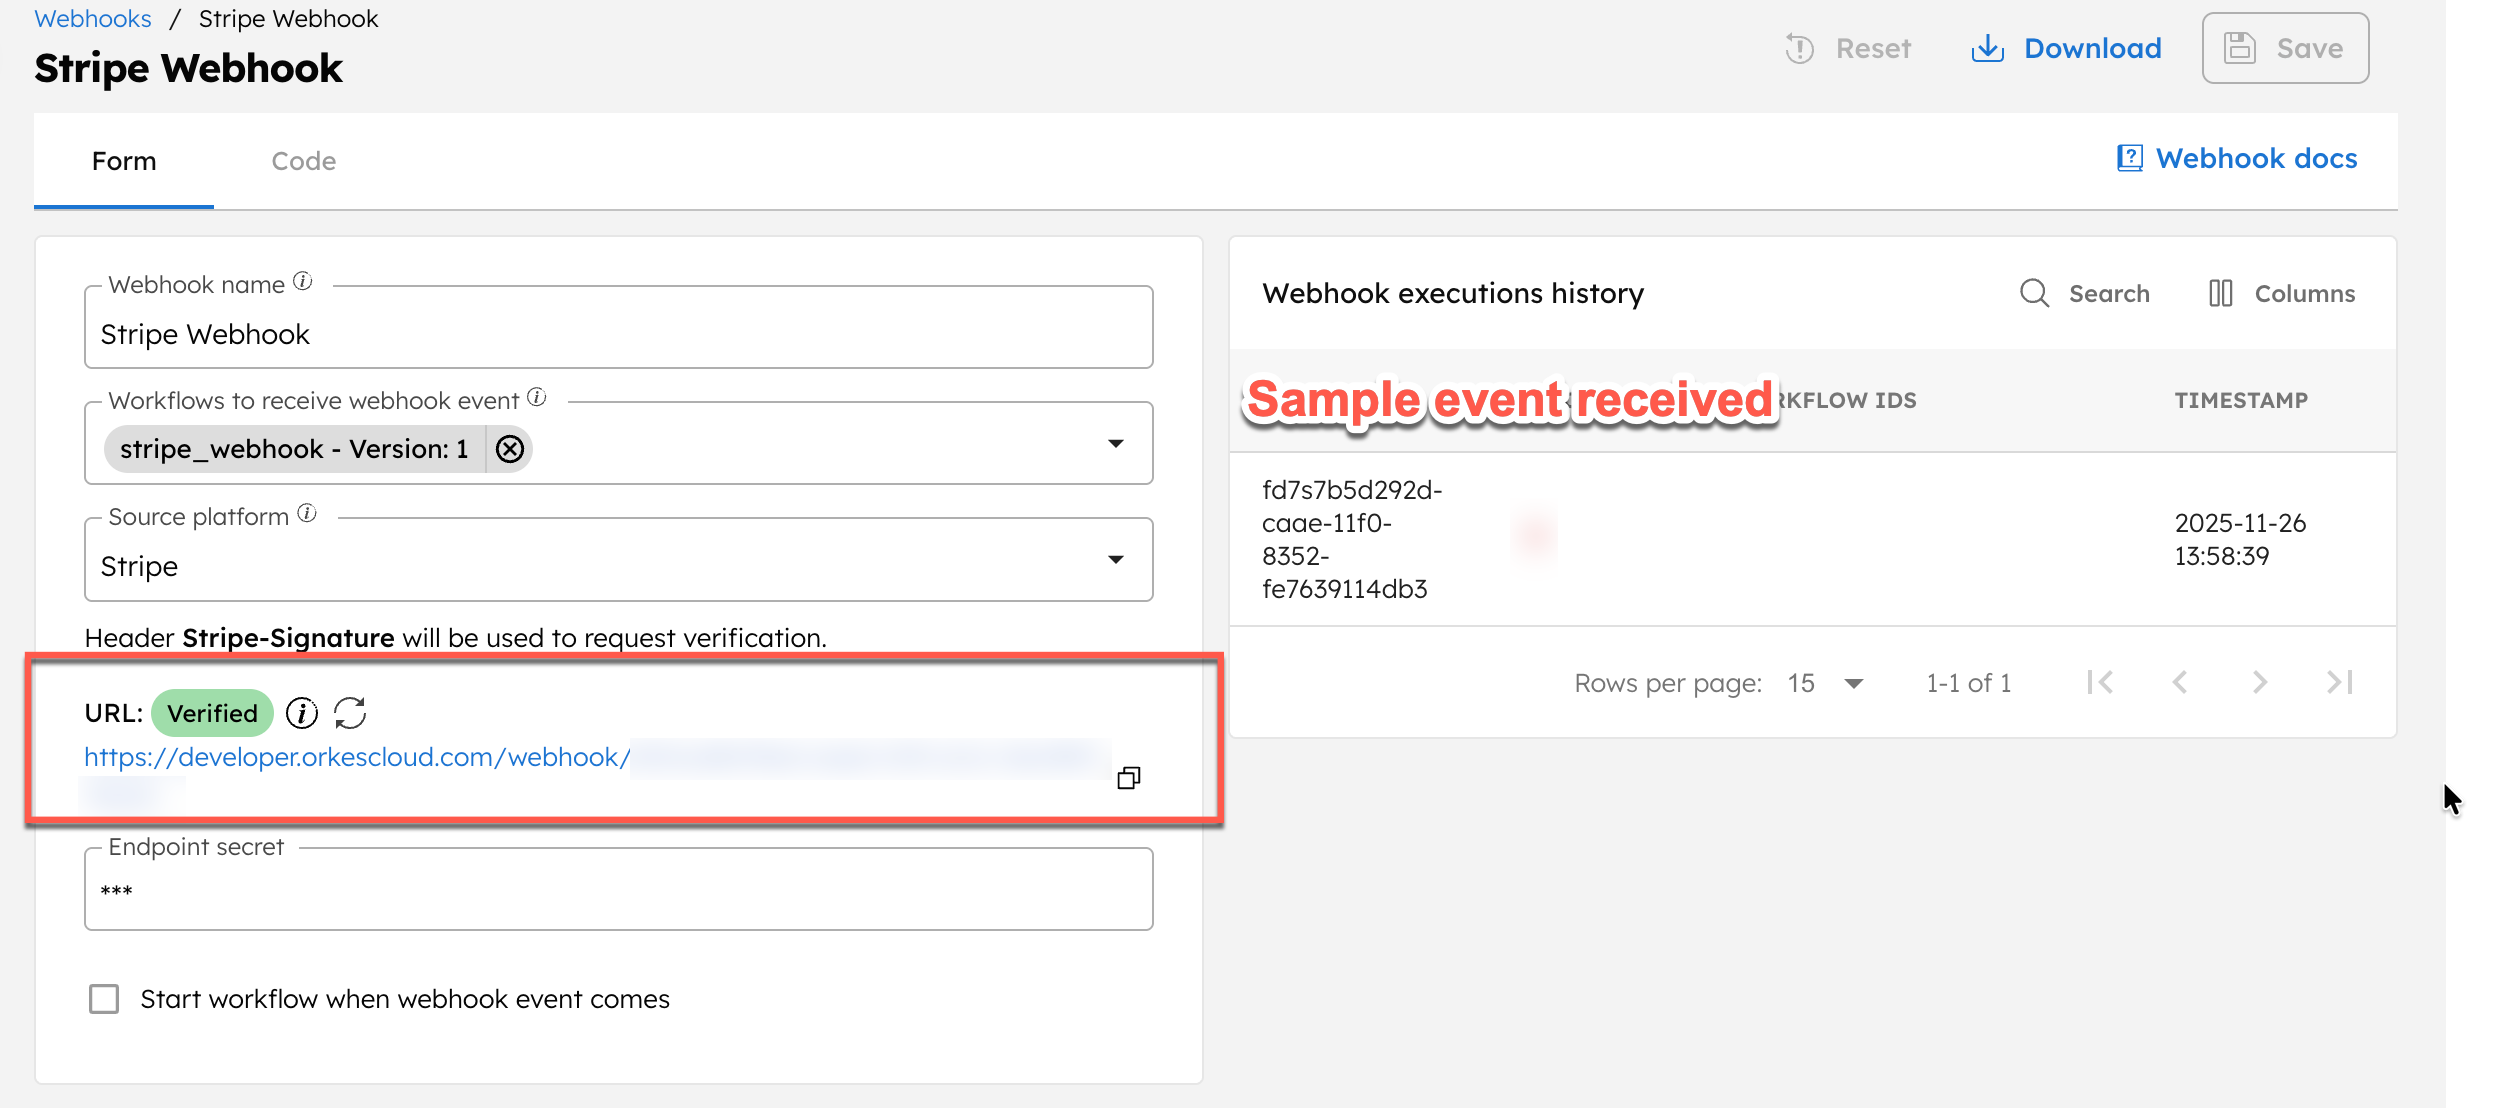
Next, we must send a sample event to verify the webhook in Conductor.
Install Stripe CLI to send events from Stripe for testing purposes.
To send a sample event:
- Open a terminal and paste the following command:
stripe login
- Complete the login procedure, and then paste the following command:
stripe trigger checkout.session.completed
This sends a sample event to your Conductor webhook and verifies it.
Step 5: Modify and run the workflow
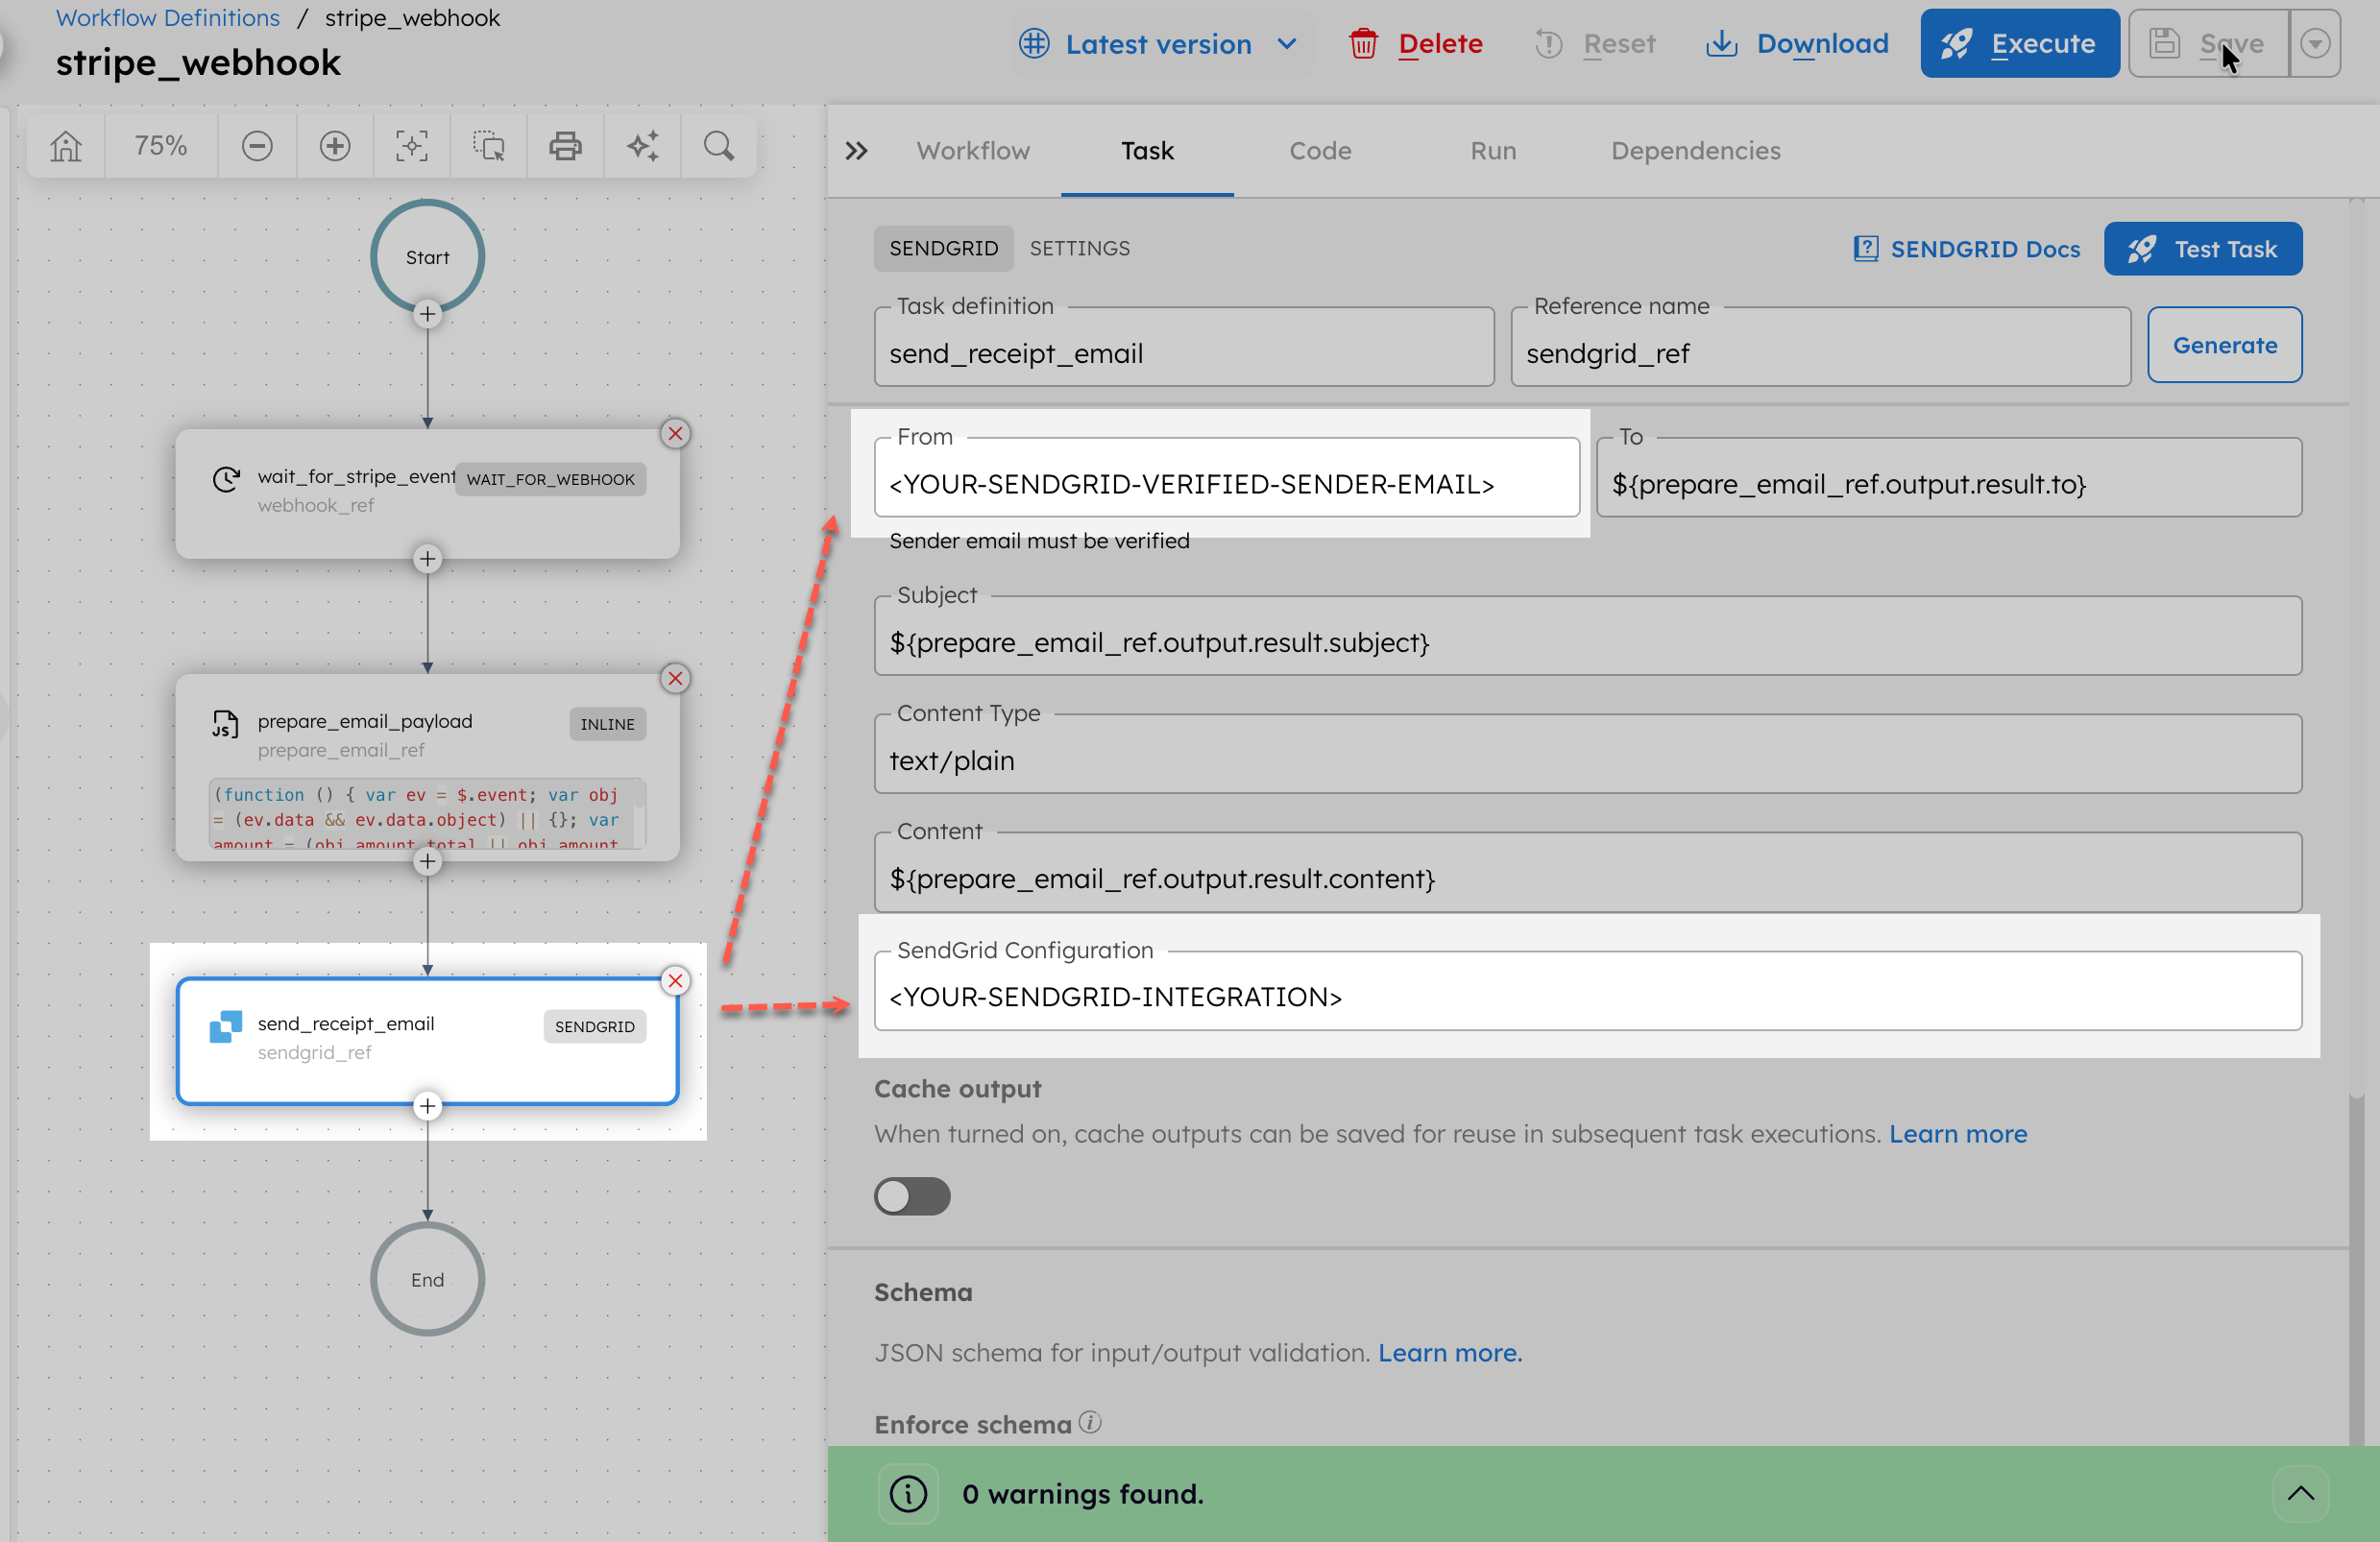
Before running the workflow, update the SendGrid task with the integration and verified sender email you configured in Step 2.
Open your workflow definition and select the SendGrid task. Replace <YOUR-SENDGRID-VERIFIED-SENDER-EMAIL> with the actual verified email address and <YOUR-SENDGRID-INTEGRATION> with the name of the SendGrid integration you created earlier.
Once updated, go to the Run tab, and enter the following Input params:
{
  "eventType": "checkout.session.completed"
}
Select Execute to start the execution. It will now run and wait for incoming events from Stripe.
Step 6: Test using Stripe CLI
You can send test events using the Stripe CLI. Open your terminal session and trigger the event again:
stripe trigger checkout.session.completed
This sends a sample event to the Conductor webhook, allowing the Wait for Webhook task to complete successfully.
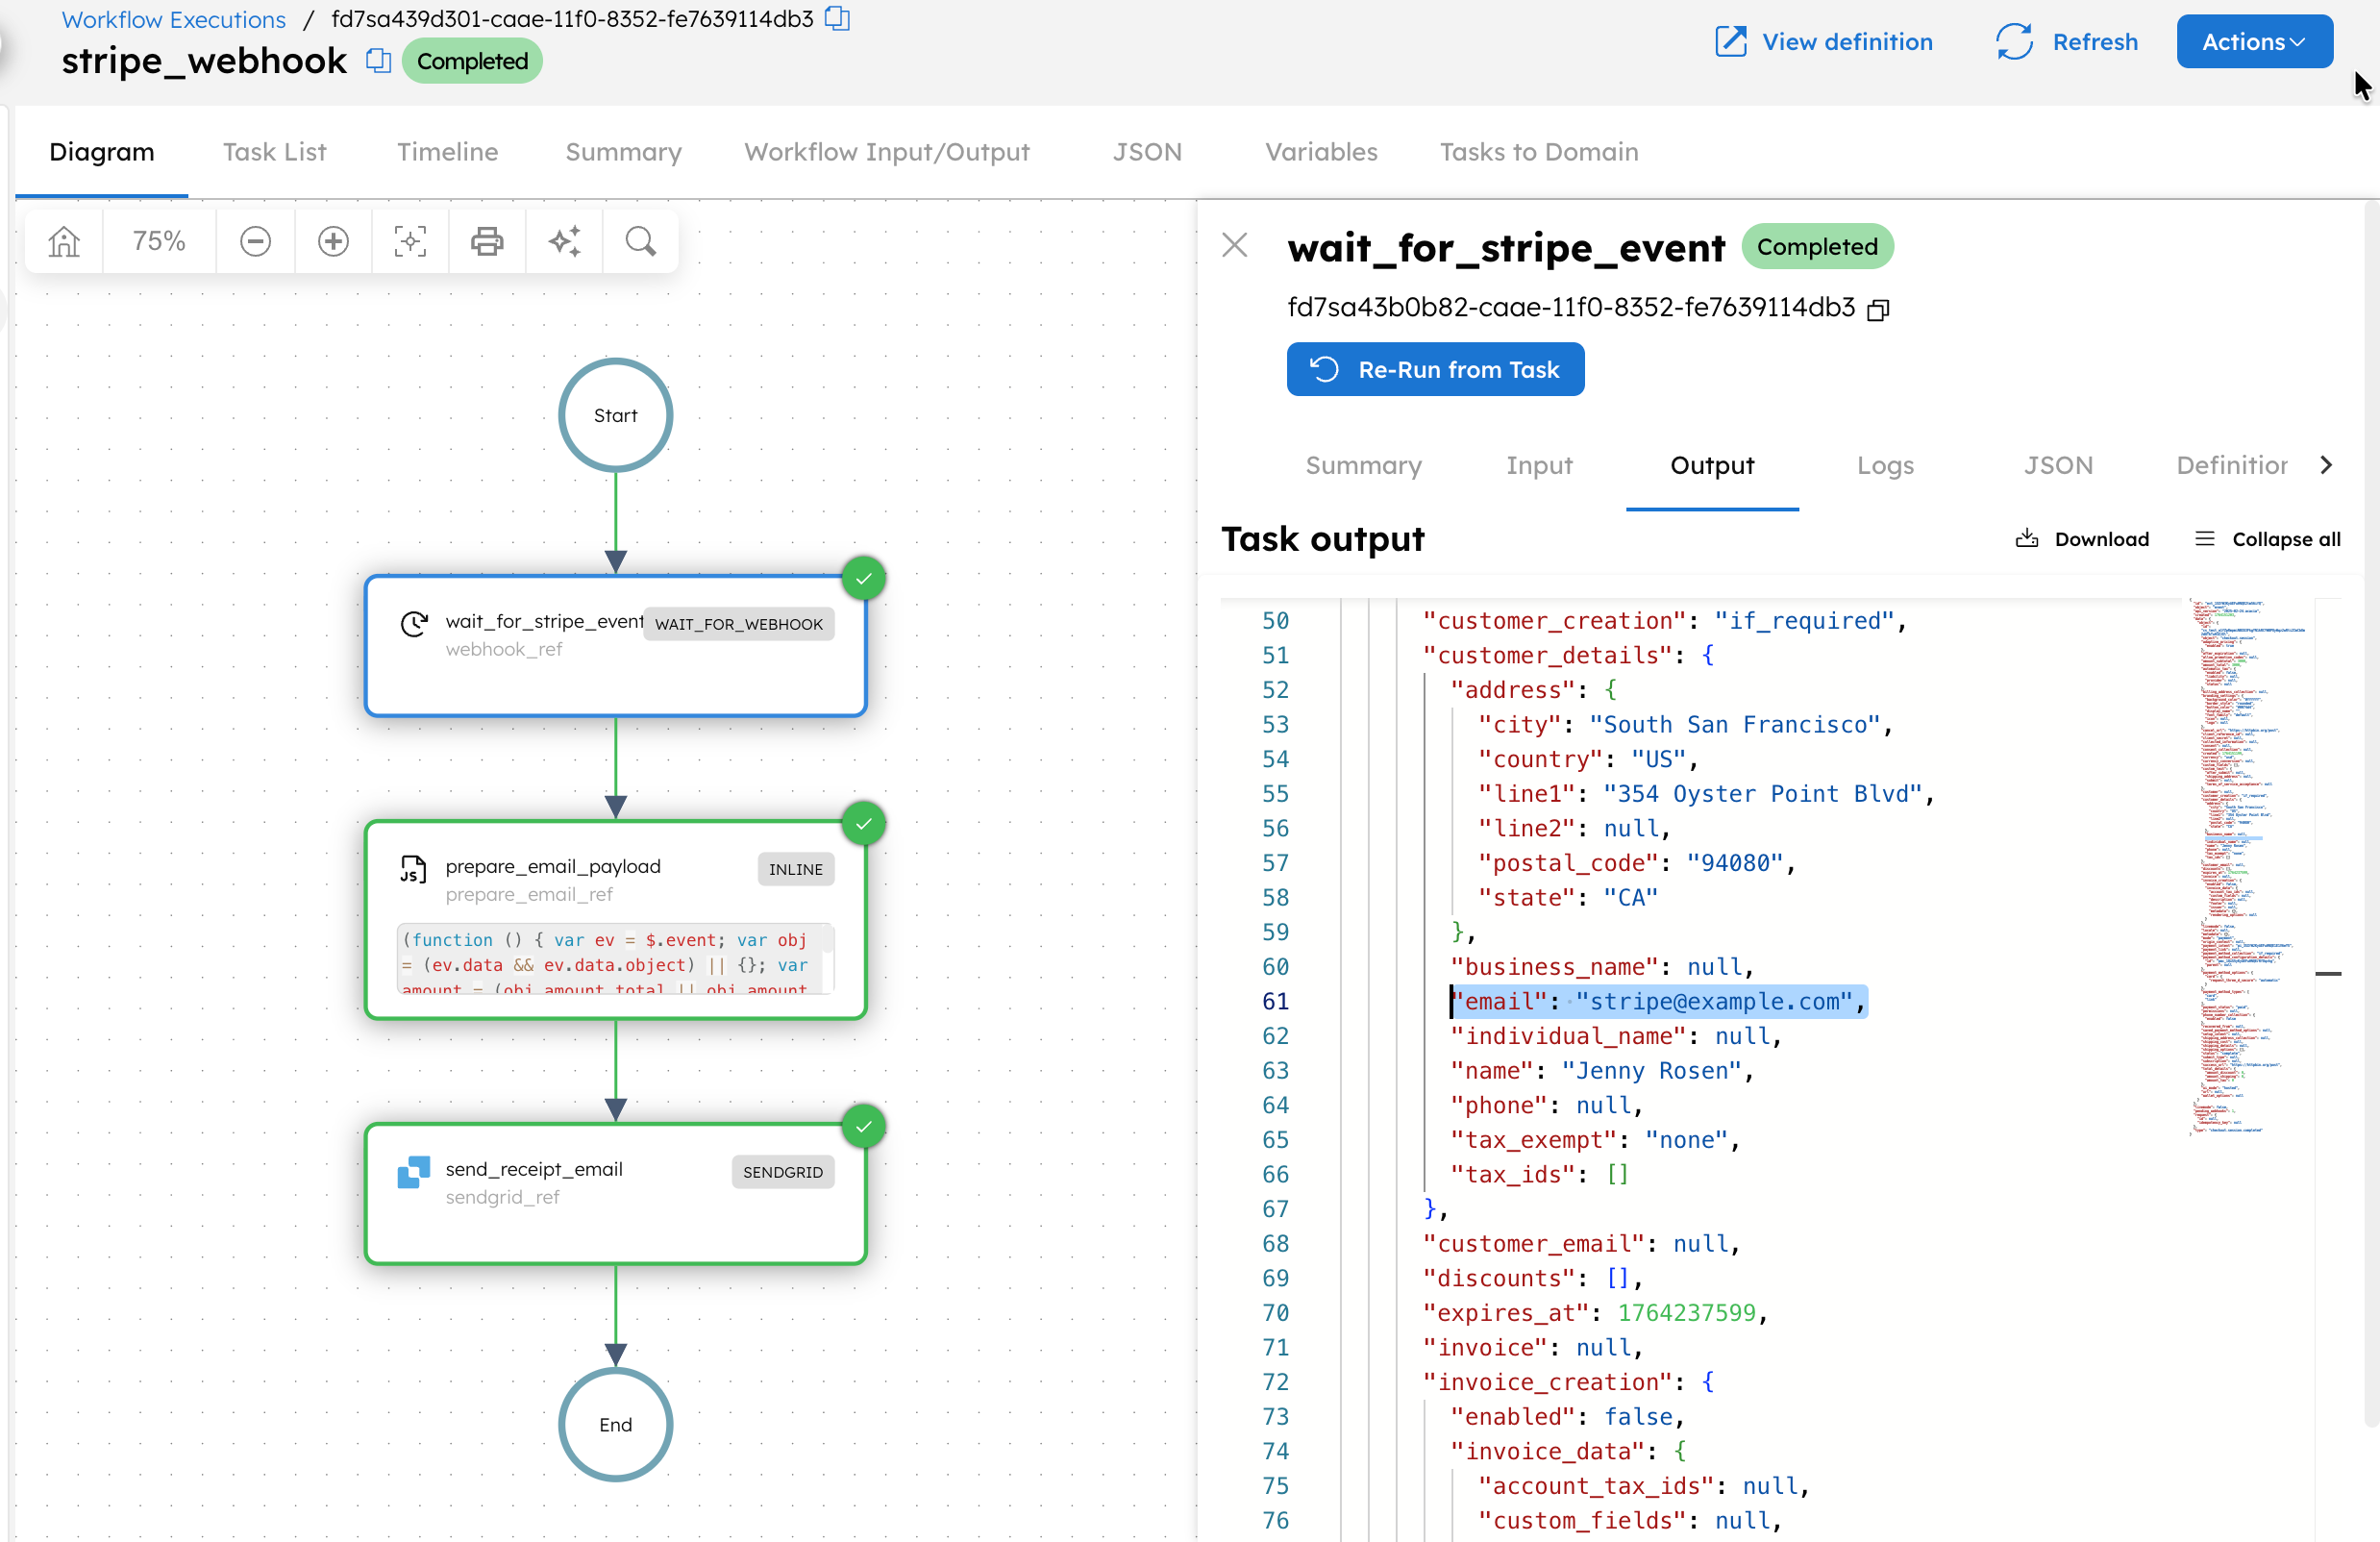
Go to Executions > Workflow to view the execution details. Since this is a test event, the email is sent to the default test address stripe@example.com.
After confirming the workflow works as expected, switch the Stripe webhook from test mode to live mode, add the event types you want to monitor in production, and configure the production Conductor webhook URL. This makes the workflow fully production-ready.
Workflow modifications
This payment confirmation workflow can be extended by:
- Automating using a workflow scheduler that schedules the workflow to run at regular intervals.
- Sending a Slack notification when a payment succeeds so internal teams are notified instantly.
- Using a JSON JQ Transform task to extract additional fields from the Stripe event, such as customer metadata, product details, or coupon information, and process downstream accordingly.
- Replacing the Inline task with a Switch task to route different payment event types, for example,
routing payment_intent.succeededandcheckout.session.completedto different email templates. - Adding logic to detect refunded or failed payments and trigger follow-up workflows for customer communication or internal review.
- Triggering additional downstream tasks such as creating an invoice, updating a CRM, registering the order in an internal system, or provisioning access to a purchased service.
- Introducing a Human task step if manual verification is required for certain payments, such as high-risk transactions.